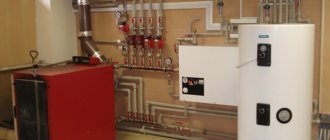
How is such equipment connected?
The general installation scheme of heating boilers consists of the following series of stages:
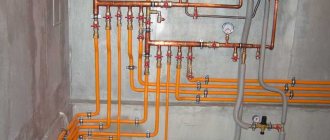
- installation of distribution combs;
- installation of appropriate pumping circuits for each consumer;
- installation of safety equipment;
- installation of an expansion tank;
- installation of shut-off valves;
- connection of the boiler with the supply and return circuits;
- filling the circuits with coolant;
- testing equipment and checking its operation.
In practice, everything depends on the power of the equipment, the number of consumers, the design features of the boiler, etc. It should be noted that quite high requirements are placed on the piping of pellet boilers. Firstly, because the moisture content of the fuel must remain acceptably low, and secondly, because both the fuel and the coolant are heated to very high temperatures. Poor-quality piping can lead to the fact that the operating conditions of the equipment will be violated, and the boiler will quickly fail.
In accordance with fire safety standards, it is recommended to use non-flammable metal pipelines for piping pellet boilers. The use of polypropylene structures in practice is not only dangerous, but also unprofitable, since the temperature of the coolant at the boiler outlet often exceeds the performance indicators of polymer materials. As a result, the pipelines will have to be replaced within a couple of years.
A pellet boiler is a rather complex device. Experts strongly do not recommend that inexperienced beginners install and wire such devices. However, knowledge of the main stages of tying and some of the nuances of this process will allow you to effectively monitor the work of the invited team of installers.
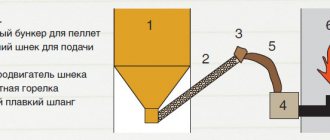
The diagram shows one of the options for piping a pellet heating boiler: 1 - MK pump; 2 - mixing valve MK; 3 — pump TK1; 4 — mixing valve TK1; 5 - water recirculation in TK1; 6 — pump TK2; 7 — mixing valve TK2; 8 — water recirculation in TK2; 9 - DHW pump; 10 - DHW heat exchanger; 11 - supply of running water to the hot water supply
To piping a pellet boiler, you must:
- install the boiler;
- connect the appropriate burner (if a combined boiler model is used);
- install a pellet hopper;
- connect the auger for fuel supply;
- connect the automatic boiler control panel.
After this you should do:
- Installation of a safety group on the boiler supply, which includes a pressure gauge, automatic air vent and relief valve.
- Installation of a thermal valve sensor, if provided for by the design of the model;
- Installation of a chimney whose diameter and height meet the technical requirements.
- Installation of a system of devices to maintain reverse flow: two pressure gauges for supply and return, a circulation pump and a thermal head.
- If there is a high probability of sudden power outages, it is recommended to supplement the system with a suitable UPS model.
Reverse flow support allows you to control the heating level of the coolant before it enters the system. Until the return temperature reaches the required level (usually 60 degrees and above), the coolant will remain within the small circulation circle. Only when the coolant is heated to the required level will the thermal head open and cold coolant begins to flow through it, and hot coolant will begin to circulate in the main circle.
Under no circumstances should you use a pellet boiler with a low coolant temperature. A temperature of 55 degrees is the so-called “dew point”, upon reaching which a significant amount of condensation occurs. As a result, the volume of soot in the chimney, as well as on the heat exchanger, can increase significantly. The equipment will require additional maintenance efforts, and its power will noticeably decrease.
This is what the combustion chamber of a pellet heating boiler looks like after exposure to excessive amounts of condensate that appears due to errors in the installation of the recirculation system
The process of piping a combined pellet boiler is presented in detail in the video:
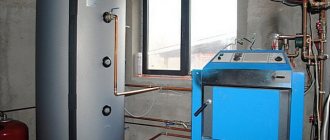
Many manufacturers of pellet boilers recommend supplementing the design with a special storage tank, which allows you to accumulate heat. Fuel savings can reach 20-30%. In addition, the use of a storage tank allows you to avoid overheating of the boiler and achieve the highest possible efficiency.
Background
and here is the burner itself.
I live in an urban-type settlement; we have recently settled into a new place of residence. And now, as it were, winter begins, and we heat the house with wood in the old fashioned way. It was not my desire that prompted me to make a homemade product, since I was already doing well, but my father. He decided to make a pellet torch burner. Everything would be fine, but when the body has already been welded, the pellets have been purchased, the question remains of how to start it all. A radical decision was made: the feed auger moves thanks to a wiper motor from a VAZ, of which we have a lot, because we are engaged in car repair/disassembly, in which case it can be replaced with the same one without losing performance. But the inflation was carried out by a centrifugal fan of the stove from some Nissan, the breakdown of which is definitely not worth worrying about. We assembled it, launched it, but how to manage it?
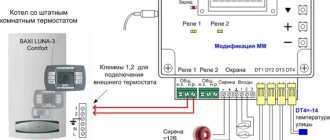
basic diagram for boiler combustion control
Here I have already joined, who seems to have a diploma as a “programmer”, but unfortunately, I gave up on studying, and naturally, I am an ordinary lover of all kinds of electronics and nothing more. I immediately and indiscriminately ordered a time relay for the auger and a PWM controller for the fan. I connected it, selected the work timings, but because of such a simple “automation”, sleepless nights began. What if it boils and the pipe bursts, what to do next? But the scheme was really dangerous, because... The efficiency of the boiler turned out to be very high for our burner, so the water temperature is either 60+, or the boiler goes out. Therefore, my father fixed the air supply system by welding, thereby lowering the minimum temperature threshold. But now, who knows, is there enough power for the required temperature, or vice versa, will it boil?
The temperature that this product produces
Typical system water temperature
Arduino nano v3
And then I remembered that I once played with the Arduino. Exactly from that moment I thought, why not build automation on its basis? Yes, I know that trusting such a dangerous gadget to the Arduino is a bad idea. But I have no choice, because the budget is a little tight in winter, and the factory automatics are not so wonderful (my father’s friend has exactly this, he played with it for a long time). As soon as I told my father about this idea, an ultimatum was immediately given: you programmer, let’s do it, otherwise you’ll sit by the boiler at night and tweak the boiler settings so as not to burn everything to hell.
Components of the strapping
Which components and elements will be included in the set of heating system components depends on the type of heating system:
- Heating with natural (gravitational) circulation of heated water (coolant) - popularly called “physics” heating;
- Forced circulation – with connection of an asynchronous circulation pump;
- Mixed scheme.
In a scheme with natural water circulation, the set of piping elements will be as follows:
- Heating boiler - after it, the heated coolant rushes up and moves through the pipes, returning to the boiler slightly cooled;
- Heating piping pipes - most often for a “gravity” scheme, metal pipes are used that are larger than plastic pipes, with a diameter of up to 2 inches. The diameter is selected based on the need to minimize coolant resistance for its unhindered circulation;
- Expansion tank - installed at the highest point of the system, and can be open or closed in design;
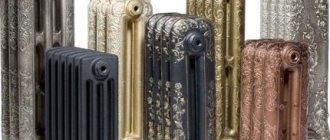
- Heating devices – radiators, radiators or registers;
- Mayevsky tap - installed on the heating radiator to bleed air;
- Fittings - welded or threaded turns, doubles, tees made of cast iron, brass, bronze, copper or stainless steel, tees, drains and other types of connectors;
The advantage of the “physics” system: easy independent installation, simple circuit, common parts and assemblies, low cost of components.
Disadvantages: large size of components, inertness, insufficiently fast heating of wiring and heating devices. Heating scheme with gravitational water circulation
Review of models and manufacturers
On the market you can find devices both made in Russia and from foreign manufacturers. First, let's tell you a little about domestic models.
The first category will be the Orange models from NCC Biyskenergoproekt. They received this name due to their bright color. Their main features are excellent quality-price ratio, as well as high efficiency. Moreover, they are easy to use and very reliable. Such models have electronic control, forced ventilation, and an automated fuel loading system. The cost of models in this line is about 150 thousand rubles.
Another line of models that I would like to mention is “Start”. They are assembled in Chelyabinsk, but they contain voluminous Polish burners. This makes it possible to achieve high efficiency and complete combustion of fuel cells. This is a line of combined-type boilers that can operate not only on pellets, but also on wood, as well as small chips. For this purpose, the model comes complete with a special cast iron grate that is mounted instead of the burner. The cost of such a model is from 130 to 250 thousand.
Another option is Zota Pellet from Krasnoyarsk. It consumes different categories of fuel. Its distinctive feature will be the ability to control the heating process using SMS. The line includes five models with a power from 15 to 100 kilowatts, which are used in closed heating systems. If we talk about reviews, they are just as good as the Finnish Auterm Biomatic, but about half the price.
Also quite interesting are the Kupper boilers produced by Novosibirsk. The power of manufactured devices ranges from ten to forty kilowatts. They are solid fuel boilers with a pellet burner. The price of this model is about 80 thousand rubles. In addition, the reviews note that setting up such a device is not easy, it is necessary to select high-quality pellets, and so on. It should also be noted that this is an incomplete range of domestically produced models on the market. Quite interesting solutions in this segment will be the products of Obshchemash.
Now let's talk about products from foreign manufacturers. One of the most popular brands of foreign pellet boilers is the South Korean Kiturami. They are used both for heating liquids and for heating. In addition, models from this manufacturer have mechanisms for automatically cleaning the burner, heat exchanger and its grate. There is an automatic fire safety mechanism valve here. The price of such devices from this manufacturer is somewhere up to 200 thousand. Kiturami boilers are considered one of the most reliable. Reviews about them are good, although users note quite serious consumption of pellets.
Faci brand products also deserve attention. Users note that these boilers have economical fuel consumption, environmental safety, nice design, simple operation, and configuration. It is also noted that boilers of this brand require constant maintenance.
Another foreign brand that deserves attention is Polish. The models of this company are distinguished by the use of the latest technical solutions
But this is included in the cost of these devices. Users also write that the consumption of pellets here is higher than indicated in the technical documentation. In addition to boilers, this brand also produces high-quality pellet burners.
The pellet boilers produced by the Latvian company also deserve attention. It produces four series of boilers, each of which has its own characteristics with varying powers from 5 to 100 kilowatts. All models presented by the manufacturer can be installed in a system where there is natural water circulation. Owners of devices from this brand note the ease of operation of such models, as well as high-quality work with pellets of various qualities.
Of course, there are significantly more products from foreign brands on the market. Also worthy of attention are various models from brands such as Roteks and Termal.
In general, it should be noted that the market today offers a large number of products, both domestic and foreign brands, which allows the buyer to choose the most suitable solution for himself, which will best satisfy his needs.
Installation Features
If you decide to use pellet boilers to heat your home, you should pay special attention to their installation. When installing the boiler, it is necessary to take into account the material of its manufacture.
If the product is made of boiler steel, you can do without a separate foundation
When installing the boiler, it is necessary to take into account the material of its manufacture. If the product is made of boiler steel, you can do without a separate foundation.
It is important to know that strengthening of the base also occurs under bunkers with a carrying capacity of more than one and a half tons. When burning pellets, a small amount of ash is formed
This eliminates the need for frequent boiler cleaning. To achieve maximum results, it is necessary to consider the possibility of installing a large ash pan. This allows cleaning to be done once a week. Do not neglect cleaning the boiler, as this will reduce the efficiency of the boiler.
When burning pellets, a small amount of ash is produced. This eliminates the need for frequent boiler cleaning. To achieve maximum results, it is necessary to consider the possibility of installing a large ash pan. This allows cleaning to be done once a week. Do not neglect cleaning the boiler, as this will reduce the efficiency of the boiler.
Installation of a heat generator consists of the following steps:
- Installation of the distribution ridge;
- Installation of a pump circuit for consumers;
- Installation of protective devices;
- Installation of expansion tank and shut-off valves;
- Connecting the device to the supply and return circuits;
- to start the coolant in the circuit;
- Test run of the boiler and quality control of its operation.
The installation of a heat generator has its own characteristics. It all depends on the type of boiler, its power, characteristics of the heating system and hot water supply
It is important to remember that the harness must meet high requirements. There are reasons for this
First of all, it should be noted that for the operation of the device it is necessary to use fuel with low humidity
It is also important to heat the boiler components to a high temperature. Poorly executed piping can lead to interruption in the operation of the heat generator and rapid wear of individual parts and assemblies
In accordance with fire regulations, pellet boiler pipes must be made of non-combustible materials. The ideal solution today is polypropylene pipes. However, in practice this is not the case. At the outlet, the coolant has a high temperature, which significantly exceeds the temperature limits of polypropylene heating pipes. This leads to rapid wear of the system.
A pellet boiler is a rather complex device that must be installed and secured very carefully. Therefore, it is not recommended to do it yourself. Of course, if you have certain skills and knowledge, then anyone can do this job. But still, if possible, it is better to resort to the services of specialists.
The heat generator is connected as follows
- to put the kettle on;
- Connect the appropriate burner;
- Set up a funnel to hold the specified amount of granules;
- Install the screw that is used to supply fuel to the combustion chamber;
- Installing a control panel to manage the system.
After completing all these steps, you can move on to the next steps:
- Install the pressure gauge, bleed valve and air bleeder valve;
- If necessary, install a thermal valve sensor;
- install a chimney that meets all requirements;
- Installation and connection of all devices that support reverse flow of coolant;
- Installing an uninterruptible power supply to avoid malfunctions of the boiler.
DIY pellet boiler
The most complex and expensive element of the system is pellet burners for boilers.
Such a burner not only burns fuel, but also regulates combustion, automatically cleans itself and maintains the temperature selected by the owner.
Some types of burners can be switched from pellet heating to electric (for example, at night at a reduced rate), and can also be controlled via a smartphone.
This is a high-tech element, which is very difficult to recreate at home. Such an automatic pellet boiler costs about 60-80 thousand rubles.
There is a more inexpensive option - semi-automatic burners, for example, Pelletron-MB 15 kW. Such a burner costs about 14 thousand rubles.
If it is possible to make a burner yourself, then you will need to develop or find ready-made drawings and understand them well.
The most difficult thing is to adjust the speed of feeding the pellets into the burner so that they have time to completely burn out. To do this, you will need a combustion sensor, which can be made from a phototransistor. It reacts to the brightness of the glow and regulates pauses between pellet feeds (when the brightness of the glow drops, it turns on the feed).
To ignite fuel, you can use a glow plug from a car heater or a soldering hair dryer.
Turbocharging fans are not winged, but .
The most economical option when choosing a heating system for a private home is to install gas equipment. Gas boiler for heating a private house. basic selection criteria and installation rules.
Which wall-mounted gas boiler option is best to choose? Read here.
Are you planning to install gas heating in a private home? Then the next topic will be interesting for you: https://microklimat.pro/otopitelnoe-oborudovanie/kotly/dvuxkonturnye-gazovye-kotly-dlya-otopleniya-chastnogo-doma.html. You can read everything about choosing and installing a double-circuit gas boiler, and also get an answer to the question: why is a double-circuit option preferable to a single-circuit one?
Manufacturing of pellet supply unit
Bunkers can vary in shape and size (the larger the bunker, the less often you will need to load pellets). Welding a container will not be difficult, especially since even a small factory-made tank will be expensive - from 18 thousand rubles. and for a homemade structure, you can even put together a plywood box on a stand. Inside the bunker, the bottom is made with a slope towards the auger (for feeding pellets).
A shaft pipe is installed to supply fuel to the burner. It can be made from ordinary plumbing plastic pipes and corrugations, or a steel tube.
Construction of a pellet boiler
An auger is mounted inside. It is curled from flat-section tire wire or a factory model is ordered, which will be more reliable. The length of the auger will depend on the distance of the tank from the furnace. The drive is done through a gearbox from an electric motor of suitable power. Sometimes a mechanism from car window lifters is used. It just produces low revs, which makes it the most suitable option.
If the hopper is installed above the burner, then it is possible to design a structure without a screw mechanism.
Heat exchanger manufacturing
The heat exchanger design is selected according to the size of the furnace. You can cut round pipes and weld them with a comb into two longitudinal pipes (it will be more convenient to work if the longitudinal pipes have a rectangular cross-section).
All welding seams must be checked for leaks, and then the heat exchanger must be installed in the furnace body, bringing out the pipes for connecting the supply and return.
Design and principle of operation of pellet boilers
To install such a solid fuel installation yourself, you will need to work hard, and first understand how it works and what it consists of. The heart of the pellet unit is the burner device, which performs almost all the main functions and is connected to the boiler controller, acting on its commands. Burners designed for burning pellets are of two types:
The difference between them is as follows. A retort pellet burner is a bowl (retort) filled with fuel from below via a screw, and air is supplied to the combustion zone by a fan through holes located on the sides of the bowl. During operation, the flame column is directed upward, which must be taken into account by the design of the boiler. The flare burner device is a pipe, which is also the combustion chamber, where a screw feed of pellets occurs at one end, and a powerful flame torch, directed horizontally, comes out of the other. This is achieved by forcing air into the chamber from the same side as the fuel.
Note. Flare-type burners are used more often than retort burners, since the latter have problems with supplying low-quality pellets. To assemble a boiler installation with your own hands, it is also preferable to use a flare burner device; below we will explain why.
In the future, we will consider the operation of the unit with a torch burner, since this design is better suited for our purpose. So, the combustion chamber in the form of a pipe is located inside the boiler, and the outer part of the burner consists of a housing with a feed screw and a fan for forcing air. To operate the electric ignition and maintain the flame, the design also includes a control board, a photosensor and an incandescent element. At the top of the housing there is a fuel supply pipe.
The process goes like this: at the controller’s command, the auger delivers a small amount of pellets into the chamber and stops. The glow element turns on and at the same time the fan turns on, causing the fuel to ignite. The appearance of a stable flame is detected by a photosensor and notifies the control unit, which turns off the incandescent element. Then work begins in normal mode, the screw conveyor resumes supply, and the fan pumps in the required amount of air. At the command of the same controller, pellets are poured into the burner through the nozzle, moved there from the loading hopper by an external screw conveyor.
Note. Many manufacturers use a fuel hopper mounted directly above the burner nozzle, which allows pellets to pour into it independently without an additional conveyor.
Now it’s worth considering the design of the pellet boiler as a whole. The design of the unit body is typical for all solid fuel installations; it consists of an internal chamber made of steel or cast iron, enclosed in an outer casing filled with water - a water jacket. To extract heat from flue gases, the design can provide 2 types of heat exchangers:
In a water-tube heat exchanger, the coolant flows through pipes, washed by combustion products and transferring their heat to it. But such a device is rarely found in solid fuel boilers; usually the opposite is true in them: flue gases pass through the pipes, giving off combustion energy to the water jacket, this is a fire-tube heat exchanger. In order for the boiler to operate efficiently, the heat exchanger is made of two or three passes. This means that the flue gases, passing through the flame tubes, change their direction to the opposite direction twice or three times, making 2 or 3 moves. This allows them to transfer maximum heat to the water jacket, and at the exit to the chimney to obtain a temperature of no more than 150 ºС.
The working process goes like this: the burner burns fuel and heats the chamber walls, which heat the coolant. In turn, combustion products, under the influence of natural draft and fan operation, pass through the flame tubes, also giving off heat to the water jacket, and are discharged into the chimney. The combustion intensity is controlled by the controller based on a signal from a temperature sensor immersed in the coolant at the outlet of the unit. This is the operating principle of pellet boilers: to automatically regulate the combustion process and, if necessary, increase or decrease the supply of fuel and air to the burner.
Scheme, assembly, code and launch
The task has been set, we must move. The main advantage is that the motors operate on 12V, just like the Arduino with the motor driver. I order an Arduino, a relay with a high load threshold (it turns out that the wiper motor eats current like a hungry dog, the 20 A unit did not easily digest it), and a 2 A L298N motor PWM controller, the stove fan is not so gluttonous, fortunately (I thought so before the real tests). I took the temperature sensor ds18b20, I don’t know why. The kits arrived at my place, I decided to play around, but it turns out that the temperature sensor needs a resistor. I got upset and forgot for a couple of days. Because I live in the suburbs, I don’t have radio electronics stores, and I didn’t really need to go to the city, I forgot about the project for two weeks. But now, I finally bought resistors, assembled them, played around with them, and attached a computer fan to the PWM as an indicator of operation, but did not attach anything to the relay, because... it has an operation indicator in the form of an LED. I was delighted and ran to show off to my father, but accidentally touching the Arduino to something metal, I shorted it out. But I didn’t despair, I ordered two more pieces, and added a 1602 display to the load, otherwise it somehow doesn’t look boyar-like, automatic and without a display.
All necessary components List of specific components:
- In my case - Arduino Nano
- Temperature sensor L298N
- 4.7kOhm resistor for sensor
- Solid State Relay SSR 40 DA
- Display 1602 with I2C adapter
- A bunch of solderless wires (I don’t know how to solder, so I collected everything on chips and terminals)
- First, a box from the router was taken, and then a large electrical dose
test assembly
And then a pack of Arduino and a display arrived to me - I started “coding”. The code was ready by evening; I chose a case from an old router as a DIY box, but without calculating the height of the PWM controller heatsink, I removed part of the lid so that it would close. From that moment it was decided that the box was a test box, since it was already damaged and I didn’t put much effort into the appearance.
Diagram made with my crooked pens
After writing the article, I played for a long time with PWM, or rather with eliminating the noise emitted from the Arduino. I solved everything with the Gyver library, which increases the frequency of the PWM signal. And since I started changing the code that works on three-layer mats and crooked hands, I decided to immediately find a library that would add Russian characters to my already useless display. After half an hour of scouring the Internet, I found a suitable library that matched my I2C display adapter.
Errors when piping heating boilers.
Attention: Incorrectly calculated boiler power will not be able to provide the required level of heating. The power must exceed the heat transfer parameters according to the formula 1 kW x 10 m2, since in cold weather heat quickly disappears through windows and doors. A large boiler will be able to heat the system faster and, naturally, will consume more resources, but will turn on less often
You should also not forget about the flow of fresh air into the room in which the boiler operates; this is necessary for the combustion process and especially applies to a small area
A large boiler will be able to heat the system faster and, naturally, will consume more resources, but will turn on less often. You should also not forget about the flow of fresh air into the room in which the boiler operates; this is necessary for the combustion process and especially applies to a small area.
Conclusion: Proper installation and accurate calculations of the heating boiler power will help create maximum comfort for living in a country house at any time of the year.
How to choose a boiler for pellets and wood
First of all, the heater is selected based on power. It should compensate for heat loss during the coldest 5-day period of winter. Their value depends on several factors:
- temperature differences in the house and outside;
- thickness and material of layers of enclosing structures;
- degree of protection from wind;
- glazing area.
A wood-pellet boiler is selected according to power.
A thermal engineering calculation is required, which may seem complicated to a non-specialist.
You can estimate the required performance using a simplified formula:
W=0.1*S, where
W – device power, kW;
S – heated area, sq. m.
This dependence is valid for houses with the following parameters:
- ceiling height 2.5-2.7 m;
- standard sizes of window openings;
- thermal resistance of enclosing structures that meets the requirements of SNiP “Building Climatology” for the given region;
- the presence of double-glazed windows.
In case of abnormal cold weather, it is recommended to add a reserve of 15%-20%. For a 2-circuit boiler, add the same amount so that it is enough to heat the water.
The simplified method gives a large error in both directions; it is recommended not to save money and order a calculation from a heating engineer.
Advantages and disadvantages
Drawing up a competent diagram and knowing the structure of the unit is not enough for a full-fledged informed decision to create a homemade stove that runs on pressed waste wood. It is also necessary to take into account all the advantages and disadvantages of the design.
The main positive points include:
The advantages include such a feature of pellet stoves as the absence of unpleasant odors and black smoke
, which makes the design environmentally friendly.
Do-it-yourself pellet boiler - a test! Pellet boiler with their hands.
But such units also have unpleasant sides, which also need to be taken into account when drawing up a heating equipment diagram.
- high cost of imported components for self-assembly of the stove;
- due to the fact that it is not very developed, it becomes difficult to purchase fuel;
- To automate the process, you will have to additionally take into account energy costs, since all automation equipment runs on electricity.
If the unit is stopped for more than 10 hours, a new adjustment must be made.
You will also have to think about the power source. To avoid unexpected power outages, it would be better to install an autonomous generator.
DIY pellet boiler 5h
Selection options
Manufacturers produce a large number of different models of pellet boilers. You can buy them in specialized or online stores.
When choosing the optimal model for yourself, you need to pay attention to factors such as:
- unit power;
- efficiency;
- functionality;
- fuel consumption;
- number of circuits.
Double-circuit boilers can be connected to heating and hot water systems. When choosing a pellet stove, be sure to take into account what type of room it will heat: residential or industrial. For domestic needs, a small power boiler is sufficient.
Features of pellet boilers
Heating equipment using compressed wood pellets as fuel has appeared relatively recently. But from the moment of their invention, such boilers immediately won the recognition of millions of customers.
If it is not possible to install gas equipment in the house, then it is recommended to purchase it.
The advantages of this type of heat generators include:
- Autonomy
. Thanks to the presence of a control unit and a system for automatically turning on the burners, once you load fuel, you can forget about it for 2-4 weeks. - Safety
. Pellet boilers have multi-stage protection, which avoids pipeline explosions and fires. - Efficiency
. On average, the efficiency of equipment ranges from 87 to 97%. - Cheap maintenance
. Pellets are inexpensive, and the ash pan needs to be cleaned no more than once a month. - Durability
. The service life of the units is at least 25 years. - Compactness
. Most often, the models are relatively small in size.
If you become familiar with the advantages of this type of heating equipment, it becomes clear why it has so quickly gained popularity among residents of Europe and America.
If you believe the statistics, pellet heat generators will take leading positions in both the domestic and global markets in the coming years
The widespread distribution of units operating on pellets is hampered by the rather high cost. Not everyone can immediately shell out a tidy sum for the boiler itself, the burner and additional equipment.
These are the things, people, and now - conclusions:
final version of the assembly
As a result, what I have is: a button for separate supply of pellets for ignition (I’m still thinking about the idea of auto-ignition), a mode of “acceleration” of the temperature regime, by quickly supplying pellets and high blowing speeds, and temperature thresholds in the form of 60 and 80 degrees, in which the automation operates. More specifically, from 60 to 80 the burner operates in fast mode. As soon as it reaches 80, it reduces its power up to 60 degrees, and all this ad infinitum: up and down. I'll install an incubator relay as a cut-off device for all electronics, otherwise I don't trust my code. Naturally, all this is displayed on the display, namely: the current supply state (waiting/feeding), operating mode (ignition, heating, cooling), and of course, the temperature, which seems to be updated every 0.7-0.8 seconds. One caveat: feeding is implemented via delay(), which is why during feeding (6-8 seconds) nothing happens except feeding, until the temperature is calculated. I don’t think that this is such a critical problem, since when the boiler is operating in mode, in these 6-8 seconds it will not even gain/lose 0.2 degrees. And that’s all, if the topic is interesting to you, I’ll try to implement an auto-ignition system and an extinguishing system (by stopping the supply and purging at maximum power). And in general, my head is full of ideas, all I need is motivation and at least some budget to implement them. Fortunately, there is one more arduino left, we can come up with something.
schematic, code and libraries <—
Advantages of using polypropylene pipes for piping a heating boiler
The use of standard metal pipelines for boiler piping is gradually becoming a thing of the past. There are too many disadvantages in this technique - corrosion, labor-intensive installation work and the cost of the material. The use of polypropylene (plastic) pipes is much more practical and reliable. And all this is thanks to the properties of new technologies that are used in their manufacture. But not every type of plastic pipe is suitable for heating systems, and their correct choice is the basis for the long service of the entire system as a whole.
Selection of polypropylene pipes for piping the boiler
The so-called plastic pipes for hot water are a tube made of aluminum (or fiberglass), which is insulated on the outside and inside with a layer of polypropylene.
The rigid core material prevents the entire pipe from deforming when hot water passes through, and the insulation layers protect the reinforcement from corrosive processes.
It is recommended to choose pipes from well-known manufacturers, since possible manufacturing defects may appear during operation. The maximum possible heating of water when passing through polypropylene pipes is 95°C. Practical experience shows that some models can withstand a short passage of water with a temperature of 110-120° C without loss of physical properties.
But it is not recommended to carry out such experiments in a finished heating system - in the worst case, the polypropylene will peel off and the pipe will lose its tightness. To avoid this, it is recommended to make an intermediate steel connection system from the boiler to the distribution of polypropylene pipes.
Necessary tools and components
To carry out connection work, the following list of tools is required:
- Welding machine for plastic pipes. If the amount of work is small and will not be carried out in the future, you can rent a tool or buy the cheapest device. Its main purpose is to heat the outer and inner parts of the pipe to the required welding temperature. Be sure to check the package, it should include nozzles of the following sizes - from 20 to 63 mm.
- Scissors on pipes. The simplest models will do. The main thing is that the cut is strictly perpendicular to the plane of the pipe. This is necessary to ensure quality welding.
- Roulette.
- Connecting elements according to the connection diagram - fittings, clamps, ball valves, etc.
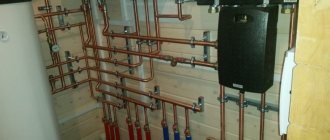
Diagrams for piping a boiler with polypropylene pipes
Depending on the type of boiler used in the heating system, the piping configuration will also differ. Let's consider the 2 most common connection options - a gas double-circuit boiler and a single-circuit solid fuel boiler.
A gas boiler
All modern gas double-circuit boilers belong to a forced water circulation system. This means that their design already includes an expansion tank to compensate for the loss of water expansion during heating and a pump designed for circulation.
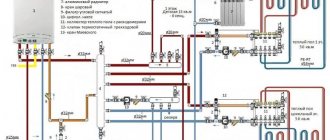
The general diagram for connecting polypropylene pipes to the boiler is shown in the figure:
It should be noted that all connection dimensions should not be taken as mandatory, since they may differ depending on the type of boiler and manufacturer.
It is necessary to take into account the following nuances:
- Please read the operating instructions carefully.
- Use only paranitic gaskets. Other materials (fum tape, rubber) expand under the influence of temperature, which can lead to a pressure drop in the system. This negatively affects the operation of the boiler.
- The connection of the boiler to gas must be carried out by the appropriate services. Don't do this yourself. In addition to a possible fine, without certain skills and tools, connecting yourself can lead to a gas leak.
- Starting the boiler after connecting all pipes. It is carried out by a representative of the manufacturer, as it requires adjustment of the boiler system.
Solid fuel boiler
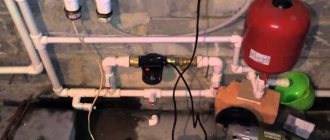
For a boiler operating on solid or liquid fuel, it is necessary to provide a safety system, which includes an expansion tank, a pressure control device and a pump. The general connection diagram is shown in the figure:
Particular attention should be paid to connecting steel or cast iron pipes. They are necessary to lower the temperature of the water coming from the boiler to an acceptable level (not higher than 95°C)
It is recommended to use a cast iron heat exchanger, as it protects the entire piping system from condensation.
Application of buffer tank
The wiring diagram for a solid fuel boiler with a battery tank is not widely used. It is quite cumbersome, but allows for more correct heating operation. Its advantages:
- Stabilization of temperature in the system due to the increased volume of water in the circuit;
- Possibility of reducing the number of approaches for adding fuel to the boiler furnace due to the accumulation of excess heat in the storage tank;
- Possibility of accumulating clearly unnecessary excess thermal energy when using too powerful a boiler or excessive stacking of firewood.
The heat accumulator circuit has one drawback - it is necessary to allocate space for the device itself. The volume of the container used reaches several hundred liters, so you will need free space to place the tank.
There are many schemes for connecting buffer tanks. The simplest of them involve the use of the same coolant in the boiler and in the heating system. A more efficient scheme is using a three-way valve with a thermostat, which ensures a more uniform and economical consumption of thermal energy from the buffer tank.
Schemes with two circuits are also used. In this case, heat accumulators of heating systems are equipped with heat exchangers connected to solid fuel boilers. Heat exchangers heat the water in the tank, which is the coolant of the heating circuit. This option is distinguished by its efficiency and more uniform heating.
This scheme with a buffer tank is gentle for solid fuel boilers that are not designed for high heating pressure. And in this case, the coolants will be separated, the pressure in the tank and in the radiators will not in any way affect the pressure in the boiler itself and the heat exchanger.
Using a single-circuit solid fuel boiler often forces you to look for schemes for organizing hot water supply. For these purposes, you can adapt a storage or instantaneous water heater. It is also possible to use a more advanced heat storage tank with a built-in DHW circuit coil. This piping scheme will be an optimal and profitable solution, as it will solve the problem with hot water supply.
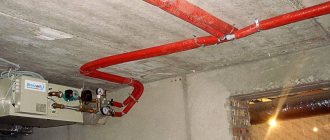
Pellet boiler wiring
Due to its impressive size, the boiler is installed in a special fire room, where space should be allocated for storing fuel reserves. Rules for installing a pellet boiler:
- The surface must be level.
- The floor and walls near the boiler must be finished with non-combustible materials.
- The chimney is installed in exactly the same way as for any solid fuel boiler (insulation and condensate collection are required).
- The diameter of the chimney pipe must match the diameter of the hole on the boiler intended for the exit of exhaust gases.
- It is imperative that the room has adequate ventilation.
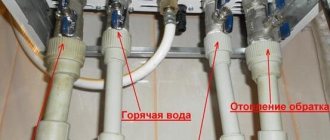
As with any other boiler, you need to take care of installing an expansion tank and a safety group. The boiler is connected to the heating pipes through ball valves and filters. After connecting to the heating supply and return, the system is filled with coolant. The system is subjected to pressure testing and put into operation.
If the system is made of plastic, it is recommended to use a metal pipe for supply in the immediate vicinity of the boiler. This is due to high operating temperatures.
Setting up a Navien gas boiler
Next, we’ll look at how to set up a Navien Deluxe gas boiler with your own hands. Manipulations are carried out using a remote control with a built-in room temperature sensor.
Heating settings
To set the heating mode and set the coolant temperature, hold down the button with the image of a radiator until the same icon appears on the screen. If the “radiator” picture blinks, it means that the set coolant temperature is displayed on the screen. If the symbol does not flash, the actual water heating level is displayed.
Navien wall-mounted gas boilers - model range, pros and cons
How they work and what are the advantages of Navien Ace gas boilers
To set the desired temperature, use the “+” and “-” buttons with the “radiator” icon flashing. The possible range is from 40ºC to 80ºC. Once the temperature is set, it will be automatically saved. The “radiator” icon will blink for a few seconds, after which the actual temperature of the coolant will be displayed on the screen.
Heating with air temperature control
To set the desired air temperature in the room, you need to hold down the “radiator” button until the image “house with thermometer” appears on the screen. It means “Heating with room temperature control” mode.
When the “house with thermometer” symbol is flashing, the desired room temperature is displayed on the screen. When the icon is not flashing, the display shows the actual room temperature.
When the icon is flashing, using the “+” and “-” buttons, the desired level of heating in the room is set, adjustable in the range of 10-40ºC. The temperature is then automatically saved and the icon stops flashing.
Setting the hot water temperature
To set the hot water temperature, you need to hold down the “water tap” button until a similar flashing symbol appears in the right corner. You can then set the desired hot water temperature between 30ºC and 60ºC. The settings will be automatically saved and the “water tap” symbol will stop flashing.
Note! In the “Hot water priority” mode, the water heating temperature is regulated differently. Now let’s look at how to configure the Navien Deluxe gas boiler in the “Hot water priority” mode. To activate it, hold down the “water tap” key until the “faucet and light” symbol appears on the screen.
Now you can set the desired temperature using the “+” and “-” keys. When changing the DHW temperature, the “water tap” icon should flash above the “tap and light” symbol.
To activate it, hold down the “water tap” key until the “faucet and light” symbol appears on the screen. Now you can set the desired temperature using the “+” and “-” keys. When changing the DHW temperature, the “water tap” icon should flash above the “tap and light” symbol.
Now let’s look at how to configure the Navien Deluxe gas boiler in the “Hot water priority” mode. To activate it, hold down the “water tap” key until the “faucet and light” symbol appears on the screen. Now you can set the desired temperature using the “+” and “-” keys. While the DHW temperature is changing, the “water tap” icon should flash above the “tap and light” symbol.
The “Hot water priority” mode involves preparing a supply of water at a given temperature even if it is not in use. It allows you to supply heated water to the consumer a few seconds earlier.
Away Mode
The “Away” mode means the gas boiler operates only for preparing hot water. To switch the unit to this mode, you need to press the button that shows an arrow and a water tap. The “water tap” symbol that appears on the screen means that the “Away from Home” mode is set. The actual temperature in the room is displayed next to it.
Note! This mode is convenient for use in the warm season, when hot water supply is necessary, but there is no need for heating
Setting the Timer mode
The “Timer” mode is necessary to set the time for stopping the operation of the gas boiler within the range from 0 to 12 hours. The unit will work for half an hour, turning off for the specified interval.
To set the “Timer” mode, hold down the “radiator” button until the “clock” symbol appears. When the icon is flashing, use the “+” and “-” keys to set the interval time. The set value is saved, the “clock” stops blinking, and the display shows the actual air temperature.
Gravity pellet burner: manufacturing
Making this module yourself will save you from $300 to $2500. In addition, the use of a gravity pellet burner allows you to completely avoid connecting the boiler to the electrical network. In this case, granular fuel enters the combustion chamber directly from the bunker, and the air supply is ensured by natural draft. The intensity of fuel combustion is adjusted by changing the position of the chimney damper.
The disadvantages of such systems include:
- Possibility of ignition of pellets in the bunker when reverse draft occurs;
- Reduced installation efficiency to 85-90%;
- The need to manually adjust the supply of granules and the position of the gate valve.
Materials for making a gravity burner yourself can include:
- A heat-resistant steel pipe with a wall thickness of at least 4 mm is used to make the combustion chamber;
- Sheet structural steel with a thickness of 3 - 4 mm is used to manufacture the mounting flange;
- The main bunker can be welded from sheet steel with a thickness of 2-3 mm.
Since this type of burner does not require connection to an electrical network, installation of an automatic control system and an electric motor, the cost of manufacturing the unit will be minimal.
Common problems and errors
Low efficiency and frequent breakdowns of heating equipment are a clear sign of mistakes made during its installation.
Mistake #1 . Most often, problems arise due to insufficient heating of the coolant. As a result, this leads to the appearance of a large amount of tar or soot.
Mistake #2 . Incorrect adjustment or lack of protection against boiling water is one of the most common problems. Because of this, the coolant heats up excessively, which negatively affects heating appliances, pipes and other equipment.
Mistake #3 . If the heating system is not highly efficient, then you should pay attention to the quality of the sealing. To do this, you need to check whether the boiler and other structural parts of the system are reliably insulated.
Mistake #4 . It often happens that the owner of the house allocates only a few square meters for the boiler room. As a result, he is faced with the following problem - servicing the heating system becomes extremely inconvenient and even unsafe. Recommendations for arranging a boiler room are given in this article.
How to draw a drawing of a pellet burner
Before starting to develop drawings, it is necessary to carefully study existing designs. This will allow you to choose the right material and avoid design errors.
The presence of drawings greatly simplifies the manufacturing process of the unit. A set of drawings for a pellet burner must include details of the main components and an assembly drawing of the unit, which must indicate:
- The combustion chamber;
- Container for loading pellets;
- Screw conveyor;
- Blower fan.
When used individually, structural elements can be displayed schematically, without elaboration of specific details, however, overall and connecting dimensions must be indicated with maximum accuracy. Drawings of individual parts must contain comprehensive information about the configuration and material used.
Depending on the type chosen, the unit drawings may have a number of significant differences.
Boiler Assembly Guide
Pellet boilers have a rather complex design. The instructions for assembling them will also be difficult and multi-step. For greater convenience, the assembly process of each main unit is considered separately. Buy or make the necessary elements, and then simply assemble them into a single system.
It is highly recommended to buy this element of a pellet boiler ready-made. The burner is where you will spend the most money.
Making a burner yourself is almost impossible for the reason that this part of the boiler is not simply a container for igniting loaded granules, but a complex control and regulatory mechanism.
Pellet burners are equipped with special sensors and have several preset programs that allow you to achieve the most efficient fuel consumption and ensure the most efficient heating of your home.
Housing and heat exchanger
You can handle the assembly of the housing and the manufacture of the heat exchanger yourself. It is best to make the boiler body horizontal - with this placement of the unit, maximum heating efficiency is achieved.
It is recommended to use fireclay bricks to make the body. You simply assemble a kind of box without a top cover and place a heat exchanger in it with connected pipes and other elements. Brick is recommended for the reason that it accumulates heat much more efficiently than cast iron, steel sheets and other popular materials.
The heat exchanger of a pellet boiler is a system of pipes interconnected and connected to the heat supply pipes of a private house.
First step. Assemble a rectangular heat exchanger from square pipes. To do this, cut the pipes into pieces of the required length and weld them into a single structure.
Second step. Make holes in the profile that serves as a vertical post for connecting round pipes.
Third step. Prepare holes in the remaining front pipes for drainage and water connection pipes. Hot water will be discharged through the top hole, cold water will be supplied from below.
Use metal pipes with a length of 150 mm. Next, you can use polypropylene pipes. Be sure to install ball valves where the pipes connect to the boiler. Additionally, you can install filters if necessary.
Fourth step. Weld the back of the unit to its front and weld the side pipes.
At the same stage, select a convenient place to connect a chimney pipe with a diameter of 10 cm. At the bottom of the heating unit, provide a small chamber for collecting ash. Also, the design of a pellet boiler necessarily includes a firebox. More about him later.
In the firebox, as already noted, pellets are stored and from here they are supplied to the burner.
First step. Prepare the necessary materials and equipment. You will need an auger with a diameter of 7.5 or 10 cm, an electric motor and a metal casing. You will connect the engine to the pellet burner control unit.
The function of a metal casing can be performed by any container of suitable volume with sufficiently thick walls.
Second step. Install the inlet pipe of your auger into the discharge mouth of the casing. Connect a corrugated plastic pipe to the other part of the auger to supply granular fuel to the burner.
In conclusion, all you have to do is assemble all the listed elements into a single structure. Do this and proceed to installing the boiler.
Requirements for the premises under the boiler
The PC is installed in a separate building or an extension to it. If the PC productivity is more than 30 kW, it is placed in a separate building - the furnace room.
To organize its operation, boiler owners draw up regulatory documents regarding operation and fire safety.
Dimensions to be maintained
Basic requirements for placement:
- The floor for installation must be made of non-combustible materials: concrete or metal sheet.
- The base for the PC should be made of reinforced concrete with a height of 10-20 cm.
- Emergency and operational passages must be provided between the boiler and the walls of the building - a distance of at least 1 m.
- The room must be dry and heated, with an internal air temperature above + 10 C.
- Supply and exhaust ventilation in the building must be calculated based on the power of the PC; the data can be clarified from the technical and design documentation of the boiler room.
- If the boiler room is installed in a separate room, heating networks to the heating facility are laid either underground, with laying below the freezing level of the soil, or by air. In both cases, the heating main must be well insulated from heat loss to the environment.
- The height of the chimney must be at least 5 m and protrude at least 0.5 m above the roof level; it is recommended to install a draft stabilizer or a regular rotary damper.
- The chimney diameter is calculated in accordance with the boiler power. For pellet boilers it must be at least 150 mm.
- Installation of a condensate trap is required.
- The roof is treated using master flush, the gap is filled with non-flammable mineral wool.