Of all the hot water heating systems that burn various types of solid fuel, the pellet boiler is rightfully considered the most advanced. And it is not surprising, because the efficiency of burning pellets is very high, and the degree of automation of the unit allows you not to interfere with its operation for weeks, as long as the volume of the loading hopper is sufficient. But all these advantages also come with another side - the decent cost of the equipment, which includes not only the heater itself, but also a fuel bunker with a screw conveyor. However, there is an opportunity to become the proud owner of such a high-tech unit by paying half the price for it. To do this, you will have to make a pellet boiler with your own hands; we will discuss this topic in this material.
Is there any point in doing this?
Often, a person who wants to install such a unit in his home is faced with the question of whether he needs to assemble a pellet stove with his own hands or whether it is best to purchase a ready-made option. It must be remembered that in the first case, a person will be able to create a unit that will fit the existing conditions in all respects, and in the second, he will have to use a structure that is ready for use, but does not take into account the individual characteristics of the room. If doubts are caused by the type of fuel used, then you need to know that pellets are a type of processed wood and agricultural waste, which makes the fuel efficient in terms of heat generation, but economical in cost. Such a homemade stove is environmentally friendly because:
- does not pollute the air;
- does not contain harmful components in vapors;
- do not require special fuel supplies, which eliminates the need to cut down trees.
After weighing all the pros and cons, a person will be able to understand whether it makes sense for him to make such a boiler with his own hands or purchase one already ready for use.
Types of equipment
Pellets are used as fuel in the structures. These are compressed briquettes, which contain sawdust, shavings, peat, cake and many other industrial wastes. Depending on the heating area, boilers of different capacities are produced. Those used in residential areas are called fireplaces.
Pellet fireplaces
A pellet fireplace has a power of 6 to 15 kW. Used to heat a separate room or a room with a small area.
There are three varieties:
- Convection type. They only heat the surrounding air.
- Equipped with a water circuit. The air and water are heating up.
- Using not only pellets, but also firewood as fuel.
Pellet boilers
A pellet stove is used for heating industrial buildings or large residential buildings. Their power ranges from 15 to 100 kW. A separate room or basement is provided for such furnaces.
Divided into 3 types:
- Powered by pellets.
- Equipped with grating. Sawdust or firewood is used as fuel.
- Combined or universal ovens. It can be used for both firewood and pellets.
Operating principle and design features
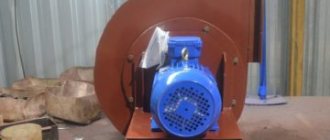
The basic operating principle of the unit is a combination of screw technology and an ignition mechanism that guarantees rapid ignition. The pellet boiler diagram includes these features and assumes that the process of burning granular fuel is accompanied by a forced supply of air, which is why it has a fan. The principle of operation assumes that the automatic ignition is activated only after the fuel has ignited well. Directly during the combustion of briquettes, hot flue gases are formed. Coming out of the firebox, they enter the heat exchanger, where they transfer 95% of the released heat.
Further work goes like this:
- combustion products enter the ash pan;
- automatic air supply allows you to maintain optimal boiler parameters for heat production (human participation in this process is not provided).
Setup and subsequent control can be done, if the need arises, using the built-in remote control. The ability to set the maximum and minimum temperature values for a given room allows you to ensure stable support of the optimal temperature for it.
Features of the furnace operation - when the maximum temperature for the unit is reached, further fuel supply automatically stops. New arrivals become possible only after the temperature drops to minimum levels. Design features also include:
- the combustion chamber is small;
- up to 72% of heat removal occurs in the structure;
- the average temperature of gases removed during exposure to flame is 150 0;
- volumetric type burners, due to which a high efficiency rate is achieved (up to 96%);
- some units can be equipped with a hot water supply circuit (additional heating in the house).
There are 3 main types of equipment:
- pellet boilers designed for granular fuel made from wood;
- combination stoves/boilers capable of burning wood or coal for a short time;
- Pellet boilers (burners) are universal in terms of fuel used - any type of solid fuel is suitable for them.
The cost of each type is different, so the universal option will be higher in price, since the layout and design are more complex, since it takes into account each type of fuel used by the stove.
Production technology
For any owner, the idea of turning waste into fuel, or even making money from it, is attractive. In principle, it is possible to make pellets with your own hands, but you should not expect industrial quality from them. It is unlikely that you will be able to make an imported pellet boiler using homemade pellets work, but a homemade or solid fuel unit does an excellent job with them.
Equipment necessary for the production of pellets from sawdust or wood chips
The wood pellet production technology consists of several successive stages:
- Large crushing of raw materials. Fragments should be no more than 1.25 cm3. This is preparation for better drying. For this operation you need a crusher.
- Drying in a drying chamber. The raw materials are brought to a moisture content of 8-12%. There are different types of chambers, some use direct heating (hot air from the firebox is supplied to the drying chamber), others heat the heat exchanger, and from it the air in the dryer is heated. The second option is less effective, but in this case the possibility of soot getting into the raw materials is excluded. Even a small amount of soot can stain wood chips. As a result, the quality of the pellets can be classified as “white” (if the appropriate raw materials were used), and the color – gray.
- Fine crushing. The dried wood is fed into crushers (usually hammer type). The resulting wood fragments measure more than 1.5 mm for white and gray pellets, and 4 mm for industrial ones.
- Hydration. Wood fibers with low moisture content will not be able to stick together. That's why they are moisturized. If pine or spruce waste is used, water is injected. Raw materials from hardwoods - oak, birch, beech - are processed with hot steam.
- Pressing. There are presses of different designs working here. The raw material is pressed through a matrix (flat or round), which forms cylinders of given sizes.
- Cooling. Under the influence of high pressure, pellets heat up to 70-90°C. In this state they crumble easily, so they are left to cool.
- The finished granules are sifted (from the remnants of non-glued particles) and packaged.
As you can see, the process is multi-stage and requires quite a large amount of equipment. However, if cheap or free raw materials are available, it is profitable to make pellets yourself.
Features of straw pellet production
Making pellets from straw is easier. It initially comes dry, so there is no drying stage. If there is wet straw, it is dried naturally in the sun, and then crushed and mixed with dry straw, thereby achieving the required moisture content of the raw material before pressing.
Grinding is also easier. This requires a straw cutter, which immediately cuts the raw material into fragments of the required length. So the grinding also takes place in one go. After bringing the mass to the required humidity, it is pressed through a press. And here everything is simpler: since the raw materials are softer, less effort is required. Less powerful equipment means lower costs. At the same time, the line productivity can be high.
As you can see, less equipment is required for the production of straw pellets, and less time and energy is also required.
Advantages and disadvantages
A well-designed diagram of a modern boiler using compressed wood waste should take into account all the advantages and disadvantages of stoves of this type. The advantages that the oven offers during use:
- Economical (no need to use wood or coal for heating).
- High efficiency (higher only for gas boilers and furnaces).
- High-quality equipment (even a homemade stove should be assembled from good materials).
- Pellet heating has a high calorific value.
- The cost of fuel is lower than analogues.
- Durability and reliable operation.
- Complete safety of oven operation.
- Automation of the fuel supply process.
- There is no need for constant human control (the stove automates the process of feeding pellets and maintaining temperature).
An additional advantage of the stoves is the absence of any unpleasant odors and black smoke characteristic of combustion, which increases the environmental friendliness of the design.
Drawings, if the stove is homemade, should also take into account existing disadvantages:
- High cost of imported components used for self-assembly of the stove.
- Difficulties with purchasing pellets, since this type of fuel cells is not well developed in our country.
- The need to use electricity for the operation and correct performance of automation devices.
Assembly Guide
A do-it-yourself pellet stove is a unit consisting of a burner, a housing with a heat exchanger, a firebox, a hopper and a screw mechanism (it is used to supply pressed fuel to the boiler).
Burner
The burner used in furnaces may have a different design; drawings are drawn up for them separately, since the technical characteristics and operating principles will also differ. The volumetric burner is installed during self-assembly directly into the firebox of the heating device. The main burner materials are steel and cast iron.
Pellet burner design
It must be remembered that a homemade pellet burner for a boiler will not meet safety requirements without prior control by a specialist, since an ordinary person may not know all the intricacies of the work. The burner must be installed in strict accordance with the regulations.
Also, a burner for a pellet boiler assembled by yourself can be supplemented with an ignition system. It can be manual or automatic. If automatic is selected, you will need to additionally install an electric fan. The torch burner differs from other options in its low power and has compact dimensions convenient for use at home.
The retort burner has the shape of a bowl. It is filled from below. The fan supplies air to the combustion zone, which enters the burner through special small holes.
Methods of supplying fuel to the burner
Purchase
A burner assembled in production conditions will require serious investment. The average cost of a finished product is about 75,000 rubles. The cost is affected by:
- Manufacturer.
- Materials used.
- Dimensions.
- Ignition type.
In order to save money, it is proposed to create a burner with your own hands according to existing diagrams and drawings.
DIY making
A homemade pellet boiler, the drawings of which are selected for work, must correspond to the type of burner. You can also make it yourself. The burner operating in the unit is fireproof. The service life with proper assembly is at least 10-15 years (production options can work up to 20 years). All the tools and components that the burner requires can be purchased at a regular store.
Pellet burner diagram
The parameters should be calculated using a specialist or a special calculator. Video on installation work related to the burner:
Housing and heat exchanger
It is recommended to make the body from fireclay bricks (resistant to high temperatures, overheating and temperature changes). Cast iron is also suitable for this element.
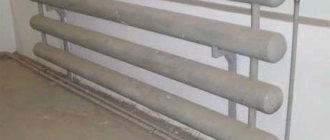
The heat exchanger is created from pipes. They must have a square cross-section. It is necessary to make holes in order to later bring round pipes. The material is sheet steel, the thickness is 4-6 mm. There should be technical doors in the front and rear walls (required for maintenance of the unit). Tools – welding machine and drill.
The heat exchanger, according to the available diagrams, is located inside the boiler body.
Firebox
You can use a purchased or self-made element as a firebox. This part of the boiler provides the flow of fuel necessary to maintain optimal temperature parameters. It is recommended that it be of medium size to refuel the stove for 2-3 days at once.
DIY methods
Brick pyrolysis boiler
On the Internet you can find a lot of options for making pyrolysis boilers from a variety of available materials. Let's look at the most common of them.
The first option is a simple boiler made from a gas cylinder. It would seem that round steel containers made of fairly thick steel are ideal for making fireboxes, especially since it is not easy for a home-made master to give the desired shape to an iron sheet 5 mm thick, but almost everything is already ready.
But, unfortunately, nothing good will come of this idea. Conventional structural steel used for the manufacture of cylinders does not have the necessary level of heat resistance and chemical resistance, so the walls of fireboxes made from them will quickly burn out.
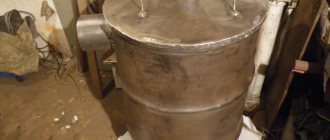
But it is still possible to find a use for the cylinder in a heating system. It would make an excellent fuel reservoir for a waste boiler.
The second option is a brick pyrolysis boiler. This pyrolysis machine has an efficiency of up to 90%. This indicator is achieved due to the high level of thermal inertia of the brick, which makes it possible to maintain an optimal temperature level in the gasification and combustion chambers, regardless of the intensity of thermochemical reactions inside them.
In addition, a brick boiler can be converted in such a way that there are two gasification chambers. And make sure that they work on different fuels for the pyrosol boiler - one on wood, and the other on coal.
Thanks to the different duration of gas formation, as well as the shift in fuel loading time, it is possible to ensure that the boiler never gets cold.
And the third option is a mini-oven that runs on sawdust, shavings, and rags. It is made from a pair of canned food cans of different diameters inserted into each other. Fuel smolders in the bottom can, and pyrolysis gas is drawn into the holes punched with a knife in the bottom of the top can and burns there.
Starting and maintaining the boiler
Before the first launch of the structure, you will need to invite a specialist to check all elements for compliance with safety requirements. It is not recommended to switch it on yourself.
Start-up is carried out only after checking the unit for compliance with the selected scheme. The tightness of the chimney, bunker and the boiler itself must be checked. Before starting, you need to make sure that the heating system is full and the pressure in it corresponds to parameters suitable for operation. All instruments and automation must be in working order.
Caring for the unit is not difficult. As it burns out, it is necessary to add fuel, clean the stove from ash, and also monitor the performance of the automation elements. Separately, you will need to check how the burner and ignition system work.
Conclusion
A pellet stove is a modern and environmentally friendly source of indoor heat. The operation of a retort burner or any other is durable, which will not require the cost of repairing it. You can make the boiler yourself, which will save money.
Author: Kolesnikov Yuri Fedorovich, heating engineer*
© When using site materials (quotes, images), the source must be indicated.
Pellet fuel, or simply pellet, as is known, is granular waste from wood processing or agricultural production (straw, husks, etc.) pressed at elevated temperatures. The cost of heating with pellets in countries with abundant natural energy resources may be lower than with coal (excluding places directly adjacent to coal-mining regions). Pellets do not emit harmful fumes like liquid fuel, they are explosion-proof, they stain no more than firewood, but do not require wood harvesting for fuel.
At the same time, pellets are a rather capricious energy carrier; if used incorrectly, they are a fire hazard, and when searching for a DIY pellet burner there is very little useful information; They will show a torch shooting out of a nozzle, and that’s it. Or they give a diagram of a supercharged ceramic burner to a vague description of a gravitational non-volatile burner, or something else like that. This article is intended to fill this gap to some extent.
Fuel pellets and heating boilers with pellet burners
Why a burner?
Pellets can be loaded into a regular stove and set on fire, they will burn. They will also burn in a stove or long-burning boiler. But the ash content will be at best 20%, and maybe even 60% (!). Therefore, when burning pellets, preliminary pyrolysis of the fuel mass is widely used; in this case, the ash content will be 2-5%. But there is no point in loading pellets into a pyrolysis furnace or boiler: in a device that burns pyrolysis gases in a separate chamber, they will coke, sinter, and there will be even more fuel waste, plus unscheduled cleaning and/or repair of the boiler. Therefore, pellets are burned in special burners, where the zones of pyrolysis and formation of a torch of burning gases partially overlap. The design of the burner is, in principle, simple. How to make a simple pellet burner, see for example. video:
Video: a simple homemade pellet burner
Is it worth it?
Economically, independent production of a spare pellet burner makes complete sense, because prices for fairly reliable branded products start around $500, if we are talking about a semi-automatic burner that requires daily maintenance; This one will be suitable as a spare. And for an automated set of equipment for heating with pellets, which requires a trip to it once a week to reload fuel, you will have to pay $3,000 or more.
Pellets as fuel
Pellet is a fairly energy-intensive fuel: 1 kg of it produces approx. 5 kW/h heat. Those. To heat a medium-sized house in mid-latitudes, the burner should burn approx. 2 kg pellets per hour; In terms of volume, it’s about half a bucket. You need to add pellets to the bunker (see below) 1-2 times a day and at the same time empty the ash pan of the boiler; the ash is quite suitable for fertilizer. A good branded burner should be cleaned no more than once a week (those requiring cleaning once a season cost from $5,000); homemade will have to be cleaned every 3-4 days.
But, firstly, pellets burn well and just like that, although they produce a lot of ash. The problem with all existing pellet burners without exception is the possibility of the so-called. reverse combustion, when the pyrolysis zone penetrates the fuel bunker, and then - smoke, stench (poisonous), fire. Secondly, pellet burners are critical to the air supply: if there is too much air, the pellets can be blown off the burner and produce a lot of ash; little - again a lot of ash and coking. The air requirement of the burning mass of pellets depends quite strongly on the combustion mode. As a result, it is not so easy to set the correct combustion mode for pellets. In general, a pellet burner is ignited in stages: way:
- Ignition is carried out with a special lighter, which is a ceramic rod heated to 900-1100 degrees. A homemade burner can be lit with a torch, but in no case should it be flammable! The combustion will immediately jump into the bunker!
- Starting - the air supply is adjusted (see below) until a stable flame is formed;
- Acceleration (reaching operating mode) - also using air (possibly together with the fuel supply) to achieve a smokeless flame (possibly with control of its temperature) and blowing off ash from the burner without blowing out the pellets;
- Operation in standby mode - the air is covered until the specified temperature of the coolant in the return is achieved;
- Stop - the fuel supply is cut off, and air is supplied according to step 3 until the remainder is completely burned.
Forced fuel systems
It is the method of fuel supply that determines the fire safety of a boiler with a pellet burner. In general, pellets can be fed into the burner by force or by gravity, when they themselves pour out of the hopper. The safest method is forced. However, this is exactly the case when you have to pay for safety and convenience: forced-feed burners are the ones that cost from $3000.
Pellet boilers with forced fuel supply and burners for them
Forced pellets to the boiler from the bunker can be pneumatic lift (item 1 in the figure and auger (item 2 and see below). What they have in common is that there is an ascending branch in the fuel supply path. If the fire comes out of the burner, then it to get into the bunker, you will need to go down, which is unlikely. Pneumatic supply completely eliminates combustion leakage into the bunker, since there is no solid mass of pellets in the fuel line, and the air blows towards the possible path of fire, so boilers with pneumatic supply can be powered from open bunker, which is loaded once a month. However, in both cases, a cup burner is needed (volumetric, see below) with a screw feed of pellets from the feeder, positions 3 and 4; it is technically complex, and its cost is at least 1/ 3 of the entire boiler power system.
Auger feed systems use 2 separate mechanical units (left and center in the figure): a pick-up auger lifts the pellet from the hopper. The fuel then falls into the feeder (receiving hopper) of the burner, where another auger pushes the fuel into the combustion zone. Oddly enough, combustion leakage into the bunker is not completely ruled out, because In the ascending branch of the fuel line, the pellets lie in a solid mass, so the descending section of the fuel pipeline is made of fusible (but not flammable!) or heat-shrinkable material. If the feeder catches fire, it will melt or break off and interrupt the path of the fire. The system with free fall of pellets into the feeder (on the right) is used less frequently due to lower fire safety, but it can be used to power gravity burners, see below.
Note: sometimes, for the sake of compactness, the fuel hopper is placed on the boiler, see fig. on right. In this case, the forced-feed system loses its fire safety property, because the ascending branch of the fuel line is excluded from the supply path.
A serious drawback of systems with forced supply of pellets is their energy dependence: you need to turn 2 electric motors. But then it makes sense to use the burner with forced pressurization, this increases the efficiency of the boiler by 3-7 percentage points, and connect the control automation, see below. In cold countries that heat themselves with imported fuel or their own waste, savings on heating for the season in this case can amount to an amount that pays for the cost of a burner with a boiler.
Burners in forced-feed systems use volumetric screws, i.e. The pellets in them are also forcibly squeezed into the pyrolysis chamber, and the pyrolysis gases are burned in the boiler furnace. Burners with a flame bowl (item 1 in the figure) are gradually falling out of use: if the automation fails (see below), the fuel in the bowl cokes, which means an extraordinary cleaning or repair of the boiler, and the penetration of fire into the feeder is not such a rare occurrence in models from the best manufacturers. When using standard fuel (recommended by the manufacturer), you need to clean the burner with the bowl from any remaining ash once a week.
Methods for supplying fuel from the feeder to the pellet burner
Burners with secondary air supply to the afterburner (item 2) or with a retort that forms primary and secondary flows directly in the bowl (item 3) are free from most of these disadvantages. A burner with an afterburner almost never cokes, but it still needs to be cleaned manually once a week, while a burner with a retort needs cleaning monthly, and only then based on the results of an inspection.
Note: according to the retort scheme, the so-called. fireplace burners with gravity fuel supply for boilers and stoves up to 5 kW, pos. 4 in Fig.
About automation
Burners of systems with forced supply of pellets are not examples for beginners to repeat, not only because of the complex mechanics. All its advantages, incl. safety, they show only under the control of a microprocessor operating from a whole set of sensors:
- In the chimney - it gives not only the presence, but also the amount of draft.
- In the firebox – shows the flame temperature.
- In a heating system, it gives the return temperature.
- In the burner, in the combustion zone - shows the presence and level of fuel.
- Same thing in the feeder.
- Same thing in the bunker.
The microprocessor, guided by data from the sensors, regulates the supply of both fuel and air according to a program specified by the user from the remote control, for example. “Winter”, “Spring/Autumn”, “Lower level of comfort”, “House is empty”, etc. It is the simultaneous coordinated regulation of air and fuel supply that ensures the highest possible efficiency of the boiler using any available pellets; this is a serious advantage of systems with forced supply.
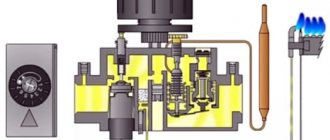
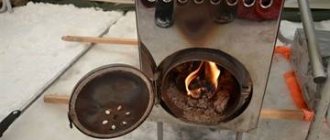
Petropelette.
The petroleum pellet was developed for installation on the industrial Cooper boiler of the Novosibirsk OOOTeplodar. The burner is simply hung instead of the bottom door of the boiler on the hinge on the boiler. Therefore, switching from firewood to pellets takes no more than 3 minutes. Pellets are not firewood, they just don’t burn in air. They require pressurization to burn, and the conditions of pressurization depend on the specific boiler and other factors. Therefore, the Petropelette consists of the fryer itself, a pressurization system and an ignition system. There is also a combustion sensor on the burner.
Supercharging For supercharging, I used a fan from a VAZ-2110 stove or the like. Issue price 850 rub. In terms of performance, it is clearly “overkill”, so it has to be powered from 2.5 to 5 volts. At higher voltages, it simply blows the pellets out of the combustion chamber. Of course, over time I plan to use some kind of lower-capacity fan. Let me say right away that impeller type fans are not suitable. Only “squirrel wheel” systems or they are also called “centrifugal” or “snail”. Time passed and I found a more suitable fan. I bought it on AliExpert.
Gravity burners
The gravity pellet burner can be made non-volatile, because the fuel in it is poured directly into the pyrolysis chamber, and pressurization can be provided by draft in the chimney. It is also possible to enter the gravity burner into operating mode manually, manipulating only the damper on the burner and the damper (draft regulator in the chimney). However, this costs a slightly lower boiler efficiency and a greater fire hazard. Therefore, any gravity burner requires qualified maintenance. Let's hope that this article will help the reader with this too.
Pellet burners with gravity feed
Non-volatile gravity burners with manual control are not produced by industry: if used incorrectly, they are extremely dangerous. Semi-automatic burners with self-feeding fuel are sold under the name gravity burners. To prevent fire from entering the bunker, either install a gateway (on the left in the figure) made of thermosetting, i.e. elements that expand when heated, or use a double-grid scheme on the right. The movable grate periodically moves back, takes a portion of fuel and transfers it to the combustion zone, while simultaneously pushing the ash into the ash pan of the boiler. In this case, a complex burner with a screw is not needed, but this design is bad in that the gap between the grates quickly becomes clogged with ash residue. If the movable grate gets stuck in the rear position, fire penetration into the hopper is almost inevitable, so a fire sluice in a burner with a double grate is also necessary.
Without electricity
A homemade pellet burner can be made non-volatile if it is made according to the basket-flare scheme:
- The fuel is poured directly into the pyrolysis chamber, which is a perforated steel basket. The basket is made removable, because For each caliber (diameter) of pellets you need a separate basket.
- The immediate penetration of fire into the bunker prevents, to a certain extent, “tertiary” air being sucked in through the holes in the feeder.
- Primary air provides pyrolysis of fuel in the basket.
- Pyrolysis gases and secondary air enter the combustion chamber, where the main combustion occurs.
- A torch of hot gases erupts from the combustion chamber, heating the boiler.
Note: some factory burners are also built according to the described scheme, incl. well-proven Pelletrons. But they are by no means energy independent, because... equipped with built-in automation. A UPS (uninterruptible power supply) for Pelletrons can be purchased optionally or use a computer one.
Looking at Pelletrons
The operating diagram of a non-volatile pellet burner with a boiler is given on the left in the figure, and the diagram of its device and description of the principle of operation is on the right in the same place:
The device of a gravity pellet burner
An indispensable condition for successful operation is a damper in the chimney with obviously excess draft. This burner is put into operation quite simply:
- Fully open the burner damper and air damper.
- Open the fuel supply valve on the bunker (it must be there!)
- Light the pellet and immediately close the damper on the burner.
- Observing through the inspection window of the boiler (also mandatory), smoothly and slowly open the burner damper until the torch flares up and a cloud of ash appears. Do not blow out pellets!
- Using a damper on the boiler temperature sensor (or according to the type of torch), the burner is brought into operating mode.
Industrial model
On the modern market of heating devices, there are many models of boilers that use wood, or more precisely, its crushed waste, as fuel. Depending on the technical characteristics of the product, sawdust stoves can heat only a house or, in addition, outbuildings. There is a standard scheme that allows you to provide hot water supply for the heating system and household needs, where the main element is a double-circuit solid fuel pyrolysis boiler. Heat productivity in this case depends on the power of the sawdust boiler, as well as the quality and quantity of the specified fuel.
Advantages of modern units
The main advantages of factory-made heating devices for the home are:
- maximum automation of fuel combustion and stable maintenance of the required temperature. Chip boilers independently control how full the storage hopper is, from which sawdust is fed into the boiler by screw. Due to the fact that the automatic safety system is triggered in time, the fire augers do not allow the flame to spread back to the bunker;
- The automatic mode of ash ejection into a special collection relieves owners from stopping the system for manual intervention in the cleaning system. In this case, heating boilers using sawdust stop their operation only in case of problems in order to eliminate them;
- The sawdust heat generator is environmentally friendly, because here combustion is not accompanied by the release of ash from the chimney into the atmosphere, and the heated air goes through several degrees of purification from heavy particles, and only then enters the room. Meanwhile, the ash deposited by a special cyclone is disposed of without harming the environment;
- the vast majority of boilers operating on pressed or loose sawdust are distinguished by reliable operation and high heat transfer efficiency;
- full automation of the control system, which scans equipment for faults and alerts the operator about possible errors in operation, if any.
Disadvantages of factory-assembled boilers
This type of device that generates heat has practically no disadvantages, except that their cost, depending on the brand and model, can be very high. Also, sometimes problems arise with replacing failed components, which need to be ordered from the manufacturer and wait for the goods to be delivered, which is problematic during the heating season, when stopping the system is very undesirable.
- The process begins with the automatic feeding of sawdust into a hopper equipped with a system of moving floors, from where it enters the conveyor.
- The compressed or loose wood material is stored in a hopper until the sawdust burner compartment is empty, after which the movable floors come into operation. When the tank is completely filled, fuel will not be supplied until the tank begins to empty.
- At the next stage, wood chips from the hopper are fed into the boiler using a wood chip and sawdust auger.
- After entering the combustion chamber, the fuel is burned in full due to air supply. Further, the boiler operates continuously according to the same cycle discussed in these four points.
Homemade pellet boilers ↑
Speaking about homemade boilers in general, the majority of those interested in efficient heating systems still regard this possibility with considerable doubt. It seems to everyone that this is a very complex engineering structure. But you can’t screw things up here—mistakes in an area like heating can be costly. This is, of course, correct. But as for the pellet boiler specifically, it is possible to make it yourself even in the absence of special knowledge and skills.
However, I will not claim that this is a completely simple and unpretentious matter - this is not at all the case. But if you, in principle, have no fear of household technical tasks, then you can easily cope with this.
Before you decide on such an important task, you will need to decide on the material - that is, understand and imagine what metal your boiler will be made of: steel or cast iron. If it is steel, then the product will be lighter in weight, it will be somewhat easier to manufacture and install, but the service life will be noticeably shorter (about 20 years). If you choose a cast iron body option, this is probably optimal. The service life of the product will be about 40-45 years, and the material should not corrode or deteriorate. In practice, cast iron boilers are made from module sections, so that if necessary (if damaged) they can be quickly replaced. Boilers can be independent or dependent on electricity. Volatile boilers are usually equipped with an automatic pellet loading system and are equipped with a special fan. It is also possible to assemble a similar option with your own hands, but this will require a lot of time and some basic engineering skills and ideas. In the case of a non-volatile system, the boiler will be designed according to the principle of natural circulation. Here a large diameter pipe is used, placed obliquely.
Installation
Pellet boilers must be installed in compliance with certain requirements for the installation site.
Choosing a place
It is better to install the unit in a separate room due to its impressive dimensions. The best option is a room with a temperature of at least +10 °C.
Installation outside the building is not recommended. However, when placing equipment outdoors or in a garage, pipes should be located underground below the freezing level to reduce heat loss.
Preparing the floor and walls
It is necessary to level the floor in the place where the equipment will be installed. The platform must be strong enough to support the weight of the device itself and the pellet hopper. Non-flammable plates should be fixed to the walls and floor. There must be a place for pellets near the device.
Ventilation and chimney
We install ventilation and a chimney made of non-combustible material. The latter, as a rule, is displayed on the roof, protruding above its surface by at least half a meter. It should be protected from precipitation and insulated.
The cross-section of the chimney pipes must be larger than the diameter of the hole intended for removing exhaust gases from the equipment.
Care should be taken to maintain the chimney by providing a special tightly closing opening for cleaning it.
Installing equipment
Having prepared the site, we install the device itself. We install and connect the burner, hopper, auger and automatic control panel. Communications are connected to the equipment through ball valves.
This will make the system easier to maintain. It is advisable to install filters. After connecting all the elements, a test run of the heating system is performed.
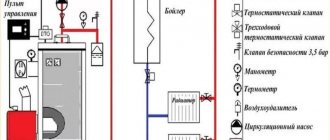
Pellet boiler diagram ↑
Below is the boiler assembly in the drawings.
The figure shows what main components a pellet boiler is assembled from
Schemes and drawings for assembling a pellet boiler: 1 - Boiler; 2 — fuel bunker; 3 — automatic feed unit; 4 - control device; 5 - recirculation unit; 1.1 - firebox (door); 1.2 — front fence (door); 1.3 — hatch; 1.4 - rear door; 1.5 — atmospheric shutter handle; 1.5.1 the shutter is open - the boiler does not work; 1.6 - place of gases; 1.6.1 - atmospheric shutter; 1.7 - feed; 1.8 - recoil; 1.9 — supply to the collector; 1.10 — return from the collector; 1.11 - ash pan; 1.12 burner in the top chamber; 1.13 - firebox; 1.14 - radiator; 2.1 — bunker hatch; 2.2 - fuel dump; 2.3 - stirrer; 2.4 auger conveyor; 3.1 gearbox; 3.2 Fan; 3.3 Air seal; 4.1 — thermometer for smoke; 4.2 - pressure gauge; 4.3 - supply thermometer; 4.4 - three-way valve; 4.4.1 minimum temperature supply; 4.4.2 — temperature supply (maximum); 4.5 - emergency thermostat; 4.6 — change of modes; 4.6.1 Off; 4.6.2 - on fuel supply (only); 4.6.3 - on air supply (only); 4.6.4 - Automatic; 4.7 - thermostat; 4.8 - output thermometer; 5.1 - safety (shutter); 5.2 - for recycling; 5.3 - shutter (ball); 5.4 - filter; 5.5 recirculation pumping; 5.6 — output from recirculation; 5.7 drainage hole
Visual diagram of a pellet boiler
Assembly nuances ↑
For these purposes, you need metal (iron) sheets (3-5 mm thick), as well as a welder and a grinder. Be sure to inspect in person to ensure that the iron casts are free of at least visible defects and that the metal itself is durable.
Making a pellet boiler with your own hands is a completely feasible task
As I already said, making a pellet boiler on your own will not be a huge effort. The simplest would be its horizontal design. It is made from steel sheets and pipes.
The basis is a rectangular heat exchanger made of square pipes. Round pipes are welded to it.
A square profile that reliably forms the joining seams would be best. Next, the heat exchanger is installed in a firebox made of fireclay bricks.
After cutting the required length of pipes, special holes are made for round pipes in the profile for the vertical stand. In the front pipes that still remain, holes must be cut for drainage. There are a total of two water pipes: for hot water at the top and for cold water at the bottom. Such holes can be made using a welding cutter, and then carefully processed with a grinder.
Install the back of the boiler (by welding) to the front. The side pipes are welded.
Advice: even if you have held a welding machine in your hands and have some skills, it is more advisable to carry out this work with an assistant, who will at least help fix all the components in the desired position. Yes, and he will provide insurance, if anything, so that this entire complex structure does not fall apart or fall during the installation process.
When the welding work is completed, you should definitely check your boiler for leaks. How to do it is easy.
- Install the structure vertically;
- Open the bottom hole slightly;
- Pour water into the top hole;
If leaks are discovered, take care of them - it’s better to do everything right on shore right away to avoid problems in the future. Well, if everything is fine, no leaks were found, then you can proceed to the actual installation of the boiler.
Chimney device
When it comes to heating equipment that runs on solid fuel, it is imperative to install a chimney. In this case, the chimney is made from a pipe with a diameter of 100 mm.
At a distance of 50–100 mm from the upper edge of the stove, a chimney pipe is cut in. This is a length of steel pipe into which the chimney will fit tightly. The smoke channel is made with a small horizontal section - 50 - 60 cm of a straight pipe is enough to weaken the draft. A large number of knees before leaving the premises is not allowed.
A chimney made of several sections is easy to use. This way you can clean it without any problems.