One of the most unpleasant household problems is the lack of water in the tap. It is easy to survive the lack of light or gas, but water is an essential component of human life, and when it is absent or in short supply, problems begin. You can always keep several containers of water in your house, for example, plastic bottles, but it is much more practical to determine what kind of storage tank for water supply and system diagram for a private home is needed, so as not to lose comfort and continue to use household appliances and a sink with a bathtub, no matter what. what never happened.
Operation of the system and the tank in it.
First start of the system.
The water tap is open.
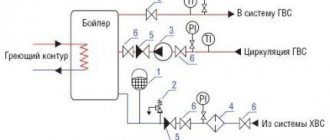
There is no pressure, the contacts of the pressure switch are closed, power is supplied through them to the submersible pump. The pump turns on, takes water from the well (well) and supplies it to the house. During the first start-up, water squeezes air out of the empty system through an open water tap. When all the air is out and water comes out of the tap in a dense stream, close the tap. Water begins to fill the membrane expansion tank, compressing the air in its air part. The pressure gradually increases, reaches the set value, the pressure switch contacts open and the pump stops. Water cannot go back into the well. The check valve won't let it in. Operation of the system and tank in operating mode.
We open the water tap, for example in the kitchen. Under the action of compressed air from the air part of the membrane tank, water is squeezed out of the tank into the tap. As water is consumed, the air expands and its pressure decreases. When this pressure reaches the lower relay setting value, the relay contacts close, the pump turns on and begins to feed the tank. The pump flow is enough for both consumers and filling the tank. Gradually the pump will fill the tank to the required pressure and the relay will open. The pump will stop. If we continue to use water, the cycle will repeat.
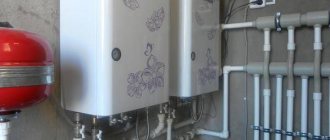
What is a thermal accumulator
A thermal accumulator is a device designed to accumulate thermal energy for the purpose of its use in homes, buildings, and industrial production.
A thermal accumulator or, as it is sometimes called, a buffer tank, is nothing more than an ordinary barrel (round or square). But this barrel is not simple, but magical.
It can save your money and create a comfortable temperature in your home. The simplest modification of a heat accumulator has two outputs at the top and two at the bottom. What else could be simpler? Many people have heard about the heat accumulator, but not everyone knows when and how to use it, while saving on heating costs.
Volume of the tank.
If there were no tank, the pressure in the system would drop immediately when the tap was opened and the pump would immediately turn on. It would just as quickly build up high pressure and stop. That is, when filling, for example, a bucket of water, the pump would constantly start and stop. The stream from the tap would also pulsate. The tank helps make starts and stops much less frequent, which increases the life of the pump and the operating comfort of the system. The larger the tank, the less often the pump will turn on. Pumps have a passport value for the number of starts per hour. This value is given in the pump documentation and is often around 50
.
But be sure to look at the instructions. For example, this norm for Grundfos with MS 402 and MS 4000 engines is 100 times per hour. Manufacturers of tanks indicate that this is usually 12 - 15
.
The volume of the tank is proposed to be calculated using the formula:
Fig.2.
Formula for calculating the volume of a battery tank. The formula is complex and easy to make mistakes, so I made a small Excel file for you. You just have to substitute your values. Download it for yourself along with the manual. n
– number of pump starts per hour, 1/hour – taken from the pump passport;
Рmax
— set
pump shut-off pressure,
bar;
Advantages and disadvantages of heating with a heat accumulator
The advantages of such systems are:
- Reduced energy costs.
- Increasing the efficiency of the heating system.
- No overheating.
- Reducing the amount (frequency) of loading solid fuel into the boiler.
- Fine-tuning the temperature in the rooms.
- Possibility of modernization (combination with a hot water supply system, use of alternative energy sources instead of fuel).
With all the advantages, heating equipment of this type also has disadvantages:
- The power of the installed boiler allows you to heat an area twice as large as required (power reserve).
- The system takes a long time to start from a cold state before entering normal operating mode.
- Due to the bulkiness of the equipment and the large number of components, transportation, placement and installation are complicated.
- There remains a need for a fuel warehouse in close proximity to the boiler room.
- The cost of equipment and the lack of quick payback, especially when replacing the boiler.
The last drawback can be successfully solved by installing the heat accumulator with your own hands.
Types of heating systems with heat storage and different numbers of coils
The coil plays the role of a heat exchanger, that is, liquids of different systems do not mix with each other, and heat transfer occurs through the walls of this spiral. Made from copper or stainless steel. Sometimes ferrous metal is used to reduce the cost of the structure.
There are four main types of systems:
Without coil. Instead, an additional tank of smaller diameter can be installed, connected to a small circuit. Heat transfer occurs due to the physical properties in which it rises up and the cold coolant falls to the bottom of the container. This system is the simplest and works with only one consumer, for example a heating system and one source. This can be either a solid fuel boiler or a solar collector. Features: minimal cost, ease of installation.
With one coil. The spiral is located inside the main tank; coolant from the source circulates through it. The energy is transferred to a storage tank from where it is circulated further to the consumer. The peculiarity of such a system is that there is no mixing of different coolants
This may be important if they have different chemical compositions
The system can also work in the reverse order; the heating system or hot water supply can flow through the coil.
With two coils. An additional small heat exchanger circuit is fed into a system connected to an alternative energy source. This system allows the use of a wider range of equipment for heating the coolant.
With three spirals. It is assumed that a single heating complex includes a solid fuel boiler and two alternative sources, for example, solar and geothermal batteries. Maximum solid fuel savings. The boiler can be used as an additional (backup) boiler.
With additional tank. There are systems in which another circuit with a heat exchanger is turned on so that hot water appears in the tap immediately after starting the boiler, without waiting for the optimal heating mode to reach. However, in such systems, the supply of hot water is limited; after its expiration, further heating will proceed more slowly than through the coil.
Application of different types of systems
Heating systems, which include only solid fuel boilers, are used, as a rule, for heating private houses. The need to build a coal (wood) warehouse is inconvenient, but this configuration is sufficient for heating in the most severe frosts.
Heating systems that include solar collectors can save up to 30% on energy costs, but cannot replace a solid fuel boiler. Therefore, it is used as an auxiliary one, especially since the sun does not always shine. But to always have water at home, the power is enough (replaces 50-90%).
Combined configurations involve the use of gas and solid fuel boilers. This is convenient when starting the system in a frozen building. If the gas unit is connected to a hot water supply system, then there will always be water. In this case, there is no need to add firewood; just press the start button of the gas burner. and the main task of heating the water will be taken on by a solid fuel boiler.
How to set up a water supply system.
I recommend Pmax = 4 bar.
If you set it less, the pump will start more often.
There is no need to set it higher either, because when using a boiler, the pressure in the system can rise above the limit values. Рmin
– set absolute pump activation pressure, bar;
I recommend Pmin
= 2 bar. If the start pressure is made less, then the stream from the tap at the end of the cycle will be noticeably weaker than the flow rate at the beginning. This will also be noticeable when using the shower, since low water pressure will have difficulty overcoming the boiler check valve. You will feel not only a weakening of the stream, but also a decrease in the temperature of the water in the shower.
Рmax
and
Pmin
are set on the pressure switch.
Pmin
with the nut on the large spring, Pmax with the differential pressure nut on the small spring.
Fig.3. Setting up the pressure switch.
When is it beneficial to install a heat accumulator:
— you have a solid fuel boiler;
— you are heated with electricity;
— solar collectors have been added to help with heating;
— it is possible to recover heat from units and machines.
The most common case of using a heat accumulator is when a solid fuel boiler is used as a heat source. Anyone who has used a solid fuel boiler to heat their home knows what comfort can be achieved using such a heating system. Flooded - undressed, burned out - got dressed. In the mornings in a house with such a heat source, you don’t want to get out from under the blanket. It is very difficult to regulate the combustion process in a solid fuel boiler. You need to heat it at both +10C and -40C. The combustion and the amount of heat generated will be the same, but this same heat is needed in completely different ways. What to do? What kind of efficiency can we talk about when at above-zero temperatures you have to open the windows. There can be no talk of any comfort.
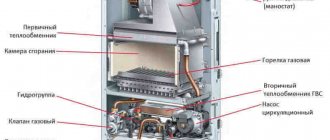
The installation diagram of a solid fuel boiler with a heat accumulator is an ideal solution for a private home when you want both comfort and savings. With this arrangement, you heat a solid fuel boiler, heat water in a heat accumulator and get as much heat as you need. In this case, the boiler will operate at maximum power and with the highest efficiency. The amount of heat that wood or coal provides is the amount you will store.
Second option. Installation of a heat accumulator with an electric boiler. This solution will work if you have a two-tariff electricity meter. We store heat at night rates and use it both day and night. If you decide to use such a heating system, it is better to look for a heat accumulator with the ability to install an electric heater directly into the barrel. An electric heater is cheaper than an electric boiler, and no material is required for piping the boiler. Minus the work of installing an electric boiler. Can you imagine how much you can save?
The third option is when there is a solar collector. All excess heat can be dumped into a heat accumulator. In the mid-season, you get great savings.
Initial pressure in the tank.
Рb
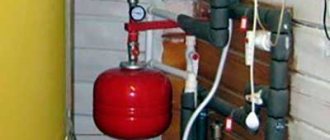
– initial pressure of the gas cushion in the tank, bar. Tank manufacturers recommend setting it 0.5 bar below the pump start pressure (Pmin). This is correspondingly 0.5 bar less than the relay response pressure. We need 1.5 bar. Typically the factory pressure is 1.5 bar, so check the actual value before installing into the system. For example, a car pump. Fig.4. Nipple on expansion tank.
q
— design flow rate, l/sec.
Use this table to calculate q. Insert the l/min values into the Excel file, and it will calculate the required tank volume. It is also available in the Excel file. Fig.5. Water consumption table. Table source: https://ibuildrussia.ru/kak-vybrat-elektricheskij-protochnyj-vodonagrevatel
Types
The storage tank can be a container with sufficient internal volume, made of a material that is resistant to corrosion and safe for storing drinking water. The following materials are used:
- polyvinyl chloride;
- cross-linked high or low pressure polyethylene;
- polypropylene;
- stainless steel;
- steel coated with waterproof varnishes and ceramic coatings.
Plastic Tanks
Although galvanized steel is corrosion-resistant and waterproof, over time the protective layer of zinc can wear thin, especially at joints and welds.
By design there are:
- open containers that have a neck with or without a lid, but with sealed walls and bottom;
- closed, completely sealed membrane-type containers.
In the first case, everything is simple: the entire internal volume is filled with water and, if necessary, drained through a pipe fixed at the lowest point.
In the case of membrane storage tanks, the useful volume is at least a third less than the volume of the entire structure. Part of the volume is allocated under the air chamber, separated from the water using a durable elastic membrane. As the container fills with water, the membrane presses on the air chamber, creating excess pressure. When it is necessary to get water back, the valve opens and it enters the water supply system under the influence of accumulated pressure.
Tank monitoring and maintenance.
If the pump starts and stops noticeably more often, it means that air has leaked from the tank, or the membrane has leaked. Unscrew the cap of the tank nipple and press on the stem. If water comes out, then the membrane is torn and the tank needs to be replaced. If nothing works, or air hisses, then you need to pump it up: • disconnect the pump from the power supply. • open any cold water tap and wait until the flow dries up. It's a shame to waste hot water. • pump up the pressure, for example with a car pump, • close the clan. • turn on the pump power.
Why is it needed and how to use it
If for some reason the pump in the autonomous water supply system does not work, or there is no pressure in the centralized city water supply, then it can be supplied to the sink or toilet cistern from a pre-filled reserve container. Simply put, it is better to always have a supply of drinking water in the house and use it in emergency situations.
For the convenience of using a reserve supply of water, the storage tank must be integrated into the water supply so that it is either automatically used in the absence of external pressure, or it can be activated by simply turning the valve.
There are many variations on how to install and connect a storage tank, depending on the type of water source, the possible location of the tank and even the layout of the house. It is enough to choose the appropriate option and decide on the type of storage tank itself.
General connection rules
A water tank is installed on a prepared site: a concrete base tied to the foundation, or a reinforced metal frame made of profiled pipe. The design must withstand one and a half weight of the tank and the water in it when completely filled.
The inlet pipe can be of any suitable diameter, water is supplied under pressure. The outlet pipe and pipe to the water supply system are chosen with a diameter one and a half to two times larger than the cross-section of the main line. The optimal size is 32 mm.
Even the best quality insulation only slows down the decrease in temperature in the tank. To prevent water from freezing when installing the tank in an unheated attic or on the roof, you should use any suitable heating system for the pipes and the tank itself.
How to make a heat accumulator for heating boilers with your own hands?
The simplest assembly scheme is based on a steel barrel; if you don’t have one, you can independently weld a container of a similar shape from stainless steel sheets (the thickness of the material must exceed 2 mm). If an open heating system is used, a rectangular steel tank can serve as a buffer tank; for closed variations, this option is not suitable due to the high risk of pressure surges.
Heat accumulator for heating boilers - diagram
Craftsmen use a copper tube as a heating element: a piece 8-15 m long and 2-3 cm in diameter is twisted into a spiral and placed in a tank. Heat will be collected in the upper part of the tank: an outlet pipe is installed in this area through which hot water will be discharged, and the same element will be provided below for cold water to flow in. To control the flow of medium into the accumulation zone, taps are installed on the outlets.
The tank is checked for leaks, if all the seams are made qualitatively, they begin to form the insulating layer. The surface of the tank is cleaned, degreased, primed, and covered with heat-resistant powder paint (here it acts as protection against corrosion).
Next, the workpiece is wrapped in rolled basalt wool, securing it with tape or cord. It is also advisable to wrap the tank with foil film or sheet metal. Polystyrene foam and expanded polystyrene can become an object of interest for rodents, so you should not use them as insulation.
In the new layers, gaps are formed for the outlet pipes, and the container is connected to the heating system. The buffer tank is equipped with a thermometer, an explosion valve and pressure sensors that allow you to control the degree of heating of the medium.
Briefly about the main thing
The storage tank ensures constant water supply in a private home in the event of a planned or sudden shutdown of the central water supply or breakdown of the autonomous system. It eliminates the problems of water supply failure associated with a number of the following reasons - low well productivity, equipment breakdown, siltation of the source, power outage, etc. In addition, it reduces the load on equipment and pipes and extends their service life.
A standard water tank consists of the following elements:
- Cases.
- Inlet, outlet and drain tubes.
- Float mechanism.
- Filter.
- Luke.
- Drainage pipe.
- Diffuser.
- Ventilation.
The tank is classified according to several criteria - shape, design, material, volume, purpose, installation method. When choosing it, volume and material are first taken into account. Installation is possible both in an autonomous system and in conjunction with a centralized water supply. In each case there are several installation methods.
Design
Storage tanks for water supply are made of food-grade stainless steel (steel grade - 12Х18Н10Т) or food-grade plastic.
The material must be of high quality, otherwise unwanted chemical compounds will get into the water, which is harmful to the health of people consuming this water.
Design Features:
- A float valve of the kind used in toilet tanks is installed on the inlet pipe. If water is pumped into the tank from your own well or well, a float switch for the pump is installed instead of a tap.
- In case of failure of the float mechanism, an overflow pipe connected to the sewer is cut below the inlet.
- It is also necessary to install a filter at the entrance. There are several varieties: mesh (mud collectors), cyclones and centrifugal filter pumps. The first group is used for relatively clean water, the other two – for highly polluted water. A strainer should also be installed on the outlet pipe. It is better if it is located at the entrance of the main pipe into the house immediately before the wiring.
- A level is inserted into a tank with opaque walls. It will help determine whether there is enough water, for example, for a washing machine.
- It is necessary to ensure that sediment can be removed. Underground containers, as already mentioned, are cleaned through a hatch located on top. Tanks intended for installation at the top are equipped with a drainage pipe that cuts into the very bottom.
- Filling the tank should be done through a diffuser - a shower head or garden watering can. This will prevent water from mixing with the bottom layer containing sediment.
- A ventilation pipe (blowhole) cuts into the container from above. It should be curved so that the inlet is directed downward. A mesh should be installed at the entrance to the ventilation pipe to prevent debris and insects from entering the tank.
The ventilation pipe must have a sufficiently large diameter. It is also necessary to ensure that its filter is not clogged with all kinds of debris, for example, poplar fluff. If you drain a tank without air, atmospheric pressure can flatten it like a tin can.
Installation of water supply
The installation of the water supply network is carried out in stages.
If water is extracted from a well, a pump is installed on it.
Its type depends on the depth of the source:
- up to 8 m – surface pump;
- from 8 to 20 m – surface pump with a remote ejector;
- over 20 m – submersible pump.
The suction line of the surface pump must be equipped with a check valve. If a submersible pump is used, a check valve is installed on the pipeline leading to the house.
Storage circuit with pumping station and hydraulic accumulators
In automatic mode, the pump is turned on and off by coordinated signals of three elements:
- level sensor installed in the well;
- dry running protection relay;
- float switch installed in the storage tank.
Using a flexible reinforced hose with a diameter of 1" the pump is connected to a polyethylene pipeline (outer diameter - 32 mm) laid to the storage tank.
If the tank has a large volume and is installed on an interfloor ceiling, a flooring of thick boards should be laid under it, which will distribute the weight load over a large surface.
Water supply to the house from a well with a storage tank
Installation of the float valve is carried out in the following order:
- A washer is put on the valve shank, after which it is inserted into the inlet hole.
- Then, from the inside, they put on the shank: a stiffening plate, a second washer and a fixing nut.
- Now, from the outside, you need to screw the adapter to the shank, to which the supply pipeline will be connected.
- The float switch for the pump is installed in the same way.
When installed at the top, the tank remains connected to the sewerage system and water supply network. If the tank is located underground, it is necessary to install and connect a pumping station with a membrane accumulator. Like a well pump, the station must have dry-running protection, which will turn it off as soon as the tank is empty.
Capacity volume and material
When choosing a drive, in addition to other technical nuances, you first need to determine what material its body should be made of and what its usable volume should be for everyday needs.
A plastic container can be installed outdoors without additional protection Source sovet-ingenera.com
Material
Most often, the materials used in the manufacture of the tank body are:
- Polyvinyl chloride.
- Polypropylene.
- Cross-linked polyethylene.
- Stainless steel.
- Steel coated with a layer of waterproof coating - varnish, ceramics.
- Galvanization.
To equip drinking water supply and related household needs (washing dishes, showering, etc.) for a private home, food-grade plastic containers are most often chosen. Its main advantages over metal analogues are inertness, safety (does not emit harmful components), corrosion resistance, durability, light weight - which is convenient for transportation, installation and maintenance.
Buy or make it yourself?
This question concerns, first of all, risks, not costs. Heating equipment is a balanced system, and the introduction of a component that has not passed factory tests, the performance parameters of which are only indicative, can cause a breakdown of the entire circuit. The savings resulting from self-assembly are offset by the potential costs of debugging and repairing expensive units.
Thermal accumulator U200 Prometheus - a budget solution for small systems
A professional calculation of a heat accumulator will allow you to purchase a model that optimally meets the operating conditions and the needs of residents. In this case, one should expect a reduction in energy costs, which is more significant compared to the cost of the device.
Video description
Video instructions on how to make pressurized water supply to your home and property through a membrane storage tank:
- Lower.
The container is installed on the floor or on the ground. Filled under pump pressure. Operation of the system also requires constant operation of the equipment. Which makes the water supply completely energy dependent.
This option is ideal for low well productivity. First, the tank is pumped at a speed limited by the parameters of the source, and then it is consumed according to consumer needs.
- Membrane accumulator.
This is another way to supply water from the lower location of the storage tank when the system is not equipped with a pump. Initially, water is drawn into the container from the well, and then enters and is distributed through the internal water supply under the influence of pressure generated by the membrane accumulator.
On a note! When placing a tank in an attic, tower, basement or any other unheated place, insulation and a suitable heating system are required - both inlet and outlet pipes and the body.