Expansion tank for heating of a closed type, installation of pressure , principles of operation, malfunctions and methods for eliminating them. Expansion tanks ensure safe and reliable operation of circuits with hot and liquid media and are mandatory elements for closed water heating systems and auxiliary elements for domestic hot water. The choice of a specific model depends on the circulation volume, pressure and other parameters of the system and is justified by calculation; the selection and installation rules are taken into account in advance.
Rules for choosing a material to solve a problem
When the cause of the pipe damage has been established, it is necessary to look for acceptable repair methods. There are several of them. Only most are suitable for low water pressure in the water supply circuit or heating system.
If you don’t have such a device at hand, then any piece of rubber (for example, from a bicycle inner tube) and wire or something similar will do .
But other methods of eliminating leaks when it comes to heating or hot water supply systems are unlikely to work. Thus, often used cold welding and special sealants are not relevant for wet surfaces.
Other instantly hardening composites (epoxy resin, dichloroethane) are also excluded, since they can be used on dry and disconnected water supply routes.
A minor leak in the pipeline can be repaired on your own . But this will only be a temporary measure. At the end of the heating season, it is recommended to carry out major repairs so that the system no longer fails.
Expansion tank problems
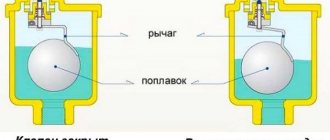
One of the reasons for the drop in pressure may be a breakdown of the expansion tank. There are two reasons for this: wear of the membrane and damage to the chamber. It is not very difficult to detect a breakdown in the tank: you need to press on the nipple. If air comes out and a characteristic sound is made, then the tank is in good condition. If water comes out, it is necessary to replace the membrane or the expansion tank itself.
You should not try to glue the membrane, because in the process of constant compression and stretching, the hole will appear again. There is a boiler with a built-in tank. In this case, there is no need to look for components for boiler equipment; it is easier to install an external tank and install a plug on the old one.
We recommend: How to repair heating pipes?
Hot and cold H2O - is there a difference in the way the gap is sealed?
It's all about the difference in coolant temperature. It is this factor that is decisive when choosing a material.
With hot pressure, minor damage can heal without outside intervention . Larger gaps can be easily repaired with regular salt and a bandage.
But when the water cools, the flow will resume. It will not be possible to fix a leak in a cold water pipe with salt and a bandage. It is easier to repair a failed hot water pipe in the summer when it is turned off. Then you don’t have to control the temperature in the room while fixing the leak.
Membrane tanks
Preface.
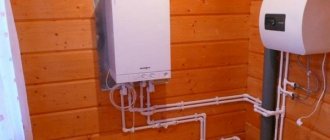
Modern engineering solutions make life easier for consumers in many ways. One such technical solution is membrane tanks. A membrane tank is a device for creating differential pressure. In heating systems, with the help of membrane tanks, it has become possible to install closed piping systems. This made it possible to get away from bulky containers in open heating systems and the need to control the liquid level in these containers. In water supply systems, the expansion tank made it possible to create compact reservoirs for water reserves, as opposed to bulky tanks and water towers.
Differences between an expansion tank and a hydraulic accumulator.
Although we have two different names, in meaning, these are exactly the same devices. The only difference is the color and quality of the rubber used. Red tanks are expansion tanks, they are for heating systems, i.e. designed for hot water. Hydraulic accumulators are blue, used for cold water.
Selection tips and experience.
The rubber membrane, which is located inside the expansion tank or accumulator, is essentially a consumable material. Of course, everything depends on the quality of the rubber used in them, but the material itself is not very durable, and judging by the experience of our installation department, specimens older than 12 years are rarely found. Based on our experience in servicing such equipment, we can point out that the REFLEX brand has longevity, but with one “but”! Modern copies are definitely inferior in quality to those purchased 10 years ago. Among the brands we service, we definitely do not recommend* Gilex and Wester membranes. Because they had to be changed a lot. The most common causes of failure:
Membrane rupture
Flange corrosion
· Container corrosion
Nipple tightness
Of course, any of these problems can be completely solved, but only if you have original consumables. It is unlikely that a plumber will be involved in the selection and search for similar consumables, but most likely will offer to replace faulty equipment. That is why we recommend buying those manufacturers whose consumables are available for free sale. The SANCOM online store recommends installing expansion tanks under the Tim brand, manufactured in China. This choice makes it possible to purchase an additional flange or membrane in case of failure.
How to identify a failed expansion tank.
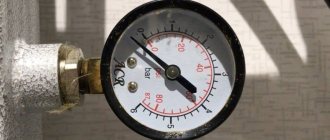
In a properly installed heating system, the set pressure should not have large differences. If you notice that the set pressure rises sharply when you turn on the boiler, most likely the expansion tank has failed. First, check the air injection nipple. If, when pressing on the nipple valve, liquid flows out of it, most likely this is an internal rupture of the membrane, since there should be no water in the air space. The membrane will have to be replaced with a similar one. If, when you press the nipple, there is neither water nor air, you should check that the tank is full of water. If the tank is screwed to a flexible connection, you can gently rock it; if the connection to the pipeline is rigid, then knock on the walls of the tank. A dull sound means the tank is full, a loud sound means the tank is empty. If the tank is full, it means it is not inflated with air. The reason for the lack of air in the tank is a leaking nipple, or a lack of tightness (the flange is poorly screwed on or corrosion). In this case, we recommend that you visually inspect the tank for corrosion, then pump the tank through the nipple, with a compressor or a conventional pump, check the nipple and doubtful places and observe the pressure. Please note that the membrane tank should be pumped with air when the pressure in the pipeline system has been reduced to zero! If there is through-corrosion on the tank, unfortunately the tank will have to be replaced. If the nipple is faulty, you can replace it with another one, a regular car one will do. If the tank is empty and the heating system is operating under pressure, it is likely that the air pressure in the expansion tank is greater than the water pressure in the pipeline. Adjust the pressure in the membrane tank if necessary.
How to identify a failed hydraulic accumulator?
If you have a country house and a pumping station or surface pump is installed in the house, then it will be easiest to identify a failed tank. The hydraulic accumulator provides a certain supply of water in your pipeline, therefore the pump only has to work when the supply of this water runs out. If every time you open a tap, the pump turns on and turns off when you close the tap, then we can say with confidence that the membrane tank is not working properly. It is more difficult to determine a tank that has failed while the pump is running in a well or borehole. However, the easiest and most accurate way is to ask an assistant and listen to the pump work. If there is no assistant nearby, then a failed hydraulic accumulator can be determined by the pressure. Every time you open the tap, the pressure stops for a second, and then suddenly bursts out with a powerful jet. But this example may also mean incorrectly configured automation and tank pressure. You can use another way to check... Turn off the power to the pump and check if there is water in the pipeline. If there is water, then there is a supply of water in the tank. If there are several tanks, then this method will only show the failure of all tanks at once. Whenever there is doubt about the functionality of the membrane tank, we recommend checking the nipple of the membrane tank. There must be air in it. If liquid leaks through the nipple, the membrane is most likely torn and needs to be replaced. If there is no water or air, check that the tank is full of water. If the tank is filled to capacity with water, then most likely the air has been bled from the nipple; try draining the system and pumping up the tank through the nipple using a regular car pump or compressor. If the tank is empty and air with good pressure flows through the nipple. This means the air pressure is higher than the pressure in the water line.
Installation of a membrane tank.
The membrane tank is very easy to install and connect to the system. It has a flange connection, typically either a 3/4" or 1" male thread. The expansion tank can be connected to any section of the pipeline. To tap into the system, you can use a tee or an outlet on the manifold. You can connect using any water pipes, but it is most convenient to connect using a special angled flexible connection. There is another option for installing small expansion tanks, this is installation on a special bracket drilled to the wall, or on a wall-mounted safety group. But this option is suitable for tanks up to 36 liters. The installation of this device can be easily accomplished by the owner of the farm; it does not require great skills. The only thing that needs to be checked and adjusted after installation is the factory inflated pressure, and if the values are incorrect, adjust it. The pressure in the tank is calculated based on the pressure drops in the system, according to the settings of the pump automation. In order for the tank to fill, you need to pump water pressure into it greater than the pumped air pressure. For plumbing systems, air pressure below 1.5 Bar does not make much sense, since this is the pressure that will squeeze water out of the tank. The tank will let water in when the water pressure exceeds the air pressure. Next, the tank will begin to empty when the water pressure becomes less than the air pressure. And the tank will be emptied under the air pressure that was pumped into it. Therefore, pump up the air pressure in the tank, taking into account the pressure that will squeeze out the water when the pump is turned off. Pumping up the air pressure in the tank should only be done on an empty pipeline. Upon completion of work, just in case, check the tightness of the nipple.
Replacement and repair of membrane tank.
Replacing the tank will not be very difficult and the homeowner can easily cope with this task. First of all, it is necessary to drain the entire system, or the area that is closed by the taps provided for this. After the membrane tank is empty, it is necessary to unscrew the nut twisted with the flange and release the tank. Once a new tank is installed, it is necessary to adjust it to the air pressure you need; it is better to do this before starting the system. After you screw the tank on and set the desired pressure, you can do a test run. Make sure that there is no air hissing or leaks when starting up.
In addition to replacing the tank itself, it is also possible to repair it. For example, you can replace a rusted flange or membrane (bulb) inside the tank. Plumbers are reluctant to attend such an event, because such work is dirty, and they cannot charge much for it. Most likely, you will be offered to replace the entire tank, citing the lack of suitable spare parts. Therefore, owners often have to rack their brains with replacing the internals. Replacing the membrane or flange is not difficult. You just need to unscrew the bolts on the flange. However, you need to understand the feasibility of such repairs. For example, if the tank fails quickly or has traces of corrosion, then it is better not to plan such repairs, but, in fact, to replace it with a new tank. If the tank remains like new, and you have a membrane from the manufacturer, then it is better to change it. Before you begin repairs, you must be sure that it is the membrane that has failed. The main factor in membrane rupture is the presence of liquid when pressing the nipple valve. Remember, when the membrane ruptures, water enters the internal cavity of the membrane tank and has contact with the untreated inner surface. Such contact can accelerate internal corrosion of the tank walls, so when replacing the membrane, dry the inside of the tank thoroughly.
Installation, replacement or repair of expansion tank from SANCOM
The installers of the SANCOM online store will perform work on installing any membrane tanks in heating and water supply systems. Vast experience in the installation of plumbing systems allows us to speak with firm confidence as professionals in the service market. Work of any complexity, expansion tanks of any volume, both for heating and water supply, with floor and wall installation. The work is carried out on-site to the customer, when installing equipment, it is possible to travel with the necessary material and equipment. The cost of replacement depends on the distance of the facility from Moscow, the complexity of the working conditions, and the volume of the expansion tank. We carry out repairs of expansion tanks, if necessary consumables are available. For the expansion tanks that we supply and recommend, we carry out repairs under warranty and post-warranty service.
I hope this article will be useful for you!
The author of the article is Alexander Kapustin, the article was prepared for the SANCOM online store on 05/29/2019. This article is the intellectual property of the SANCOM online store and its author. When copying an article and posting it on third-party resources, be sure to indicate the source and author! For questions of cooperation and feedback, please contact us by email, indicating the link to this article.
All the best!
*Personal opinion of the author of the article, based on personal service experience.
How does the pipeline material affect the solution to the problem?
Metal pipes are distinguished by their enviable resistance and durability. Almost their only drawback is their susceptibility to corrosion. This is often what causes a leak in the circuit.
If you need to order high-quality installation of engineering systems (heating, water supply), please contact DESIGN PRESTIGE by phone +7 , and we will install the system at a professional level in accordance with high quality standards.
Less commonly, other pipelines also fail: plastic, polypropylene (mainly in places of threaded or fitting connections).
It is enough to compress the plastic pipe in the problem area, and all manipulations can be carried out under water pressure. The main thing is not to overdo it with the screed, otherwise the plastic will crack, and then you will have to replace the entire pipe.
A polypropylene pipeline can be easily repaired by soldering a separate fragment; a metal-plastic pipeline requires inserts . In the latter case, if the damage is not extensive, wrapping with electrical tape or treating with an adhesive (polyurethane, epoxy) will be sufficient.
Installation stages
Sometimes, in addition to the main tank, it is necessary to install smaller containers. In this case, the displacement will be calculated taking into account all the tanks included in the system.
After choosing a model, you must follow the rules for installation:
- the diameter of the pipes must be the same or larger than the inlet opening of the tank;
- fittings are used dismountable;
- it is necessary to choose the right place so that it is convenient to carry out repair work;
- the metal body is grounded;
- the tank is installed closer to the pump; there should be no other equipment between them that can increase the pressure in the system.
- Installing filters on a pump that will pump water from a well. This is necessary to prevent sand from accumulating in the membrane and erasing it.
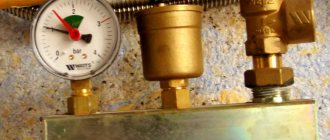
- A five-terminal part is installed to which a pressure gauge, relays and protection sensors will be connected, as well as a shut-off ball valve and a tee.
- The container is mounted on the wall or mounted on legs and screwed with anchor bolts.
- A flexible line connects the tank and the five-pin part.
- A pressure gauge and sensors are installed.
It is advisable to provide a means for draining water in case of emergency repairs.
How to solve a problem?
When water circulates under pressure in the pipes, most major repairs cannot be done. Therefore, you have to act in other available ways in order to at least temporarily stop the leak and wait for emergency services.
Using a self-tapping screw
This option is applicable only for minor holes with a diameter of no more than 3-4 mm .
To plug the hole, you need a galvanized self-tapping screw, which is additionally equipped with a press washer.
It is simply screwed into the hole and secured . As a result, the water is blocked. After such repairs, the pipe can last up to 3 years, but it is better to replace the burst fragment as soon as possible. In addition, a self-tapping screw inside the pipeline leads to clogging of the system.
Cementing
Cast iron or steel pipes can be easily patched using cementation.
The sequence of actions is as follows:
- Using a special hard metal brush, carefully remove the layer of rust in the area of the fistula. The metal that is being painted is also removed, even if this leads to an enlargement of the hole.
- Cut the bandage to a certain length and dip it in the cement solution.
- They wrap it around the crack in several passes to form a kind of cocoon.
- The top is coated with cement to secure the result.
Clamp
A clamp is a fairly simple design consisting of a metal ring, a rubber gasket and a tightening bolt.
This device is sold in stores, but in emergency situations you can quickly make it yourself. You will need a piece of plastic rubber, scissors and a metal clamp corresponding to the diameter of the pipe.
Further actions:
- clean the damaged area from rust;
- put on a clamp, and slip a rubber gasket under it;
- The coupling is pressed tightly.
If the pipe is very rusty, a clamp will be almost the only way to disguise the leak. This is because welding cannot be used here.
Bandage and table salt
Salt is ideal for sealing leaks in hot water pipes under pressure. Step-by-step instruction:
- Distribute digestive salt over the bandage in as large a layer as possible.
- Wrap it around the hole, preferably more tightly.
Sealant
Using sealant (also called “cold welding”) to eliminate leaks in existing pipelines is not productive, since there is no guarantee that the problem will be solved 100%.
This is due to the fact that such compositions are designed to work with dry surfaces , and condensate is present on pressure pipes.
But if there is a small crack, you can try to seal it with a heat-resistant sealant. Outwardly, it is similar to plasticine.
Break off a small piece, carefully crumple it with your fingers and insert it into the hole, followed by smearing it to the sides . Large holes cannot be masked this way; first you will need to insert a wooden chip.
Here you will need fiberglass fabric and BF-2 glue.
Step by step steps:
- the problem area is thoroughly cleaned of rusty particles and degreased with aviation gasoline (acetone is an alternative);
- wait 15 minutes until the surface dries;
- cut a tape from the fiberglass of such a width that it completely covers the area of the leak;
- an adhesive composition is applied along the edges, and epoxy resin is applied to the center;
- apply to the crack, press with your hand and wrap;
- fixed with copper wire.
Wire or harness
A method somewhat reminiscent of the one with a clamp . Only instead of it they take a medical tourniquet and any metal wire. Rubber is tightly wrapped around the damaged pipe fragment and tightened with wire.
Wooden chop
It is necessary to quickly plan a wedge-shaped peg of a suitable diameter from any piece of wood. Then they hammer it into the hole with a hammer.
Self-installation
Before moving on to the issue of installation, let us clarify one point: the type of tank. They are horizontal and vertical. And this is important to consider when installing the structure. Otherwise, any membrane tank is installed according to a similar principle.
Installing a water tank
If you want to do this yourself, then you should have at least a little experience working with water pipes. In general, the installation process is quite simple, the main thing is to adhere to a few rules:
- The tank must be installed taking into account the need for access to it for preventive/repair measures.
- The tank must be connected to the pipeline using special quick-release connectors so that in certain situations it is possible to disconnect the unit from the network.
- The diameter of the pipeline must be no smaller than the cross-section of the inlet pipe.
- The expansion tank housing must be grounded to avoid electrical corrosion.
- There should be no equipment between the tank and the pump that could increase hydraulic resistance.
Our article is coming to an end. Its purpose was to provide basic information about expansion tanks, including selection criteria and rules for quality installation. If you are confident enough in your abilities, go for it, but if not, then we still advise you to entrust the installation work to a professional.
How to stop a leak in a hidden pipe?
You won’t be particularly happy when a pipe hidden under a building structure starts leaking. Especially if the renovation has only recently been done. Since it is not always possible to quickly reach the source, you need to know how to temporarily stop the flow.
Here are a few techniques that are suitable for a water supply system in a private home:
In just a couple of hours, mustard will seal microcracks from inside the pipeline. When the leak is fixed, the circuit should be flushed.
- The heating system is temporarily filled with industrial sealant. It will settle on the internal surfaces of the pipeline and thereby stop water from seeping through microscopic gaps. After a major overhaul, the coolant is replaced with a new one.
Large holes cannot be sealed this way. Then they turn off the system, drain the water from the riser and begin straightening. Namely, it will be necessary to dismantle the structure and replace problematic spans. If you live in an apartment building, neighbors are warned about the upcoming event.
Preventing the problem from recurring
It is easier to prevent problems in the heating circuit than to suddenly look for ways to eliminate them. So before the start of the heating season, communications are checked by testing, especially focusing on dangerous areas.
These include:
- level spans;
- threaded connections and welds;
- zone of joining sections at radiators;
- places of implantation of heating equipment;
- near fittings;
- hard-to-reach areas.
First, everything is checked by eye, then with the circuit running.
Additional Information
The expander helps to absorb hydraulic shocks created by air pockets and sudden closure of the valve. Tanks can perform this function if they are placed on the return flow of the coolant directly in front of the boiler. Do not assume that the pressure set at the factory will be ideal for practical needs. It is reconfigured using a spool valve.
Important: any pressure gauge, when measuring pressure in the expander, registers only an excess value; to obtain an absolute figure, add 1 bar.
A pumped tank does not work well, since the air will push the coolant out. If everything is configured correctly, but the fuses continue to periodically discharge water, most likely the problem is in the expander being too small. Therefore, it is worth choosing tanks that hold 10% of the total coolant circulating in the system, or even more. Since the tank does not have fittings for pressure gauges, they must be connected to the nipple. It is located on the side opposite to the coolant-filling circuit.
Since car and bicycle pressure gauges measure pressure in MPa, you need to compare their readings with the pressure in the heating system (expressed in bar or kgf/sq. cm). One bar is equal to 100 kPa. When using a car meter, it is recommended to wait 10 minutes after turning off the boiler for the circulation to stop. When the tank is built into the boiler itself, it is necessary to shut off not only the shut-off valves, but also the coolant supply and its return. By following these recommendations, you can significantly simplify your life.
To learn how to check the serviceability of the expansion tank, see the following video.
The circulation of coolant in the heating system is ensured not only by pumps, but also by maintaining the required pressure. In the event of low pressure, the movement of liquid in the pipes slows down, for this reason the automation mechanisms are triggered. This leads to a reduction in the operating period of the heating system.