© www.vodogrev.com 2022 Copying site materials is prohibited.
Membranes are an integral part of hydraulic accumulators. Their main purpose is to divide the accumulator into two chambers: water and air. Based on their application, membranes are divided into membranes for water supply accumulators and membranes for heating accumulators. Membranes are replaceable parts of hydraulic accumulators. They are subject to constant stretching and compression, as well as temperature changes. In this regard, membranes must be replaced periodically.
What to look for when choosing a membrane for a hydraulic accumulator or expansion tank:
Before choosing a membrane for a hydraulic accumulator or expansion tank, be sure to make sure that the device can be disassembled and that the membrane can actually be changed. Some manufacturers of hydraulic accumulators and expansion tanks produce devices that do not require replacement of the membrane. They are much cheaper than regular ones. Such tanks have both disadvantages and advantages. On the one hand, this can be regarded as a kind of manufacturer’s guarantee that the membrane will remain unharmed under any circumstances. On the other hand, in practice, such tanks fail with the same frequency as tanks with removable membranes. If a tank with a non-removable membrane breaks down, it cannot be repaired. You will have to buy a new tank, not a new membrane.
Where and how to install the tank
The coolant in individual heating systems can move by gravity, or due to the pressure created by the pump. But in any case, it requires a capacity that will compensate for the expansion. This is not necessary only if the water is heated by a gas boiler, since it has a built-in tank.
Expansion tank inside a gas boiler
A system based on a solid fuel boiler requires the installation of an expansion tank
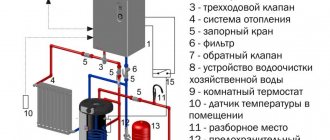
Electric boiler circuit
Prices for popular models of indirect heating heaters
Indirect Heaters
When choosing a location to install the tank, you need to consider the following requirements:
- It must be located in the same room as the boiler.
- Unobstructed access to the tank must be provided.
- It can be installed on the floor or hung on a bracket. In this case, the inlet pipe must be at the bottom, although in some models it is located on the side. In any case, the air chamber should be higher than the water chamber - this way air will not enter the chamber with water and provoke the occurrence of cavitation phenomena.
- If the container is hung on the wall, then the pipeline supplying it must be secured independently so as not to create a load with its weight.
- Only tanks with a small capacity can be attached to the wall, and only when there is confidence in its sufficient load-bearing capacity.
- There must be a gap sufficient between the tank body and the wall to allow a visual inspection.
- The pipe route should approach the connection point in the shortest possible way.
With this arrangement of the tank, air can enter the water
Pipe connection from below is more correct
Option to install the tank on the wall
The best place to install a compensation tank is the return pipeline, between the circulation pump and the boiler. Here the temperature of the water (or other coolant) is minimal, which is a gentle operating mode for the rubber membrane. Although, the tank can also be installed on the supply side. There will be no error in this case - however, the membrane will have to be changed more often.
Where there is no centralized supply of heated water and gas is not supplied, water heating equipment powered by electricity is the only chance for a comfortable home life. How to choose an electric storage water heater for an apartment? In a special article we will consider what their features and differences are, what are the principles of operation, placement and installation.
What types of membranes are there:
- White. The material from which the membrane is made is rubber. Maximum operating pressure is 7 bar. Temperature difference - from 0 C to 50 C.
- Black. The material from which the membrane is made is EPDM rubber. Maximum operating pressure is 8 bar. Temperature difference - from -10 C to 99 C.
Membranes for hydraulic accumulators
A hydraulic accumulator is a device for maintaining constant hydraulic pressure when using water and reserving a certain amount of water in the water supply system. It is assumed that the water temperature in the water supply system will not exceed 50 degrees Celsius. Accordingly, both white (rubber) membranes and black membranes (EPDM) are suitable for hydraulic accumulators.
Membranes for expansion tanks
An expansion tank is a device in the heating system that accepts excess coolant at the moment when it expands, thus preventing rupture of the pipeline and taps. Since hot water circulates in the heating system, the requirements for the membrane increase significantly. For the expansion tank, only a black membrane made of EPDM rubber is suitable.
The structure of the tank and its applicability
Why is water volume compensation needed at all? This is due to a physical phenomenon that we all studied in school. The picture below shows how the water level in the flask gradually increases during the heating process. If it has nowhere to move (the vessel is sealed), the increasing pressure will cause the walls to rupture.
Visual process of liquid expansion
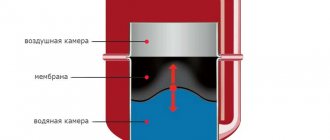
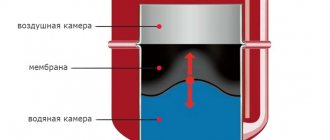
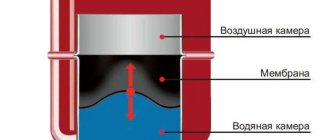
How is the changing volume of liquid compensated in the tank? Everything is very simple: the internal cavity of the tank is divided by a thin elastic partition (membrane), into the lower part of which excess heated water flows from the pipeline. In the upper part there is air or nitrogen, which, in the absence of water, fills the entire tank. When liquid enters, the excess air volume is automatically released through a valve at the end of the container.
The principle – it couldn’t be simpler
In general, in any systems that have ring (closed) circuits, a compensating capacitance is required. However, its volume is not equal to the amount of incoming water, since 2/3 of the tank is always filled with air.
Note! The size of the tank is selected depending on the characteristics of the system, and it itself can be installed not only for heating, but also for hot or cold water supply and work like a regular hydraulic accumulator.
Advantages and features of the expansion tank
The advantages of such a device as an expansion tank include:
- environmental friendliness of the rubber from which the membranes are made;
- Possibility of use for water of any quality;
- the simplest process of pumping and bleeding air;
- lack of evaporation - and, accordingly, loss of coolant;
- simple and quick installation that does not require significant costs.
On a note. The main function of such a tank is to maintain equal pressure between the parts filled with water and air, and to ensure stable pressure throughout the entire system by preventing the occurrence of unnecessary loads.
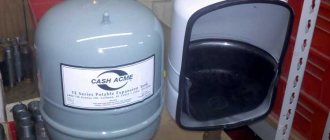
Tanks with a removable membrane, the entrance to the body of which is closed with a flange with six bolts, are very convenient to use. By unscrewing them, you can quickly and easily replace the membrane. But there are also models with a non-removable diaphragm, in which the entrance to the container is rolled. In them, the membrane does not have a pear-shaped configuration, but is a diaphragm separating the cavity of the tank.
By unscrewing the flange, you can easily replace the membrane
Removable membrane configuration
Instead of a removable coupling, it is rolled, it is impossible to disassemble such a tank
Reservoir with non-removable diaphragm
Prices for membrane expansion tanks
Diaphragm expansion tanks
Production and operational nuances
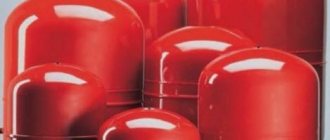
External painting of tanks is carried out on an automatic line by applying powder paint and baking, resulting in a very high-quality and durable coating. As for the color, it is chosen by the manufacturer not so much according to the principle: cold water - heating, but rather to visually highlight a particular series of models.
Flat tanks with small capacity
- Yes, it happens that the tank is intended exclusively for cold water and cannot be used for heating. But most manufacturers make expansion tanks universal, since everything here depends only on the quality of the membrane rubber.
- Another thing is that cold or hot water usually requires a larger tank so that there is always a supply of water in the system. This is not required for heating, so expansion tanks can have a very small displacement (from 5 liters).
- Containers intended for coolant can have a white or gray coating, but more often they are painted red - a color that in the minds of any person is associated with hot.
- All necessary characteristics are indicated by the manufacturer on a nameplate glued to the back of the case. This is the full displacement of the tank, the minimum and maximum permissible pressure.
Tank characteristics on the label - The required amount of air, ensuring the minimum pressure, is pumped at the factory, and in most cases it is sufficient for the normal operation of the average autonomous system. But it must be correlated with the operating pressure, which should be 0.2 atmospheres higher than the minimum.
- That is, in this case it should be set to 1.7 atm. If you need it to be higher - for example: 2.2 atm, then the minimum value must be raised to 2 atm by pumping air.
Air bleed valve
Pumping is carried out using a regular bicycle pump through a drain valve (nipple) - before the container begins to fill with water.
Video - Operating principle of a heating expansion tank
Replacing the removable membrane
Table 1. Diaphragm replacement process
| Steps, photo | A comment |
| Before you start disassembling the tank to replace the bulb, you need to reduce the pressure in it to zero. To do this, you need to bleed the air by removing the protective cap from the valve and pressing the bleeder tongue with your finger. |
| Take an adjustable wrench or ratchet and unscrew the six bolts on the coupling. |
| After unscrewing the last bolt, the coupling can be easily removed. |
| The rubber “bulb” is simply removed from the container... |
| ... and a spare membrane is installed in its place. |
| Having inserted a new membrane into the tank body, you need to carefully distribute it inside with your hand so that there are no folds. Particular attention should be paid to the neck, which should be located clearly at the mouth of the tank and fit tightly to it. |
| Next, proceed in reverse order: attach the flange to the neck... |
| ... screw the bolts crosswise ... |
| ... and pump air to the minimum pressure. |
How to replace the membrane in the tank
- Turn off the power and relieve pressure in the system.
- Unscrew the bolts and remove the flange. If the flange has oxidized, it is necessary to replace it with a new one - a stainless steel flange or a galvanized steel flange.
- We take out the damaged membrane.
- We install a new membrane.
- Install the flange and tighten the bolts
- Pump up the air to 1.4 bar.
- We connect the tank to the water supply system.
- We periodically check the air pressure in the tank so that we do not have to change the membrane again.
Preparation for use
Before starting the heating system, and before filling the tank with water or antifreeze, air is pumped into the expansion tank through the air valve. For this you can use an auto compressor. It is convenient because it has a pressure gauge. Most production tanks are already filled with a working medium in the form of nitrogen or air, but it is still worth comparing the existing pressure with what is indicated in the technical documentation.
In private houses or apartments, expansion tanks are installed with a gas compartment already filled from the factory with a pressure of 1.5 bar. This pressure is quite enough and no additional pumping is required. Manufacturers also indicate in the instructions for the boiler the required initial pressure for recharging the coolant, without which the boiler will not even turn on.
When starting, you need to warm up the system to at least 70 °C. The coolant will begin to expand and release air that needs to be removed. And then record the pressure during expansion with the device. This will help determine the final pressure for the relief valve at the current 70°C.
How to buy a membrane
So, if you want to buy a membrane, you can make a purchase directly through the website, or call by phone in the contacts section. Our manager will accept the order and arrange delivery or help with pickup.
For buyers from Moscow and the Moscow region - membrane delivery throughout the city and the nearest Moscow region. For buyers from other regions of Russia - delivery by any transport company as agreed.
© www.vodogrev.com 2022 Copying site materials is prohibited.
