Organizing proper storage of a car is the key to its long service life and reducing overhead costs for repairs. The temperature in the garage during the cold season should be about +5 °C. Higher values will lead to the formation of condensation and premature corrosion of the metal, while low values will cause difficulties in starting the engine.
As the ground freezes, the floor becomes the main area of heat loss. If it is concrete, the room gets colder many times faster. Insulating the garage floor will help solve the problem. And we will consider in detail how to do this correctly in this material. After studying the information provided below, you will understand the types of insulation, read the step-by-step instructions for carrying out independent work.
Why is garage floor insulation done?
Work on floor insulation increases the financial costs of construction or repair of an operating facility, but nevertheless, these costs are justified, because Floor insulation allows you to achieve the following results:
- The ability to maintain indoor temperature within the specified parameters with minimal heat loss through the floor surface;
- Creating comfortable conditions when repairing various types of equipment and performing other work;
- Maintaining an indoor microclimate that will be optimal for storing equipment, spare parts and other materials.
Many users think about how to make a warm floor in a garage, and depending on the design of the floor, there may be several options for such arrangement.
Recipe for preparing the mixture
Before pouring concrete, you need to prepare a solution. The ingredients used are cement and sand in the following ratio: 1:3, 1:4 or 1:5. It depends on the brand of cement purchased. So, for example, if the cement is M400, then you choose a proportion of 1:3.
However, more and more often, when carrying out this type of work, the choice is made on dry mixes such as M150 (sand concrete). They are made using modern technologies, fiber fiber and plasticizers are added to the recipe, and this allows you to make a smooth and durable screed. Leveling mixtures are used as a face screed.
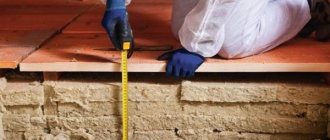
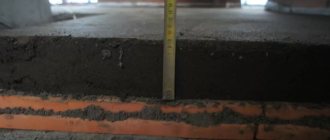
The thickness of the layer is two to three centimeters.
TAKE NOTE: When making the solution yourself, it will be handy to use a concrete mixer or at least a shield with a shovel.
The reinforcement will give the necessary rigidity and strength to the concrete surface.
Insulated floor design options
Insulation of the garage floor, depending on the materials used in its construction, can be done:
- For concrete floors using expanded clay, penoplex and other modern thermal insulation materials.
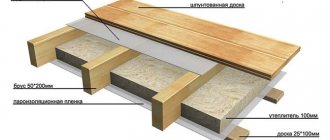
- For wooden floors using expanded clay or mineral wool.
Insulation of a concrete floor in a garage with expanded clay
Expanded clay is a fairly common and inexpensive material for floor insulation.
If expanded clay is used as a material providing insulation, then the sequence of work is as follows:
- In accordance with the perimeter of the garage, a pit is dug, 0.4 - 0.5 meters deep;
- The bottom of the pit is compacted and a drainage layer is laid, using coarse sand.
- Waterproofing (roofing felt or other similar material) is laid on the drainage layer.
It is important to remember that in order to ensure waterproofing of the floor, it is necessary to glue the strips of roofing material together and the places where it adjoins the elements of the foundation or walls!
- To create the plane of the installed floor, according to its required level, beacons are set, in accordance with which the insulation is backfilled.
- Expanded clay is leveled, its top layer is spilled with a liquid solution of sand and cement.
- A metal mesh is laid and secured.
- Concrete is poured in accordance with the required marks of the installed floor.
Advice from an expert: after pouring concrete, it is necessary to periodically wet it until it hardens completely, this will prevent the formation of cracks on the floor surface!
Insulation of a concrete floor with penoplex
Penoplex is a building material that has a gas-filled structure and is made from polystyrene.
Penoplex - a highly effective thermal insulator for floors
When using this material, insulation of a concrete floor in a garage is carried out as follows:
- The base is prepared, for this purpose the top layer of soil is removed to a depth of 5.0 - 10.0 cm, after which the prepared area is compacted.
- The beacons are set to the required floor level height.
- A rough screed up to 5.0 - 7.0 cm thick is poured onto the prepared base with cement mortar and time is given for it to harden.
- After the screed has hardened, waterproofing is laid over its surface. Roofing felt is used as this waterproofing layer. The joints of the sheets and the junctions with the garage foundation (walls) are glued.
- Penoplex is laid over a layer of roofing material. The sheets are glued together with special glue or foam.
- Another layer of waterproofing is laid. In this case, polyethylene is used, glued with tape.
- A reinforced mesh is placed on top of the second layer of waterproofing, which is attached to the load-bearing building structures.
- A concrete floor is poured along previously installed beacons.
Insulation of a wooden floor with expanded clay
Due to the fact that expanded clay has a number of advantages and is a relatively inexpensive building material, it is often used for insulating garages when the floors are made of wood. In this case, the work is carried out similarly to the option with a concrete floor, but there are a number of differences that affect the process of work.
Expanded clay is poured into the space between wooden joists
Floor insulation is performed in the following sequence:
- A pit is dug, and its depth must correspond to the sum of the thickness of the rough screed, the joists on which the floor boards are laid and the thickness of these boards.
- The base of the pit is compacted and preparation (rough screed) is poured over its area.
- A layer of waterproofing is laid. For this, roofing felt is used, the joints of the sheets and the junctions with the walls and foundation are glued.
- Logs are laid over the waterproofing layer.
- Insulation is poured between the joists and aligned with the top mark of the joists.
- A wooden floor is laid.
Insulation of a wooden floor with mineral wool
Another material that can be used to insulate a wooden floor is mineral wool.
Mineral wool is less popular for floor insulation, but effective
This building material has the ability to absorb moisture, which can adversely affect the condition of the flooring.
It is very important to pay attention to the tightness of the waterproofing layers, ensuring that moisture cannot penetrate into the thermal insulation layer!
In this case, the work is performed as follows:
- The base is prepared, the soil is leveled and compacted.
- The floor level is marked in relation to the building structures.
- The concrete is prepared (rough screed).
- Waterproofing made of roofing felt or similar material is laid over the rough screed layer.
- The joints of roofing felt sheets and the junction points are sealed.
- The logs are being laid. The pitch of laying the logs must correspond to the width of the sheet or roll of mineral wool.
- Mineral wool is placed between the laid logs, and the joints between the sheets are sealed with tape or adhesive tape.
- A second layer of waterproofing is laid, for this purpose polyethylene is used, the parts of which are also connected to each other using adhesive tape or adhesive tape.
- A wooden floor is laid along the previously installed joists.
Implementation of waterproofing
To prevent water from approaching the concrete slab due to capillary rise, it is necessary to lay a special moisture-proof material.
Typically used as a waterproofing agent:
- Tol;
- Glass rubber;
- Folgoizol;
- Polyethylene film (250-300 microns);
- Hydroisol.
Regardless of the type of material you choose, it must be overlapped.
The required overlap is ten to fifteen centimeters. PolaRemont.ru also advises taping the joints with PVC tape or double-sided construction tape.
Some useful tips:
- Waterproofing is laid in an even layer over the surface of the sand layer;
- Try not to allow any creases;
- The canvases should “climb” onto the wall and remain at the height of the future floor;
- The waterproofing material is carefully folded in the corners. Under no circumstances should you cut it.
Why are overlaps needed? They provide the waterproofing agent with a decoupling between the walls and the poured concrete monolith, and will also create the necessary thermal compensation gap.
The sand is spilled with water - this way it will be evenly distributed and settled
Advantages and disadvantages of various materials used for floor insulation
Various materials that can be used to insulate a garage floor have their own inherent advantages and disadvantages, which determine the possibility and economic feasibility of their use.
Let's summarize the advantages and disadvantages of building materials in a table.
| dignity | flaws |
| Expanded clay | |
|
|
| Penoplex | |
|
|
| Mineral wool | |
|
|
Gaps and screed slope
When installing a concrete floor, you should never forget about such an important condition as the slope. Only two percent is acceptable, i.e. two centimeters per square meter. The slope of the screed should lead towards the drain grate or gate.
Compensation gaps should not be neglected either. They are needed near internal protruding parts (pipes, pillars, ledges, etc.) and all walls. This condition is mandatory when the garage area does not exceed fifty square meters. It is most convenient to leave gaps while screeding. To work, you need to stock up on a strip of polystyrene foam (half a centimeter thick), expansion tape or a plastic profile made of the same material.
How to insulate a garage floor if you have a cellar
Often in the garage, in addition to the fact that the vehicle is parked there, there is also a cellar in which vegetables and various preparations for the winter are stored. In this case, floor insulation work has some differences from those previously discussed.
The process of floor insulation itself, depending on the materials used, will be similar to the work options discussed above. The difference is that in order to achieve the required microclimate inside the garage, you will need to insulate and waterproof the walls and floor of the cellar itself.
Important: when constructing a cellar in the form of a caisson, no additional work is required!
Work on insulating the cellar is carried out during its construction. The materials used to perform this work may be the same as those used to insulate the garage floor. Particular attention is paid to waterproofing the walls of such premises and the junctions of various building elements.
The ceiling of the cellar is the floor of the garage, so the strength of this structure determines the service life and technical characteristics of the entire room. The most complex element of this design is the entrance to the cellar, which must also be thermally insulated and no cold bridges should form on its elements.
Useful tips
To insulate your garage floors as efficiently as possible, there are some important details you need to pay attention to. Very often, garage cooperatives build premises equipped with inspection pits. In this case, it is not enough to simply insulate the floor; you must also take care of an open source of cold.
The inspection hole is rarely used for its intended purpose. To minimize heat loss, garage owners make plugs and insulate them with available materials. If the thermal insulation of the floor and the pit is different, there is a high probability of additional condensation in places where there is a temperature difference.
Important! The thickness of the insulation of the inspection hole plug must be the same as the thickness of the material used in the concrete screed.
If there is a basement in the garage, it is imperative to additionally insulate the partition between it and the main room. In order not to reduce the height of the ceilings, you can insulate the partition from the bottom side. Sheets of expanded polystyrene or other insulation are attached to the basement ceiling and secured with boards or metal profiles.
Eliminating cracks
To insulate an existing garage floor with your own hands, you need to eliminate the cracks in the floor. There are two options: disassemble the surface and lay insulation underneath, or eliminate the gaps manually by pushing various insulating materials into the gaps with a screwdriver (or other convenient tool).
The modern building materials market offers the use of polyurethane foam to insulate hard-to-reach and narrow areas. Liquid foam expands very quickly, filling all voids with its volume. After hardening, the excess part is very easily cut off with a mounting knife. One cylinder will be enough to seal cracks in a floor area of up to 20 m2.
Choice of insulation
Popular floor insulation options:
- Expanded clay is a popular bulk heat-insulating material with moisture- and fire-resistant properties;
- Affordable and easy to use foam boards with a long service life;
- Expanded polystyrene, characterized by excellent moisture resistance and thermal conductivity;
- Mineral wool in the form of slabs is suitable for insulating wooden floors. Requires vapor barrier and ventilation;
- Granulated slag, which is a by-product of iron smelting. Its advantages are thermal insulation properties. The disadvantage is toxic combustion products. In order for them to weather, you need to keep the material in the fresh air for about two years.
Overview of the thermal insulation materials market
Before moving on to the process of insulating a garage structure, let’s talk about insulation materials. About those that are used today for this purpose. There is a fairly large layer of building materials of this type that builders use today. There are traditional materials here, and others that have appeared recently, but have already gained popularity.
Mineral wool
This insulation has been used in construction for a long time. At the very beginning of its appearance, it was a roll-type material. Today it is still produced in this design, but the modern form of mineral wool is slabs. They are called mineral wool slabs.
Mineral wool boards are a popular insulation materialSource 2gis.kz
The only drawback of mineral wool is its hygroscopicity. That is, this material absorbs moisture well, while losing its thermal characteristics. To prevent this from happening, the heat-insulating layer is covered with waterproofing films on both sides. Today, manufacturers offer moisture-resistant mineral wool slabs, in which hygroscopicity is reduced to the maximum. This makes it possible to refuse waterproofing.
So for mineral wool this characteristic is 0.035-0.04 W/m K.
Expanded polystyrene boards
Many people call this material foam plastic, which is fundamentally wrong, although both materials are included in the group of foamed plastics made from polystyrene. It’s just polystyrene foam – a material originally created for packaging. It has low density and low thermal insulation qualities. The same cannot be said about expanded polystyrene, which was originally developed as a thermal insulation material.
Moisture-resistant polystyrene foam boardsSource www.stroyportal.ru
This foam insulation has serious advantages:
- thermal conductivity – 0.028-0.034 W/m K;
- the extruded version does not absorb moisture;
- passes air through itself;
- strength – 1 kg/cm²;
- inert to many chemicals;
- mold and fungi do not live on the surface of the insulation;
- it is a good sound insulator;
- service life – 30 years.
But polystyrene foam boards also have their drawbacks. And the most important of them is fire hazard. The insulation burns well and maintains combustion, while emitting acrid smoke. Today, manufacturers are trying to change the situation with this indicator. Fire-resistant boards have already appeared on the market, but there are not many of them.
Expanded polystyrene boards brand PSB-S-35Source karkasdomproekt.ruPolyurethane foam
This is a two-component material, the ingredients of which are mixed before application. In terms of its physical state, it is a foamed semi-liquid mass that hardens in air, forming a hydrophobic layer on the insulated surface. That is, not afraid of moisture.
This is a non-flammable insulation. Service life – 50 years. Thermal conductivity – 0.019-0.028 W/m K. moisture absorption is minimal – 1.2%.
Layer of applied polyurethane foamSource foamshop.ru
Warm plaster
This plaster solution got its name because manufacturers add particles of heat-insulating material to its composition. These can be polystyrene foam granules, so-called crumbs, vermiculite (foamed rock of volcanic origin), sawdust and other ingredients.
Warm plaster is applied to the wall in a thick layer. Source tk101.ru
So, we have looked at the main thermal insulation materials that are most often used today when insulating a garage building. Of course, this is not the entire list of proposed options. They just use these more often.
| Insulation | Mineral wool boards | Expanded polystyrene boards | Polyurethane foam | Warm plaster |
| Price | 13-20 rub. for 1 m² | 15-50 rub. for 1 m² | 1200-1500 rub. for 1 m² | 350-750 rub. for 1 m² |
The price range for each material is quite wide. This is explained by the fact that the basis for pricing is the thickness of the insulation and its density. The table shows that the most inexpensive option is mineral wool and polystyrene foam boards.
The most economical thermal insulation materialsSource krysha-expert.ru
Rescue ventilation
The first step to defeating condensation and corrosion is installing ventilation in the garage. In opposite corners of the garage, two pipes must be brought out.
We will place the lower edge of one of them closer to the floor. Cold air will flow into the room through this pipe. A short pipe near the ceiling in the other corner will serve as a hood.
This simple but reliable device will work automatically without failure, creating natural movement (convection) of air throughout the garage without fancy fans.
Convection will prevent condensation from forming. Wet fumes will simply fly out into the chimney. Exhaust gases hazardous to health, evaporation of fuel, and other chemicals stored in the garage will also be directed there.
Now let’s move on to the most important thing - insulating the garage with our own hands. Here the situation is more complicated, but the task is quite accessible for independent solution
Tags: garage insulation
Comments 53
A thermos is good, but when you leave you need good ventilation, otherwise everything and the iron will rot and mold
In order for the floor to be warm, it is necessary, as in the villages before, - a double floor, and the stove takes air from the bottom, as a result, a vacuum is formed there and the warm air is forced to fall down, thereby keeping it warm and dry
Yes, there should be a hood from below
For ventilation, another hole is needed, closer to the floor))
A chimney through the entire garage, or make a heat exchanger into the combustion chamber - a flame cut-off and a secondary air supply - you will get an economical potbelly stove with high efficiency
Run a chimney through the entire garage and you will be hot!
Weld a second jacket to the potbelly stove on three sides and pump air from the fan into this cavity. You will get a heat gun. You can also weld a couple of pipes through the firebox
I did everything super, but there are too many disadvantages, I personally wouldn’t do it, firstly, the car will rot, it will be fucked up, like secondly, all Popenhagen rubber bands will be there, thirdly, there will be mold and moisture everywhere, as I understand it, it will not warm up for you all the time, and when you work there, there are no differences for the garage very good, well, that’s my opinion, in any case, the owner is a gentleman
yeah, you forgot to take it with you
Try turning on the stove with Hydrogen. I have a friend who heats her house when the gas is turned off. Hydrogen is obtained from water and the gas burner will have to be rebuilt
Try turning on the stove with Hydrogen. I have a friend who heats her house when the gas is turned off. Hydrogen is obtained from water and the gas burner will have to be rebuilt
Hello, can you give me more details?))
There are a lot of instructions on the Internet for making a Hydrogen Generator.
There is a lot of stuff on the Internet))) I wanted to see the implementation of the generator itself. I myself work almost in this field, but only in my profession it is necessary that hydrogen and oxygen are not released, we keep the voltage low so that there is no strong decomposition of the electrolyte)))
From the rich experience of young and not so young years... As a child, I heated myself with kilowatts, in the USSR there were such incandescent lamps, now you can find horseradish. And they provide a lot of light and warmth. Now I have a fairly rich garage with almost the same insulation and heat curtains. The cold comes from the floor - well, I saved a little... A friend has 2x50 penoplex under the floor (concrete) and wears slippers.
The potbelly stove must be heated with coal. Firewood flies down the chimney, but there is little use.
and near the stove they insulated the wall with mineral wool. the packaging is enough. and cover it with tin. It won’t lose five centimeters, but it will keep you warm.
Fix a fan with metal blades above the potbelly stove or, at worst, put a regular fan on your leg to blow on the hot stove. The room warms up more evenly this way.
Ali has these. They work due to temperature differences.
There are, but they are not suspended from above and the price tag is more or less noticeable in space.
Fix a fan with metal blades above the potbelly stove or, at worst, put a regular fan on your leg to blow on the hot stove. The room warms up more evenly this way.
We have a regular fan on top, everything is fine
It’s good if the dew point is inside the room - just constant dampness in winter, but if this point is inside a concrete wall...
Just a song, and OSB is a business choice, just don’t spoil the texture with paint, varnish on the edge