Underfloor heating systems have become very popular among the population today, as they allow for more efficient heating of houses and apartments. With proper installation and operation, such heating can completely replace standard heating from radiators, but they are still mainly used together. Warm water floors are connected in different ways. Today we will tell you how to make a heated floor from heating in a private house. This scheme is useful when everything is already installed and working, but a decision was made to add heating.
How to make a heated floor from heating in a private house
Principles of technology for connecting a heated floor to a heating system
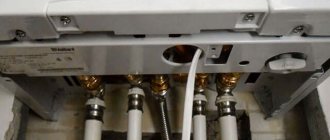
Installation of heated floors from an existing heating system is carried out based on the following principles:
- a collector unit must be connected to existing radiators;
- the coolant temperature must be reduced to at least +55°C;
- the installed structure must differ in standard pressure, which does not exceed 8-9 atm.
Connecting a water heated floor to an existing autonomous water heating system
The list of preparatory work also includes the calculation of all operating parameters of a heated water floor, which depend on the characteristics of the existing heating system. It can be single-pipe or double-pipe.
The latter type is characterized by the presence of two pipelines. One is designed to supply hot liquid, and the other is to remove cooled coolant back to the boiler for heating.
A single-pipe heating system is characterized by the presence of one pipeline through which water circulates. Therefore, the warm floor is connected to it according to the principle of another radiator. It is installed after the heating device, which allows you to reduce the temperature of the coolant without additional devices.
How to connect a heated floor to a heating system
It is also necessary to take into account that it is impossible to achieve effective functioning of a heated floor in the presence of the gravitational principle of fluid movement. When the coolant moves from a large diameter pipeline to a smaller one, the coolant will not be able to overcome the resulting hydraulic resistance.
Installation
There are various methods for installing heated floors in a bathhouse, which are characterized by general installation rules and certain features. Need to know the step by step guide. Almost all underfloor heating systems must be laid on a heat-insulating material, after which they are covered with a screed on which the floor covering is laid.
In addition, waterproofing acts as an obstacle to the formation of condensation in a structure consisting of several layers. Such a layer can be mineral wool, expanded clay, thick polyethylene film and much more. Let's consider the installation of various systems.
Electric heated floor using cable
Visually, this cable cannot be distinguished from an ordinary wire. The difference lies solely in functionality. A heated cable is capable of converting electrical energy into heat. Such a system is characterized by the presence of a thermostat, thanks to which you can regulate the power and speed of achieving the required temperature.
In addition, manufacturers usually provide temperature sensors, thanks to which you can monitor the operating mode of the cable system.
Please note that the electrical cable used in heated floors can be single-core or double-core. The first option is characterized by greater electromagnetic radiation, however, it is still within normal limits
The second option is characterized by simplicity of layout, since it does not require connecting two ends to the thermostat, since one is enough.
If the cable floor will be laid on a wooden surface, then you need to take care of safety. The wood must be treated with fire retardants, despite the fact that there will be no direct contact between the wire and the floor covering.
For those who want to equip a bathhouse using an electric heated floor, manufacturers provide various devices that will be useful during installation. These devices are special guides, supplemented with fasteners, and a mounting grid. Using the guides, you can place the cables at the optimal distance from each other
It is important that there is a distance of at least 5 cm from the cable on the wall, and at least 10 cm from other heating devices.
Film heated floor
This is the cheapest and fastest installation option. Here, thermal film is produced in special rolls. All you need to do is spread the mat over the floor, secure the strips with adhesive tape or some other simple method. There is no need for a cement screed, which takes a lot of time. In this situation, infrared mats are filled with tile adhesive, onto which the tiles are directly laid. In some cases, the covering is laid directly on the mats.
Water floor
Can be installed in various ways. The choice of one option or another is influenced by the preference of the bathhouse owner and the technical characteristics of the flooring. The most common are two installation methods.
- Concrete type, which is similar to installing electric underfloor heating. The only difference is that the pipes are thicker.
- The flooring method, which is especially popular, as it does not overload the floor covering.
Installing a heated floor using a concrete screed is the most common option, the only downside of which is that it requires a fairly large amount of time. In this case, you don’t have to worry about overheating, so this installation method is chosen quite often. Please note that it is not recommended to install pipes close to each other. The optimal distance between them is 30 cm.
This case does not provide for the presence of bends and kinks. Pipelines must be fastened using clamps and dowels. In some cases, wire is used. The presented method involves running the pipeline in a spiral or snake. This option is not very difficult to build.
Pipes
To ensure the efficient functioning of a water heated floor, it is recommended to use pipes with a diameter of 2 cm. The preferred material is polyethylene or metal. When using the latter option, a multilayer structure is used for pipelines, and the surface of the elements is covered with a special anti-corrosion layer.
Characteristics of Rehau pipes for underfloor heating
Polyethylene as a material is more preferable. It is not subject to electrochemical corrosion, which cannot be said about metal. Polyethylene pipes are also easier to install. They are sold in large-volume coils, which allows installation of an entire water circuit with one element. The main material for securing pipelines is plastic ties or special profiles, which are installed using dowels.
SANEXT pipe structure for heated floors
The circuit is installed according to the selected scheme. If the pipe material is polyethylene, then the radius of the coil should not be less than five of its diameters. If you bend the contour too much, creases will form. This is where the material is most susceptible to destruction during long-term use.
Installation of VALTEC water heated floors
Laying waterproofing and insulation
For waterproofing, we recommend using inexpensive polyethylene film. Its main advantage is that it stretches well, so during operation there will be no cracks, tears or other defects in the waterproofing layer.
- If you need to create thermal insulation greater than 5 cm, then we recommend that you buy 1 wide tile; the best option would be 2 thin ones.
- The insulation should be taken with a reserve so that you have enough to cover all connections.
- Some craftsmen cut tongue-and-groove grooves into the slabs; this will take more time, but the heat-insulating layer will be firmly fixed.
- Sometimes strong gaps appear in the places where the insulation boards drain, they need to be foamed with polyurethane foam.
If you think that the work ahead is difficult, then you can study the question of how to make an electric heated floor. Because its installation will not take so much time and effort.
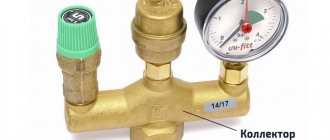
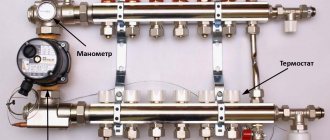
Collector
The collector is designed to regulate the operation of a warm water floor. When choosing a specific model, you need to pay attention to the presence of the required number of outputs to connect all elements of the system.
The structure of the underfloor heating collector
The cheapest manifold has only shut-off valves. This model does not provide the ability to adjust operating parameters, which makes the heated floor not always effective.
More expensive options are equipped with additional valves. They allow you to adjust the operation of the heated floor when necessary.
There are also models that are equipped with servos and pre-mixers. The first additional element provides full automation, and the second allows you to adjust the temperature of the coolant supplied to the heated floor.
The collector is mounted in a special box (material – galvanized steel), which corresponds to its size. It is installed at a certain height so that all the necessary pipelines can be connected to it.
Do-it-yourself underfloor heating manifold
[ads-mob-1][ads-pc-1]
Thermal insulation substrate
Pipelines are laid on a prepared base, which is formed using special heat-insulating substrates. Use the following options:
- with foil coating. Thermal insulation material used is penofol. This substrate can be used when there is no need for high-quality insulation of the floor; Laying foil underlay under a heated floor
- polystyrene foam boards. To increase durability, polymer material is used as a coating. They can be equipped with markings or special bosses. In this case, laying water heating pipelines will be very easy and quick; Expanded polystyrene boards for water heated floors
- mineral wool insulation. It is used in cases where an unheated room or soil is located under the structure. This thermal insulation material must be installed taking into account regulatory requirements for thickness and heat transfer resistance. Types of mineral wool insulation for heated floors
How to organize thermal protection for a basement
In heated basements, thermal insulation of external structures that are in direct contact with the ground provides protection for walls in the ground from freezing, prevents the internal surfaces of enclosing structures from condensation, and reduces heat loss.
The photo shows four main methods of constructing thermal insulation for heated basements:
Basic methods of thermal insulation of basements
Thermal insulation in basements without heating is carried out in the same way as in heated ones. It can be done with the additional construction of a thermal insulation layer in the ceiling above the basement, when the unheated basement is separated from the part of the building located above the ground by a layer of thermal insulation.
In this case, the temperature in the basement will be significantly lower, and to prevent freezing and protect communications laid in the basement from damage, they may need to be insulated.
When placing a layer of thermal insulation on the street side of the basement structure, there are the following advantages:
- It makes it easier to eliminate cold bridges.
- When condensation occurs, the moisture content of the enclosing structures is minimal.
- The usable area inside the room is not reduced.
- Convenience for inspecting structures, which allows you to promptly notice their damage, such as rotting, destruction due to the action of insects.
The disadvantages of external thermal insulation are:
- The need to protect the thermal insulation layer from mechanical damage during construction and throughout its entire service life, and the price of such protection may be higher than the cost of the thermal insulation material itself.
- Insect control is difficult to implement. This problem, when using external insulation, can only be eliminated with poisons, which is not always possible.
- When making brick cladding, there may be cold bridges that increase heat loss in the basement.
Formation of a cold bridge during external insulation of the basement
In order to avoid problems associated with waterlogging of enclosing structures, which lead to unpleasant odors, mold, rot and corrosion.
In this case, at the design stage of the structure it is necessary to solve problems such as:
- Groundwater inflow. If they get into the basement, it is very difficult to ensure rapid drying of the basement enclosing structures.
- The moisture present in building materials when freshly laid concrete leaves through the room itself for quite a long time.
- Capillary rise of liquid occurs through the foundation of the building.
- Moisture condensation forms from the room air. This is due to the fact that it is difficult for the internal thermal insulation layer to ensure tightness, which contributes to the condensation of internal air on the concrete foundation wall; in addition, moisture condensation is possible from soil gases, which often penetrate along the perimeter of the base of the basement.
- When installing internal thermal insulation, materials that are sensitive to moisture are often used, and their performance deteriorates significantly when wet. In this case, even at the construction stage, very high-quality waterproofing should be carried out, which is often difficult to achieve.
- The inner layer of thermal insulation can create difficulties when drying it, for example, with a closed vapor barrier layer. This occurs when moisture is released, which is present in building materials, the seepage of soil liquid and the capillary rise of moisture.
- Simply removing the internal vapor barrier layer does not solve this problem. In this case, moisture gets inside the thermal insulation from the basement air, and then condenses inside the enclosing structures. This creates favorable conditions in which mold and fungi develop.
- Walls located below ground level are quite cold, they are in direct contact with the ground, and many methods of constructing thermal insulation inside the basement cannot ensure the tightness of the thermal insulation layer. In summer, warm and fairly humid air from the room can flow onto cold surfaces of the basement, where the air temperature inside is below the dew point.
Tip: With moisture and insects, the least number of problems are created by a basement design with a middle layer of thermal insulation, although it is the most expensive and structurally complex option.
When using a building envelope that has external and internal thermal insulation layers, the same disadvantages exist as when using external thermal insulation, and the additional installation of an internal thermal insulation layer increases its cost.
Connection diagram for a water heated floor depending on the configuration of the existing heating
Connecting a heated floor to heating devices occurs in several ways, depending on the configuration of the existing system:
- single-pipe scheme. The supply of the circuit with the circulating coolant is connected after the circulation pump, and the return - after. The operation of the system is adjusted using an installed manifold or ball valve; Single pipe water heating system
- two-pipe scheme. When the water heated floor is laid, it is connected to the supply and return pipelines of the existing heating. The operation is controlled using two ball valves; Two-pipe water heating system
- connection diagram without circulation pump. Installation of this system is possible, but there is no guarantee of its normal functioning and efficiency. Considering the complexity of installation, it is much easier to use the first or second option. To operate a heated floor, the supply is connected at the beginning of the room, and the return is connected at the end. It is also important to ensure the required level of slope when installing pipelines. Connection diagram for a one-pipe and two-pipe heating system without a circulation pump
How to organize heating in the basement
Heating in basements is necessary to maintain the required internal air temperature, which depends on the purpose of the room during operation. The most commonly used systems are air and water heating.
The load on the heating system can be determined from the heat balance equation for the basement. In some cases, in basements that are not in use, it is possible to maintain a relatively high temperature without installing a heating system. This is possible at a soil depth below two meters in the climate of the Moscow region, where it never drops below 5–10 °C.
Properly manufactured thermal insulation of walls in the basement allows you to maintain a temperature of 5–10 °C in cold weather without additional heating. In addition, engineering equipment located in the basements makes it possible to maintain the required temperature due to process heat generation. Heating devices are most often located near the surfaces of the basement enclosing structures.
What are the basic requirements for placing gas equipment in the basement?
The requirements for the installation and operation of gas equipment are strictly regulated and limited. The question of whether it is possible to install a gas boiler in the basement is specified in building codes and regulations.
A gas boiler can only be installed if the boiler room is in a private house. The installation of gas heating equipment in the basement of apartment buildings is prohibited. The instructions indicate the requirements that must be observed when installing gas boilers.
These include:
- The ceiling height in the room is at least 2.5 meters.
- The total area in the basement must be more than 4 square meters.
- Natural lighting is a must here. The area of the window opening is 10 sq.m. rooms of at least 0.3 sq.m.
- It is necessary to construct an entrance door whose width is at least 80 cm.
- Presence of natural air circulation in the basement.
- It is necessary to provide for the installation of a gas analyzer and a special electric valve that gives a signal and turns off the gas supply.
Advice: The main requirement for the installation of gas equipment is good air circulation, which is only possible if there is a large air flow.
When operating heating equipment in the basement, established standards must be strictly observed.
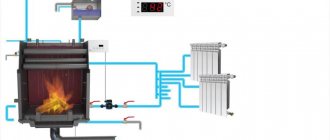
Heated floor connection diagrams depending on design features
A system of pipelines with a circulating coolant is connected to existing heating devices using the following schemes:
Installation of a water heated floor system
- unregulated. To operate the structure, a low-power circulation pump is used. Given this feature, the length of the circuit should not exceed 70 m. Its diameter is 16 mm, which provides a throughput of 5-10 l/min. This scheme is not effective, since there is no possibility of monitoring its operating parameters;
- application of balancing adjustment. The circuit includes a special tap. It allows you to reduce the fluid flow rate to the required level. In this way you can regulate the temperature of the warm water floor;
Three way thermostatic mixing valve design - use of a three-way valve. A special heat-sensitive device is used. It allows you to increase the efficiency of underfloor heating, since the system temperature is automatically regulated. The three-way valve is installed at the point with the highest temperature. If there is a decrease in heating efficiency, it can be reduced to the optimal level;
- introduction of a mixing unit. In this case, a balancing valve or flow meter is installed. The latter regulates the level of thermal energy consumption, which ensures the required degree of heating. There is also an option when an auto valve is installed. With its help, you can stabilize the operating pressure difference and, as a result, obtain the required amount of heat.
Construction of a water system
Making a warm water floor in a bathroom with your own hands is a more difficult task, but why not try to cope with it... We have to assemble a structure from pipes and connect them to a source of hot water.
Metal-plastic and polyethylene pipes are suitable for the pipeline. Both materials have flexibility and low hydraulic resistance.
Thorough theoretical preparation
One heating circuit can cover an area of up to 20 square meters. meters, which is enough for a bathroom, but if the floor is planned to be divided into autonomous zones, then water must be supplied to them through a distribution manifold.
Assembling the manifold consists of connecting all its sections with a pump and mixer, installing thermometers, taps, and air vents. After this, the assembled distributor can be mounted on the wall and pipes can be connected to it
The collector must have flow regulators. With the same water supply to circuits of different lengths, they will heat unevenly. A longer circuit will heat up worse. Moreover, the flow of water in it may even stop due to strong resistance. To eliminate these troubles, flow regulators in the manifold are used.
A mixer is also a necessary thing. The maximum heating temperature in the floors is 50°C; water is supplied to the heating radiators at higher temperatures. If you drain water from the general heating system into the floor, then it must be diluted with cold water to the desired temperature, which is what the mixer does
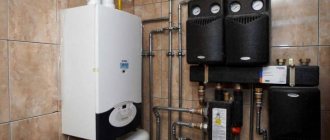
A number of strict conditions in order to proceed with installation:
- The presence of a closed-type heating system using a circulation pump.
- A double-circuit boiler must have a power reserve.
- All work is carried out with the heating system completely turned off.
The pipes must be freed from coolant.
In the thickness of a warm floor, one can distinguish the obligatory functional layers:
- base;
- hydro- and thermal insulation;
- pipeline made of durable pipes;
- concrete screed or gypsum fiber;
- decorative floor covering.
In wooden houses, you can also make a water floor, but you should worry about reliable waterproofing. It needs to be done in several layers, this is the only way the wooden base of the floor will last for many years without repair.
Step-by-step guide for installing a water floor
The construction of a water system is a cycle that includes standard types of work.
Stage 1. Clean the floor and, if necessary, remove the old covering.
Stage 2. Waterproofing the floor. We lay a waterproofing film on the floor. Preferably in one piece, but if there are several strips, then they should be laid overlapping and the seams should be joined with a blowtorch. The waterproofing material should also cover the surface of the walls (up to 10 cm upward).
Stage 3. Fill the rough screed with a mixture of expanded clay and cement (3-5 cm thick). Dry thoroughly (up to a week), sprinkling the surface with water in the first days to prevent cracks.
Stage 4. We insulate the surface with foam plastic, polystyrene or other similar material. We spread polyurethane with a foil reflective coating on top. We seal the joints with tape. Now the heat from the pipes will be directed only towards the room.
Stage 5. Lay the pipes. We bend them according to the developed diagram, maintain 15-20 cm between the pipes. We fasten the resulting curved structure. We connect the water supply pipe to the flow distribution manifold.
Laying pipes in a “snake” pattern is the most common. An alternative is snail laying. The first option is easier to install, but provides uneven heating. In the second option, the heating is generally more uniform, but there may be cold areas of the floor, since the return turns lie between the supply turns
Stage 6. Turn on the coolant supply and check for water leaks in the system.
Stage 7. We make the second screed with the same solution as the rough one. If unevenness of up to 5 mm was allowed in the rough screed, now we pre-install beacon slats to perfectly level the surface.
One of the purposes of underfloor heating screed is heat accumulation. With a thick screed near a water floor, heat accumulation is higher
The finishing layer of screed takes 5-7 days to dry - the same as the rough layer. After complete drying, you can begin finishing the floor and laying floor tiles.
Advantages and disadvantages of underfloor heating from existing heating
Installing a water heated floor according to this scheme has several advantages:
- optimal and uniform heating of the entire floor surface, which is achieved by introducing additional control devices into the design;
Connection diagram of a water heated floor to the central system through a separate input - creating a comfortable indoor environment. All the heat is concentrated from below, and the cold air is located near the ceiling. This scheme is considered more comfortable for any person;
- for the construction of all elements, a material is used that is not susceptible to corrosion and destruction over a long period of time, subject to all installation rules;
- when installing a warm water floor, the movement of air masses in the room is reduced, which reduces the amount of dust. This has a positive effect on the body of people who suffer from allergies;
- using one source for floor and conventional heating, you can significantly save on installation and the number of additional units for their normal functioning;
The disadvantage of this design scheme is the impossibility of its use in multi-storey buildings with centralized heating. Some difficulties may also arise during the installation of all elements. But if you take into account all the recommendations, this is not so difficult.
[ads-pc-2][ads-mob-2]
Calculation
Initially, a calculation scheme is prepared. Warm floors and radiators are the main heating components in the design of a heating system. Therefore, the main calculations are related precisely to their parameters, in particular, to the total filling volume of the heating liquid. Let's give an example of calculating the energy of a heated floor. The average comfortable temperature is 24°C. When calculating, its calculated value is adjusted by the amount of heat loss. For example, take a concrete screed covering system. Obviously, when passing through this layer, a certain amount of heat is lost, which must be taken into account.
On a note
In any case, if the total heat loss is greater than the heat output, then we can only talk about an additional power source.