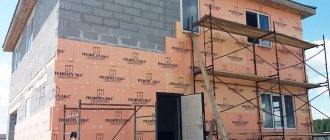
Regular participants of our portal know that in the Moscow region, as part of the “HOUSE IN A YEAR” project with FORUMHOUSE, construction work is underway to build a modern and comfortable country cottage. The key characteristic of this project is the use of modern building materials and technologies, which we describe in detail in the history of the project.
In particular, extruded polystyrene foam (EPS) was used to insulate the USHP foundation on which the house is being built. But insulating the foundation is only one of the technological stages in building an energy-efficient house. Therefore, in this article, a specialist in a master class format will talk about how to properly insulate the blind area and basement of a country cottage, and answer the following questions:
- Why is it necessary to insulate the blind area and the basement of the house?
- What are the requirements for heat and waterproofing materials?
- How to carry out work correctly.
General information about Penoplex insulation
This insulation is a domestic development.
It is also produced for our conditions. This cannot but rejoice, since the material takes into account all the features of the domestic climate, which is far from mild. The insulation is based on polystyrene foam, which at high temperatures is subjected to additional foaming - extruded. This operation allows you to significantly increase the already excellent performance characteristics.
The material is very popular not only among independent developers, but also among professional builders. Its main technical characteristics include:
- moisture resistance – no more than 0.5% of the total volume;
- guaranteed service life - more than 50 years;
- compression resistance – 27 tons per square meter;
- operating temperature range – from – 50 to + 75 C.
This information is not exhaustive, since the material also has many positive qualities. Full information can be obtained on the website of the material manufacturer.
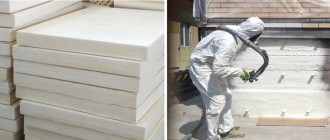
Penoplex in packagingSource brus4you.ru
There are many varieties of this insulation on the market, but among them three main varieties can be distinguished:
- "Penoplex-45". This type of insulation has the highest density among all material lines. It is used for insulation of complex building structures that are subject to high loads. These could be airfields, various industrial structures or elements of highways.
- "Penoplex-35". This type of material is often called “Penoplex Foundation”. They are used for insulating monolithic and pile-type foundations. It is also used to insulate the pile base. The material can be laid in both vertical and horizontal directions.
- "Standard". The most widely used type of material, made in the form of flat slabs. It is used for insulating a wide variety of objects, from utility networks and stone walls to insulating wooden floors.
All of the listed insulation modifications are produced in the tongue-and-groove form factor. This allows the elements to be installed as closely as possible to each other and to avoid the formation of gaps between them.
Solid pad of insulation for pouring the base of the foundationSource ctkomplekt.ru
The method of cutting the material deserves a special mention. If a special tool is used for this, then professionals advise carrying out cutting work at medium speeds. This will prevent the material from melting and sticking to the cutting parts of the tool.
If you are interested in the question of how to insulate a house with Penoplex, then slabs of medium and smaller thickness will most likely be used. They cut perfectly with an ordinary stationery knife and are neatly broken along the cut line.
An example of replacing a blind area for a small 6x7 house
Let's give an example of replacing a blind area for a house - what may influence the decision to replace it, and we will assess the condition of the foundation and blind area.
Assessing the condition of the blind area and foundation after winter
- small surface cracks visible to the naked eye;
- in some places there is noticeable uplift and wider destruction;
- the destruction of the blind area damaged the basement finishing and, most importantly, it no longer performs its main function - draining water from the foundation of the house;
- the foundation is washed away and the basement is flooded;
- the base of the house is an old strip foundation, laid with violations of technology;
- It is objectively possible that the cottage will be washed away and deformed.
Making a decision to replace the blind area
Since there is an old foundation under the house and taking into account the damage that has occurred, the owners make a decision: remove the old blind area and make a new one to avoid erosion of the house.
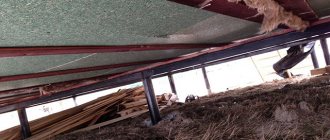
First, the old blind area is dismantled and preparatory excavation work is carried out.
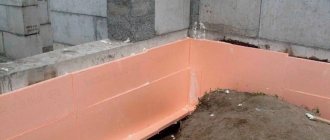
The width of the future blind area is 70 cm (minimum acceptable value). For it, a base about 90 - 100 cm wide is dug, and soil is selected at a slight angle to a depth of 45 cm. A leveling layer of sand is laid out on the prepared area under the foam coating.
This material will make the blind area warm. Accordingly, the foundation will not freeze and heaving will not occur. Thanks to these measures, ideal protection of the house and blind area will be achieved.
5 cm (500 mm) + 30 cm (sand) + 6 cm (crushed stone) = 41 cm + 4 cm of sand for leveling.
The next step is to lay geotextiles of minimum density. In this example – 150mm. (you can use material of higher density, but not less!). Geotextiles are sold in rolls 2 meters wide.
Drainage system design
The “tape” laid with penoplex is covered with the entire width of the geotextile. Sections of drainage pipe are taken, placed on top of the textiles and connected to each other with special angles.
The drainage pipe for draining water must go into the ditch. To do this, a trench is prepared according to the size of the pipe and covered with geotextiles. We can roughly say that upon completion of this stage, the pipe is located approximately in the middle of the geotextile.
After the pipe is laid, it is backfilled with crushed stone. It fills the distance between the penoplex and the drainage pipe. Then it needs to be wrapped with the free edges of geotextile.
The next step is filling it with coarse grain sand and leveling it with a rake.
How wide should the thermal protection be?
The outflow of heat from the soil occurs not only from the surface, but also through the colder adjacent layers of the soil. Therefore, the width of the thermal protection under the blind area is determined by the depth of soil freezing in a particular area. It also makes no sense to make the width of the thermal protection larger than the width of the blind area required for effective water drainage.
The thermal protection belt must have such a width that the distance from its edge to the bottom of the foundation exceeds the freezing depth. The exact width value can be obtained by squaring the freezing depth, subtracting from it the square of the height of the underground part of the foundation and taking the root from the resulting value. At the same time, practice shows that making a thermal protection belt wider than 120 cm, even if there is a basement floor, is irrational.
Features of penoplex
The operational and technical characteristics of penoplex allow us to call it the most effective insulation material available on the market today.
It is essentially an advanced foam made by extruding polystyrene. During the production process, polystyrene granules with the addition of foam are placed in a high-temperature chamber. The mixture melts and foams due to the fact that the blowing agents, when heated, release a large amount of gases - carbon dioxide, nitrogen and others. Through molding nozzles, a mass resembling whipped cream is squeezed onto a conveyor, hardens and cut into panels.
The result is a porous material. But, unlike polystyrene foam, it has a single fine-cellular structure that does not break down into granules. Each cell is gas-filled and fully insulated, providing high thermal insulation performance. Penoplex is characterized by a higher density and greater strength than polystyrene foam.
EPS insulation is lightweight, cuts well and does not crumble. The sheets have a tongue-and-groove joint, which prevents even the slightest cold from leaking in. It is convenient to use for independent insulation of any building elements.
Several types of penoplex are available. For thermal insulation of blind areas and basements, grades 35, 45 and “Foundation” are suitable.
Dense fine-cell structure of penoplex
We insulate the foundation ourselves
The high cost of the required materials and the simplicity of the process make it possible to insulate the foundation yourself, minimizing the total cost of this type of work. We will dwell on the features of each option for installing a penoplex foundation in more detail, which will allow us to avoid inevitable mistakes in the future.
We insulate the slab foundation
The technology for insulating the foundation with penoplex with your own hands is not complicated and is similar to working with the simplest version of a children's construction set. The slabs are laid on a pre-prepared base, tightly joining them to each other. As a rule, no additional fastening is required for this. A prerequisite is the laying of a polyethylene sheet to prevent the concrete mixture from leaking into the seams.
Penoplex for slab foundation
Calculating the required quantity will also not be difficult for any home craftsman who has not yet forgotten the elementary school mathematics course. The area of a standard Penoplex foundation slab with dimensions of 1200x600 mm is 0.72 m2. Therefore, to determine the required amount of material, it is enough to divide the total area of the future slab by 0.72, rounding to the nearest integer. When making calculations, do not forget to determine the amount of Penoplex insulation for the side walls of the slab base of the house.
Often, to determine transportation costs, it is necessary to calculate the number of packages of material. To do this, in addition to the total number of slabs, you also need to know their required thickness. This is due to the different configurations of penoplex packs, which have a standard thickness of 400 mm. Thus, the package will contain 8 pieces of slabs with a thickness of 50 mm, and 20 pieces of slabs with a thickness of 20 mm.
We insulate the strip foundation
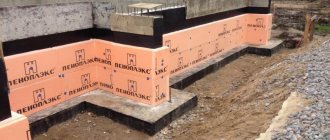
Since the strip type of base is the most common, the technology of its insulation should be discussed in more detail. Penoplex slabs allow you to finish the walls of the foundation of a new house or one that has stood for several decades. The sequence of work will look like this:
Penoplex for insulating strip foundations
- It is necessary to completely remove the soil from the strip base at a distance convenient for two people to move. Typically, this value is 1 meter.
- The surface of the belt is thoroughly cleaned of various debris and lagging parts of the concrete mixture. This is especially true for foundations with a long service life. Plastic brushes, mounted in a drill chuck or on a grinder, are recommended as tools.
- If deep depressions form on the surface of the foundation walls, they must be filled with fresh cement mortar and plastered.
- Before attaching foam boards to the foundation, it must be insulated from moisture. To do this, the dried walls of the tape are covered with coating mastic, onto which roofing material is glued. Waterproofing the foundation with penoplex, even taking into account its low moisture permeability, is not recommended.
- Having decided on the basis of preliminary calculations which penoplex for the foundation is suitable in your conditions, we install it. In the lower, underground part, a special adhesive for slabs is used, sold in the form of a dry mixture and prepared directly at the construction site. For the above-ground part, builders recommend using dowels and nails.
- The outer surface of the insulation must be coated with one or another composition. Before closing the penoplex on the foundation, wait until the adhesive has completely cured. The best option is plastering using plastic reinforcing mesh.
The described technology has wide application, and, for example, correctly insulating the foundation of a bathhouse with penoplex, as well as the outer surface of a country pool, will now not pose any problems for you. By maintaining consistency and striving for high quality work, it is not difficult to get the result you are going for.
This may be useful:
- Construction technology for a rubble concrete foundationInstallation of a foundation for a fireplace - types, technology, featuresInsulation for the foundationDrilling wells for piles: equipment and technology
Additionally, we recommend reading:
Installation of EPS
When the waterproofing is finished and the bitumen has finally cooled down, insulation of the foundation with polystyrene foam proceeds to the main stage. The thickness of the insulation is determined in accordance with the parameters of the foundation and the climatic characteristics of the region. For example, if the winter in the area where you live is harsh and long, it would be reasonable to lay the thermal insulation in two layers, five centimeters each.
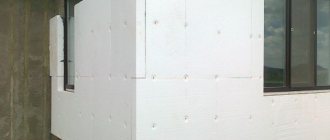
Expanded polystyrene sheets are available both corrugated and smooth. To ensure optimal adhesion to glue, the former are better suited. But if you nevertheless purchased smooth slabs, immediately before installation, treat them with a needle roller.
How to attach?
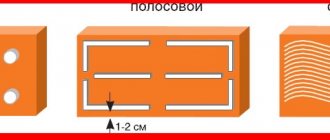
Fastening polystyrene foam below ground level requires the use of exclusively special glue that does not contain organic solvents. It is applied to the insulation with dotted strokes in the corners and in the center of the sheet. Then the insulation sheet should be firmly pressed against the foundation and held until the glue sets.
Under no circumstances should you fix the thermal insulation in the basement using dowels, as they will damage the moisture-resistant layer. Above ground, the sheets are attached to the wall with hardware three days after installation, when the glue has completely dried. Each sheet contains approximately five dowels, which are driven into holes drilled through the insulating material.
How to lay it?
EPS sheets should be laid from the corner of the house, checking the correct installation using a level. At the corners, it would be better to lay the material in two layers, with a meter extending in each direction from the corner. The slabs are mounted to each other using a connecting locking system at the edges. If there are gaps between the sheets, they are sealed with polyurethane foam sealant.
Thermal insulation protection
Thermal insulation must be protected from rodents and unexpected ground movements. There are two main protective technologies: using geotextiles and roofing felt or reinforced fiberglass mesh. The cost of the glue on which the mesh is attached is quite impressive, so it is permissible to use cement mortar instead.
Backfilling the trench
The trench dug around the perimeter of the house, after completing the insulation work, should be filled in only when all the materials are dry, including the cladding of the basement floor.
This process occurs in several stages:
- the bottom of the trench is covered with a layer of sand up to 150 mm thick;
- the sand should be moistened, leveled and compacted well;
- Expanded clay or gravel is laid on top of the sand layer, the layer thickness is from 200 to 300 mm;
- the excavated soil is poured on top of the gravel cushion and compacted very carefully;
- The trench should not be completely buried; approximately 300 mm should remain to the ground level for the blind area.
How to fill the screed correctly?
When pouring screed over XPS slabs, it is possible that separated liquid will seep between the expanded polystyrene slabs, which will lead to their displacement or even floating. It is not enough to simply lay the insulation on the ground; it must be carefully adjusted at the joints, immobilized and waterproofed.
All elements of the thermal protection belt must be carefully adjusted to each other without the formation of gaps. Temporarily the insulation is attached to the ground with knitting needles made of 4 mm wire, bent in the shape of the letter “L”, in an amount of at least 3 pieces. on the stove. Next, you should roll out a plastic film over the insulation, after which you can start pouring concrete.
Scheme and procedure for insulation with penoplex
The main task of insulation is to prevent freezing and swelling of the soil. By following the order and installation rules, everyone will be able to insulate the blind area around the house, even if they are doing it for the first time. First of all, you need to take care of the necessary materials. Need to purchase:
- foam sheets;
- cement, sand and crushed stone;
- slats and polyethylene;
- bitumen and bitumen mastics;
- polyurethane foam;
- metal pipes;
- boards for formwork;
- shovel and plaster trowels.
Stages of the thermal insulation process for the blind area:
- Preparing the area. Space is freed up, trenches are dug and the top fertile layer of soil is removed. The trench should be close to the house. The depth of the trenches is approximately 30 cm. And its width is usually selected taking into account the width of the expanded polystyrene sheet, which is approximately 100 cm. This approach significantly reduces the amount of material waste. It is also necessary to remove all remnants of roots, since the root system easily extracts moisture and, when germinating, can destroy the foundation.
- 15 cm of sand is placed on the cleaned area as a layer. Then the sand layer is compacted and slightly moistened with water.
- The next layer is crushed stone 10 cm thick, which must be thoroughly compacted.
- At the next stage, sheets of insulating material are evenly distributed onto the prepared base of sand and crushed stone. If necessary, a reinforcing mesh is installed on top of it.
- The gaps between the wall and the sheets will be filled with polyurethane foam.
- Along the edge of the trench, I make formwork from boards 10 cm high above the ground level.
- Lay a mixture of concrete or asphalt. It is taken into account that there should be a slope of 10 degrees from the wall. When pouring concrete, through gaps (slots) must be left every 2 m. This is done using thin slats that are inserted into the concrete. After the concrete has hardened, the slats are removed. Then the resulting seam is treated with hot bitumen. If the slats are left in concrete, then they must be lubricated with bitumen mastic.
- Afterwards, along the edge of the blind area you need to make a drainage system. This is done in one of two ways:
First way. Asbestos-cement pipes are laid on the covered sand layer.
Second way. Install a concrete trench on the sandy base of the foundation, which can be given the desired shape using a piece of metal pipe or log.
Brief instructions for insulating the foundation:
- Prepare the foundation: remove construction debris, grease, dust and rust. If there are cracks or holes on the surface of the foundation, then they must be leveled with cement mortar and a level;
- An important step is to waterproof the surface. This is done using water or bitumen mastic. Solvents should not be used; they may destroy polystyrene foam;
- Using penoplex glue, the sheets are attached to the foundation. It is best to arrange them in a checkerboard pattern. Thickness - up to 10 cm.
Owners of strip foundations need to pay attention to the differences in the instructions for installing insulation. First, slabs are laid on the concrete base. Then a durable polyethylene film is glued, which is secured at the joints of the foundation with construction tape
The formwork is prepared and, after reinforcement, it is poured with concrete. After removing the formwork, the foundation needs to be insulated again, so polystyrene foam is again applied to the side walls
Then a durable polyethylene film is glued, which is secured at the joints of the foundation with construction tape. The formwork is prepared and, after reinforcement, it is poured with concrete. After removing the formwork, the foundation needs to be insulated again, so polystyrene foam is again applied to the side walls.
The re-insulated blind area is filled with concrete solution and leveled. Sometimes, in order to give it a beautiful and well-groomed look, the top is decorated with decorative stone.
Calculation of thermal insulation
To insulate the foundation with penoplex with your own hands, you should calculate the thickness of the slab. The nature of the soil and the climatic conditions of the region determine the parameters of thermal insulation. Manufacturers, as a rule, indicate the recommended thickness of the material in the instructions. To be more reliable, you can do the calculations yourself using the following formula:
- R - heat transfer resistance. The required value for each region can be found in the reference book. The thickness of the material must be such as to create resistance;
- H1 - foundation thickness;
- H2 is the desired thickness of the foam board;
- L1 - thermal conductivity coefficient of the foundation;
- L2 is the thermal conductivity coefficient of the insulation.
By substituting reference data for your region, you get the required slab thickness. This value is the minimum. When selecting penoplex, you need to round its value up.
For reliable thermal insulation, the material is laid in two layers so as to overlap the joints of the plates. Therefore, if the calculated value is, for example, 100 mm, then the foundation must be sheathed with slabs 50 mm thick, but in two layers.
Why and when do you need to insulate?
The blind area performs 4 functions:
- Removal of atmospheric precipitation from the base of the house; Acts as thermal insulation in case of insulation, protecting the soil from freezing; Serves as a decorative element; Provides more comfortable movement around the site.
If it is carried out according to all the rules, then it will drain water from the foundation even without insulation, but it will not protect against soil heaving, which is observed during seasonal temperature changes. When, during severe frosts, soil water becomes ice, the volume of soil increases and begins to put pressure on the blind area and foundation.
These structural elements are subject to destruction, manifested in the form of cracks.
This happens especially quickly with the blind area due to its small thickness. When it is insulated, the soil under it and near the foundation does not freeze
It is important to make high-quality drainage in parallel with insulation
Advantages of an insulated blind area
Each owner must decide for himself the issue of insulating the basement and blind area, but experts strongly recommend doing this in cases where the house where they live permanently stands on heaving soil on one of the following types of foundation:
- Shallow; Pile; Columnar; Slab.
It is better to insulate the blind area even when there is a basement floor, and if the foundation, located below the zero level, was not insulated during construction.
The feasibility of performing work on insulating the blind area is determined by the purpose of the structure. If people live in the house permanently, then thermal insulation is necessary, but if it is a dacha where people come only in warm weather, then there is little point in investing a lot of money in it. It is enough to simply make a good drainage system from the foundation.
Many developers carry out the blind area after the construction of the house is completed, and this is their main mistake. Ideally, everything should be done in 2 stages. The first is the installation of a rough blind area after vertical insulation of the foundation and before the final finishing of the base.
It includes excavation, preparatory work, concreting, and digging a trench to drain water from the house. All this does not exclude the possibility of installing an insulated structure around the building in use.
The second stage - the installation of a finishing blind area - begins after finishing the finishing work of the facade and basement. Advantages of this approach:
- The appearance of the base does not suffer; Such a phenomenon as winter heaving of the soil is excluded; Reliable support for scaffolding is provided.
There are many recommendations regarding the width of the blind area. Many consider it an axiom that it should protrude at least 20 cm in relation to the roof overhang. But one can argue with this, because the drainage system removes water from the roof, and it practically does not fall onto the blind area, so the minimum width of the blind area should be 80 cm.
Insulation scheme for the blind area
The width of the structure plays a huge role on subsidence soils. The value recommended by the standards is from 1.5 to 2 m.
Such a wide blind area can cost the owner more than the building itself, but one cannot ignore the subsidence of the soil, because
because the integrity of the structure depends on this. But there is a way out - a combination of the open part of the structure with a hidden blind area.
Do you need a vertical thermal protection belt?
Proper insulation of the blind area is not limited to placing thermal insulation under the concrete covering; the thermal protection must be combined with the vertical insulation belt of the foundation. This is necessary in order to prevent heat leakage through the concrete itself, which has high thermal conductivity.
Therefore, parallel to the installation of insulation of the blind area, polystyrene foam slabs are fixed to the above-ground part of the foundation with glue and disc-shaped dowels, which are subsequently hidden under the finishing of the base. It is extremely important that the thermal protection of the foundation and blind area has a continuous contour. The best option is when a horizontal belt is first laid, and then the base thermal insulation slabs rest on it with their lower end.
Materials for insulating blind areas and foundations
The purpose of the blind area is to prevent rain, snow and condensation (dew, fog) from penetrating the walls of a private house. In addition to this function, the blind area is often built for:
- Protecting the foundation of the house from atmospheric water and moisture;
- Maintain cleanliness around the base;
- Creation of a pedestrian zone in the form of a sidewalk path;
- Protecting the soil from freezing.
Slope of the blind area Work on the construction of the blind area requires compliance with certain rules, requirements and parameters:
- The material of the blind area must be waterproof and wear-resistant, so most often they choose paving slabs of any configuration, asphalting or concreting the surface;
- The width of the blind area is not an arbitrary parameter. The tape should be 15-20 cm wider than the width of the eaves overhang on dense soil, and 100 cm wider on shrinkage soil;
- A brick or gravel (crushed stone) blind area is made with a slope from the wall of ≥ 5, the concrete strip must have a slope of ≥ 3;
The blind area need not be made for buildings on a columnar foundation, but in this case there must be a system of drains that drain water from the walls more than 1.5 meters, and a waterproof coating must be laid in places where water is collected from the roof.
The foundation is also insulated from the outside in order to protect it from exposure to low temperatures, which turn water into ice, which destroys the building material of the blind area. In the spring, thawed ice can contribute to deformation and displacement of the soil.
Scheme of insulated blind area
Penoplex takes a leading place among insulation materials in home construction due to its high heat saving efficiency and environmental friendliness. According to the principle of implementation, insulation of the foundation and blind area with penoplex is a simple laying of insulation sheets in one or several layers, depending on the requirements and design of the structure. Standard sheets have a thickness of 100 mm.
Advantages of the material:
- Low moisture absorption;
- High thermal insulation properties;
- Strength and durability due to the high density of the material;
- Temperature stability over a wide range;
- Passivity to chemicals and fungal infections;
- Simplicity of installation and ease of machining.
Disadvantages of penoplex:
- Fire hazard;
- Fragility;
- High price;
- Additional waterproofing.
What is required to create a warm structure?
To build a blind area outside the house you will need:
- shovels, shovels and bayonets;
- gloves;
- vibrator;
- plumb line, tape measure, thread, pegs;
- sharp knife;
- boards for formwork;
- rule.
Materials:
- sand;
- crushed stone;
- clay;
- waterproofing;
- thermal insulation;
- geotextiles;
- covering: concrete, paving slabs, granite chips, lawn, etc.
Depending on the type of blind area, some of the listed materials and tools may not be needed.
Device technology
Any blind area consists of an underlying layer and a protective coating.
Backfill: what materials to use
The purpose of the underlying layer is to create a level base for laying the protective coating. Its thickness is about 20 cm. Sand and crushed stone are often used for these purposes, but native soil or clay can also be used.
The simplest design of a blind area made of clay
Sand and crushed stone are used on well-draining soils. In this case, sand is first laid, spilled and compacted. Then there is a layer of crushed stone, which is also compacted.
If the soil on the site is clay or loam, then it is better to use native soil. If, with such soils, crushed stone or sand is laid around the foundation, then water will certainly be present near the house. Because it turns out that the density of the soil outside the underlying layer will be higher. This will cause water to accumulate under the blind area. If, with this design, a drainage pipe is laid around the perimeter of the bedding, the problem will be solved. And it’s effective. But there will be more work, and the cost of the blind area with drainage will be higher.
Types of protective coating
The covering for the blind area must meet many requirements:
- should not allow water to pass through;
- must be frost-resistant;
- have increased abrasion resistance;
- should not be destroyed by water.
This could be paving slabs or paving stones. The shape and color can be very different - you select based on the general design of the territory and the houses of nearby buildings. The thickness of these materials is at least 6 cm; only in this case will they withstand harsh operating conditions.
The protective coating can be made of natural or artificial stone
You can use slabs or tiles made of natural or artificial stone, you can lay out the paths with large pebbles or pour crushed stones on top of all layers.
There is another type that is becoming increasingly popular - this is a soft blind area. It has few layers but works effectively. There may not be any hard or waterproofing layer on top: you can pour soil and plant grass or flowers. An interesting solution for a summer house or country cottage.
The principle of constructing a soft blind area
All these options are not bad, but the cost of their arrangement is quite high. If there is a need or desire to do it cheaply and cheerfully, your choice is a concrete blind area. There will be a lot of work, but the total cost is low.
General principles
Depending on the soil on the site and the purpose of the building, different materials and layer structure can be used, but there are some points that are always present:
- the blind area has a general slope “away from the house”, its minimum value is 3% (3 cm per meter);
- There must be an expansion joint of 1-2 cm between the protective coating and the foundation (lay roofing material in two layers, polystyrene foam or EPS, cover with sand, fill with sealant);
- when waterproofing and insulating the foundation, the material rises to the level of the blind area;
- the base should hang over the expansion joint and it should not interface with the protective coating (a gap of 1-2 cm is left).
Another popular type of protective coating for house formwork is paving slabs or paving stones.
How to make a blind area at home with your own hands
First, markings are made along the perimeter of the building using pegs and laces. The following is the order of work:
- The plant layer and some soil are removed. The depth of the trench depends on the size of the underlying layer and the thickness of the protective coating. Usually - 25-30 cm.
- The bottom is treated with herbicides. This is necessary to prevent plants from growing in this area. They are able to destroy even concrete and asphalt, and they grow instantly between tiles or paving stones.
- The bottom of the trench is leveled, forming the required slope and compacted.
- The underlying layer is laid and compacted, maintaining the slope. It is advisable to compact everything using a vibrating platform. Manual tamping is ineffective. Density is especially important when laying concrete, but it is advisable to compact it well under tiles or paving stones: it will not collapse or warp.
- A protective coating is laid.
- A drainage groove is formed.
It's very short and sketchy. Each coating has its own characteristics, and each needs to be discussed separately.
Briefly about the next steps
After this, it is necessary to start implementing drainage located along all edges of the installed blind area. This can be done in several different ways.
First option. Asbestos-cement pipes, the diameter of which should reach 100 mm, are laid close to the blind area on an underlying layer of crushed stone or sand. They must first be cut in half.
Second option. A special monolithic concrete trench is installed over the crushed stone bed. To ensure the most suitable shape, you can use a small piece of metal pipe or a pre-sanded log.
Drainage arrangement
It is very important to properly insulate the blind area, because the preservation of heat in the house, its stability and service life directly depend on it.
Why is insulation required?
There are many types of foundations, but among them there is one universal one that is suitable for many different buildings - this is the insulated Swedish slab foundation, which is widely used not only among large developers, but also private builders.
The insulated slab foundation differs from the rest in that the structure itself is covered on top with a special insulation. This allows you to prevent the negative impact of temperature changes on the foundation of the building.
A builder with extensive experience will easily answer the question about the need for insulation. And he will highlight the following reasons:
- If the constructed building is located in an area where there is a very high level of humidity, it is simply impossible to do without insulating the foundation. There is a logical explanation for this. The thing is that droplets of moisture penetrate deeply into every crack and after the air temperature drops below 0, the freezing process occurs. As a result, they expand and lead to the destruction of concrete.
- Insulating the foundation makes it independent of the climate and allows you to preserve the entire structure of the building.
- Insulation allows you to reduce the influence of moisture on the foundation from the ground.
To protect the walls from the harmful effects of the soil, in which heaving processes occur with the onset of frost, it is necessary to insulate the part of the soil that comes into contact with the structure. It all depends on the soil.
For example, in dry sandy soils there is no significant expansion during frost, while soil with a high clay content practically pushes the building to the surface of the ground.
To avoid such negative consequences, you need to make a blind area and at the same time lay a special thermal insulating layer. This layer is made on the basis of expanded clay, polyurethane foam, and expanded polystyrene. This allows soil areas close to the foundation to maintain temperatures above zero throughout the year. Thus, the risk of the negative impact of soil heaving processes on the foundation is reduced.
How to insulate a blind area
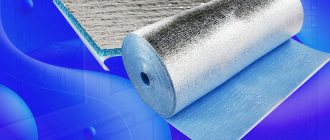
Durable, durable and moisture-resistant materials are used as insulation: expanded clay, polystyrene foam, polyurethane foam (foam rubber) and extruded polystyrene foam (penoplex). Any of the listed materials will reduce soil heaving and prevent the ground around the house from freezing, but the best of them is polystyrene foam, which consists of 90% air bubbles.
In addition to excellent thermal insulation properties, EPP has other advantages:
- High compressive strength (0.25-0.50 MPa);
- Almost zero water absorption (no more than 0.2%) and vapor permeability;
Healthy! According to research, if you completely immerse an EPP sheet in water for 30 days, during this time it will gain no more than 0.4% moisture.
- Fire resistance (class G1);
- Operating temperature range (from -50 C to +75 C);
- Low thermal conductivity, about 0.029 W/mK (provided that the thickness of the EPP sheet is at least 5-10 cm);
- Frost resistance;
- High resistance to mechanical loads;
- Lightness;
- Durability (up to 40 years).
Among other things, this material is considered environmentally friendly and chemically resistant to alkaline environments. Thanks to the latter property, polystyrene foam will not be affected by either the components of the cement mixture or groundwater.
The thickness of standard foam sheets is 20 mm, but for insulating the foundation and blind area it is better to choose EPP with a thickness of at least 50 mm for the middle part of the base and from 60 to 120 mm for the corners. The fact is that the corners of the blind area require more insulation, since in these areas the base freezes the most.
If you want to insulate the blind area with foam plastic, due to its lower cost compared to penoplex, then be sure to take into account one significant drawback of this material - low resistance to mechanical damage. Because of this, it will be necessary to lay a reinforcing frame on top of the thermal insulation layer (and this obviously will not reduce costs).
To understand the design features of laying a heat-insulating layer made of EPP, let’s look at the step-by-step instructions for this process and start by determining the dimensions of the blind area.
Do or pay?
Now you know enough to decide what kind of blind area you need. Further material will help you understand the details, and in order to decide whether to take on the work yourself or order it from builders, we inform you: the price of just the work of constructing a blind area in Central Russia ranges from 2000-2500 rubles / sq. m. m for soft crushed stone up to 3300-4200 rub./sq. m for concrete monolithic. We emphasize: this is only work, the purchase of materials with delivery is the owner’s, so there is no need to count on wholesale discounts.
This is due to the fact that a normal customer, a normal designer and normal builders make the blind area at the same time as the entire structure. A finished house without a blind area is unfinished, but how much do builders like to finish unfinished projects and whether such work is profitable for them, you can ask any of them. Perhaps expand your knowledge of Russian, in parts not reflected in general-purpose dictionaries.
How to do it yourself?
Insulation of the blind area can be done in the summer, when the ground is dry. To complete the work, it is advisable to choose several days without precipitation. When installing a blind area, you should calculate the required width.
It is worth remembering that it should be 0.3 m more than the roof overhang of the walls. This is necessary for proper removal of precipitation from the foundation. When constructing a blind area, cold bridges should not be allowed.
Technology for creating a warm structure:
- Thermal insulation should be carried out not only on the blind area, but also on the foundation. This way, the soil under the house will not freeze.
- Attach waterproofing to the walls of the trench. For example, cellophane.
- Membrane device. It is recommended to use Technonikol. The material has a long service life and high strength.
- Construction of a cushion of crushed stone and sand 0.1-0.3 m each.
- When insulating a structure yourself, you should level the surface with sand and crushed stone. Then, according to the level, you can lay polystyrene foam in a checkerboard pattern. All cracks must be thoroughly foamed. If cracks appear on the material, they also need to be eliminated.
- The membrane fabric is laid on expanded clay.
- For the concrete layer, formwork is made from boards. For thermal expansion of the structure, cross members are used every 0.2 m.
- To obtain resistance to loads and increase service life, it is recommended to reinforce the blind area. You can use a metal mesh with cells from 3 to 5 cm.
- For tightness, a damper tape is used around the perimeter of the foundation.
- Pouring concrete 0.1 m thick. The slope of the structure is from 2 to 3 degrees.
- If necessary, you can paint the structure after complete hardening.
You cannot use the blind area for 2 weeks, i.e. walk on it.
The video will show you how to insulate a blind area with penoplex with your own hands:
Expenses
The cost of materials for the construction of an insulated blind area depends on several circumstances:
- material quality;
- manufacturer;
- supplier.
Approximate prices for materials for insulated blind area:
| Material | Measurement value | Amount (rub.) |
| Polyurethane foam | p/m | 380 |
| Expanded clay | cube m | 2000 |
| Expanded polystyrene | sq. m | 280 |
| Styrofoam | sq. m | 150 |
| Sand | cube m | 2000 |
| Crushed stone | cube m | 1350 |
| Concrete | cube m | 3000 |
| Reinforced mesh | sq. m | 130 |
| Drains | PC. | 250 |
An example of replacing a blind area for a small 6x7 house
Let's give an example of replacing a blind area for a house - what may influence the decision to replace it, and we will assess the condition of the foundation and blind area.
Assessing the condition of the blind area and foundation after winter
- small surface cracks visible to the naked eye;
- in some places there is noticeable uplift and wider destruction;
- the destruction of the blind area damaged the basement finishing and, most importantly, it no longer performs its main function - draining water from the foundation of the house;
- the foundation is washed away and the basement is flooded;
- the base of the house is an old strip foundation, laid with violations of technology;
- It is objectively possible that the cottage will be washed away and deformed.
Making a decision to replace the blind area
Since there is an old foundation under the house and taking into account the damage that has occurred, the owners make a decision: remove the old blind area and make a new one to avoid erosion of the house.
First, the old blind area is dismantled and preparatory excavation work is carried out.
The width of the future blind area is 70 cm (minimum acceptable value). For it, a base about 90 - 100 cm wide is dug, and soil is selected at a slight angle to a depth of 45 cm. A leveling layer of sand is laid out on the prepared area under the foam coating.
This material will make the blind area warm. Accordingly, the foundation will not freeze and heaving will not occur. Thanks to these measures, ideal protection of the house and blind area will be achieved.
5 cm (500 mm) + 30 cm (sand) + 6 cm (crushed stone) = 41 cm + 4 cm of sand for leveling.
The next step is to lay geotextiles of minimum density. In this example – 150mm. (you can use material of higher density, but not less!). Geotextiles are sold in rolls 2 meters wide.
Drainage system design
The “tape” laid with penoplex is covered with the entire width of the geotextile. Sections of drainage pipe are taken, placed on top of the textiles and connected to each other with special angles.
The drainage pipe for draining water must go into the ditch. To do this, a trench is prepared according to the size of the pipe and covered with geotextiles. We can roughly say that upon completion of this stage, the pipe is located approximately in the middle of the geotextile.
After the pipe is laid, it is backfilled with crushed stone. It fills the distance between the penoplex and the drainage pipe. Then it needs to be wrapped with the free edges of geotextile.
The next step is filling it with coarse grain sand and leveling it with a rake.