The question of how to repair household heaters of various types is asked quite often, since these devices are used everywhere and are not insured against breakdowns of various kinds.
Modern heaters, whether convectors, infrared or oil, are made according to the same principles, but can differ radically in layout and engineering solutions. Let's consider a certain universal scheme for dealing with problems, focusing on the key features of individual classes of devices.
Basic safety rules
You should always remember that home heaters are powerful devices that operate on high voltage. Therefore, safety rules are the first thing to follow when repairing an electric heater:
- Be sure to turn off the power to the device by unplugging the power plug from the outlet.
- Availability of backup power must be ensured. In addition to the outlet into which the heater was plugged in, you will need another one, or an extension cord with reliable contacts and a wire designed for the appropriate power of the device.
- Only tools with insulated handles are used.
- Do not work with a disassembled heater with wet hands.
- To check the device circuits, you need to use special measuring instruments. Handicraft “dialing” is unacceptable.
- It is necessary to ensure good lighting of the work area.
And the main thing you need to do when repairing home heaters is to proceed from simple to complex, take your time, and before performing any operation, think about whether there are means to eliminate its consequences.
Spiral selection
Gynecological intrauterine devices come in different brands, both domestic and foreign. In addition, their cost can vary from 250 rubles to several thousand. This is influenced by many factors.
The Juno Bio spiral is quite popular among Russian women. It attracts, first of all, with its low cost. However, the low efficiency of this device entails a high risk of pregnancy. The Mirena intrauterine device has proven itself well, but it is one of the most expensive in its series. At the same time, the use of an intrauterine device is considered the cheapest and most accessible form of contraception.
This is a hormonal IUD. Its manufacturers promise that the Mirena IUD is less likely to move in the uterus or fall out. Namely, this leads to pregnancy, therefore patients are advised to regularly check the presence of an intrauterine contraceptive in the right place.
The standard voltage in the household electrical network is U=220V. The current strength is limited by fuses in the electrical panel and is usually equal to I = 16A.
- Tables of physical quantities, I.K. Kikoin, 1976
- spiral length formula
An electric soldering iron is a hand-held tool designed for fastening parts together using soft solders, by heating the solder to a liquid state and filling the gap between the parts being soldered with it.
Electric soldering irons are produced designed for mains voltages of 12, 24, 36, 42 and 220 V, and there are reasons for this. The main thing is human safety, the second is the network voltage at the place where the soldering work is performed. In production where all equipment is grounded and there is high humidity, it is allowed to use soldering irons with a voltage of no more than 36 V, and the body of the soldering iron must be grounded. The on-board network of a motorcycle has a DC voltage of 6 V, a passenger car - 12 V, a truck - 24 V. In aviation, a network with a frequency of 400 Hz and a voltage of 27 V is used. There are also design limitations, for example, it is difficult to make a 12 W soldering iron with a supply voltage 220 V, since the spiral will need to be wound from a very thin wire and therefore many layers will be wound, the soldering iron will turn out to be large, not convenient for small work. Since the soldering iron winding is wound from nichrome wire, it can be powered with either alternating or direct voltage. The main thing is that the supply voltage matches the voltage for which the soldering iron is designed.
Electric soldering irons come in power ratings of 12, 20, 40, 60, 100 W and more. And this is also no coincidence. In order for the solder to spread well over the surfaces of the parts being soldered during soldering, they need to be heated to a temperature slightly higher than the melting point of the solder. Upon contact with a part, heat is transferred from the tip to the part and the temperature of the tip drops. If the diameter of the soldering iron tip is not sufficient or the power of the heating element is small, then, having given off heat, the tip will not be able to heat up to the set temperature, and soldering will be impossible. At best, the result will be loose and not strong soldering. A more powerful soldering iron can solder small parts, but there is a problem of inaccessibility to the soldering point. How, for example, can you solder a microcircuit with a leg pitch of 1.25 mm into a printed circuit board with a soldering iron tip measuring 5 mm? True, there is a way out: several turns of copper wire with a diameter of 1 mm are wound around such a sting and the end of this wire is soldered. But the bulkiness of the soldering iron makes the work practically impossible. There is one more limitation. At high power, the soldering iron will quickly heat up the element, and many radio components do not allow heating above 70˚C and therefore the permissible soldering time is no more than 3 seconds. These are diodes, transistors, microcircuits.
Elementary breakdowns
The first thing to check is the integrity of the fuses. The reason for their combustion may be increased voltage in the outlet or a sharp reset of the parameters. Therefore, checking and replacing fuses, if available, is a smart first step.
A common cause of electric heater failure is described as an “open circuit.” Roughly speaking, energy does not circulate along the calculated circuit. There may be several reasons:
- broken contacts;
- looseness or carbon deposits on fork parts;
- burning or breaking of the cord in the area where it enters the plug;
- mechanical damage to the cable;
- carbon deposits, tearing, breaking of wires inside the device.
Before you start disassembling the case, you should carefully check the basic things. For example, plug the device into a different outlet. If this does not help, you can move on to further work.
Kinds
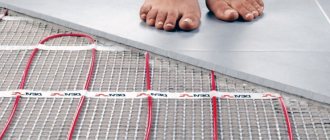
Film heaters come in three types:
- floor;
- wall;
- ceiling
Therefore, they are not suitable as the main type of room heating, but as an additional type they are used everywhere.
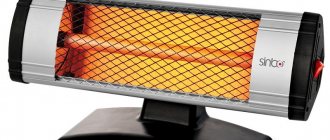
Ceiling film infrared heaters are more efficient. Infrared radiation is directed downward and heats objects, from which the heat spreads evenly throughout the room. They can be mounted on almost any type of ceiling covering and their installation does not cause any additional inconvenience, as it may seem at first. In addition, the undoubted advantage of such a heater is the absence of the risk of accidental damage.
If you are wondering how to choose a film heater for your dacha, then the ceiling option is most suitable for this purpose.
- Firstly, the absence of apartments on top eliminates the possibility of flooding and damage to such equipment.
- Secondly, a large heating area will not require the use of additional heating systems.
The floor covering can be installed under any final covering. The main advantage is the lack of impact on household appliances. The disadvantage is that it is undesirable to be under heavy furniture due to the possibility of damage.
Visual inspection for electrical problems
Until the disassembly of the case begins, it is useful to look everywhere possible. This is where a small but powerful flashlight comes in handy.
- Through the cracks in the fan heater grille, you can inspect the wire leads for broken contacts or broken lines.
- You can quite easily inspect the inside of the device for the presence of carbon deposits on the contacts.
- The main place of inspection, if available, is the contacts of the heaters: heating element, spiral elements, infrared bulb.
Often, a visual inspection reveals other causes of heater failure: the presence of foreign objects, liquid leakage, etc.
Removing the heater housing
Most modern electric heaters are not difficult to disassemble. The case can be disassembled quickly, after unscrewing several screws. But at the same time you need to carefully monitor the order in which the parts are removed. Many manufacturers use the housing as a supporting structure, attaching parts of the heater engineering solution to it.
If you are not confident in a good memory or have no experience in disassembling electrical appliances, it is worth photographing each action so that after the repair you can correctly assemble the entire working structure.
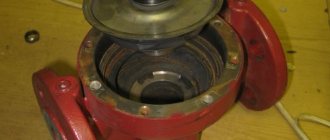
The biggest difficulties arise when disassembling oil heaters. Here the main circuits and sensors are covered with a lid. It can be easily removed: to pry the latch, you need to carefully move a thin metal object (screwdriver, knife) around the perimeter of the lid. This must be done carefully, without scratching the part. After determining the location of the latch, press on it and remove the cover.
How the device works
If the heater is broken, before you start repairing it, you should become more familiar with its structure and operating principle.
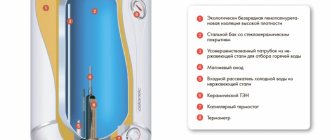
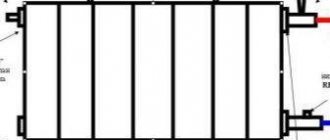
The main parts of an oil heater are as follows:
- Metal body.
- Heating element – heating element.
- Control block.
- Connecting wires.
The device works according to this principle:
- The housing is filled with special oil.
- When the radiator is turned on, the temperature of the heating element begins to rise.
- Accordingly, the oil also heats up.
- Gradually, heat is transferred to the walls of the housing, and from them the room is heated.
- When the temperature in the room reaches the optimal value, the control unit is activated and the heating element is turned off.
- The process is repeated throughout the entire period of connecting the heater to the power supply. Thanks to this, a comfortable environment is created in the room.
Checking internal parts
After disassembling the heater, all structural elements are carefully inspected. If there is carbon deposits, it is cleaned off; if there are breaks, they are eliminated. The power supply from the 220 V cable is checked. A tester is used for this. To make sure that the cable is not broken and is in good condition, during testing it is bent, moved, and probed. If the tester readings change, it is better to replace the power wire.
Tester
Checking key heater components
Let us note right away that heaters differ in the principle of operation and the parts used. To check the functionality of most components, you need skills in using a multimeter and an understanding of the structure of electrical circuits. Therefore, we will touch on the simplest things available to the average user:
- Circuit breakers. The first thing to check is the integrity of the fuses. In some heater models, these elements are hidden inside and access from the outside is not possible.
- Position sensor. Present on most powerful fan heaters and some models of oil heaters. The check is simple: if the sensor is working, then when the device is tilted it opens the circuit. In a vertical position there is almost zero resistance. The check can be carried out by any dialing. If the sensor is broken, it is replaced entirely.
- Regulator. Carbon deposits and oxides in temperature controllers are a common cause of heater failure. The elements must be disassembled, thoroughly cleaned with fine sandpaper, and wiped with alcohol.
- Thermal sensor, thermostat. The temperature sensor device is quite simple. Inside the mechanical unit responsible for opening the circuit at a certain temperature is a bimetallic strip. You need to set the regulator to minimum, take out the element, inspect for traces of soot, cracks, delamination, any oxides and deposits. If present, the plate should be replaced.
- Quartz resonator. Present in ceramic heaters, changes in its parameters develop over time, as a result of which the device ceases to obey the regulators. The part must be replaced; other repairs to the heater are not possible.
To eliminate other breakdowns, you need experience in electrical work, the ability to test the parameters of heating elements, motor windings, starting capacitors and the condition of other components. Therefore, it is irrational to go into detail, especially since each class of heaters has its own characteristics.
Repair process
Every owner, when an additional heating device fails, asks the question of how to get the broken equipment back to work. The solution to the issue is quite simple and consists of several points:
- Regardless of the type of work performed, before disassembling the oil cooler, you must disconnect it from the power supply.
- Then you need to disassemble the device and examine the oil radiator circuit to understand why it does not work. For this purpose, the control panel is disconnected from the main body. In this case, latches, screws and staples may be used as fasteners, so it is important to conduct a thorough visual inspection. After determining the type of fastening, remove the control panel. At the same time, it is very important not to make special efforts so as not to break the plastic elements.
- Restoring the operation of an oil heater begins with checking the power cord and switch. Sometimes an oil heater does not work due to broken power cord wires. You can check the reliability of this using a tester. As for the switch, the reason here is a broken contact, which is the result of burning of the wires at the connection points. To solve the problem, the wires are disconnected and stripped, and the connection point is also cleaned. Next, the switch is assembled and the restored contact is checked using a tester.
- At the next stage, all contact connections of the control unit are inspected. At each contact, oxidized or burnt areas are identified, as well as places of weakened fastening. Repairs are carried out using screwdrivers and sandpaper. In some cases, they use a soldering iron to solder the torn wires.
- If the thermal relay or temperature controller turns out to be faulty, you need to carefully remove these elements and disassemble them. The bimetallic plate located inside is pulled out and replaced with a new element. There cannot be any other faults in these parts. A new plate restores the functionality of the relay or thermostat.
- Thermal fuses are checked for operability using a tester; in case of malfunction, they are replaced with new elements. Each of the existing thermostats should be checked.
- If the oil heater does not heat up, the cause may be a faulty heating element. A tester is also used to check the condition of heating elements. It is used to measure resistance, the normal value of which should be equal to 1 KOM. A deviation from this value indicates a malfunction of the heating element and the time for its replacement.
Having gone through all the stages of checking the electrical parts of the oil radiator, you can begin to eliminate mechanical damage.
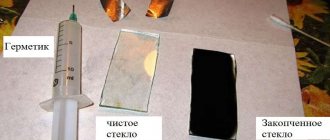
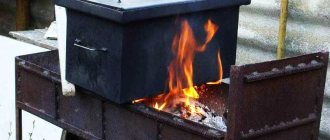
The most pressing problem is oil leakage from the radiator housing. To solve this problem, you need to disassemble the device and drain the remaining oil. When inspecting the housing for damage, it is important to accurately determine the location of the leak. Here, with the help of sanding paper, cleaning is carried out, as a result of which the size of the hole is determined. The method of repair depends on this. If the hole size is small and there are no signs of corrosion around, then you can use a small self-tapping screw or screw in the hole.
You can also use a special “cold welding” sealant to repair oil radiators. For convenient use, the material is pre-softened in the hands to a plastic state. The sealant is rolled into a ball and the hole is covered with it, carefully leveling it on the surface. For the sealant to completely harden, you need to wait about 20 minutes. After this, you can turn on the heater.
A hole caused by rust is more difficult to repair. The damaged area is also cleaned with emery cloth, removing rust to the base metal. After this, an inspection is carried out and the size of the hole is determined. A small hole can be soldered using brass solder rather than tin. A patch is applied to more extensive damage and welded using semi-automatic welding equipment. The process is complicated by the fact that it requires special equipment and skills to work with it.
You can repair oil radiators yourself; to do this, you need to have minimal skills in plumbing and electrical engineering. Moreover, repairing a minor breakdown will cost less than buying a new device for heating the premises.