close ×
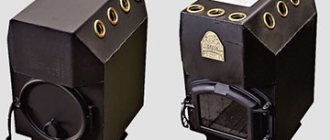
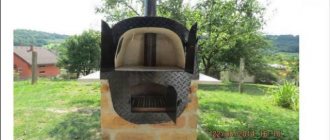
An excellent alternative to solid fuel boilers is a pyrolysis furnace. This is a long-burning stove that operates on a special principle and allows significant fuel savings. Compared to other types of heating devices fueled with wood, such a stove can work much longer, while being in no way inferior in the efficiency of heat supply. Let's take a closer look at how such a stove works, as well as what features of its operation and construction you need to know.
Criterias of choice
If desired, it will be easy to choose a ready-made model whose parameters meet the requirements, but often home craftsmen, carried away by the ideas of inventors, make pyrolysis furnaces with their own hands. When choosing a gas generator installation option, a number of points are taken into account:
- purpose of the pyrolysis unit. To heat a barn, chicken coop, garage or other technical premises, choose a relatively compact metal or brick structure. To heat the house, the priority is to build a long-burning brick stove. For tourism purposes, choose a portable camping pyrolysis oven;
- device power. Depending on the parameters of the heated object, the required power of the gas generator is determined;
- mobility of the structure. The brick pyrolysis furnace is stationary; the device is erected at a permanent place of operation. Almost all types of metal gas generators are mobile.
For tourist purposes, choose a portable camping pyrolysis stove.
For high-quality operation of a pyrolysis stove, the presence of solid fuel of a certain humidity is required, the reserves of which are stored in a utility room.
Pros and cons of gas generators
Pyrolysis combustion units are highly efficient and have many competitive advantages:
- high performance – efficiency up to 95%,
- environmental friendliness - minimal smoke level, no soot,
- comfortable maintenance - fuel is loaded 1-2 times a day depending on the model, there is no need to constantly monitor the fuel supply,
- fuel variability - pyrolysis can operate on any solid fuel resource. These can be various materials, including peat, pellets, wood, coal. Sawdust, husks, cardboard and other types of industrial waste are also used.
Another plus is the availability of self-assembly and installation of a factory model of a gas generator and the possibility of making a pyrolysis furnace with your own hands.
The main disadvantage of long-burning units is the high cost of the product. Depending on the power, models are sold in the range from 30 to 100 thousand rubles or more. Therefore, many are attracted to the idea of making their own pyrolysis oven for the home from inexpensive materials.
Among the disadvantages of operating pyrolysis devices, the requirements for fuel quality are also noted. Firewood must be stored in proper conditions to ensure optimal moisture levels. Otherwise, the efficiency of the unit is reduced, since the presence of wet vapors negatively affects the gas processing process.
Advantages and disadvantages of units
Among the wide variety of heating units, there are two main groups based on the principle of heat transfer, these are:
- Furnaces with a water circuit. In such units, water is heated, which releases heat into the environment for a long time, thereby ensuring long-term maintenance of a high temperature in the room. Among the advantages of such heating systems are their profitability and relatively low costs. However, there is a high risk of the colorimeter freezing, and the cost of additional plumbing work with such a unit may unpleasantly surprise the owner.
- Furnaces with different options for placing heat exchangers. In this case, the firebox is located above or below the air chamber. In the first case, it is necessary to install special smoke exhausters and fans. They create forced draft. If the firebox is under the air chamber, then natural draft works here.
Technical solutions for long-burning furnaces
The designs of the products are quite diverse, thereby significantly expanding the functionality of the designs. There are two types of materials for making the unit: iron and brick. Brick heating devices were improved by Igor Viktorovich Kuznetsov. He took as a basis the developments of Joseph Samuilovich Podgorodnikov. Thus, Kuznetsov’s furnaces began to differ significantly in their increased efficiency. We got acquainted with its designs in the previous article. In this article we will look at the main points of making metal stoves on wood for long burning with our own hands with diagrams.
Let's look at the varieties of some heating devices made of metal. Heat exchange in them is carried out in the following ways:
- through metal walls;
- convection method using an air jacket;
- through the water jacket.
Types of long-burning stoves:
- “Lachinyanka” is a rather complicated structure, operating on one load of coal for up to seven days (about 25 kg is required).
- Waste oil oven.
- “Buleryan” is a device for air heating.
- "Bubafonya." Such a design is quite easy to make using a gas cylinder or metal barrel.
The basis for developing a long-burning stove with your own hands is drawings. Information on how to properly manufacture a structure is presented in several articles at once, because the technologies for performing the work are quite complex and differ significantly from each other.
In Buleryan’s DIY article, read about how to make a stove yourself. There are also diagrams and drawings available for download, as well as step-by-step instructions for assembly and welding.
There are many types of waste furnaces. A drip-type device is often installed in the garage. A massive, but more durable option is a waste oil stove from a gas cylinder. To heat large warehouse-type premises, an exhaust furnace with a water circuit is used.
“Bubafoni” are also different. Among the most common are a device made from a barrel and a unit made from a gas cylinder, which is more durable, since its walls are thicker and burn out more slowly.
Material selection
For the manufacture of wood chip stoves, acid-resistant and heat-resistant steel grades are used, because they not only tolerate high temperatures well, but are also resistant to condensation that forms during ignition.
This metal is used for the internal lining of furnaces and boilers, as well as for the manufacture of drums and internal casings of washing machines.
It is also necessary to choose the thickness of the metal correctly. After all, the thinner the part, the less rigid and durable it will be (even if it weighs less), but at the same time it is noticeably easier to process. And the thicker it is, the stronger the structure will be, but the greater its weight, and the processing will be noticeably more difficult.
Therefore, most often for home-made stoves, stainless steel with a thickness of 1–1.5 mm is used, although both thinner and thicker metal can be used.
As a basis for the manufacture of round heating devices, you can use spoon dryers of various diameters, made of food grade stainless steel.
Such dryers can be bought on AliExpress and other sites for a low price. Metal thermoses are well suited for creating pyrolysis stoves, because they are also made of stainless steel.
However, they are quite difficult to drill due to their round shape and the inability to use a drilling machine, and for complete pyrolysis, the air flow in the combustion zone should be minimal, and in the afterburning zone located above the combustion zone, maximum.
Often, various steel containers are used to make wood chips, such as:
- saucepans;
- mugs;
- pots;
- banks.
The main selection conditions are:
- heat resistance;
- acid resistance;
- compliance with the size and shape of the water container that will be installed on top.
Drawings, dimensions and calculations
You can make a small stove with your own hands to heat a garage or other space using scrap materials.
It’s easy to create a sketch plan and drawing of a small metal stove-stove yourself
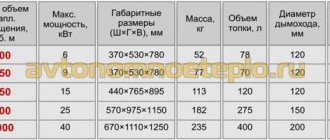
An obligatory step is the creation of a drawing or diagram of the future structure. To do this, you need to determine the shape and dimensions of the case, the location of the cameras. After this, the power sufficient to heat the room is calculated. The parameters are determined as follows:
- Let's assume that 10 kW of heat is required to heat the room at the lowest outside temperature. We determine the required power of the furnace in normal combustion mode. It is known that in the gas generation mode the furnace power is 10-30% of that which develops in the flame combustion mode. Consequently, to obtain 10 kW with gas generation, the unit, when burning with a flame, must develop a power of W = 10 / 0.3 = 33.3 kW (we assume a 30 percent power ratio);
- We choose the least energy-intensive fuel. For example, dry beech is optimal;
- We calculate the volume of fuel that can provide the required power. A portion of firewood burns in flame mode in approximately 4500 s. Therefore, during this time it should provide the following amount of heat: Q = 33.3*1000*4500 = 149.85 MJ. Let's calculate the required mass of fuel, taking into account that it burns only 80% completely, and the efficiency of a homemade stove is approximately 50%: M = 149.85 / (15.5*0.8*0.5) = 24.17 kg. Knowing that the density of dry beech is 620 kg/m3, let’s convert the resulting mass value into volume: V = 24.17 / 620 = 0.039 m3 = 39 l;
- We calculate the volume of the firebox. The average furnace load factor is 0.63. It should have a volume: Vt = 39/0.63 = 61.9 l.
You can make a drawing or technical drawing of the product yourself, taking into account the shape and features of the stove. A ready-made image of a suitable unit is taken as a basis.
Tools and materials
List of required consumables and working tools:
- sheet steel grade St20, thickness 3–4 mm;
- steel equal angle angle 4x50 mm;
- pipe with a diameter of 50–60 mm;
- steel reinforcement with a cross section of 8 mm;
- steel pipes with a diameter of 110 or 120 mm for the chimney;
- bricks in the amount of 15 pieces;
- electric welding machine and several packages of electrodes;
- drill and metal drills, grinder with 230 mm circles;
- building level, tape measure, pencil, hammer.
Choose consumables that are high-quality and reliable. Not only the operation of the pyrolysis furnace, but also the safety of the surrounding area during the heating process depends on this.
Preparation and selection of installation site
The assembly of the structure is carried out directly in the room where the stove will be installed. It is best to order sheet cutting into blanks from specialists in the store. This will ensure a good quality base for the product.
The space around any stove must be safe and heat-resistant, and the floors must be level.
The site for installing the unit must be prepared.
- a base of bricks or other non-combustible material is laid on the floor;
- the base area should be larger than the dimensions of the oven;
- install the unit at a distance of at least 80 cm from the nearest walls;
- the floor within a radius of 1.2 m in front of the heating device must have a fireproof coating (iron sheet 1.5 mm thick).
Types of pyrolysis furnaces
The following types of pyrolysis furnaces can be distinguished:
- Single-circuit devices. Single circuit furnaces have two combustion chambers that are separated by a fireproof partition.
- Dual-circuit devices. These gas generator furnaces have the same design, but they have an additional circuit that heats the liquid for hot water supply.
Also, based on the material used to make the heat exchanger, the following types of pyrolysis furnaces are distinguished:
- Devices with a cast iron heat exchanger. The service life is at least two decades, but the unit is sensitive to sudden temperature changes in the combustion chamber. In such aggressive conditions, a cast iron pyrolysis furnace gradually becomes unusable.
- Devices with a steel heat exchanger. Service life is at least 13 years. The equipment is susceptible to corrosion processes, but is not afraid of temperature changes.
A pyrolysis furnace with a water circuit is able to heat a small volume of liquid in a short period of time.
For property owners who do not want to purchase a pyrolysis combustion furnace in specialized stores, but to construct the device with their own hands, a mini pyrolysis furnace will come in handy. This is the same stove, but small in size, installed in garages, bathhouses or other small rooms.
The operating features of a mini pyrolysis oven are presented in the video.
https://youtube.com/watch?v=jzprMcjGF6Y
about the author
Sergey Surenovich Lachinyan is a famous inventor in the field of new physics, acoustics and electronics. The idea to create a new type of stove was inspired by the autonomous mobile housing he was creating at that time, based on a GAZ-66 car with a booth (there are many articles about it on the Internet and in the media). To heat the living area, a stove with low fuel consumption and the highest heat transfer efficiency was required. It would seem that these things are incompatible, but through trial and error the inventor found a solution and made the long-awaited stove.
The principle of its operation was the smoldering of coal in the complete absence of oxygen - in physics this phenomenon is called pyrolysis. In nature, it can be observed during the smoldering of peat springs and coal mines, where there was a fire years ago, but currently they are “mothballed” and still “burn” without oxygen and practically without emitting smoke.
The created pyrolysis oven can be used in tents, greenhouses, country houses, as well as in small agricultural buildings (chicken coop, pigsty). The inventor called it PNG 5-50, but truck drivers, fishermen and hunters, who warmed the interior of their cars and tents in the cold, gave it their own name, close to their hearts - “Lachinyanka”. Over time, the design of the furnace was modernized, acquired complete forms and could be assembled from more easily accessible materials. A patent was later received for the invention.
A little later, the PNG 5-150 model appeared with the possibility of using a water jacket for a complete replacement of blast furnaces and much greater power for the heated area.
Now the drawings of pyrolysis furnaces are available to everyone for a nominal fee, and as Sergey assures, in the future we will have proposals that will allow us to use this furnace not only for heating.
Only by purchasing drawings from us, you are guaranteed to receive support from the author - Sergei Lachinyan!
If you are interested in stoves for your home, then you have probably heard about the Lachinyanka stove. The model is truly unique and worthy of attention. Therefore, stay with us to take a closer look at its design, operating principles and even production stages (if you want to do it yourself, yourself).
Operating principle of a pyrolysis furnace
What is the operating principle of this stove? The processes occurring in it are unfamiliar to many, so it is necessary to study in more detail the principle of operation of a pyrolysis furnace.
A distinctive feature of a do-it-yourself pyrolysis furnace from a conventional one is that the fuel in it burns when there is a lack of oxygen. And this is surprising, because in conventional designs the fuel burns if there is a large amount of oxygen and this ensures the normal functioning of the entire heating system.
How does the pyrolysis process occur? When hydrocarbon fuels are burned, a process of oxidation and heat generation begins. Fuel under the influence of high temperature does not burn completely, releasing a large amount of various gases. The higher the temperature with a lack of oxygen, the more intense these gases begin to be released.
Thus, the principle of operation of a do-it-yourself pyrolysis oven is to burn these gases. That is why such furnaces are also called gas generators. Pyrolysis is the process of decomposing fuel into its component parts when heated, followed by their combustion and release of heat.
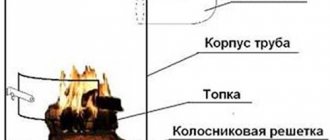
How does this boiler work? The boiler consists of the following elements:
- Gasification chamber
- Afterburner
- Air supply system (primary, secondary)
- Water jacket
- Grate
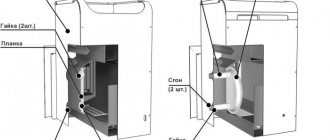
Boiler elements
The operating principle is as follows:
- Fuel is loaded into the gasification chamber and ignited.
- Gas begins to be produced from the fuel.
- Primary air is supplied to the chamber, and due to excess pressure, gas begins to flow into the lower afterburning chamber.
- Secondary air is supplied to the afterburning chamber, and the resulting mixture burns at a high temperature.
- The water in the water jacket of the boiler is heated and supplied to the heating system, while at the same time return water is supplied to the inlet part of the jacket.
- The coolant used also serves as a boiler cooler.
This is the basic principle of operation. But for proper functioning, strict proportions of the air-fuel mixture must be observed. Otherwise, combustion will proceed unevenly, with increased smoke. So, to the question whether it is possible to make pyrolysis ovens with your own hands, we will answer positively. But it’s worth making a reservation right away:
- To manufacture such a unit, it is not enough to have good welding skills or to have working drawings of the unit in hand.
- It is necessary to use high-quality materials, many of which are expensive.
- This primarily applies to metal. For manufacturing you will need good alloy steel.
- Appropriate electronics will be required. Unless, of course, you plan to hire a stove technician to constantly monitor the boiler.
There is no need to talk about using such a boiler for the main heating of a home. To make a pyrolysis boiler, you can, of course, take old barrels, pieces of pipes and other iron trash, which is also used to build an iron furnace. But we must understand that the processes occurring in this unit require compliance with certain conditions for its normal operation.
Making a stove yourself
Baking a bubafonya with your own hands begins with drawings. Like any pyrolysis stove for a bath or a pyrolysis boiler with your own hands, you start with a diagram. For drawings of pyrolysis boilers, see the photo below.
Drawing of the Bubafonya pyrolysis furnace. Calculation of basic proportions.
Scheme of a pyrolysis furnace.
Preparing the room, materials and tools for work
Initially, you need to choose a room where you will make a pyrolysis boiler with your own hands, where we will install a babufonya stove. This needs to be done for this reason. When the pyrolysis boiler operates, the lower part of the body heats up to a very high temperature. To avoid a fire hazard, you need to make a small foundation for the stove. Refractory brick is best suited. First you need to dig a “pit” measuring one meter by one meter. The depth of the swarm is 20-30 centimeters. We fill the hole with crushed stone. Pour in the liquid solution. As soon as the area is dry, we cover it with refractory bricks in two rows. It's best to do everything below the level. In some modern buildings, such as auto repair shops, production workshops, warehouses and other premises with concrete floors.
You don't have to make a foundation for the stove. The concrete floor is of sufficient thickness. If there is little space and there are walls nearby, in close proximity to the stove, it is better to install a reflector. Of course, made of heat-resistant steel.
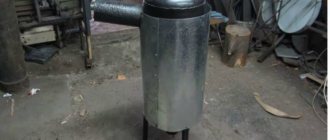
The materials are as follows. A two-hundred-liter barrel (if the pyrolysis stove is made from a barrel) or an old cylinder will serve as the basis for the future stove. Select thick-walled boiler pipes for the production of a chimney. They can be found in any heating network. You will need a channel, a sheet of metal (not thin). The following tools will be needed: Welding, electrodes, hammer, chisel, metal saw, power cutting tool.
Installation and assembly of the structure. Chimney installation
Stage one. First you need to cut off the top of the balloon. Do not throw away the cut top. It will be needed as a future cover. The diagram of the pyrolysis stove is located above. A do-it-yourself pyrolysis oven begins with cutting off the top of the body.
Stage two. We will make a chimney hood. We make a hole of the required diameter along one of the sides of the body. Find a piece of boiler pipe that is bent at a 90 degree angle. The pipe diameter is suitable from 100 to 150 mm. We will make the chimney riser from a boiler pipe of the same diameter. The thicker the pipe, the better the draft in the chimney system. And we know that if the draft is good, then the pyrolysis furnace with your own hands will heat with good efficiency. We will weld the adapter for installing the chimney. We will seal the transition using asbestos cord, clay, or fiberglass.
Third stage. We will weld 2 holders and a top tube to the cover; it will be able to control the lowering of the system. We will attach a metal strip to the stove. It will serve as a side that prevents the stove lid from moving. In the lid of the cylinder, using a gas cutter, we cut out a hole for the pipe (air exhaust) approximately 88 millimeters. This pipe can have any shape. Round or square, it doesn't matter. This is not important for bubafoni to work. And the assembly will be simplified.
Fourth stage. We take a sheet of metal 4 mm and higher. Cut out a round pancake with a hole in the center of the pancake. The diameter of the pancake will be equal to the diameter of the air exhaust pipe. Between the edge of the air distributor and the wall of the furnace body we leave a gap that is equal to 5% of the length of the circle. We take the thickness of the iron under the plate, based on the size of the stove body. If the stove is made from a cylinder, take the thickness of the iron plate from 8 millimeters. If you make the stove body from a 200-liter barrel, then take the metal plate from 5-6 millimeters. We will weld six blades under the bottom of the air distributor plate. Their necessity is due to the uniform combustion of wood in the chamber from below, and the gases from above will burn completely. A do-it-yourself pyrolysis oven with this mode of operation will last a long time.
In the center of the air distributor we attach a second round pancake, smaller in size - 4 centimeters. The plate is necessary because there is sufficient space between the blade and the firewood for the gases to escape. And the coals did not block the air supply path. Having assembled all the parts together, you need to load the body with wood. The firewood is placed vertically, with paper, wood chips or birch bark placed on top of the firewood for ignition. What kind of wood will we burn with? Dry or raw? If you will often be using raw firewood, you definitely need to add one part to the boiler design. The chimney should be extended downwards, having received an elbow for collecting condensate. Place a drain valve on this elbow.
Alternative options for installing furnaces
There are three such options. Let's consider additional options for assembling bubafoni that can be implemented.
In option 1, we will cut out the top lid of a 200 liter barrel. Let's make a pressure circle for the air distributor from it.
In option 2, cut two circles from a sheet of iron, with the same diameter as the diameter of the pipe. Then we will connect the first circle to the pipe by welding. This will be the bottom. The next circle will become a pressing oppression.
In option 3 we use an iron cylinder (made of large sheet metal) instead of a barrel. Brew a sheet of rolled paper along the seam. The lid with the bottom is also made from a sheet of metal. Everything else is made in the same way, from previous design options.
Stages of installing bubafoni from a gas cylinder.
We will arrange all the work on producing Bubafoni from an old gas cylinder into logical steps: Fill the body with water (the cylinder valve is unscrewed). This will prevent a possible explosion of residual gases. Important, responsible operation!!!
Fill the body with water (the cylinder valve is unscrewed). This will prevent a possible explosion of residual gases. Important, responsible operation!!!
Using a grinder, cut off the top part of the cylinder. Please note that where there is a seam, an additional reinforced layer is glued to the inside of the cylinder. This will complicate the cutting process, but it can be solved. Without this there is no way, the curb will interfere with the movement of the piston. The action is not simple and it is better to cut below the seam. Let's make a hole in the body for the chimney near the top of the boiler. An elbow is made from an iron pipe with a cross-section of approximately 100 millimeters at a right angle. Then two pieces of pipes are cut at 45 degrees and welded together. Next, a 120 mm chimney pipe is connected to the elbow through an adapter. This will definitely make the traction better. The adapter must be sealed using fiberglass or ordinary clay. We will make the lid from a piece cut off from the cylinder, or from sheet metal. Of course, a flat lid would be better. You can place a frying pan or saucepan on it. We cut out the hole for the piston by welding. The section can be anything. Maybe not round. A square or any other pipe will serve its purpose just as well. Installation will be simple.
A pancake 27 cm in size is cut out of a 4 mm piece of metal. For the rod we make a hole in the center. The circle is made in such a size that there is a gap of 5 percent of the size of the pancake. Six blades are welded to the bottom of the disk. The blades are bent so that a turbulence of air masses is obtained in the direction of the arrow to the right. The wood will burn better and will burn off all the gas at the top of the chamber. In the center, on top of the blades, a disk with a 40 mm hole is attached. This is necessary so that the charcoal does not clog all the spaces in the air mixture supply rod, and there is sufficient clearance between the firewood and the blades. The stove is installed on the foundation, shielded from nearby walls and objects. This will achieve additional fire safety. The foundation, after heating, will serve as a good heat store for the room and will not cool down so quickly. When loading raw wood into the stove, an additional bend is added to the chimney pipe below, which accumulates condensate. And a tap is installed in the elbow to drain condensate.
Laying the foundation for a pyrolysis furnace
To build a foundation for a pyrolysis stove we need:
- Shovel
- A container for mixing mortar or a concrete mixer (whoever has one).
- Ready-made mortar in bags or individual components (sand, cement)
- Crushed stone
- Fire-resistant red brick
Let's get to work. We will conditionally divide all work into three stages: First stage. First, let's dig a hole the size of each side of the square, equal to one meter, or the side of the square, up to one and a half meters. Accuracy is not important here. The depth of the hole for the foundation of the bubafoni should be thirty centimeters. No need to go deeper. Otherwise, there will be cost overruns and materials.
Second phase. We fill the pit with crushed stone. Mix the concrete solution. The brand of solution is optional. We fill the crushed stone in the hole with concrete mortar. Make the surface smooth. A simple trowel will be enough. You need to pull it across the surface of the concrete with a flat, clean board. When the concrete has dried, check the quality of the plane using a building level. If necessary, we additionally adjust the resulting plane according to the level. Depending on the temperature at which the concrete dries, from several days to a week, we wait for the concrete pad to dry completely. After the concrete pad has dried, we move on to the next stage.
Third stage. We lay fire-resistant bricks on top of the concrete base. How many rows of bricks will be enough? Two or three layers of refractory bricks are enough. If there are walls nearby, then it is necessary to install screens to reflect heat from the walls of the building. Screen materials can be the most common.
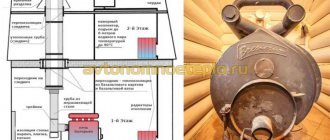
Mechanism of action of a pyrolysis oven
Internals of a pyrolysis furnace
All existing pyrolysis furnaces, and brick ones are no exception, operate on the same and extremely simple principle.
The user places fuel in the firebox, compacts it thoroughly and ignites it. After this, you need to close the furnace doors and start the smoke exhauster. Under conditions of elevated temperature and lack of air, the load begins to smolder, simultaneously releasing wood gas. This is precisely what the principle of pyrolysis is based on.
Pyrolysis oven
During the pyrolysis combustion process, the loaded fuel is separated into wood coke and a mixture of pyrolysis gases. There is also some solid residue left. The decomposition reaction is exothermic and is accompanied by the active release of a large amount of heat. Pyrolysis is a much more efficient use of fuel compared to conventional combustion.
The resulting gases pass into the second chamber of the firebox, mix there with the incoming secondary air and burn, releasing additional heat. The generated heat is used simultaneously to heat the house and dry the loaded fuel.
The main feature of the pyrolysis process is that one load of fuel is enough for at least a day when wood is used (for stoves with a medium-sized firebox). The use of coal allows you to completely forget about the need to add fuel to the stove for several days.
Principle of operation
Pyrolysis gases ignite at a temperature of at least 450 degrees. However, elevated temperature alone is not enough. It is necessary that air is supplied to the furnace in certain quantities in accordance with a pre-calculated and tested scheme. To control the volume of supplied air, the pyrolysis furnace is equipped with a fan. It, in turn, connects to the automatic control unit.
The main difference between the design of a pyrolysis furnace and an ordinary furnace unit is the presence of an additional combustion chamber for wood gases. In this case, the height of this chamber must be at least 500 mm.
It is the arrangement of the firebox that is the largest cost item when constructing a pyrolysis furnace. To achieve maximum efficiency, the firebox must be equipped with automation equipment. However, if you have a limited budget, you can do without them - with automation it is simply more convenient and, of course, more efficient.
At the same time, pyrolysis furnaces of any configuration are environmentally friendly. Pyrolysis gases actively interact with carbon dioxide. As a result of this reaction, the release of harmful products is minimized. Thanks to this, the requirements for the chimney are significantly relaxed.
Ignition of the Bubafonya stove
To begin with, remove the caps from the cylinder and remove the piston-press with the air duct from the stove. Let's put dry wood inside the stove. Any type of firewood. We place the firewood horizontally, as close to each other as possible. If we place the firewood vertically, we will get an unpleasant surprise.
The surprise will be next. An unburned log standing vertically will not allow the piston to move to the bottom. If this happens, there will be a full-fledged fire in the lower chamber. The fuel will burn quickly. The operating mode of the stove will be burning instead of smoldering. I’m generally silent about smoke from the air duct; it will definitely appear. Firewood does not need to be stacked above the level of the chimney opening.
Next, you need to press the firewood with the piston and put the bubafoni cover on the piston.
How to properly set fire to wood? Simply throwing a burning match will not work. It will definitely go out before it even reaches the firewood. We'll keep it simple. Take paper, rags or a piece of birch bark. Let's light it and throw it in the oven.
We need to wait 20 minutes for our bookmark to burn well. Then close the valve on the air duct. Air will begin to enter the stove in less quantity. In the primary chamber with firewood, the firewood will stop burning and begin to smolder. Pyrolysis gases will be released. But we need gas. After all, the installation is pyrolysis! This is how our super stove will reach its operating mode.
Video instruction. Ignition of the Bubafonya stove
Cost of work and materials
Before starting the assembly process, you should calculate how much it will cost to build such a boiler. In general, it is generally accepted that making a boiler yourself is the cheapest and most economical option. However, we should not forget that in order for the system to serve uninterruptedly for a long time, it is necessary to purchase only high-quality materials.
With additional use in the house or for a bath, self-assembly of the boiler will save up to 2000 USD. However, many who want to cut costs sometimes misjudge their own strengths. Therefore, it is recommended to solve this issue not in one day, but to think and make all the required calculations.
How to heat?
In greenhouses, you can use a stove without any problems and get a good harvest, but only in spring or autumn. It is not profitable to use a stove in winter: this type of heating will be very expensive, and the investment simply will not pay off. Thus, stove heating is for those gardeners who do not plan to work in winter frosts.
Some people mistakenly believe that air temperature is important in a greenhouse, but this is not the case. Plants do not need warm air to grow, but warm soil. The quality and speed of development will depend on the temperature of the earth.
Considering this fact, you need to understand that the stove in the greenhouse is installed as close to the ground as possible - so that the main heat flows heat the soil. Otherwise, heating will lose a huge part of its potential.
Air for the furnace is taken by piping outside the greenhouse. Subsequently, it enters the furnace space and is heated, after which it enters the greenhouse. Stoves are very efficient, which can be disastrous for greenhouse plants - high temperatures can harm them.
That is why in greenhouse stoves the materials for the firebox do not burn, but slowly smolder. This allows you to maintain a soil temperature that is comfortable for plants, while fuel is consumed more slowly and has to be replaced less frequently.
Knowing about the basic principles of heating greenhouses, you can proceed directly to choosing the type of stove.
How to make a pyrolysis oven with your own hands: step-by-step instructions
The assembly of a metal structure is carried out in stages:
- The frame is made by welding the metal elements of the racks together. Up to 1 m in height, the width is the size of the oven.
- The inner walls are installed on the brick base along the entire length and welded, and a compartment for ash is placed on the bottom.
- The main parts are welded: the afterburner with the base and with the combustion chamber.
- Stiffening ribs are attached.
- Cut out the firebox window.
- The system is connected to supply air to the stove.
- Install the top plate and outer walls.
- A steel water jacket and water tanks are installed.
- Water pipes (as a set) - heat exchanger, are welded into a flow circuit with a significant external surface to deliver the greatest heat transfer to the coolant.
- Install a fan in the pipe.
- Cleaned (pre-calcined) sand is poured between the inner and outer walls. It will accumulate heat and also protect against overheating and burnout.
- The doors are attached and sealed. A collector with water is connected to the circuits.
Assembling a brick stove is carried out in the following order:
- Prepare the materials - ordinary brick 400 pieces, fireclay brick up to 100 pieces (for the heat exchanger) and a mortar of: 8 parts sand, 1 part water and 4 parts clay.
- The solution is made in advance: the clay is mixed with water until it becomes sour cream and left overnight. Next, the solution is passed through a sieve and sand is added.
- A heat exchanger consisting of two chambers is created from brick.
- The grates are attached in a loose, light position, since they will expand when heated.
- Place a fan, chamber doors, and valves.
Important! A pyrolysis furnace requires dry fuel with a humidity of up to 20%, then the heat transfer effect will be maximum. With increased fuel humidity up to 50%, the furnace performance indicator is reduced by 2 times
Stove with cooking plate
Do-it-yourself laying of a small stove made of solid brick is the simplest and most popular option; step-by-step instructions and photos are included.
The dimensions are:
- depth - 53 centimeters;
- width – 78 centimeters.
The work goes better and faster if the master has everything he needs. Therefore, you should purchase in advance; you will need:
- grate;
- red solid brick;
- blower door;
- combustion door;
- pipe valve;
- cast iron stove on a single burner.
If the stove burns wood, it does not require fire bricks. And red must be chosen very carefully so that it is free from unevenness and cracks. You will need no more than 107 pieces. The remaining items on the list are needed in a single copy.
Preparation of masonry mixture
The recipe for preparing the masonry mixture is quite simple. For it you will need:
- water – 1 part;
- clay – 4 parts;
- sifted sand - 8 parts.
The ingredients are simply mixed together. Sand is added last. It is actually very easy to calculate the correct consistency of the finished solution - it should slide off the trowel without leaving any traces. And during laying, it will not leak out of the seams (the thickness of which should not exceed 5 millimeters).
The volume of the mortar is calculated based on the amount of bricks available. On average, one bucket of masonry mixture is enough for fifty bricks.
Pyrolysis boiler manufacturing technology
To make a powerful boiler, you need to be able to handle an angle grinder and a welding machine, as well as understand the drawings. If you manufacture a boiler with a power above 25 kW yourself, you must do everything according to the drawing, otherwise the boiler will not meet safety requirements.
The walls of the boiler should be made of heat-resistant steel, only this will guarantee that it will last for quite a long time. If such steel cannot be found, you can use ordinary steel, only in this case the internal chambers of the boiler are lined with fireclay bricks.
Boiler manufacturing stages.
- The boiler body is made of sheet steel. Using a grinder, boiler parts are cut out of a sheet of metal, holes are made in the walls for the ash pan door and loading door, as well as for pipes and a smoke exhauster. The most important thing is to adhere to the dimensions indicated in the drawing. Using a welding machine, the parts are connected, after which the seams are cleaned of scale and ground.
- Then the pipes are welded so that there are no gaps between the seams. A pipe of the required diameter is taken and a protective heat exchanger is installed on the rear wall of the boiler. After that, they check whether the heat exchanger is leaking due to increased pressure from the compressor, and only then install the rear wall of the chamber, made of heat-resistant steel.
- Then they begin to install a partition that separates the gasification and gas combustion chambers, installing a cast iron grate. An air duct with a damper is made at the top of the gasification chamber. An air duct is also made at the bottom of the chamber and at the same time the bottom and sides are lined with fireclay bricks.
- The boiler doors are made of heat-resistant steel, and for maximum tightness they are reinforced with metal corners.
- The boiler should be installed in a non-residential area, connecting the chimney. Then a water circuit is connected to it and a smoke pump is installed.
about the author
Sergey Surenovich Lachinyan is a famous inventor in the field of new physics, acoustics and electronics. The idea to create a new type of stove was inspired by the autonomous mobile housing he was creating at that time, based on a GAZ-66 car with a booth (there are many articles about it on the Internet and in the media). To heat the living area, a stove with low fuel consumption and the highest heat transfer efficiency was required. It would seem that these things are incompatible, but through trial and error the inventor found a solution and made the long-awaited stove.
The principle of its operation was the smoldering of coal in the complete absence of oxygen - in physics this phenomenon is called pyrolysis. In nature, it can be observed during the smoldering of peat springs and coal mines, where there was a fire years ago, but currently they are “mothballed” and still “burn” without oxygen and practically without emitting smoke.
The created pyrolysis oven can be used in tents, greenhouses, country houses, as well as in small agricultural buildings (chicken coop, pigsty). The inventor called it PNG 5-50, but truck drivers, fishermen and hunters, who warmed the interior of their cars and tents in the cold, gave it their own name, close to their hearts - “Lachinyanka”. Over time, the design of the furnace was modernized, acquired complete forms and could be assembled from more easily accessible materials. A patent was later received for the invention.
A little later, the PNG 5-150 model appeared with the possibility of using a water jacket for a complete replacement of blast furnaces and much greater power for the heated area.
Now the drawings of pyrolysis furnaces are available to everyone for a nominal fee, and as Sergey assures, in the future we will have proposals that will allow us to use this furnace not only for heating.
Only by purchasing drawings from us, you are guaranteed to receive support from the author - Sergei Lachinyan!
Classification of pyrolysis devices
The design provides two compartments: the first contains solid fuel and the process of its slow oxidation occurs. When wood smolders, a large amount of flammable gases are released, which enter the compartment above and burn. To prevent the fuel from flaring up and smoldering, the supply of oxygen is strictly regulated. By and large, pyrolysis devices operate on gas, which is produced in the unit itself.
Scheme of a pyrolysis furnace
The operation of a long-burning installation provides the maximum amount of thermal energy with significant savings in fuel resources. This is due to the fact that the fuel is processed almost completely, as a result, soot and ash are almost not formed, and there is also no smoke.
This group includes a number of designs:
- Potbelly stove. A gas generator with an internal structure in the form of a potbelly stove is used for heating residential and technical premises. The model is also relevant for baths and saunas, used for cooking, there are outdoor options for barbecue complexes;
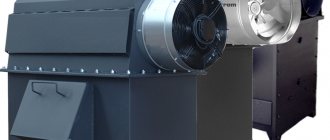
- Buleryan stove. This shaft-type pyrolysis structure with an efficiency of up to 75% is intended for heating both residential and non-residential premises. Cold air is sucked in through the lower ends of the pipes surrounding the boiler, which quickly heats up and is thrown upward into the room through the upper elements.
- Bubafonya stove. The invention belongs to a craftsman from Kolyma; an old gas cylinder is used as the basis for the design. The installation is relevant for heating technical premises. A bubafonya from a cylinder with a volume of 50 liters is capable of working on one stack of firewood for 6 hours, maintaining a comfortable temperature in a room of up to 70 m².
- Lachinyan stove. The installation combines the highest possible efficiency and extremely low fuel consumption. The models are actively used for heating RVs and camping tents. “Lachinyanki” are also used for heating agricultural buildings and hunting lodges. Models with a water jacket are used for heating residential premises up to 300 m². It is noteworthy that 2 buckets of coal are enough for 5-7 days of uninterrupted operation of the pyrolysis unit of Lachinyan, a famous inventor from Kazakhstan.
- Pyrolysis furnace using waste oil. An economical long-burning unit during mining is designed for heating non-residential premises. The design is as simple as possible, and most home craftsmen can make such a model.
Pyrolysis furnace Buleryan
A gas generator in the form of a brick structure - a Kuznetsov stove - is used for heating residential premises and bathhouse complexes. The device is also used for cooking. The efficiency of Kuznetsov pyrolysis furnaces is 80% and higher, the fuel in them burns almost completely. The full potential of hot gases and smoke is used to heat the brick body of the structure. High productivity of Kuznetsov gas generators is ensured by a special two-bell design.
Types of pyrolysis
https://pirolizeco.ru
The choice of type of pyrolysis depends on the composition of the processed raw materials and the planned final product.
Dry and oxidative method
Taking into account the temperature at which the process occurs, oxidative and dry types of pyrolysis are distinguished.
During the oxidation reaction in the installation, industrial waste is thermally decomposed. They are partially burned or come into direct contact with fuel combustion products. The method is optimal for neutralizing raw materials unsuitable for gasification or combustion:
- Pasty raw materials;
- Waste with high viscosity;
- Precipitation with humidity percentage;
- Ash waste and sludge;
- Contaminated land;
- Dusting raw materials;
- Waste containing metals and their compounds;
- Cables;
- Old cylinders;
- Waste car tires.
The oxidative pyrolysis method is suitable for the disposal of solid waste from industrial processes and wastewater.
Dry pyrolysis is a method of heat treatment of raw materials with its active neutralization. The fuel is a chemical substance. The method is used to create waste-free technological cycles.
Low, medium and high temperature types
The low-temperature process occurs at around 450-550 degrees. Characteristics of the method:
- Increased yield of liquid product and semi-coke;
- Reduced output of combustible gas with increased calorific value;
- Suitable for producing liquid fuel (resin);
- Used in the processing of rubber waste to obtain monomers;
- Semi-coke serves as a household combustible material.
The medium-temperature coking method occurs at temperatures up to 800 degrees. Accompanied by the release of an increased volume of gas with a reduced combustion temperature. The volume of residual products: coke and liquid is also reduced.
High-temperature type - coking in the temperature range of 900-1050 degrees. The release of solid and liquid residues is minimized. Gas production is increased to the limit with reduced combustion heat. Result: reduction in resin concentration, obtaining fuel suitable for transportation.
Fast and slow pyrolysis
A quick method is high-temperature decomposition of the material without the participation of oxygen at a heating rate of thousands of degrees per second. It has been compared to “explosive effervescence.” The destruction of substances occurs at the molecular level.
Slow pyrolysis is the long-term decomposition of a material under the influence of temperature at a heating rate of degrees per minute (hour).