Here you will learn:
- How does a pyrolysis oven work?
- Main types of furnaces
- How to make a pyrolysis oven with your own hands
- Stove modernization
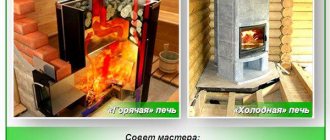
Solid fuel heating equipment will always be in demand. There are places where gas may never appear. In some settlements, gas supply is planned for the next 10-15 years. Some people just like to heat with wood, while others use wood stoves to heat their baths. A pyrolysis oven is an ideal option for heating rooms for any purpose. It can be made of metal or brick. Our review-instructions will tell you about the manufacturing process.
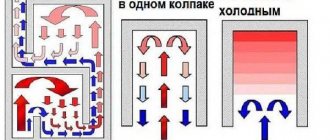
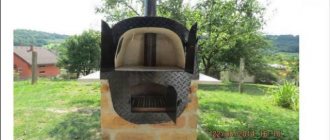
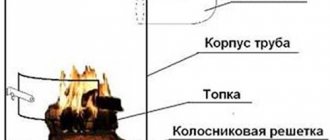
Internal structure of the long-burning stove "Bubafonya"
Let's look at the bubafoni device. An old household gas cylinder is the base of the stove. The wood inside the bubafoni burns. Pyrolysis, as the basis of the process, decomposes wood at high temperatures into gases, which, when burned, generate thermal energy. Wood burns in stages:
- Stage No. 1 - the fire heats the wood, burning out light flammable substances. Having crossed the two hundred degree bar, the firewood decomposes into simple substances and the gas begins to burn.
- Stage No2. This stage of combustion is the most efficient, as the gases are heated to a temperature of 700 degrees Celsius.
- Stage No3. We get what this device can provide - the required heat.
Construction of a pyrolysis boiler. The inner chamber is divided into two parts. This makes it possible to burn solid fuel in one chamber, and burn pyrolysis gas in the second. In the chamber below, which is filled with wood, the initial burning of the wood takes place. In the upper part, it is filled with wood combustion products, which ignite. The heavy press pushes the fuel down, and the wood is burned efficiently. At the top of the firebox there is a hole to which the chimney is connected, and the smoke leaves the stove through this system. Air enters the combustion chamber through an air duct located on one structure of the press. The air supply is regulated by the air duct damper.
Pyrolysis
Not everyone is familiar with the concept of “pyrolysis”. This process is the thermal decomposition of organic matter (when there is not enough oxygen) into pyrolysis gases and solid residues. At high temperatures, the pyrolysis gas mixes with oxygen, as a result of which both the gas itself and the organic matter, in our case the fuel, are completely burned.
If the solid residues are removed after the first stage, the process of making coal will actually be ensured. However, we are interested in the process as a whole, considering it as a heating system.
Advantages and disadvantages of a pyrolysis oven
Let's start with the good, with the advantages of pyrolysis boilers:
- Fantastic efficiency, often reaching more than 85%.
- The ability to simply maintain the long-burning stove device
- When using high-quality materials in the production of the stove, durability and reliability.
- Meets strict environmental safety requirements.
- Availability of fuel. It is at every step. Wood, chips, other wood waste.
- Due to its small size, it is possible to install the unit in any room.
- There are no difficulties in servicing the oven.
- Baking a bubafonya with your own hands is simple and, most importantly, quick.
Unfortunately, this type of boiler has some disadvantages. One of the main disadvantages is weak traction. Without draft, a pyrolysis stove will be of little use, since there will be no good heat transfer. Let's look at the following disadvantages:
- Complex chimney design.
- There is no model range of pyrolysis systems that can be fired using mixed fuel. For example, fuel oil, diesel.
- It is difficult and unfamiliar for beginners to make the initial setup.
- Not everyone can assemble a pyrolysis boiler with their own hands.
However, the flawless performance of the bubafonya stove and the low price of fuel cover all the existing shortcomings.
Fuel
A pyrolysis furnace can use two types of solid fuel: wood or pellets. Its humidity can reach 50%. The fuel must be wet and dry - it must be dried in the open air, under a canopy. It must be taken into account that pellets in original packaging can increase their humidity by up to 30% if stored in an unheated room.
Fuel for pyrolysis furnaces
Note: For use in pyrolysis furnaces, it is recommended to increase the fuel moisture level to 12%. To achieve this figure, you can use a homemade dryer.
It is impossible not to mention pyrolysis oil. It is a product of a heating process of up to 800 degrees for a short period - up to 30 s. Essentially, pyrolysis oil is liquefied wood tar. It is characterized by a high calorific value, but contains a lot of sulfur, like household fuel, and corrodes metals. It is used on an industrial scale.
Making a stove yourself
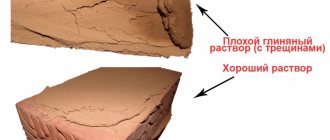
Baking a bubafonya with your own hands begins with drawings. Like any pyrolysis stove for a bath or a pyrolysis boiler with your own hands, you start with a diagram. For drawings of pyrolysis boilers, see the photo below.
Drawing of the Bubafonya pyrolysis furnace. Calculation of basic proportions.
Scheme of a pyrolysis furnace.
Preparing the room, materials and tools for work
Initially, you need to choose a room where you will make a pyrolysis boiler with your own hands, where we will install a babufonya stove. This needs to be done for this reason. When the pyrolysis boiler operates, the lower part of the body heats up to a very high temperature. To avoid a fire hazard, you need to make a small foundation for the stove. Refractory brick is best suited. First you need to dig a “pit” measuring one meter by one meter. The depth of the swarm is 20-30 centimeters. We fill the hole with crushed stone. Pour in the liquid solution. As soon as the area is dry, we cover it with refractory bricks in two rows. It's best to do everything below the level. In some modern buildings, such as auto repair shops, production workshops, warehouses and other premises with concrete floors.
You don't have to make a foundation for the stove. The concrete floor is of sufficient thickness. If there is little space and there are walls nearby, in close proximity to the stove, it is better to install a reflector. Of course, made of heat-resistant steel.
The materials are as follows. A two-hundred-liter barrel (if the pyrolysis stove is made from a barrel) or an old cylinder will serve as the basis for the future stove. Select thick-walled boiler pipes for the production of a chimney. They can be found in any heating network. You will need a channel, a sheet of metal (not thin). The following tools will be needed: Welding, electrodes, hammer, chisel, metal saw, power cutting tool.
Installation and assembly of the structure. Chimney installation
Stage one. First you need to cut off the top of the balloon. Do not throw away the cut top. It will be needed as a future cover. The diagram of the pyrolysis stove is located above. A do-it-yourself pyrolysis oven begins with cutting off the top of the body.
Stage two. We will make a chimney hood. We make a hole of the required diameter along one of the sides of the body. Find a piece of boiler pipe that is bent at a 90 degree angle. The pipe diameter is suitable from 100 to 150 mm. We will make the chimney riser from a boiler pipe of the same diameter. The thicker the pipe, the better the draft in the chimney system. And we know that if the draft is good, then the pyrolysis furnace with your own hands will heat with good efficiency. We will weld the adapter for installing the chimney. We will seal the transition using asbestos cord, clay, or fiberglass.
Third stage. We will weld 2 holders and a top tube to the cover; it will be able to control the lowering of the system. We will attach a metal strip to the stove. It will serve as a side that prevents the stove lid from moving. In the lid of the cylinder, using a gas cutter, we cut out a hole for the pipe (air exhaust) approximately 88 millimeters. This pipe can have any shape. Round or square, it doesn't matter. This is not important for bubafoni to work. And the assembly will be simplified.
Fourth stage. We take a sheet of metal 4 mm and higher. Cut out a round pancake with a hole in the center of the pancake. The diameter of the pancake will be equal to the diameter of the air exhaust pipe. Between the edge of the air distributor and the wall of the furnace body we leave a gap that is equal to 5% of the length of the circle. We take the thickness of the iron under the plate, based on the size of the stove body. If the stove is made from a cylinder, take the thickness of the iron plate from 8 millimeters. If you make the stove body from a 200-liter barrel, then take the metal plate from 5-6 millimeters. We will weld six blades under the bottom of the air distributor plate. Their necessity is due to the uniform combustion of wood in the chamber from below, and the gases from above will burn completely. A do-it-yourself pyrolysis oven with this mode of operation will last a long time.
In the center of the air distributor we attach a second round pancake, smaller in size - 4 centimeters. The plate is necessary because there is sufficient space between the blade and the firewood for the gases to escape. And the coals did not block the air supply path. Having assembled all the parts together, you need to load the body with wood. The firewood is placed vertically, with paper, wood chips or birch bark placed on top of the firewood for ignition. What kind of wood will we burn with? Dry or raw? If you will often be using raw firewood, you definitely need to add one part to the boiler design. The chimney should be extended downwards, having received an elbow for collecting condensate. Place a drain valve on this elbow.
Alternative options for installing furnaces
There are three such options. Let's consider additional options for assembling bubafoni that can be implemented.
In option 1, we will cut out the top lid of a 200 liter barrel. Let's make a pressure circle for the air distributor from it.
In option 2, cut two circles from a sheet of iron, with the same diameter as the diameter of the pipe. Then we will connect the first circle to the pipe by welding. This will be the bottom. The next circle will become a pressing oppression.
In option 3 we use an iron cylinder (made of large sheet metal) instead of a barrel. Brew a sheet of rolled paper along the seam. The lid with the bottom is also made from a sheet of metal. Everything else is made in the same way, from previous design options.
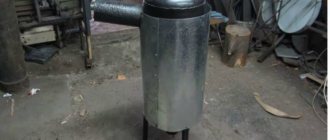
Stages of installing bubafoni from a gas cylinder.
We will arrange all the work on producing Bubafoni from an old gas cylinder into logical steps: Fill the body with water (the cylinder valve is unscrewed). This will prevent a possible explosion of residual gases. Important, responsible operation!!!
Fill the body with water (the cylinder valve is unscrewed). This will prevent a possible explosion of residual gases. Important, responsible operation!!!
Using a grinder, cut off the top part of the cylinder. Please note that where there is a seam, an additional reinforced layer is glued to the inside of the cylinder. This will complicate the cutting process, but it can be solved. Without this there is no way, the curb will interfere with the movement of the piston. The action is not simple and it is better to cut below the seam. Let's make a hole in the body for the chimney near the top of the boiler. An elbow is made from an iron pipe with a cross-section of approximately 100 millimeters at a right angle. Then two pieces of pipes are cut at 45 degrees and welded together. Next, a 120 mm chimney pipe is connected to the elbow through an adapter. This will definitely make the traction better. The adapter must be sealed using fiberglass or ordinary clay. We will make the lid from a piece cut off from the cylinder, or from sheet metal. Of course, a flat lid would be better. You can place a frying pan or saucepan on it. We cut out the hole for the piston by welding. The section can be anything. Maybe not round. A square or any other pipe will serve its purpose just as well. Installation will be simple.
A pancake 27 cm in size is cut out of a 4 mm piece of metal. For the rod we make a hole in the center. The circle is made in such a size that there is a gap of 5 percent of the size of the pancake. Six blades are welded to the bottom of the disk. The blades are bent so that a turbulence of air masses is obtained in the direction of the arrow to the right. The wood will burn better and will burn off all the gas at the top of the chamber. In the center, on top of the blades, a disk with a 40 mm hole is attached. This is necessary so that the charcoal does not clog all the spaces in the air mixture supply rod, and there is sufficient clearance between the firewood and the blades. The stove is installed on the foundation, shielded from nearby walls and objects. This will achieve additional fire safety. The foundation, after heating, will serve as a good heat store for the room and will not cool down so quickly. When loading raw wood into the stove, an additional bend is added to the chimney pipe below, which accumulates condensate. And a tap is installed in the elbow to drain condensate.
Laying the foundation for a pyrolysis furnace
To build a foundation for a pyrolysis stove we need:
- Shovel
- A container for mixing mortar or a concrete mixer (whoever has one).
- Ready-made mortar in bags or individual components (sand, cement)
- Crushed stone
- Fire-resistant red brick
Let's get to work. We will conditionally divide all work into three stages: First stage. First, let's dig a hole the size of each side of the square, equal to one meter, or the side of the square, up to one and a half meters. Accuracy is not important here. The depth of the hole for the foundation of the bubafoni should be thirty centimeters. No need to go deeper. Otherwise, there will be cost overruns and materials.
Second phase. We fill the pit with crushed stone. Mix the concrete solution. The brand of solution is optional. We fill the crushed stone in the hole with concrete mortar. Make the surface smooth. A simple trowel will be enough. You need to pull it across the surface of the concrete with a flat, clean board. When the concrete has dried, check the quality of the plane using a building level. If necessary, we additionally adjust the resulting plane according to the level. Depending on the temperature at which the concrete dries, from several days to a week, we wait for the concrete pad to dry completely. After the concrete pad has dried, we move on to the next stage.
Third stage. We lay fire-resistant bricks on top of the concrete base. How many rows of bricks will be enough? Two or three layers of refractory bricks are enough. If there are walls nearby, then it is necessary to install screens to reflect heat from the walls of the building. Screen materials can be the most common.
The order of assembling the base
- So, as we strive to consider a design that has the right to be called a pyrolysis furnace, at the first stage care should be taken with the manufacture of internal channels, the supply of primary and secondary air and the burner piping. The burner lining is made of fireclay bricks. In fact, the heat-resistant nozzle nozzles themselves are made from it.
- Next, from sheet metal, you need to cut and weld the primary gasification chamber - also known as a bunker, and the secondary gas afterburning chamber. It must be well protected from high-temperature flames and have access to convection channels.
- In practice, a material with a thickness of 4 mm is used. But it is advisable to use large thicknesses to avoid warping and premature failure due to corrosion.
- Ready-made - the upper and lower combustion sections are combined by piping the nozzles and air heat exchangers are connected according to the Buleryan principle.
- After this, you can proceed to the intermediate stage, welding fasteners that prevent hydraulic deformation of the outer casing. These are metal pins that will strengthen the internal and external elements of the boiler together.
- The casing elements are welded with simultaneous joining of all the holes of the air channels.
- Also, it is necessary to provide in advance the holes for the levers, the chimney damper and the secondary chamber damper.
- After welding the external elements of the duct, the doors, the external air supply pipe are installed, to which the injection pump and the hatch for cleaning the convection chimneys will be attached.
Ignition of the Bubafonya stove
To begin with, remove the caps from the cylinder and remove the piston-press with the air duct from the stove. Let's put dry wood inside the stove. Any type of firewood. We place the firewood horizontally, as close to each other as possible. If we place the firewood vertically, we will get an unpleasant surprise.
The surprise will be next. An unburned log standing vertically will not allow the piston to move to the bottom. If this happens, there will be a full-fledged fire in the lower chamber. The fuel will burn quickly. The operating mode of the stove will be burning instead of smoldering. I’m generally silent about smoke from the air duct; it will definitely appear. Firewood does not need to be stacked above the level of the chimney opening.
Next, you need to press the firewood with the piston and put the bubafoni cover on the piston.
How to properly set fire to wood? Simply throwing a burning match will not work. It will definitely go out before it even reaches the firewood. We'll keep it simple. Take paper, rags or a piece of birch bark. Let's light it and throw it in the oven.
We need to wait 20 minutes for our bookmark to burn well. Then close the valve on the air duct. Air will begin to enter the stove in less quantity. In the primary chamber with firewood, the firewood will stop burning and begin to smolder. Pyrolysis gases will be released. But we need gas. After all, the installation is pyrolysis! This is how our super stove will reach its operating mode.
Video instruction. Ignition of the Bubafonya stove
Operating principle of a pyrolysis boiler
In relation to heating boilers, pyrolysis is the combustion of fuel with insufficient oxygen. In this case, the fuel emits a large amount of gases, almost all of them are flammable. These gases are sent to a special combustion and afterburning chamber, where secondary air is supplied. The gas-air mixture ignites, releasing a large amount of heat. Much more thermal energy is released than can be extracted by conventional combustion of wood or coal. The fact is that many of the volatile substances formed during fuel combustion have a very high combustion temperature. As a result, pyrolysis boilers extract more heat from the same amount of fuel.
A design feature of pyrolysis boilers is a firebox consisting of two chambers. Fuel is placed in one (often this is the upper part of the furnace), gases are released in it, and therefore this part is called the gas generation chamber. Through a narrow neck, gases enter the second chamber - afterburning. Here they mix with secondary air, flare up and burn with virtually no residue.
Pyrolysis boiler with lower afterburner chamber
On average, the efficiency of pyrolysis machines is above 85%. There are models capable of delivering 92% and even a little more. But these indicators are possible only and exclusively when using dry fuel. Its humidity should be 5-8%. At 40% moisture content, combustion can completely extinguish, and at 20% it will simply be ineffective. And this is one of the main disadvantages of this technology: firewood and coal have to be dried first, for example, by making a platform near the chimney. Just firewood dried in a woodshed will not work, nor will coal taken from a pile on the street.
The video demonstrates a boiler in which the afterburner chamber is located at the top. Although boilers of this type have a simpler structure (the resulting gases themselves rise upward), homemade boilers prefer a chamber with a lower location of the afterburner (as in the photo above).
Recommendations for increasing the efficiency of a homemade stove
How to increase the efficiency of bubafoni? What problem is preventing this heat generator from working to its full potential? One of the problems is that the stove body heats up unevenly. Because of this, we get poor heat exchange in the room. Is it possible to solve this problem? Of course you can. To solve this problem, let's take a sheet of corrugated metal profile. We wrap it around the stove, obtaining a protective “shirt” and spot-weld the profile sheet to the cylinder.
You can find another solution besides welding. It's up to you to decide. By implementing this solution into a finished design, we will obtain a long-burning furnace device that forms rising air currents. Cold air will rise from the bottom of the ribs. After passing along the body of the cylinder, the air will heat up and become hot at the outlet. In addition to this modification, you can do the following.
Cover the entire structure with bricks. This will allow heat to accumulate from the generator, releasing it evenly over the entire area of the building for quite a long time. In addition to the profile sheet, you can use pipe scraps. Profile or regular round pipes are suitable. They are welded around the cylinder body, resulting in an effective design for generating heat with uniform heating.
Installation of the combustion door
We grab a steel strip to the body of the horizontal potbelly stove and wrap it around, forming a ring. It is necessary to trim the edges several times so that after welding such a mandrel sits very tightly on the edge of the body. The ring is welded to a cut-off lid from a barrel or cylinder, or to a steel sheet, then the seam is carefully welded on the outside. The strip should protrude above the plane of the lid by about 12–15 mm, this is enough for a tight lid, while at the same time the firebox will open relatively easily.
Several steel plates are welded on the inside of the door, forming grooves for the internal partitions of the firebox. Because of the annular rebate, the door itself must be installed on a remote canopy; accordingly, the clamping lock must also be moved to the side by 40–60 mm.
1. Cover. 2. Air duct with damper. 3. Canopy
When loading vertically, the lid acts as the outer wall of the afterburning chamber, so it does not require careful sealing. The edges of the vertical body are bent inward with a hammer; on the contrary, the side of the lid needs to be slightly flared. In this case, it is important not to bend the lid itself, then the connection will be tight under its own weight. A hole is cut in the center 1–2 mm larger than the diameter of the air supply pipe.
Negative effects of reduced loads
In addition, during calculations, one should take into account the negative impact on the entire fuel system of working with a reduced load.
Potbelly stove
Such an example would be a simple potbelly stove with a divided firebox. To be honest, this furnace performs the function of pseudo-pyrolysis, since its simple design is very far from the described theory of thermal destruction of organic raw materials with separate combustion of its products. The partition separating the firebox simulates the possibility of two separate processes, gas generation and afterburning. The presence in this case of nozzles supplying additional air gives a very dubious opportunity for the smoldering products to fully burn. This happens due to the main flame, or does not happen at all.
To manufacture such a “gas” stove, minimal alterations in the design are required. A metal plate is welded into the firebox space and you can consider yourself “ahead of the rest.” Some improvement as a result of such alterations is of course possible. But it will consist in a banal lengthening of the path traversed by hot gases. The need for pyrolysis in a brick kiln, in my opinion, is very doubtful. A medium-sized heating and cooking stove, with channels built into the wall, has very good performance characteristics, which I can verify as a user. Building such a brick structure requires more knowledge and additional materials. Non-standard dimensions and the danger of carbon monoxide penetration do not imply its placement in a residential area. Application for industrial needs is a completely different matter. Firing of clay products or tempering of metal is possible. There is a large cavity inside for holding ceramics and a high temperature can be maintained for a long time.
Trial fire
After the potbelly stove is made, you need to test it in action. The first fire will show all the defects. The oven must be heated before painting. The test is carried out in the following order:
- We light the stove with a small amount of fuel. The first stage lasts 30-40 minutes.
- If smoke is not visible anywhere, next time we make a full load and heat the stove. Our goal is to fade the old paint.
If smoke gets in somewhere, these places need to be sealed. After testing, the oven must be coated with heat-resistant paint.