The decision to use a homemade liquid fuel stove may be prompted by the availability of shareware testing.
This is especially true in car service centers.
But many go further than simply installing a small burner in the home.
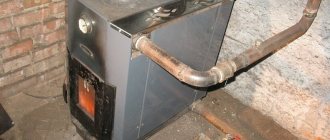
An exhaust furnace with a water circuit can become the main heating device in centers where there are several separated rooms - for customer service and technical ones.
How to bring an idea to life and what to consider when creating it, as well as the choice of design and correct installation. More about all this.
How to start and stop a stove
After many experiments, I found the simplest and most effective way to ignite such a stove.
First I pour oil into the pan. There shouldn't be too much of it. It is enough for the oil to cover the bottom of the pan. Then I take a piece of foam rubber and thoroughly moisten it with gasoline or solvent. I place the soaked foam rubber in a tray so that the lower part of the piece is immersed in oil.
Then I set the foam on fire. It burns steadily even when the draft gets too strong. As a result, the surface of the pan is heated to the required temperature.
Then I carefully open the valve of the fuel tank until it begins to flow in a very thin stream. Adjust the feed rate as carefully and slowly as possible
The stove will gradually enter operating mode. Periodically monitor the waste level in the pan.
To stop such a stove, it is enough to simply close the valve on the oil tank, and then, when the oil stops flowing, close the emergency valve. The oven will go out completely within 3-5 minutes and the housing will begin to cool.
Burner device
Pipe with a diameter of 100 mm with a wall thickness of 4 mm and a length of 200 mm (1). Holes with a diameter of 18-20 mm (2) are drilled in the lower part. All burrs on the inside of the pipe are carefully removed. If they are not removed, soot and soot settling on them will narrow the internal diameter of the burner.
The membrane separator is put on the pipe and welded exactly in the middle (3). Then it is installed inside the stove and welded to the inside of the cylinder around the entire perimeter (4). It is advisable to weld a separator at the bottom of the partition; this will create a sufficient height of the side so that in the absence of waste oil it is possible to switch to solid fuel pellets.
How to make a burner yourself
To understand how to make a Babington burner device, you need to study its design from the drawings. You can find quite a few of these on the Internet, but for manufacturing it is better to adopt the experience of specialists and use a proven prototype for work. Below is a drawing of a burner made and tested by one of the experienced participants in one of the specialized forums:
Now a few words about what the unit can be made from according to this drawing. The author used a regular steel tee with threads for connecting pipes with a diameter of 2 inches (DN50) as a body. Instead of a tee, a cross of the same size will do. The remaining elements are in accordance with the list:
- Any metal part with a hemispherical end can act as a nozzle
Hemisphere or hollow ball for a Babington burner. There are several options - starting from a brass door handle and ending with various spherical nuts.
- The nozzle is made from a metal pipe with an external pipe thread, length – 150-200 mm.
- Copper tube with a diameter of 10 mm for the fuel path.
- Metal tube for organizing air supply. Diameter – at least 10 mm.
- Threaded fittings are used to connect a copper tube to the body.
You will also need a small pump to pump used oil. Units from a VAZ car or motorcycle cope well with this task; you just need to ensure their rotation from an electric motor. Any low-power compressor is suitable, including one from a refrigerator, since the pressure in the air path should be low (nominal - about 2 Bar, maximum - 4 Bar).
An important operation is to drill a calibrated hole of very small diameter in the improvised nozzle. But first you need to select a drill of the required size, because the power of the future homemade Babington burner will depend on the size of the hole. Calculating power will be discussed in the next section, and how to make a small hole yourself is shown in detail in the video:
What to assemble a stove from
To assemble such a stove, I prepared the following:
- 50 liter gas cylinder;
- steel pipe. It is best to use a pipe with a diameter of 10 cm. Two meters of the product was enough for the body, burner and chimney;
- steel corner. In total, it took me a little more than a meter of 5 cm corner. From it I made a stand for the stove, various internal parts of the heat exchanger and door handles;
- sheet of steel. About 50 cm2 of 4 mm sheet was used for the plugs and the bottom of the upper chamber;
- brake disk. I used a cast iron disk from a machine. The main thing is that it fits freely into the cylinder;
- empty freon bottle. A standard bottle will do. The main thing is that the needle valve works. I used it to make a fuel tank;
- a piece of fuel supply hose;
- a pair of clamps;
- a piece of half-inch pipe. Oil will be supplied to the stove through it;
- half-inch valve;
- loops.
Basic rules of operation and maintenance
To protect yourself when using a homemade stove, and also to extend the life of the structure, you must adhere to some rules:
- it is prohibited to fill the lower compartment with liquid fuel more than 66 percent;
- to ignite, you must first ignite the paper sheet and then lower it into the lower tank;
- the required operating mode is set by adjusting a special damper;
- during operation it is not allowed to use other types of liquid fuel, the design is intended exclusively for testing;
- Do not leave a lit stove unattended for a long period of time;
- Attaching the structure to the walls of the building and using high stands should be avoided;
- It is prohibited to place the oven directly under shelves or other objects that may fall;
- Do not keep flammable substances in close proximity to the heating device;
- the room in which the stove will be operated must have good ventilation;
- Water should not get into the oil, otherwise it will foam and slowly splash out;
- contacting surfaces of the room must be made of non-combustible materials;
- cleaning the internal parts of the structure is allowed in any convenient way;
- There is no need to add fuel after ignition; the poured portion of waste should burn out completely.
You should stick to approximately these sizes
The structure must be cleaned regularly
Features of operating oil stoves
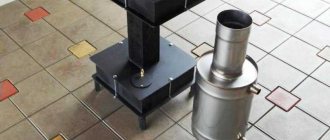
The heating unit is installed on a hard, flat surface covered with metal or ceramic tiles.
The tank lid for filling the oil and adjusting tools must be located in a free access area. To remove exhaust gases, you will need to install an exhaust ventilation hose. The internal diameter of the sleeve must be at least ten centimeters. It’s good if the exhaust pipe is easily detached from the stove, this will make it easier to regularly clean the unit.
Note! The end of the ventilation hose must be absolutely vertical, otherwise the wind can blow into the pipe and extinguish the flame. The height of the vertical section is at least four meters.
Before starting the heating device, it is necessary to check the integrity of the ventilation and the absence of unnecessary objects in the device. To speed up the lighting procedure, you can add a little lighter fluid or kerosene to the fuel compartment.
Set the mixture on fire with a paper or rag wick.
After five to ten minutes, the stove will begin to heat up and the fuel will boil. After starting the process, it is important to monitor the stove and periodically add fuel.
Note! The gap in the firebox opening should be no more than one and a half centimeters, so soot will not get into the room.
To stop the device from working, simply stop the oil supply. For urgent extinguishing, a fire extinguisher is used. It is not recommended to extinguish oil stoves with water.
The principle of operation of boilers during mining
A homemade waste oil boiler can operate according to one of two schemes:
- With the combustion of fuel in one container and its afterburning in the second - a kind of pyrolysis scheme;
- With the ignition of heated and evaporated fuel - an extremely effective scheme.
If you set fire to used oil in any container, it will burn with a yellow, slightly smoky flame. Even if the resulting heat is taken into the heating system, it will not be enough to heat the premises. In addition, in combustion products we will find a bunch of unburned and toxic components. Therefore, the main task of a heating boiler using liquid fuel is to ensure optimal combustion conditions for waste oil. The resulting heat is sent to the water circuit.
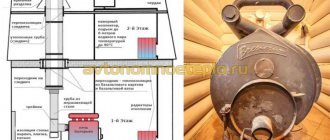
The first scheme is used in the simplest ovens, like this one:
Combustion in this scheme is carried out with air intake through the control valve.
Here we see a fuel tank with a control valve, an afterburner and a secondary chamber. Secondary air is supplied to the afterburner through rows of side holes. The used oil is poured into the tank, a little kerosene is poured on top of it, after which it is ignited.
The flame in the afterburner will initially be yellow because the oven is cold. As it warms up, it will acquire a white-pink hue, and a hum will appear, characteristic of a powerful stream of flame. This means that the unit has entered operating mode. By increasing the size of the upper chamber and adding a tubular heat exchanger to it, we get a simple exhaust furnace with a water circuit.
To consider the second scheme of a hot water boiler using waste oil, we will take the following diagram:
Diagram and principle of operation of a hot water boiler using waste oil
This is not exactly what we need, but the principle is the same. The unit shown in the figure includes several important components. The first unit is the fuel tank, which supplies waste oil to the boiler. The supply should be drip. The waste enters a bowl in which a flame is ignited. As the structure warms up, the oil begins to enter the bowl already hot, and its combustion temperature increases.
Combustion takes place in the internal volume of the furnace, limited by a metal cylinder. This is our combustion chamber - air enters it from above, and in the upper side part there is an outlet for the chimney. The presented drawing shows a unit with a blower, which makes its operation more efficient. There is no water jacket here, but there is a blower that blows air over the inner cylinder with the combustion chamber. Hot air can be sent through ducts into heated rooms.
When using air ducts, they must be carefully insulated to reduce heat loss.
A water circuit will help you organize heating using waste oil yourself. To do this, we remove the blower fan and hot air nozzle from the drawing; there will be no holes in their place. Instead, we weld a coil to the cylinder with the combustion chamber, which plays the role of a heat exchanger. It can be made from a pipe of suitable diameter. The ends of the pipe are brought out - the heating circuit is connected to them.
Thus, we have made an excellent waste oil furnace with a water circuit. All that remains is to work on increasing efficiency. To do this, we can wrap the chimney pipe with an additional heat exchanger and connect it to the main one. Now we wrap our hot water heating boiler in thermal insulation, after which we clothe it in an additional casing - this will help reduce heat losses.
Operating rules
A waste oil furnace has exposed surfaces and poses a risk of fire. The floor must be covered with heat-resistant materials - ceramic tiles, concrete or metal. The wooden flooring is sheathed with iron sheets. Adjacent walls and flammable structures near the stove are also covered with steel. The unit is not installed in drafts; fuel supplies, rags and rubber items are stored separately. Do not add new oil to a running device. A powder-based fire extinguisher must be stored in the building.
The microclimate and heat distribution in the room can be improved using a water circuit on a homemade stove. Using waste oil instead of fuel allows you to economically and efficiently heat a building.
In this video you will learn more about the design of the mining furnace:
Fuel requirements
The fuel can be any used oil: motor, transmission or industrial. The only condition is that it should not contain any impurities. The presence of even minor inclusions can lead to an explosion.
The presence of water in the oil is also unacceptable - it begins to boil much faster than the oil, foaming, splashing and sudden ignition occur. All this can lead to a fire.
The oil must be filtered before filling the tank! Do not use other flammable liquids! Gasoline is used only in small quantities to ignite a cold stove!
Advantages and disadvantages
A furnace that runs on waste oil has its advantages and disadvantages.
The first include:
- universal design that allows you to install the unit in any room;
- quick air heating;
- saving on fuel;
- small dimensions;
- self-production uses available materials;
- simple drawings that allow you to quickly make a device with your own hands.
You just need to have a little patience and the miracle oven will be ready.
There are not many disadvantages, but they still need to be taken into account. Due to the use of oil as fuel, the inner surface of the chimney and the stove itself is instantly covered with a layer of soot. During operation, the unit heats up quickly, so it makes loud noise and buzzing. The structure is almost never used in residential premises.
Industrial or motor oil can be used as fuel.
The liquid must not contain any impurities, otherwise an explosion may occur. Water in fuel can also cause a fire. It boils quickly, causing the oil to foam and ignite rapidly.
Universal scheme
We unfairly ignored another scheme for building a boiler that runs on waste oil - based on a burner. Here we can use a simple Babington burner, characterized by high efficiency and simple design
It uses a metal ball through which the waste flows. The ball itself has a hole through which air is supplied. It picks up the smallest particles of used oil, spraying it. The finished air-droplet mixture is ignited and forms a steadily burning high-temperature flame.
The finished burner is connected to a universal factory boiler that can work with any type of burner. It is also mounted in conventional solid fuel metal and brick stoves. Advantages of the resulting assembly:
- You can regulate the temperature by limiting the fuel supply to the waste oil burner.
- Possibility of automating combustion intensity adjustment.
- Possibility of switching to another type of fuel - for example, pellets, natural or liquefied gas.
By choosing a Babington burner to build a homemade boiler, consumers have at their disposal a device that can operate even on contaminated waste oil. The main task is to provide air supply under high pressure. Typically, compressors from refrigerators are used for this.
As a basis for homemade work, we select a drawing of any heating boiler with a traditional wood burning scheme. A small illustration will help you understand the essence:
Here we see a boiler that can work with equal success both on wood and waste oil - with the help of an appropriate burner.
The work takes place in several stages. The first is to assemble a Babington burner according to this scheme (or any other):
There are a great variety of Babington burner assembly schemes. We decided to use the most common one here.
The second stage is the assembly of a suitable solid fuel stove, which will subsequently operate on waste oil. When choosing a drawing and following it, do not under any circumstances reduce the size of the combustion chamber where the burner flame escapes - if tomorrow you do not have enough work, you will have to freeze. And you can always throw a portion of firewood into the large combustion chamber and continue to enjoy the warmth.
The third stage is connecting individual elements. The burner is connected to the fuel tank, after which it is inserted into the boiler assembled by yourself. We start heating the oil in the tank, open the valve, turn on the compressor, ignite the fuel-air mixture, and control the operation of the water circuit.
If necessary, you can switch from used oil to liquefied gas. To do this, purchase a gas burner (no homemade products with gas!) and install it instead of a liquid burner. A gas cylinder is connected to it. As a result, you will get full-fledged water heating, albeit somewhat voracious.
Connecting the water circuit to the furnace
The water circuit is connected to the upper chamber. You can weld a water container directly to the surface of the furnace, but it is better to make a separate structure so that when the bottom burns out, water does not get into the combustion chamber. This will cause the oil to splash and ignite.
The tank can be made to any size. For maximum heating, it should fit tightly to the upper chamber and the chimney. Fittings for the coolant supply and return are welded to the tank.
Be sure to attach a thermometer and pressure gauge. The pump and expansion tank are installed on the return line, closer to the boiler.
Do-it-yourself waste oil stove from a pipe
The easiest way to make a furnace body is from a gas or oxygen cylinder, pipe or barrel with thick walls (read: “How to make an exhaust furnace from a gas cylinder - theory and practice”). Such a unit will be able to produce a maximum of 15 kW of heat. It will not be possible to exceed this threshold, since due to a violation of the thermal regime the boiler will begin to smoke, and this is quite dangerous.
First we need to create a body - this is done in the following sequence:
- We take a pipe with a cross-section of 21 cm, a wall thickness of 1 cm and a height of 78 cm.
- To make the bottom, we take sheet steel with a thickness of more than 0.5 cm. After cutting out the bottom with a diameter of 21.9 cm, we weld it on one side.
- Next, legs are welded to the bottom, which can be made from bolts.
- Now you need to make a viewing window, which is located at a distance of 8 cm from the bottom. It is necessary to monitor the combustion of the bowl at the start. The size of the window is determined based on personal preference. The door is made from a cut piece of pipe to which a thin collar is welded. To ensure that the door closes hermetically, an asbestos cord is laid around its perimeter.
- A smoke exhaust pipe with a cross-section of 10.8 cm and walls 0.4 cm thick is welded on the opposite side of the body, 7-10 cm from the top.
Making the lid:
- Take a piece of metal 0.5 cm thick and cut out a circle with a diameter of 22.8 cm from it.
- We weld a collar of 3 mm metal 4 cm high along the edge of the circle.
- In the center of the lid we make a hole with a cross-section of 8.9 cm, and on the side we cut a hole with a diameter of 1.8 cm. The second hole is necessary to obtain an additional viewing window. It requires a lid, which is also a safety valve.
Now, for a pressurized exhaust furnace, it is necessary to make a pipe for transporting air and fuel:
- You will need a pipe with a cross-section of 8.9 cm, a wall thickness of 0.3 cm and a length of 76 cm.
- We drill 9 holes around the circumference, with a distance of 5 cm from the edge, and their diameter should be 0.5 cm.
- Stepping back 5 cm, we make two more rows, 8 pieces each, of holes with a cross-section of 0.42 mm.
- After another 5 cm, 9 holes are drilled in the fourth row with a cross section of 0.3 cm.
- On the same side, 9 slits are made along the edge, 0.16 cm thick and 3 cm high. To do this, you can use a grinder.
- From the opposite end of the pipe, moving 0.5-0.7 cm from the edge, make a hole with a cross-section of 1 cm.
- We insert the fuel supply pipe into the prepared hole. The thickness of its wall should be 0.1 cm, and the cross-section should be 1 cm. It should be at the same level as the air supply pipe. Its bend and length are determined by the location of the fuel container.
- The air and fuel supply pipe is welded to the cover. It must be positioned in such a way that there is 12 cm left from it to the base of the body.
It's time for the supercharged stove to make a bowl for fuel:
- First, take a pipe with a cross-section of 13.3 cm and a wall thickness of 0.4 cm, cut a piece 3 cm long.
- Now we cut out a circle with a diameter of 21.9 cm from 2 mm sheet steel.
- By welding it to a piece of pipe, we get a bowl into which we will supply fuel.
Let's start assembling a garage stove for testing:
- We retreat 7 cm from the bottom of the body and mount the bowl inside it.
- We mount the cover together with the fuel supply device.
- We install the chimney on the smoke pipe. The chimney must be positioned strictly vertically; even slight slopes are prohibited. The part of the pipe that remains indoors does not need to be insulated, but the part that goes outside is better insulated.
After the oil nozzle for the stove and the oil block are installed, testing proceeds. First, a certain amount of paper is placed in the bowl, a flammable liquid is added and set on fire. The oil supply begins after the paper has almost burned out.
Taking into account fuel consumption of 1-1.5 liters per hour, it will be possible to heat up to 150 square meters of space.
How to weld a simple stove
Then the heat is released in greater quantities into the room, rather than being “thrown out” to the street. Another upgrade is to make an iron drawer. Oil is poured into it. With this design, the stove is easier to maintain. The drawing contains all the necessary dimensions. Before assembling a homemade oil stove, it is necessary to select the correct diameter of the firebox and body.
Here everything depends on the volume of the room that needs to be heated. If it is a garage of 3 by 6 meters, take a profile of 80x80x4 mm. The fuel box is made of metal 60x60x4. It is more difficult to work with round rolled metal.
The step-by-step instructions look like this:
- Cut the metal according to the drawings to make a casing, drawer, afterburner. If the latter has a bend, the tube is cut at an angle of 45 degrees.
- For a profile of a smaller standard size, one wall is cut out with a grinder. Plugs are welded to the sides. The result is an open container to which you need to attach a handle.
- The structure is welded. It is necessary to drill an air hole at the top of the fuel chamber. The pipe is perforated. At this point the work is completed.
It should be taken into account that you need to calculate the number and diameter of holes in the afterburner. If you use a profile of 80 by 80 mm, then the cross-sectional area will be equal to 6400 square millimeters. This value is divided in two
Pay attention to the markings of the drill used. If it is 8 mm, then the hole area will be 50 sq. mm
Now 3200 must be divided by 50. The result is that 64 holes will be required to work effectively. However, as a result of customization, their number can be increased.
It is important that the chimney is of sufficient length. The elevation of the chimney outlet must be at least 5 meters
Then the operation of the stove during testing will ensure the highest possible efficiency even without supercharging. Otherwise, the pipe will have to be extended to this mark. But you can further increase productivity if you organize an inclined chimney running along the wall. The heated metal will release heat into the room. Only in this case is it important to follow fire safety rules. There should be no wooden shelves above the pipe, and no wallpaper on the walls. Even better is to cover the wall with a metal sheet.
Making a drip heater
Professionals who have assembled more than one “dripper” use old propane cylinders with a diameter of 200 mm. Oxygen ones are also suitable, since their cross section is 220 mm. the latter benefit due to thick walls. They serve for a long time, do not burn out, and accumulate heat. Pipe C-10 is also suitable if it has a wall thickness of 5 mm. An excellent option for a durable housing is pipes made of heat-resistant stainless steel alloys, alloyed chromium, molybdenum or nickel (for example, 15X1MF or 12X18H12T) with a wall no more than 3 mm. However, it is not advisable to specifically purchase this raw material due to its high cost.
Technologically, the manufacturing process is as follows:
- A flame bowl is made using a piece of pipe or ready-made steel containers. This one is pulled out through a rubber hatch, so it is not made too big.
- The openings necessary for connecting the chimney pipe and the cleaning service hatch are cut out in the body. The latter is framed and closed with a door. Bolts can be used for fastening.
- An afterburner is being made. All holes are not made at once. Usually the bottom 2-3 rows are drilled, and the rest are drilled during the setup process. If you do everything at once and there are too many of them, you will have to make a new one.
- Weld the cover with the air duct and flange. The latter is necessary for installing the fan. The fuel supply device is connected. Photo and video instructions will help here.
Now assemble all the components and connect the electrical wiring. The structure will be more stable if you make a metal frame. A heavy metal profile is suitable for this.
Do-it-yourself stove: drawings, videos and other useful information
Although many specialized stores have a used stove, not all consumers want to buy it. Many of them are trying to find a more economical solution, which consists of constructing the structure themselves. It is assembled from inexpensive elements.
Massive design on metal legs
As a basis for a future design, you can take an unnecessary gas cylinder. Its walls are quite thick, so it will take a very long time to burn through. In addition, such a container has a suitable shape. Additional materials you will need are metal pipes, corners and sheets.
Drawings for self-production
The internal space must be divided into two combustion chambers. One will be at the bottom and the other at the top. On the bottom side, legs made of metal corners are attached by welding. A partition is attached to the lid of the upper chamber in the same way. It should be located closer to the chimney.
Two circles are cut out of a steel sheet. The first of them will act as a removable cover for the lower chamber. The second circle will create the bottom of the upper compartment. Holes are made in the blanks in the center corresponding to the diameter of the chimney.
48 holes are drilled in the connecting pipe, eight of them are made in a circle, and six are made in height. Their diameter should be 9 mm. This is necessary for the afterburning chamber, in which the burning vapors will be saturated with oxygen. At the final stage, a chimney pipe is connected to the structure.
Special holes must be made in the pipe
In the finished drawings of a waste oil stove you can find specific dimensions of certain parts. If they are not indicated, then you need to make your own measurements.
Creating a waste oil furnace with a water circuit from metal sheets
Above we talked about the design of a structure made from a finished container in the form of a gas cylinder. However, many want to learn how to make a waste stove from ordinary sheets of metal directly with a water circuit. The steel thickness for the walls should be 4 mm, and for the lids and bottom - 6 mm.
Stationary heating structure made of steel sheets
Blanks are cut out from individual sheets according to the drawings. They are cut out using a grinder, and then welded to each other around the perimeter. After manufacturing, the seams are necessarily checked for leaks. A 6x6 mm hole is made in the lid of the lower compartment for filling fuel.
The sheets used must be of sufficient thickness
Holes are drilled in the connecting pipeline, as is the case with a gas cylinder structure. The chimney is attached to the top cover.
Additional drawing for manufacturing the structure
The advantages of such a stove, and what disadvantages need to be taken into account
Waste oil furnaces with a water circuit come to the rescue in many cases and have their own advantages:
- This is a universal heating unit that is ideal for utility rooms, greenhouses, home workshops, garages;
- construction of a furnace is inexpensive (it can be assembled from scrap metal);
- warms up the room very quickly in any frost;
- compact design;
- can be adapted for heating and cooking;
- allows waste to be disposed of.
But there are also disadvantages that need to be kept in mind when operating the stove:
- requires regular cleaning of the chimney and combustion chambers, as during operation it is intensively covered with soot;
- it operates “loudly” and produces a hum when the fuel is actively burning;
- you need containers and a place to store used oil (it will freeze outside at sub-zero temperatures);
- the furnace is a fire hazard, since the body heats up to very high temperatures and the requirements for installation and operation must be strictly observed.
But all these disadvantages are not significant compared to fuel savings, especially if used engine oil is obtained free of charge. If all requirements are met, the stove will serve for a long time and safely.
Oil furnaces with a water circuit can have any configuration and size, it depends on what materials the home craftsman has at his disposal, and on what power the unit plans to obtain.
What are the requirements for waste furnaces?
Scheme of work
The heating device must be located on an absolutely flat horizontal surface so that the oil level in the lower reservoir is at an equal distance relative to the top of its sides.
The components of such a heater must be made of heat-resistant and high-quality materials. At the very beginning, the slope of the chimney must be made at an angle of 30 degrees, after which it must be given a strictly vertical position and taken out of the heated room. To make a chimney, steel with a thickness of at least 3 mm is required, and only its outer part can be made of galvanized sheet metal or asbestos-cement pipe. The diameter of the smoke exhaust structure or its internal cross-section should not be less than 10 cm in diameter.
The design of the lower tank must be equipped with a valve that can be easily rotated. This will allow you to regulate the power of the stove and control oil consumption. The thickness of the walls of the tank into which the waste is poured should not be less than 3 mm.
The holes in the connecting pipe, like the pipe itself, can have different sizes, but they must be proportional. The diameter of the holes should be equal to 1/10 of the diameter of the pipe itself.
Requirements for installation and operation of an oil furnace
It is required that the stove be located in an empty room, near which there should be no flammable surfaces. Particular attention is paid to self-made devices. They should not be placed on a shelf or other support that could catch fire.
A homemade furnace for mining should be located on a flat base, which can be concrete or brick. It is necessary that the distance between the apparatus and the wall be at least 1 m. To create good draft, the chimney must have a length of more than 4 m. Insulation should be provided on its external side to prevent the formation of acid condensation.
The used oil should not contain any solvent or other flammable element, so such components should be kept away from the furnace. It is also unacceptable for moisture to get into the container with oil. This will cause a fire in the oven. In the event of an emergency, a fire extinguisher should be used to extinguish the fire.
Important! In the room where the stove is located, there must be a good system of natural supply and exhaust ventilation.
The operating principle of a stove with a drip supply of fuel is similar to the operating mechanism of diesel engines
Before starting work, oil is poured into a container in an amount equal to half the volume of the tank, which will provide the necessary space for the formation of vapor. For the vapors to become enriched with oxygen, you need to wait some time. Then the fuel is ignited using long matches. As soon as the process of ignition of vapors begins, the damper is closed halfway.
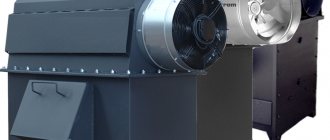
To increase the performance of the mini-furnace during mining, you can install a sealed tank with liquid above its upper chamber. To supply and drain water, fittings are attached to it, which are located at different levels. Another option for increasing productivity is the necessary air convection, which is carried out using a fan located near the upper chamber. By taking warm air from the stove, it helps to cool it, which has a positive effect on the life of the device.
Supercharged furnace design
A pressurized homemade stove for testing is a closed cylindrical vessel, inside of which there is a well-known afterburning chamber in the form of a pipe with holes. At the bottom of the vessel there is a door for access to the firebox and ignition. The chimney pipe is welded to the top of the cylinder, and forced air is supplied into a pipe with holes through the top cover or a simple insert through the side wall.
Used oil is located at the very bottom of the vessel and is supplied automatically as needed. The supply methods can be different: from a container with a submersible pump or through a float mechanism, whichever you prefer. The figure above shows a diagram of a stove with air injection, a water jacket and fuel supply using a float valve.
The used oil at the bottom of the container is ignited by adding a small amount of gasoline or solvent, then the blower fan is turned on. After warming up, the fuel begins to actively release vapors that are burned with excess oxygen. As a result, a powerful flame is formed, spreading in all directions, as can be seen in the photo.
The combustion products leaving the furnace body have a very high temperature (sometimes up to 400 ºС), as in the previous case. In order to prevent the release of heat and increase the efficiency of the unit, the chimney must be equipped with a water heat exchanger connected to the heating system through a storage tank. Then you can achieve a furnace efficiency of about 80-85%.
What is good about a brick oven with a water boiler?
How can you not enjoy the sounds of peacefully crackling logs in a bathhouse?
And what if, besides, there was an original wicker firewood basket nearby, with logs lying comfortably in it? Modern wickerwork used for these purposes is made from wicker, birch bark and even metal. Woven into a trough shape, they allow firewood to be neatly stacked and beautifully complement the design of the sauna. This is not only an aesthetic pleasure, it is also “natural” warmth, heat and a unique aroma. How to save firewood, since it takes a lot of it to kindle? Every year the popularity of standard or Russian stoves with water heating boilers is growing. A brick kiln with a water circuit is characterized by good heat transfer, reliability and high efficiency. This design will be effective both in a small and in a bath room with an area of up to 100 sq.m.
It is not too difficult to make such a design, the main thing is to take into account all the features and recommendations. For example, the pipe must not only be thick-walled, but also seamless, the welding seam must match the thickness of the pipe walls, and the feed is welded only to the edge of the upper thick pipe. The oven is laid out with ordinary and refractory bricks; for masonry, ordinary and refractory mortar are used. Such bath heating will be reliable, durable and comfortable.
Pellet stoves are an economical and convenient device that allows you to save on fuel. Pellet units operate on special compressed pellets made from wood shavings, which are easily combustible. The main advantage of the work is that the pellet burner is able to burn fuel as efficiently as possible thanks to unique supply algorithms, as well as the flow of air, which helps regulate combustion.
A wood burning stove with a water circuit is efficient and reliable. Such designs make it possible to heat large rooms, even at low outside temperatures. Their advantage is an environmentally friendly combustion process and good efficiency. In the process of their work, they produce process water at high temperatures, which is also used. At the same time, fuel costs are minimal, and the heating rate of the room is fast. The stove looks like a steel firebox with a wall thickness of 4-6 mm. The heat exchanger tubes are located between the walls.
Each of the described options is a universal solution for heating a bathhouse or other country house. Having decided to purchase a stove of a certain type, you need not only to study the options for modern models offered by manufacturers, but also to think through everything thoroughly and take into account the parameters of the actual room where it will be installed, its area, and functional features.
Oven burner
In conclusion, let us recall one more method of fairly effective drip combustion of waste. This is a water-oil burner. These were once widely used by builders and road workers to heat up bitumen boilers, but now they have practically fallen out of use because the water-oil burner itself is bad: it is gluttonous and produces a lot of smoke. However, if it is attached to the combustion door of any furnace (air enters through the ash pan), then the oil vapor will burn out perfectly in the hot combustion chamber and the water-oil drip furnace will show very good efficiency.
The design of a water-oil burner is simple: fuel and water are dripped simultaneously into a hot bowl over which there is an air flow. Drops of water explode like on a hot frying pan and spray oil into the mist. Fuel vapor flows through the socket through the air flow (furnace draft or pressurization) into the furnace firebox, where it burns. The difficulty in this case is the need to configure 2 drops, fuel and water, but the design of a water-oil burner is simpler than any of the stoves described above, except for the wick. But its efficiency in combination with a potbelly stove is no worse than that of stoves with a flame bowl. How to make a water-oil burner for a stove with your own hands, see the final video:
Below you can share your thoughts and results with our readers and regular visitors.
You can also ask questions to the author*, he will try to answer them.
How does a used oil unit work?
Before you start making your own equipment. We advise you to familiarize yourself with the operating principle of this oven. Of course, you can watch the video, but there you will not find the answer to many of the questions that you will have during the process.
The beauty of this design is its simplicity; at first glance, few people can believe that this small unit is capable of producing such an amount of heat that is enough to heat a relatively large room. In fact, it has been proven that using pressurization and airflow (these systems serve to increase efficiency) it is possible to heat at least
Case manufacturing
I will make a stove from this cylinder.
I used a used cylinder. There was no more gas in it, but just in case, I opened the valve and left the cylinder outside overnight.
Then I carefully and slowly drilled a hole into the bottom of the cylinder. To prevent sparks from appearing, I pre-moistened the drill with oil
Hole
Then I filled the bottle with water and drained it - this removed the remaining gas. Work carefully, try not to spill gas condensate, as... It stinks very strongly and for a very long time.
Then I cut out a couple of openings. In the upper opening I will make a combustion chamber and install a heat exchanger, in the lower opening there will be a burner with a tray. The chamber at the top is specially made so large that, if necessary, it can be heated with wood, pressed briquettes, etc.
Shown how to cut a balloon
Shown how to cut a balloon
Shown how to cut a balloon Shown how to cut a balloon
In the end this is what happened
Then I once again washed the opened gas cylinder from gas condensate.
Fuel supply system
We insert a ½ inch water pipe (1) (with a reserve) into the hole at an angle (30 - 40o), weld it to the stove body. The location of drilling the hole does not play a special role, since the evaporator bowl is made mobile and can be turned with the receiving hole in any direction.
We lower the coupling onto the end of the pipe and mark the outreach distance (2), cut it with a grinder, forming a “spout” for more convenient formation of a stream of oil (3).
A regular water ball valve (4) is screwed to the tube, which will be used as an emergency backup to shut off the fuel supply in the event of a failure of the valve on the exhaust tank.
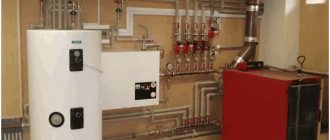
Work specifics
The hot water boiler is located at the top of the stove. It is non-removable and has taps for drawing water into the bathhouse and for starting the heating circuit. The steam room is heated from a brick wall facing inside. To maximize its effect, it is necessary to make the distance from the stove to the brick box quite small to reduce heat loss, but also sufficient for air penetration. Essentially, you need to build a structure reminiscent of a long-burning brick furnace with your own hands, only the combustion chamber is replaced by a metal furnace during mining. In this case, the creation of a powerful separate foundation will not be required, which greatly facilitates the process of building a bathhouse.
There is another option for making a structure using mining, combined with a brick kiln. Only the lower reservoir is manufactured. The combustion chamber has the shape of an elbow, smoothly bent at 90°. A vertical plate is welded to the end, which communicates with the internal (furnace) part of a conventional brick oven. The hot gases generated during the combustion of waste enter the brick stove and heat it.
The further design is no different from the usual one: a water boiler is installed, a heating circuit with natural or forced circulation, shut-off valves, and so on are connected. This compact option is optimal for those who already have a ready-made furnace and only want to adapt it for burning waste.
Brick stoves with a ready-made water circuit are more stable heat sources that maintain temperature for a long time, which is important when winter cold sets in.
Tips and instructions
Take the prepared cylinder. It is important that there are no seams. As the pressure increases, this is where the splitting will occur. The walls must be at least 1.5 centimeters. Thick walls will not allow the tank to warm up, since the oil boils at 300 degrees, and inside the chamber the temperature must be at least 600.
The gas must first be released. It is advisable to do this outside. There the etching will be much faster.
You need to cut off the top with a grinder. Make legs at the bottom. This is not necessary, but it will be more convenient to operate and assemble. They are made from corners or fittings. At the top, retreat ten centimeters and weld the hole for the hood.
For exhaust hood, it is better to take a thin chimney pipe with a diameter of ten centimeters. The length should be from 4 meters. We insert it into the hole and weld it hermetically. A hole is made in it to regulate the air supply - there will be a damper there. A furnace for a garage during its development requires active mixing of pyrolysis with oxygen. Therefore, it makes many holes ten centimeters from the top. At a height of one meter from the floor, we make a landing in the tube for a new pipe with a diameter of 8 millimeters. It is inserted parallel to the floor.
At the top of the tank you need to make a hole of eight centimeters. There will be an oil intake here. There you can also place a tray where you can heat food and water. To do this, you need to cut a rectangle out of steel and weld it.
Making a drip-type stove with your own hands: step-by-step instructions
- Drill a hole in the bottom of the tank to allow the gas to escape. The drill must be generously lubricated with coolant or oil to prevent sparks. You can use a hand drill.
- A do-it-yourself drip-type furnace is equipped with doors. Cut them through with a grinder.
- From rolled steel you need to cut a pancake with a hole in the middle.
- We install it in place between the doors.
- We prepare the pipe - drill holes for oxygen supply.
- The tube is inserted into the prepared pancake and brewed. The seam must be airtight and not allow air to pass through.
- Take a cut circle from a pancake and weld it onto a car brake disc. This is how we will make a coupling.
- We drill a hole in the sidewall above the thicket and weld a metal dropper pipe.
- It is better to install a faucet on a hose outside. It should be made of oil-resistant rubber.
- A residual pipe is installed on top of the cylinder - this will be the chimney.
Oil drip stoves are a little more difficult to assemble. The oil is supplied by a tap system through a hose, which makes it heavier in design.
Making a pallet for mining
The tray was made from a cast iron automobile brake disc. Cast iron has good heat resistance, so I decided to use it.
I will make a pallet from this disk
I welded the bottom underneath.
The steel circle is the bottom
Welded the bottom
I welded the lid on top. In it you can see the counterpart of the burner and the opening. Air enters the stove through the opening. I made it wide - it's better that way. With a narrow opening, the air draft may not be strong enough, which is why the oil will not be able to get into the pan.
Next I made a coupling. In my stove it connects the pan and the burner. With a coupling it will be much easier to maintain the stove. If necessary, I can take out the tray and clean the burner from below.
Next I made a couplingCouplingPutting the coupling in placePutting the coupling in place
The coupling was made from a 10-centimeter pipe, simply cutting it along the longitudinal edge. I did not weld the opening in the coupling - there is no need for this.
How homemade oil furnaces work
If you burn any used oil, it will smoke strongly and smell unpleasant. In this regard, direct combustion is not used. First, the volatile elements are evaporated and then burned. This approach forms the basis for the operation of a furnace of this design.
There are oil furnaces with two combustion chambers. The lower chamber is designed to heat the fuel and then evaporate it. Combustible vapors are directed upward, saturated with oxygen as they pass through a pipe with holes. Once in the upper part of the pipe, the mixture ignites, and its combustion occurs in the second chamber. This releases more heat with less smoke.
The second method of splitting heavy fuel into easily flammable components is more efficient, but also more difficult to implement. To obtain the required evaporation efficiency, a metal bowl is mounted in the lower chamber. After it heats up, the waste oil evaporates.
General operating principle
If we want to get high-quality heating based on waste, we cannot simply take the oil and set it on fire, as it will smoke and stink. To avoid these unpleasant and hazardous side effects, you need to heat the fuel so that it begins to evaporate.
Volatile substances obtained as a result of heating will burn. This is the basic principle of operation of the heating unit during testing.
Image gallery
Photo from
Heating device made from improvised means
Homemade model with turbocharging
Connecting the module to a conventional stove
Miniature coffee stove
Application of perforated tube
To implement this principle, the design of the stove includes two chambers, which are connected to each other by a pipe with holes. Fuel enters the lower chamber through the filler hole, which is heated here. The resulting volatile substances rise up the pipe, becoming saturated with air oxygen through the perforation.
A schematic diagram of a two-chamber stove with a connecting perforated pipe allows you to understand exactly how a simple unit functions during mining
The resulting combustible mixture ignites in the chimney, and its complete combustion occurs in the upper afterburning chamber, separated from the chimney by a special partition. If the process technology is properly followed, virtually no soot or smoke is generated during combustion. But the heat will be enough to warm the room.
Using the plasma bowl
In order to achieve maximum efficiency of the process, you can go a more complicated route. Let us recall that our goal is to separate volatile components from the fuel by heating it. To do this, a metal bowl should be placed in the only chamber of the unit, which must not only be heated, but heated.
Through a special dispenser, waste will flow from the fuel tank into the chamber in a thin stream or drops. Once on the surface of the bowl, the liquid will instantly evaporate, and the resulting gas will burn.
The efficiency of this model is higher, since fuel supplied by drip burns better, and the problem of topping it up during the operation of the furnace disappears by itself
If everything is done correctly, the combustion of gases should be accompanied by a bluish-white flame. A similar flame can be observed when a plasma burns, which is why the red-hot bowl is often called a plasma bowl. And the technology itself is called drip feed: after all, fuel must be supplied in exclusively small doses.
With all the variety of designs, the operation of all heating units using waste fuel is based on the principle described above.
Under development: sketches and drawings
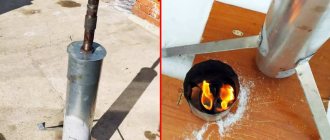
Exhaust stoves can be made of any shape and size. As a rule, to make them yourself, you use sheet metal, pipe scraps, or used oxygen cylinders. Several sketches with explanations are given below, and here you can learn how to make a burner from a blowtorch.
Round Sheet Metal Oven
It consists of a fuel tank combined with a combustion chamber, an afterburning chamber - a perforated pipe and an upper chamber equipped with a partition for cutting the flame. On the cover of the lower chamber there is a hole for filling fuel and supplying air. The more the damper is open, the more intense the combustion will be.
From a metal pipe with a water circuit
Consists of two barrels. At the bottom there is an oil container with a filler hole. The upper combustion chamber is a pipe passing through the upper barrel filled with water. The upper barrel must be equipped with fittings for water supply.
The design of such a stove resembles a samovar; its walls do not heat up to excessively high temperatures. Therefore, its installation is recommended for greenhouses, buildings for keeping animals and rooms with small dimensions, where accidental contact and burns from a hot stove are possible. The large dimensions of the tank allow you to create the effect of a heat accumulator.
From profiled pipe
To make a stove with your own hands, use a profiled square pipe of 180x180 mm and 100x100 mm. It is compact in size and easy to manufacture. The surface of the oven can be used as a cooking surface.
How to build a stove from a pipe?
Do-it-yourself sauna stove from a pipe
One of the common homemade options is a bath stove made from a pipe. Let's consider how such construction is carried out.
Pipe is an excellent “semi-finished product” for constructing a furnace
Metal stoves can be made from a sheet of steel or, for example, from an old barrel. But if there is a piece of pipe of suitable diameter on the farm, then it is worth using this “blank”.
A homemade stove for a bathhouse made from a pipe can be made with a vertical or horizontal direction of a piece of rolled pipe. By using prefabricated stove pipes, the amount of welding work required when making sheet metal stoves is reduced.
Only high-quality pipes without signs of corrosion are suitable for the manufacture of furnaces.
If the pipe has been lying outside for a long time, it should be inspected first and reinforced in problem areas by welding patches.
Preparing parts
To make a good stove from a pipe, you will need a piece of rolled pipe with a diameter of 50 cm and a length of 1.5 meters. The thickness of the pipe walls must be at least 10 mm.
The workpiece should be cut into two parts, measuring 0.6 and 0.9 meters, respectively. A longer piece is needed to build a firebox and heater, and the remaining piece will be used to make a tank.
Making a furnace
An example of using a pipe stove in a bathhouse
- First of all, you should take care of the blower. A hole 5 cm high and 20 cm wide is cut at the bottom of a long section of pipe. A thick round steel plate is welded above the hole.
- Next, a niche for the firebox is formed and a door is made for it. The door is hung on hinges or hooks.
- A piece of pipe is welded above the firebox, which will be used as a heater. The height of the segment is 30-35 cm.
To fill the heater, you should use rounded cobblestones; in extreme cases, you can pour electrical insulators made of ceramics.
A steel coupling is installed in the upper part of the future furnace, which will be required to fix the water heating boiler.
Making a water heating tank
Assortment of pipe bath stoves
When building a sauna stove with your own hands, a water heating tank is also formed from a pipe.
- For its manufacture, a piece of pipe 0.6 m high is used.
- A steel circle – the bottom – is welded to the end part of the pipe section.
Advice! The thickness of the metal for making the bottom of the water tank is at least 8 mm
A hole is cut in the bottom of the tank to accommodate the chimney. It should be moved towards the rear wall of the tank. The chimney is fixed to the bottom of the tank by welding
It is important that the seam is of high quality to prevent water leaks into the firebox. The upper part of the tank is closed with a metal lid with holes made for the passage of the chimney and for filling with water. The chimney is welded tightly to the lid, and a neck with a lid is installed in the hole for filling water.