These days, the lion's share of family income goes to paying heating bills. Every year this service becomes more and more expensive, but not everyone’s income increases, so many families are forced to tighten their belts to keep their homes warm in winter. It goes without saying that many would like to reduce these expenses as much as possible and begin to keep these expenses under personal control. Fortunately, there is a way out of this situation. To do this, you need to purchase and install heat meters for heating.
This device is designed to keep track of energy consumption for heating a home. As practice shows, if you install a heat meter correctly, you can save from 25 to 50% of money on heating your living space. Such a difference in amounts is dictated by the peculiarities of the building in which the installation of this equipment is planned. In this article we will talk about the operating principle of this equipment, its classification and how to properly install heat meters.
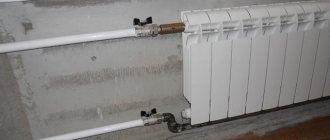
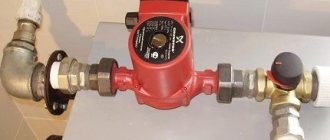
Installed heat meter
Return to content
How does a heat meter work?
Regardless of the type, any such device is equipped with the following devices: energy number meter;
- material resistance temperature transducer;
- primary heat flow converter.
The device can also be equipped with optional elements if there is such a need or if the customer so desires. These can be power supplies for individual elements of the heat meter; excess pressure converter.
Heat meter elements
In addition to its main function - monitoring heating energy consumption, such equipment can be used for the following purposes:
- measuring the operating time of any device installed within the metering area;
- measuring average coolant temperatures over the past hour or day;
- measurement of energy used over the last hour and in general since the device was installed;
- the difference between the amounts of coolant at the inlet or outlet of the heating system;
- calculating the amount of coolant required for normal operation of the heating system.
Heat meter with sensors
As mentioned above, the main purpose of heat meters is to count and display on the screen the exact amount of thermal energy that was used by the consumer to heat the home. The device does not crash, and therefore displays only real energy consumption figures. A special computer, which is equipped with each unit of such equipment, provides the total number of all thermal energy that was consumed by the consumer in one hour. In this case, temperature differences in the coolant, as well as its quantity at the beginning and end of the heating system cycle, are displayed.
Heat meters are equipped with temperature sensors and flow sensors, which are responsible for displaying information. One of these devices is installed in the supply water main, and the other in the return pipe. Sensors take readings, then special computing equipment processes them, after which comprehensive information about thermal energy consumption appears on the device screen. The equipment is quite accurate, its error ranges from 3 to 6%.
Return to content
What the consumer needs to know
- How often to take readings. According to the “Rules for Heat Carrier Accounting”, the consumer organization transfers data to the heat supply company for the whole month. But the information must be entered into the thermal energy control log at the same time every day.
- Frequency of checking meters. The inspection period for devices depends on the manufacturer, and this period can be set at two, three or every four years. The required information can be found in the specific product certificate.
- When installation is impossible or unprofitable. Despite all the visible advantages of a heat meter, installing it is not always profitable, and even in some cases it is simply impossible.
In many old houses, pipe routing is vertical and installing appliances on such risers for each apartment loses its meaning. In this case, the best option would be a common house meter, but this is only possible with the unanimous consent of all residents.
Common house heat meter
It is also unprofitable to install meters in panel high-rise and low-apartment one-story buildings due to their imperfect design.
Features of installation of meters
The owner of the apartment does not have the right to install heat metering devices, but he is interested in making sure that they are installed correctly. According to standard rules, the meter should be installed:
Heat meter for apartments: vertical installation
- Strictly horizontal or vertical. Its location depends on the purpose of the installation (apartment or house).
- The product's touch screen is always fixed upward.
- The flow channel of a working meter must be filled with liquid.
- The product must be installed according to the arrow located on its body.
All connections must be made using appropriate fittings, while maintaining the integrity of the rubber rings or gaskets.
Work on installing the device can be carried out by a specialized organization that has a license to provide such services.
Types of devices
Before installing an apartment heat meter, you need to find out what they are.
These devices are divided into groups according to the principle of operation into the following types:
- vortex;
- electromagnetic;
- ultrasonic;
- mechanical.
The principle of operation of electromagnetic heat meters is a phenomenon during which an electromagnetic field influences the heat carrier, resulting in an alternating current. If we dig deeper, we can say that as a result, magnetic induction is formed, connecting the average speed and flow rate of the heat carrier in the volume with the magnitude of the electric field voltage and the potential difference. Induction is formed at the electrodes.
Electromagnetic heat meter
As a result, we can say that the amount of thermal energy consumed is measured by measuring small amounts of electric current. That is why such equipment requires correct installation to eliminate the possibility of errors.
It is important to know! In addition to proper installation, this equipment also requires special conditions of use. Errors may increase if excessive resistance occurs across the contact area. Also, incorrect cable connections can increase the device errors. In addition, any compounds involving iron in the liquid will affect the final result. But, as practice shows and numerous user reviews indicate that this probability is quite low.
If you need the most common and inexpensive counter, then it is better to choose a mechanical model. The operating principle of this equipment is quite simple: the flow of the heat carrier imparts rotational movements to the measuring ring inside the heat meter. This is how the amount of thermal energy in mechanical devices is measured. Most devices of this type are equipped with a mechanical water quantity meter and an energy meter. The main advantage of this equipment is its relatively low cost. It is also possible to increase the service life of this product by installing special filter components.
Mechanical heat meter
It is important to know! It is highly not recommended to use heat meters of this type in an apartment or country house where the hot water used as a coolant is too hard. Elements of plaque, rust and other contaminants will clog the working and filter elements, which will sooner or later lead to failure of this equipment. In addition, the use of hard water leads to a significant decrease in pressure in the heating lines.
The most expensive at the moment are ultrasonic heat meters. Thermal energy consumption in this case is measured taking into account the length of time during which ultrasonic waves sent by the emitter of these waves reach a special sensor. Calculations directly depend on the circulation rate of the coolant in the heating main.
Ultrasonic heat meter
When installing this computing equipment, it is very important to maintain the level. That is, the main thing is that the signal-producing device and the sensor are on the same line. The speed of passage of ultrasonic waves from the emitter to the receiving sensor depends on the amount of liquid in the heating system. So, ultrasound travels a given distance in a certain time, after which this time is analyzed by special devices and processed information about the coolant flow rate, its temperature, and so on is supplied to the screen.
It is important to know! In this case, some errors are acceptable, especially when the liquid contains impurities, for example, sand or scale. A distinctive feature of this measuring equipment is the ability to adjust the coolant supply through different channels.
Now let's talk about the last type of heat meters. Vortex-type devices operate on the following principle - they take into account vortices that are formed in the middle of obstacles that are located in the path of the coolant flow. This equipment consists of the following components:
- permanent magnet mounted on the outer surface of the pipe;
- triangular prism, which is mounted to the main line in a vertical position;
- an electrode that is placed near the prism, this device measures the data.
Design of a vortex heat meter
The heat carrier flows around the triangular prism, as a result of which a change in pressure is observed inside the pipe. It is these differences that allow the device to measure the volume of liquid. The more powerful the flow moves inside the highway, the more the above vortices appear per unit time. The main advantage of this type of measuring equipment is the fact that the meter data cannot be distorted by the presence of various contaminants and impurities in the lines.
After you have decided on the heat meter model and purchased it, you can begin installation work.
Return to content
Advantages of devices
In addition to the fact that installing individual heat meters in an apartment allows you to make payments depending on the readings, it undoubtedly has other advantages.
Heat meters for apartments
These characteristic advantages include:
- Private meter installations in a residential area allow you to regulate energy consumption depending on weather conditions. This is mainly in demand during the spring and autumn periods, when the temperature outside can change every day.
- Using the device, you can detect malfunctions in the coolant line (air pockets, blockages). This leads to an uneven supply of heat, which, of course, will immediately appear on the meter readings in the apartment.
- The installation of individual heat meters is also necessary because utility organizations calculate heating fees according to established standards, and not based on actual consumption. With the device, every month the heat in the apartment will be metered according to the readings.
Thus, the benefit of installing individual heat energy meters in an apartment is obvious.
On a note. A heat meter installed on hot water supply (DHW) will quickly justify its cost if the heating in the house is of poor quality. This is possible because if the meter readings are below 40˚, the calculation is made as for cold water (according to Government Decree No. 354).
Meanwhile, the installation of such devices has a number of features, and therefore it is necessary to pay special attention to them.
Heat meters in the apartment
Individual products have a small pipe flow area, not exceeding 20 mm, and the calculation occurs in the range from 0.6 to 2.5 m/h. This is allowed based on the coolant flow rate and the different water temperatures in the inlet and outlet pipes of the heating main.
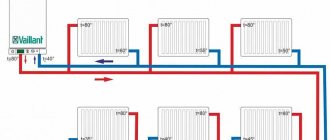
Heat meter connection diagram for apartments
This happens in this way: a meter and a heat calculator are mounted on a liquid heating system device, the operation of which is provided in pairs. Two temperature sensors branch off from the second device, one of them is mounted on the inlet pipe, and the other on the outlet pipe.
As a result, the recording device collects the necessary readings from individual meters and, using special transformations, displays the amount of heat consumed on a scale.
Selecting an installation method
There are currently two ways to install this measuring equipment. The first one is the simplest. You just need to contact a specialized company, which will promptly send qualified workers to you to install this measuring equipment. Very often, such organizations provide a guarantee for the work performed. All you need to do is purchase all the necessary consumables and additional elements and pay for the services of the craftsmen.
Heat meter installation diagram
The other method is more complicated, but using it you can save a lot. You can install the meter yourself.
It is important to know! There are some requirements for installing a heat meter. Regardless of which installation method you choose, you must first obtain permission from the relevant organization. There, the applicant will be given a whole package of documents that regulates the installation of the device. It makes no sense to do anything without this documentation, since such a violation is punishable by a fine.
Return to content
Features of installing a heat meter
It is important to know that installation and connection of the metering device can only be carried out by organizations that have special permission to carry out this type of work. Qualified specialists of such a company carry out all work in several stages, namely:
- Carry out the connection project;
- Conduct project approval;
- Install the metering device;
- Register installed equipment;
- The device is handed over and transferred to the control of the organization exercising supervision.
Self-installation
Before installing a heat meter in a private house, it is better to prepare all the necessary elements and tools. So, you will need:
- the heat meter itself;
- connecting elements for contact with the check valve;
- filter elements;
- welding machine, if we are talking about plastic lines;
- a wrench if metal pipes are used;
- collets;
- special fittings with thermal sensors;
- heat-conducting paste.
The first step is to flush the heating lines, where the measuring equipment will be installed. After this procedure, you can begin installing the flow elements of the heat meter. When performing this operation, you must adhere to the following rules:
Installing a heat meter in a ball valve
- Installation of this equipment should be carried out only in strictly horizontal or vertical sections of the highway.
- The liquid crystal tap must be mounted so that the computer is at the top.
- The flow element of the heat meter must be filled with water at all times.
- Installation of the supply part must be carried out using a set of threaded connectors. These elements are included with any model of this measuring equipment.
- This part must be positioned so that the direction indicator coincides with the direction of fluid flow.
By clicking on the link, you will learn how to choose a heating pump. Read about how to install water meters here. You may also be interested in the process of installing a heated floor under a screed.
All contacts should be as tight as possible. This condition must be met so that all elements can withstand pressure up to 1.6 MPa. Only in this case can the possibility of leaks be completely eliminated.
It is necessary to use adapters if the diameter of the flow element of the heat meter exceeds or vice versa the diameter of the main line.
Now all that remains is to install the measuring cartridge and converters. It is very important to inspect the heating line for pressure build-up before starting this work. It is imperative to make sure that the shut-off valves are closed. After this, an inspection of the measuring device and the flow element should be carried out. If these items are in order, you can continue with the installation.
Installation of a heat meter
It is important to know! During installation work, it is unacceptable to use old rubber seals.
At this stage, thermal converters should be installed. They must be installed on both the supply and return lines. To avoid confusion, it is better to pay special attention to the designations on these elements. The supply line is marked in red, and the return line is marked in blue or black. They are installed in a special niche, which is located on the measuring product.
The first step is to roll up the plug that blocks access to the niche, then arm yourself with the tool that comes with each measuring equipment and install the rubber seal. The thermal converter itself must be located in a special plastic element consisting of two fragments. At this stage it is very important to ensure that all the gutters match each other. After this, you need to mount the resulting structure into the niche of the measuring cartridge and tighten it tightly with a wrench.
The second thermal converter must be placed in a sleeve, which then must be screwed into a tee, which is fixed to the heating line. Before installation work, the sleeve should be treated with a thermally conductive compound. The contact areas must be insulated with a special material that does not conduct heat. The last step will be sealing the heat meter. As you can see for yourself, the heat meter installation scheme is quite simple, so if you are confident in your abilities, then it is better not to waste money.
Return to content
How to install a heat meter in an apartment?
Regarding the common house meter, we can say that its indisputable advantage is its low cost. However, the expected economic effect from its installation will not be so noticeable. This is due to the fact that the entrance may be poorly insulated, and a lot of energy will be spent on heating it, the payment for which will fall on the shoulders of the residents.
In houses with vertical piping
In older apartment buildings, as a rule, heating pipes are installed vertically. In this case, it will be necessary to install a separate metering device on each of the risers in the apartment, which makes this procedure extremely costly.
In such a situation, a good solution would be to install special metering devices on the batteries, but in our country (unlike Europe) such heat meters are not used.
Modern manufacturers of metering devices offer users who have apartments in buildings with vertical wiring such distributors, where the coolant flow measurements are based on the difference in the temperature of the air in the room and the surface of the battery. But still, the best option for houses with vertical distribution of heating pipes is a common house heat meter.
In houses with horizontal pipework
If the pipes in an apartment building are horizontal, then residents have the opportunity to install any type of heat meter. For example: a compact model can be installed either on the pipe supplying coolant to the room, or on the return pipeline.
Let's sum it up
Briefly, the process of installing a heat meter can be described in 5 stages:
Registration of permitting documentation for the installation of this measuring equipment.
- Selecting and purchasing a heat meter.
- Order or create an installation diagram yourself.
- Direct installation.
- Sealing the installed product and receiving an acceptance certificate.
After that, you will pay your heating bills by seeing these readings. With this device you can save a significant amount, but the benefits will not be noticeable immediately.
Return to content
Installation of meters in old apartment buildings
Almost 90% of the housing stock of multi-storey buildings in Russia was built according to standard designs, tied to local conditions. The standard design, in principle, did not provide for the installation of heat meters for heating in a separate apartment.
Here, the central heating system is based on the distribution of the coolant according to a riser system with upper or lower distribution. All heating devices are connected in parallel to common risers. What you need to know about the distribution of coolant in an apartment building.
At the entrance of the central heating main to an apartment building, a heating point with a heat meter is provided. Coolant consumption volumes are determined by meter readings and are evenly distributed to all apartments according to their area. Payment is made according to the standards.
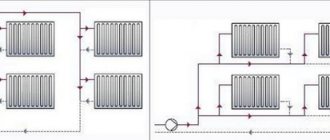
So how to install heating meters in an apartment? With a riser system, two options are possible:
- Installation of a meter for each battery.
- Changing the heating wiring diagram so that all devices are connected to one riser. One counter is enough here.
With a riser system, you will have to install a heat meter on each battery.
It’s worth noting right away that the management office is unlikely to give permission to implement the second method. This disrupts the balancing of the system; the coolant may simply not reach the upper floors. Any unauthorized changes made to the heating wiring diagram are unacceptable. You will be fined, the installed devices will not be accepted for use, and you will be forced to restore the wiring.
As for the first option. According to December 29, 2011, it is prohibited to install individual heating meters in an apartment with a common house vertical wiring where one device is powered from each riser. Here the final decision is submitted to the management company. Usually the issue is resolved positively, but it will take 2-3 months for approvals from various authorities.
Important! Try to go through all the stages of approvals, installation, connection between heating periods, this will simplify the installation of devices.
Basic approvals required when connecting meters
From filling out the application to accepting the heating meter in the apartment, you will have to go through stages defined by law, each of which will require a significant expenditure of effort, nerves, time, and material investments.
Is it possible to install a heating meter in an apartment - seven steps that must be completed in order for everything to be legal.
Before starting the process, finally decide whether it is worth doing. Find out from the management company about the actual number of meters already installed in an apartment building, whether such precedents exist.
Drawing up an application, project, obtaining technical specifications
The first stage is a visit to the management company, housing office or homeowners association. Here the following series of questions need to be addressed:
- Write an application for the creation of a commission to inspect the apartment in order to determine the technical feasibility of installing heating meters in the apartment, their location. Draw up an inspection report.
- If the commission makes a positive decision, write an application for permission to carry out this type of work related to changing the heat supply scheme and obtaining technical conditions agreed upon with the energy supply organization. The technical specifications form has a single form; you can see which heat meter is better.
- After obtaining permission and specifications agreed upon by all authorities, you can buy heat meters for batteries in an apartment or for other premises. Technical specifications are an important document; they are used to purchase meters, install them, and make a heat supply project.
- According to the technical specifications, order a project from a specialized design organization, which will indicate the installation location of the meters. In the case when the management organization gives the go-ahead to alter the heat supply scheme, bringing it to one riser, all the necessary changes are indicated in the project. The project is being approved by the management company and resource supply organization.
Purchasing a meter involves material costs.
Purchase of a meter, installation, commissioning
The device can be purchased only in specialized stores. Check the availability of a certificate for the products you sell. The device must comply with the parameters specified in the specifications. The passport must contain a stamp indicating verification at the manufacturer's plant indicating the date, and a warranty card.
The best option for installing heating meters in an apartment is to contact a specialized organization that has a certificate and permission to carry out this type of work. The organization must be included in the Unified State Register of Legal Entities (you can check it for free) and have an admission certificate for the relevant construction and design work (SRO). This is important when registering the meter with an energy-saving company.
- Draw up an agreement, costing, and estimate with the organization for the installation of the heat supply system and installation of devices. Decide on the warranty period, further support for the operation of heating meters in the apartment, carrying out verifications and eliminating emergency situations and meter malfunctions.
- After installation work and verification of the device, draw up a report with representatives of the management office and the energy saving organization.
- Write an application to the energy-saving company for registration and commissioning of the installed meters with a change in the layout of the heating system. From this moment on, you will be fully responsible for the correct operation of the devices and their technical condition. Control is carried out by the energy supply organization.
Entrust the selection of a central heating meter for the apartment to an organization that will be your executor. They will purchase devices that fully comply with the requirements of the specifications, taking into account the acceptable cost limits.