Arrangement of the territory in the garden requires effort in organizing a fireplace for cooking.
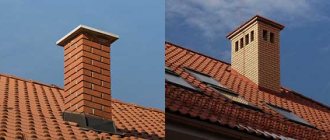
Laying stoves is a complex operation that requires a lot of experience and a sufficient amount of knowledge. We invite you to learn about the basics of laying stoves in order to have an idea of how it is done. The simplest is considered to be the laying of brick stoves. In fact, laying brick stoves requires a lot of special knowledge on the construction of fireboxes and vaults, chimney systems and other technological elements. This page describes how to lay simple stoves in a garden plot. A similar principle can be used to create heating and sauna stoves. Look at the photo of the furnace masonry, which illustrates the basics of all operations and the materials used. The video of furnace laying offers more clarity, where the work of a real professional and his advice are presented.
Detailed description of brick kiln laying technology (with video)
The description of the laying of stoves should begin with the fact that the walls and corners of the stove should be positioned strictly vertically. In order for the stove to be level, it is recommended to lay it out in formwork, which should be plumb and level at the construction site.
The step-by-step laying of the furnace begins with the need to mark the contours of the future structure on the foundation with chalk, taking into account the thickness of the seam. Masonry should be carried out with ligation of vertical seams on half of the brick, under jointing. First, all the bricks of the row must be dry fitted, then removed and placed on the mortar.
Brick laying should be done quickly. Otherwise, it will be impossible to lay the thickened mortar and level it in a thin layer, so all halves, quarters and three-quarters of bricks must be prepared in advance.
If you apply the mortar to the entire row of masonry at once, it will quickly thicken, and the joint will be uneven in thickness, so it is recommended to apply the mortar in an even layer separately to each brick. The detailed masonry of the furnace is discussed in detail in this material.
To quickly and evenly apply the mortar, it is necessary to place a small amount of it on the corner of the brick and spread it along the edge with an inclination towards the edge. Then you should unfold the brick, apply the solution to its second half, forming a tubercle in the center.
The thickness of the seams of stove masonry made of ordinary red brick should be no more than 5 mm, and of refractory and refractory bricks - 3 mm. The thinner the seams, the better the quality of the stove.
The technology of laying stoves requires that when constructing pipes, the thickness of the seams should be no more than 10 mm. The seams should be completely filled with mortar, and the internal and external surfaces should be cleaned of excess by hand or with a trowel.
Master's advice. For better retention of the plaster on the surface of the stove, it is recommended to leave the seams unfilled to a depth of 5-10 mm. If the stove is not planned to be plastered, then the seams should be filled completely.
If the brick does not fit properly onto the mortar, it should not be corrected by tapping. It must be removed, the surface must be cleaned of the solution, moistened and installation repeated.
Each row of masonry must be made with 1/2 brick joints. In rows where three-quarter bricks are used, it is allowed to bandage 1/4 bricks.
The furnace must be laid taking into account the need for horizontal rows and verticality of outer surfaces and corners. To comply with this rule, each row of masonry should be checked with a building level for horizontality, and with a plumb line for vertical walls and corners.
For convenience, it is recommended to stretch a cord between the formwork posts, which you can use to guide you when laying. Each row must be checked against the order drawings.
All internal surfaces of furnaces must be smooth, without protrusions and depressions that impede the movement of gases and impair the operation of the furnace. Turns and corners in the channels should be rounded, and the narrowing or widening of parts should be done gradually, therefore, after 5-6 rows of masonry, the internal surfaces of the firebox must be wiped with a wet rag, smoothing and rubbing the seams to remove excess mortar. If this is not done, the solution may crumble during heating.
When facing with refractory bricks, the thickness of the seams should be no more than 3 mm. This brick should not be tied with red brick. Due to their different thermal expansion, the masonry may collapse.
An outdoor stove should be easy to install and easy to use. It should be built on a separate, reliable foundation, not connected to the foundation of a house or other nearby building. It is prohibited to tie up the masonry of fireplaces with adjacent structures (walls, fences).
It is imperative to bandage the vertical seams of the masonry, and also ensure that the thickness of the seams is no more than 5 mm. In some cases, coincidence of vertical seams is allowed, but not more than two rows of masonry.
It is forbidden to place bricks with the chipped or hewn side inside the firebox or ducts, as in this case they will collapse from exposure to high temperature. A detailed illustration of the laying of a brick oven in the video will allow you to familiarize yourself with this process:
On a note! It is prohibited to coat the internal surfaces of stoves with mortar or plaster, as these layers quickly fall off and clog the channels.
One should also remember about the different thermal expansion of materials when attaching metal parts to the furnace. For example, metal supports must be guided away from the furnace using wire strands. More space is required for longitudinal thermal expansion, for example when installing grates.
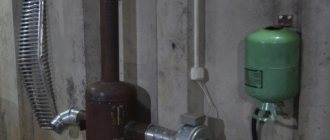
About the heat exchanger
When building a brick stove with a water heating boiler with your own hands, you should take into account many factors and calculate the project as a whole. Any type of materials and structures have their advantages and disadvantages.
There are several ways to install a water register in a furnace:
- Inside the hearth;
- In the chimney;
- In the body of the stove, next to the hearth.
Depending on the location, choose the material for the heat exchanger and its shape:
- Copper - effective due to the high thermal conductivity of the metal, but due to the low melting point of copper, constant circulation of water in the system is necessary;
- Steel - heat-resistant steel with a wall thickness of 4-5 mm is used for boilers. For long service life of steel structures, it is not recommended to drain water from them.
- Stainless steel is expensive, but the most suitable material for a boiler. The only disadvantages include the complexity of manufacturing.
When choosing the type of material and installation location of the heat exchanger, it is worth remembering that by placing the water circuit in the fireplace, in the summer the entire system will heat up; to avoid this, you will have to remove separate batteries to remove excess heat.
When installing a heat exchanger in the chimney, additional dampers are added to the stove design, which do not heat the boiler during summer operation of the stove. It should be taken into account that the heat exchanger must be larger in volume than when built into the fireplace. In addition, the boiler should not reduce the throughput of the smoke channels.
Calculation of power and dimensions
For normal heating of the room, it is necessary to correctly calculate the register area and its power. For a brick kiln, an approximate calculation is sufficient; it is impossible to make an exact one, due to many factors and variables.
It is known from practice that heating 10 m2 of space requires 1-1.5 kW of energy. From one square meter of heat exchanger you can get 5-10 kW. To determine the register power more accurately, you need to consider:
- Location of the coil in the furnace;
- Type of fuel - wood, coal. When burned, wood produces less thermal energy.
- Approximate temperature in the hearth and location of the heat exchanger;
- Average water temperature throughout the entire circuit;
- The heat transfer coefficient of the material from which the coil is made.
As the fuel burns, the power of the heat exchanger will decrease, so it is better to increase the calculated coil area by 10-15%.
Rules for laying the furnace vaults of an outdoor stove
When laying furnace vaults, it is necessary to block the combustion openings, fireboxes, and chambers using simple and complex shaped lintels. The ceiling in a wall is called an arch or arched lintel, and the ceiling between the walls is called a vault.
To cover large spans, an arched ceiling is used.
Vaults can be steep, flat or gentle. The semicircular arch is equal to half a circle. A gentle vault is less steep. The three-center arch is even flatter; thanks to its design, heating occurs evenly over the entire surface. This is important when baking pies. The number of bricks in the arch and rows in the vault should be odd. The middle odd brick is called a castle brick. The bricks on which the lintel or arch rests are called heels. To give them the desired shape, such bricks have to be trimmed. The space covered by any jumper is called a span. The lifting height of a vault or arch is the lifting boom.
The construction of any lintel must begin with the laying of bricks on which it will rest. They should be hewn out according to a template. Since the height of the arch or vault can be different, the angle of the heel changes. You cannot use one heel shape for all arches and vaults.
The laying of the furnace firebox begins with the preparation of circles and foot templates; for this, on a sheet of paper, cardboard or plywood, it is necessary to draw a vault of the desired shape so that an odd number of rows of masonry can fit in it.
You can easily and quickly build a vault on two boards. An axis should be drawn in the middle of the narrow board so that it intersects the wide board. At a distance of 3-5 cm from the bottom edge of the wide board, you need to draw a straight line A-B, marking the width of the firebox on it. The axis should run in the middle of the firebox, between points B and D. On the axis from line A-B, the height of the arch lifting boom should be measured upward. The resulting point can be designated by the letter D. After this, you need to select the center O in such a way that the circle passing from it, forming the arch, runs through points B, D and the upper point of the arch lifting arrow.
The rules for laying a furnace recommend using formwork for the arch, which is laid on prepared circles.
After installing and securing the formwork, a nail should be driven into the central point O, from which the circle was drawn, and strong twine should be attached to it, which is necessary for checking the rows of the vault and marking the bricks to be laid. The brick for laying the vaults must be hewn, giving it a wedge-shaped shape.
In this case, the seams have the same thickness. When using regular brick, the seams will be thinner at the bottom and thicker at the top. They must be completely filled with solution.
The heels should be trimmed and laid very carefully, since filling large voids with mortar and crushed stone can lead to settlement of the vault or arch and their destruction.
The laying of the vault should begin from the edges, from both heels at the same time, moving towards the middle of the vault or towards the castle. The bricks need to be fitted tightly, so that they almost touch each other on the side of the firebox.
The seams between them must be directed to one point or to the center from which the curve of the arch or vault is described.
The last thing to be inserted into the row of masonry of a vault or arch is a castle brick, greased on both sides with clay mortar. It is advisable to strike only with a log or a mallet, since an ordinary hammer can split the brick.
Master's advice. During work, the accuracy of the formwork installation must be constantly checked and adjusted by driving wedges between it and the furnace walls. The finished vault should be left in the formwork for several days, after which it can be disassembled, gradually removing the wedges. The circles are taken out last.
Peculiarities
The Russian stove simultaneously performs many functions to ensure comfortable living in the house:
- heating the house in cold weather;
- cooking food;
- drying the crop for subsequent storage;
- providing the home with hot water.
An old Russian stove
Of course, a Russian stove is not an absolutely ideal device, and it has disadvantages. Cooking food in an oven is not so easy - not every housewife knows how to use a grip and pots. Maintaining a fire is also not the easiest thing. How many men are accustomed to lighting the stove and chopping wood with their own hands? Also, the stove as a heating device has a design flaw - heat is released at a height of more than a meter, above the floor. In modern ovens they have tried to eliminate this shortcoming. To do this, smoke circulation channels are located below, heating the stove over its entire height. To make cooking easier, the design includes a cast iron stove.
Laying and lining of the firebox and furnace wells
The laying and lining of the furnace should be carried out only according to accurate, pre-made calculations. Fireboxes up to 42 cm wide should be covered with a simplified triangular vault, placing the brick flat, followed by continuation of the masonry walls, which will firmly press the heels to the underlying rows of masonry. If such a vault is erected without continuing the masonry, this may cause the heels to shift due to the thrust of the vault, and then lead to its collapse.
To avoid this, the heels laid under the arch for laying the firebox must be tightened using pieces of square, rectangular, corner or T-steel connected with a wire harness. A wire bundle consists of several wires twisted together using a nail.
The harness should be located inside the masonry, in the seam. If the harness is open, it will quickly burn out. Instead of wire, you can use strip steel, firmly fixing it to the bars. In some designs, the ends of the bars may extend outward. In this case, they should be tied together with strands or round steel rods with threads and nuts at the ends, for which holes should be drilled in the ends of the bars.
Fireboxes with spans up to 38 cm can be covered by releasing bricks from the side walls of the masonry. To firmly fix the overhanging supporting bricks, the side walls of the masonry must be located at least four rows of masonry above the row to be overlapped. The more rows are laid out, the better the laying of the furnace fireboxes, this way you can avoid the ceiling tipping over inside the furnace.
In the process of laying furnace wells, it is recommended to block the combustion openings with various jumpers. It is forbidden to rest bricks on the door frame. If the width of the combustion hole is less than 250 mm, it is blocked into a lock by cutting off the brick. If the opening width is more than a brick, it is necessary to make a brick lintel.
Covering the portal
In order to block the portal above the hearth of a Russian stove, it is not necessary to have metal. It can be covered with an arch.
If you do not want to install a samovar, then it is better to narrow the gas collector from the 19th row, and install the view on the 24th row. Wall-22 is not needed. If the height of the room allows, then for better draft and heat transfer in Russian stoves it is good to finish the last row, not reaching 35 cm from the ceiling, then you need to increase the gas collector under the view or valve (depending on what kind of stove appliance you were able to purchase).
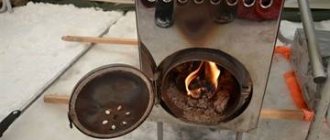
Proper completion of the laying of a wood-burning stove for a summer residence
At this point, the laying of the outdoor stove is almost complete, but there are a few technological aspects remaining. Grate bars and grates should be located 7-14 mm below the combustion opening. A gap of at least 5-10 mm should be left between the grate and the masonry of wood-burning stoves along the entire perimeter, filling it with ash or sand so that the expanding metal does not damage the masonry when heated. When laying the grates, it is recommended to tilt them towards the door by 2-3 cm, which will ensure that unburned fuel rolls off the back wall onto the grate. The grate slots must be placed along the firebox (from the door to the rear wall).
Cast iron stoves used in kitchen fireplaces are best laid level on a thin layer of clay mortar.
Proper laying of the furnace implies that the structure must be dried naturally, or, in extreme cases, artificially. During the drying process, all valves must be open around the clock. The pipe can only be closed during a thunderstorm. This drying process takes approximately 10-12 days.
Artificial drying is faster. To do this, it is necessary to heat the stove with a gradual increase in the amount of dry fuel: shavings, straw, wood chips, finely chopped firewood. It is forbidden to dry the stove by burning a large amount of wood at once, since the water in the brick, turning into steam, can destroy the masonry.
The first addition of fuel should not exceed 20-25% of the amount required for normal combustion. For the second furnace, the volume of fuel can be increased to 30-40%, for the third - to 60-70%, etc. up to the full norm. After each firebox, all stove devices must be open, and the temperature of its outer surface should not exceed 50-60 °C.
Laying a stove for a summer residence and drying is considered complete when damp spots no longer form on the surface of the stove and there are no traces of condensation on the valve.
Recommendations for use by stove makers
The efficiency of fuel combustion and the overall condition of the stove depend on compliance with operating rules, which should be followed not from time to time, but regularly.
Brick, like mortar, is a “living” material that can become deformed over time due to temperature changes. Therefore, you will have to not only clean it, but also cover up the cracks so that condensation does not form and the heat capacity of the structure does not drop.
This happens very simply, here is an example: over time, a gap of only 2 mm wide has formed around the valve. It turns out that in an hour it passes as much as 15 m³ of air heated to a temperature of 90-100 ° C, that is, approximately 10% of the total heat emanating from the stove.
Heat loss increases up to 40% if you simply open the door, and by 20-25% if air is supplied through the vent
Furnace repairs and cleaning are carried out once a year, before the heating season. But chimneys need cleaning much more often - about 2-3 times per season. Before starting the fire, remove ash from the grate to ensure free access of air for efficient combustion.
Fuel is prepared in advance, since the logs must dry. To do this, they are put in woodpiles under a canopy and left for at least a year. It is not recommended to use wet firewood, since evaporating moisture settles on the walls and mixes with soot.
It is better if the firewood is the same length and thickness no more than 10 cm. This way they will burn equally quickly and evenly, which is important for heating bricks
Typically the combustion process takes from 1.5 to 2 hours.
Firewood is stacked in the combustion chamber in rows or in a cage, with a small distance between logs. It is important that they burn at the same time, as the heat will be greater.
It is not recommended to heat the stove for a long time for increased heating. This can provoke the appearance of cracks, as a result of which first cosmetic and then major repairs will be required - laying the masonry again.
For kindling, quickly flammable materials are usually used: wood chips, paper, shavings. Before lighting, open all the dampers, the view, the door
As soon as the wood ignites, the firebox is closed and the vent is opened. The draft is regulated by the position of the valve or view.
Some more useful tips:
- A bright red flame and black smoke indicate a lack of air - the flow needs to be increased.
- A white flame and a hum in the chimney is an excess of air; it is better to cover the vent a little.
- You can move the logs only after they have thoroughly burned out and formed wastelands that allow air to pass through.
- The firebrands are pushed into the center of the hot coals so that they burn out faster.
- As soon as the coals stop burning with a blue flame, they are distributed over the hearth, moving closer to the mouth.
- To protect against carbon smoke, the pipe is not closed for another 10 minutes to prevent carbon monoxide from entering the room.
If the stove is heated with coal, it is still recommended to heat it with wood.
When finishing external walls, remember that beautiful cladding can partially reduce the flow of heat into the room.
Russian style stove dimensions
Before constructing a furnace structure, the site for the construction of a heating structure is always first selected. A Russian-style stove can be located in the corner of the room or along one of its walls. The dimensions of the heating structure depend on the size of the room. These parameters are also affected by the reliability of the foundation.
Nowadays, they often begin to build a stove in an already built house. This is not quite the right option. After all, it is more convenient to thoroughly think through the heating structure at the design stage of a residential building. However, even in this case, craftsmen will always build an effective stove. It can have the following design:
- Mini Russian stove, the width and length of which are 1240 mm and 1780 mm, respectively. This option is suitable for construction in a country house, under a canopy or even in a summer kitchen.
Miniature Russian stove design Source blogspot.com
- A medium-sized heating structure, also called a home stove. Its dimensions are 2130*1470 mm. This option is suitable for heating a house up to 40 m².
- Full-size heating structure with dimensions 3250*2250 mm. Such a stove is capable of heating a large one-and-a-half-story residential building.
On a note! The dimensions indicated above are unusual even for some stove makers. However, experienced specialists know well that previously the length was measured in arshins. Therefore, if you use not millimeters, but the ancient system of measures, then it turns out that a Russian home stove, the dimensions of which are now 2130 * 1470 mm, previously had dimensions of 3 * 2 arshins.
The above dimensions of a Russian-style stove are only recommended dimensions. When constructing such a heating structure, it is more important to maintain proportions when laying the vault, hearth, furnace and chimney. In the latter case, you need to lay out a channel of a suitable cross-section to ensure effective traction.
One of the stove size options Source ps.494444.ru
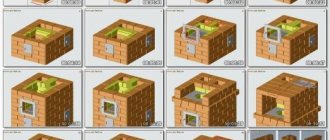
First laying rows
The first fitting row of bricks is marked and laid out on the foundation, without mortar for now. They check with a level whether the row is horizontal, and then check it with the drawing. Without a pre-drawn plan, a smooth stove will not work.
Several of the bricks being tried on are dipped into water for a couple of minutes for better subsequent setting with the mortar, and at the same time the mortar is placed on the vacant spaces, leveled and a wet brick is slapped on top.
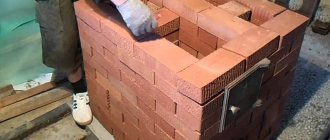
In the photo: masonry of the stove.
All bricks are connected to each other with mortar during the laying process, and the remaining mortar is immediately removed. Having laid out this row, cover it with roofing felt, preferably in three layers - this will be the waterproofing, and the first row of the stove will be considered not the one that has already been laid, but the other one, which will be on top of the insulating layer.
Shield schemes
A rough stove can have several purposes and, depending on the purpose of its use, different types of shields are built. Let's consider the possible options for shields:
- Sequential stroke with vertical channels. To build this type of shield, the least amount of materials is required. The scheme is easier to implement for those who do not have sufficient experience, due to the simplicity of the design. If the shield circuit is constructed correctly, the resistance to gases will be the greatest, and the thermal efficiency will be average.
- Sequential stroke with horizontal channels. It is much more difficult to build a circuit than the previous one, but they do not differ in parameters. Thermal efficiency increases by reducing gas resistance.
- Sequential stroke with long vertical channels. The main advantages of the scheme are that the ease of construction corresponds to the first type, and the thermal efficiency corresponds to the second. The disadvantages will be the need for additional construction of the foundation and high costs of building materials.
- Parallel move. A furnace with a shield with a parallel stroke is not compact, it takes up a lot of space, but it has the highest thermal efficiency. It is possible to reduce the furnace power.
(no votes yet)
How to properly prepare a clay solution
Required material:
Scheme of a blast furnace for in-house production.
- clay and sand;
- sieve with cells 1.5x1.5 mm;
- stirrer for solution.
The laying of a Russian stove must be done with high quality, which largely depends on how correctly the clay mortar is prepared and the thickness of the seams, as well as on compliance with the binding of the brick and its quality. In order for the solution to shrink slightly, dry without cracking, firmly bind bricks together, and withstand high temperatures without collapsing, it must have average or normal ductility. It is better to prepare clay mortar from raw brick, as it contains the required amount of clay and sand. For the solution, it is better to take fine sand, that is, cleared of vegetation and gravel. It should be sifted through a fine-mesh sieve (1.5x1.5 mm). The amount of sand directly depends on the quality of the clay, which can be checked in the following way.
Add water to a ten-liter bucket of clay and mix with a long mixing board until it becomes creamy. If the solution covers the mixer with a layer of 1 mm, it means that it is of low plasticity, and fatty clay should be added. If the solution covers the board with a layer of 2 mm, and the clay sticks in separate clumps, then the plasticity is normal. If you get a thick layer that sticks to the mixer, it means the clay is highly plastic, and you need to add sand. It should be added in small portions until the plasticity becomes normal. When preparing the mortar, the main thing to remember is that only a plastic mortar of the required thickness will fill all the unevenness of the brick well, and the seams will be dense, durable, and gas-tight.