A novice stove maker always wants to build some outlandish stove. Preferably simple. And also beautiful and effective. It is a pity that there are not so many orders of such constructions.
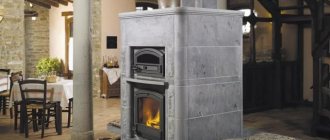
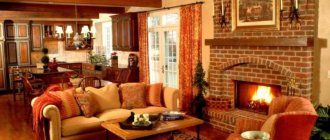
Among them, a fireplace stove with a bread chamber stands out, operating according to a scheme popular in Scandinavian countries. The scheme is not without drawbacks, but has a high degree of universalism. There is a massive universal heating stove, a decorative fireplace, and a chamber for baking bread. Simple design, multifunctionality, relative compactness. A good option for a country house, capable of heating an area of approximately 25-30 square meters.
We offer a procedure that allows you to assemble the stove yourself, having only minimal stove craft skills. A simple basic skill in working with clay and brick is sufficient for the performer. The rest is simple.
The main elements of a fireplace stove with increased heat capacity are in the following order:
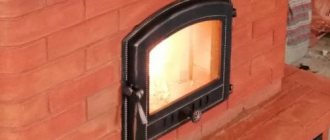
A fireplace stove can replace any heating appliances and can become an excellent oven. You can learn how to install it at your dacha from the video. It is the winding serpentine air duct that allows the heated air in the firebox to rise, pass through the entire structure of the stove and thereby heat the stove bench. On the 9th and 8th rows, overlap is performed on the firebox and bed. Next are the rows for the hob and oven, and another row that separates the oven from the wall. After the lintel has been laid out, it is necessary to use simple or, if desired, decorative masonry above the oven chamber: with a wedge or an arch. Next, a metal corner is used above the stove for cooking, and a decorative shelf is made from it. Subsequent rows will combine all the chimneys into one and windows will be made on the walls of the stove.
Next we lay out the pipe. It has a square shape, and the optimal pipe laying will be 2 and a half bricks. The ceiling through which the pipe passes is insulated using basalt slabs in several layers.
When we build brick ovens, we need to know all the nuances and have designs; even the smallest detail can disrupt the design.
Types of fireplace stoves
The design discussed above is the simplest implementation of the idea of a fireplace-stove. In fact, there are much more efficient and functional structures that combine a separate fireplace and stove, install a hob, oven or heat exchange niches, etc.
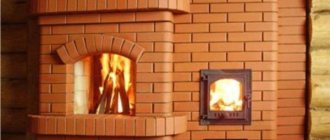
Fireplace stove with bench
Fireplace stove with bench
A massive structure with a heated lounger or stove is not suitable for every home. For example, for a summer house it will be too big, since it will occupy a significant area of the room. If you install such a unit in a country house, you can achieve amazing comfort: such a design just begs to be installed in a living room combined with a kitchen.
Wall fireplace stove
A wall-mounted fireplace stove will save space in a small room
This design can be built in a small house to heat two adjacent rooms. As in the design discussed above, heating units can be heated separately. In this case, the fireplace can be used to quickly and comfortably heat a large room, while the heating of the back wall during operation of the stove will work to heat the bedroom. The disadvantage of this design can be considered the absence of a hob, which, however, is compensated by the compactness of the structure.
Square fireplace stove with stove and oven
Multifunctional fireplace stove with stove and oven
A multifunctional heating device installed in a large room can divide it into several zones. On the side of the fireplace, you can create a cozy homely atmosphere for relaxing and gathering with friends, while the area adjacent to the stove can be used for cooking and other household needs. Fortunately, for this purpose the fireplace stove has a large hob and a spacious oven. The shelf above the fireplace can also be used to the maximum - it is convenient to dry fruits, mushrooms or medicinal plants on it.
Review of the best domestic fireplace models
Russian is very noticeable on the fireplace stove market. Consumers leave positive reviews about the company's products. The best assembly is considered to be the stoves from the Ardenfire series. The products use some elements from the best foreign manufacturers: Germany, France and Japan, and are assembled using unique technologies. Each series is characterized by being equipped with heat-resistant glass, sufficient power up to 12 kW and compactness.
Corner stove-fireplace "Amur" - wood-burning
The stove is designed to heat 90 sq. m area. The manufacturing technology is combined: the firebox is laid with fireclay bricks and lined with high-quality steel. The brick is designed for 5 years, after which it should be replaced. The firebox door has high-quality heat-resistant glass of Japanese origin. There is excellent heat flow through the door and good visibility of the fire. Glass is self-cleaning and can withstand high temperatures.
Corner stove-fireplace “Cupid”
The firebox has a volume of 73 liters and can provide power up to 10 kW. The weight of the entire structure is 157 kg, which allows you to quickly install the fireplace stove. High efficiency 3 kg of firewood allows you to keep the room warm for 8 hours.
Attention! This is a wood-burning model of a corner stove-fireplace for a summer cottage; it cannot be heated with coal. Guarantee of at least 10 years of work
Guarantee of at least 10 years of work.
Corner fireplace-stove "Neva" - wood-burning
A very compact model with a height of 87 cm and a width of 64 cm. The small size of the fireplace allows it to be installed in the smallest cottage. The model has gained well-deserved popularity among domestic consumers.
Corner fireplace-stove "Neva"
The power is enough to fire 60 square meters. m. of housing. This compact model warms up the home in 3 hours; you will need to add 3 kg of firewood to keep the room warm for 8 hours.
The weight of the structure is 95 kg, allowing installation to be completed in a couple of hours by connecting the pipe to the chimney. The manufacturer provides a 1-year guarantee of flawless operation.
The group's products produce products that comply with European standards, but are designed specifically for our climatic conditions.
Corner wood stove fireplace "Bavaria"
The domestic manufacturer Ecofireplace produces long-burning stoves that are popular with private homeowners. The company supplies a wide variety of models of heating structures, including high-quality options for corner wood-burning stoves and fireplaces for country houses.
Fireplace stove "Bavaria"
A sample of European quality, with small dimensions, it is capable of heating a room of 80 square meters. m. Made of high quality steel, the grate is made of cast iron, the self-cleaning system is heat-resistant glass. It has a very stylish look: the glass is framed by black steel doors, the side panels are trimmed with ceramics.
The design is equipped with a hob, without an oven. The depth of the firebox allows you to place wood logs up to half a meter, while the height of the fireplace is 86 centimeters. As on almost all Bavaria models, the corner fireplace stove has an economical fuel consumption mode.
The service life of Bavaria stoves is at least 10 years.
A fireplace is very useful for any home, and it is unlikely to get in the way or spoil the appearance. Such heating structures have many advantages that owners of home fireplaces enjoy. External energy independence of housing; if gas or electricity is turned off, the house will remain warm due to heating by the fireplace. It has high performance and can be used as the main source of heat for a summer residence. Fuel can be purchased as needed, at any time of the year.
Design
First of all, you need to carefully calculate everything. The size of the fireplace is determined based on the dimensions of the room.
If this is an area of 20 m2 with a height of 3.5 m, it is not difficult to obtain the desired value using the formula:
V = ShxH = 20x3.5 = 70 m³.
The dimensions of the firebox are found by dividing the area by 50.
In this case: 20 m² (20,000 cm²): 50 = 4,000 cm².
If the ratio of height/width of the firebox is 2:3, then for this situation the indicators will be as follows: height - 51-52 cm, width - 78-77 cm.
Particular care should be taken when calculating the depth of the source, since the resulting figure affects the thrust of the structure.
How accurately this is done will determine whether the smoke will penetrate the room and whether the long-awaited warmth will come.
If the depth is greater than expected, the heat will flow not inside the building, but outside.
With lower parameters, on the contrary, smoke will appear in the room and a pungent odor will be felt.
The depth should be 2/3 of the height of the firebox, that is, 2/3 of 51 = 34 cm.
Using this method, the typical values of the hearth portal for different rooms are found.
There is a ready-made table containing fireplace dimensions for buildings.
It is advisable to entrust calculations regarding the chimney to a stove installation specialist. If you ignore this important detail, “backdraft”, which is very dangerous for the health of household members, may occur, caused by the appearance of carbon monoxide and other combustion products.
As a rule, the length of the chimney does not exceed 4-5 m.
The working process of a Russian stove
Despite serious competition and a solid history, the design is still in demand among country property owners. Based on how the Russian stove is structured from the inside, it will be possible to focus on the dimensions from the outside and accordingly plan a place for it and lay the foundation.
Before you put together a Russian stove, you need to understand its operating principle - the design is a periodic heating device, that is, when burning wood, it accumulates heat, then releases it for almost a day. The structure can warm or languish like this for almost a day, which makes it possible to cook baked milk in it, steam porridges and soups, without controlling the process.
Before making a Russian stove, you should build a separate foundation that is not connected to the tape, since the structure is usually heavy
This is especially important when the house “dances” on heaving soil during freezing and thawing. In this case, the stove will move along its own amplitude along with its foundation, without destroying the finish or affecting the walls and openings
Cross-section of a Russian stove during heating and simmeringSource 2proraba.com
Work principles:
- the entire structure stands on a brick or concrete slab;
- firewood for kindling is stored in the stove, where it dries very well and, when ignited, lights up instantly;
- the top of the sub-peck is made with a hemispherical arch, like a trough;
- sand, clay, broken brick - any heat-intensive material is poured onto it, and the front part of the firebox (cooking chamber) is laid on top of it under the stoves; it is placed without clay mortar.
If you ignore the topping, then you can forget about real hearth bread and pies. By the way, they are baked on cabbage leaves.
Next comes an injection with an overtube and a highlight in the form of a tapering nozzle. On the sides of the fold near the walls there are ash pits - recesses for smoldering coals (for the next kindling) and ash. Sometimes they are raked into a fringe - a part of a cast iron or stone slab (pole) protruding from the face (brow) of the stove.
To reduce costs and cleanliness in the room, there is no need to make an ash pan and ash pan. Previously, they were raked into a nook of the mouth, then the coals of birch, maple, elm, oak and aspen retained their heat for only a day.
Cooking in a cast iron pot over coalsSource yandex.net
Most likely, this is where the belief came from that the Russian stove is quite picky when it comes to fuel. But this is not so - it works on any solid fuel, including:
- brushwood;
- dung;
- dead wood;
- sawdust
- straw;
- peat briquettes.
Thanks to this configuration, the combustion chamber acts as an economizer, where the following happens: the smoke circulation heats the air, which enters the firebox without removing oxygen from it and without interfering with combustion - mixing of heat flows should not occur. In essence, a combustion chamber is an energy recuperator (heat exchanger).
Before building a Russian stove, you should check the dimensions in advance - this is important so that the structure does not smoke, does not cool down quickly and does not use a lot of firewood. For the same purpose, perfectly smooth haila vaults are made.
Moreover, they cannot be plastered, so the bricks are chipped from the inside and polished until glossy - then there will be no swirls in the slit.
Smoke from the stove goes into the chimneySource stroyfora.ru
Necessary materials
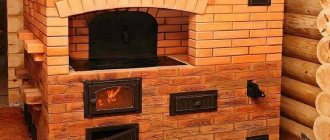
For the longevity of the stove, it is recommended to use only high-quality bricks, which must be purchased with a reserve. To build a unit with a fireplace, the following elements will be required:
- red brick – 717 pcs. (excluding pipe);
- white sand-lime brick – 154 pcs.;
- grate 20x30 cm;
- cleaning chamber doors 14x14 cm – 8 pcs.;
- firebox (21x25 cm) and blower (14x14 cm) doors;
- cabinet-oven 45x36x30 cm;
- hob 41x71 cm;
- valves 13x25 cm – 3 pcs.;
- 2 steel corners 50x50x5x102;
- 2 metal sheets 50x70 cm;
- steel strips 50x5x92 cm - 3 pcs.; 50x5x53 cm – 2 pcs.; 50x5x48 cm – 2 pcs.;
- reinforcement for laying the foundation;
- cement, crushed stone, sand, clay;
- boards for formwork construction;
- fireplace grate (you can make it yourself from fittings);
- sheet of roofing material for waterproofing the base in 2-3 layers;
- baked steel wire for securing the doors;
- pieces of asbestos or asbestos rope.
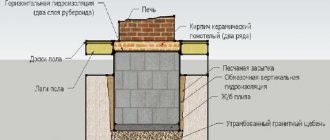
As mentioned above, the structure has dimensions of 102 × 89 × 217 cm. The fireplace protrudes from the general plane by 13 cm. Therefore, the foundation should be larger than the building itself by 10-12 cm on each side.
Device and principle of operation
The fireplace stove is installed on a foundation slab, arranged on a drainage pad made of sand and crushed stone. The structure has two combustion chambers. The one that forms the working area of the fireplace has an increased height and can be equipped with a glass door. Often it has a curved shape - this way it is possible to increase the area of the reflective surface.
Scheme of gas movement inside a combined type heating device
The firebox is made in both rectangular and trapezoidal shapes. In the latter case, it tapers to the rear wall, which is inclined, with a small threshold - a fireplace tooth or a gas threshold. Its purpose is to hold carbon deposits that settle on the walls of the chimney. Above the firebox there is a smoke collector, which goes into a direct gas channel.
The firebox has reduced dimensions and lower air supply. Depending on the configuration of the heating device, the roof of the firebox is equipped with a hob or covered with brickwork. Combustion products from the firebox rise into vertical channels arranged in accordance with the schemes of Dutch or Swedish stoves.
Internal structure of the fireplace stove
To prevent combustion products from entering the room, the smoke ducts of both devices are equipped with valves, which are closed as necessary. In addition, the chimney is equipped with an additional damper, which prevents heat from escaping after the fuel has completely burned out.
Construction of a heating device using ordering
The ordering diagram gives an accurate idea of each row, indicates where the doors, grates, valves and other furnace castings are located. They don’t deviate from it even the slightest bit, otherwise the work won’t be successful and you’ll have to dismantle and redo it starting from the place where the liberties were taken. Changes are possible only in size, but not in the design principle.
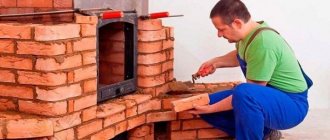
Step-by-step instructions will help you make a fireplace stove with your own hands. Laying the first row requires special care. The quality of the entire structure depends on the exact observance of dimensions and horizontality. Therefore, they take their time, check repeatedly, eliminate the slightest inaccuracies, which subsequently increase with each row. While it is easy for a professional stove maker to fix them, it is very difficult for a novice amateur.
From the second to the eleventh row, special care is required, because most of the stove appliances are located here and the firebox is formed. To secure the doors (blowing doors on the second row, furnace doors on the fifth), they are installed in place with soft wire pre-threaded into the ears and secured in the masonry. Metal and brick have different coefficients of expansion when heated, which leads to weakening of the fixation. To prevent this, strips of basalt or asbestos are laid between them.
From the fourth row, the construction of the combustion chamber begins and in parallel the bottom of the firebox is formed. Underneath there is a niche for firewood, covered by two corners. At the same time, they act as a support for the top row of bricks. The same metal is used to support the bricks above the doors.
From the fifth row, the construction of both fireboxes from fireclay bricks on the edge begins. It is recommended to reduce the thickness of the joint on clay mortar to 2–3 mm. First, a grate is placed on the final row of the ash pit, and basalt spacers are placed between the red brick and the refractory brick.
After installation above the door in the eighth row of the square, no additional elements are required up to the tenth. A hob is laid on it, the junction points are sealed with asbestos or basalt cord. Next, the furnace array and internal channels are expanded up to the thirteenth row. Then a corner is installed above the firebox and a smoke collector begins to form.
From the nineteenth row they begin to block the opening above the cooking niche, laying bricks on metal supports. Up to 24 rows, the increase occurs according to the order. Then a cast iron valve is installed. To ensure that it fits tightly and does not allow gases to pass through, more solution is used.
If the room is one-story, then a chimney is built through the ceiling and roof. The presented project is designed for a building with two floors. There is nothing complicated in the subsequent laying; they just adhere to the order, build up the flues and walls of the heating unit. If you follow all the rules, the fireplace and stove will work and bring comfort and warmth to your home.
Pros and cons of the design
The undoubted advantages of modern buildings are the following:
- high efficiency: even for the simplest units it is 65%, for complexly modified ones it is 85%;
- “omnivorous”, while when switching from one type of fuel to another, no change in heat transfer and a decrease in technical parameters were identified;
- availability and cost-effectiveness of materials: brick, clay and sand are used in construction;
- fire safety: the fire burns in the depths of the stove and coals and firewood cannot fall out;
- ease of maintenance and operation: with one morning heating, the heat lasts 24 hours;
- health benefits: the bed warms and heals the body and joints, and food cooked in a Russian oven does not have carcinogens;
- multifunctionality: in addition to the firebox itself, you can make a hob that opens into the kitchen and fireplace on the second floor.
Three hearths operate simultaneously - a firebox, a stove in the kitchen, a fireplace in the attic. Source yandex.net
The disadvantages include:
- quite large dimensions;
- the need for cleaning;
- inability to use gas;
- a separate foundation is required;
- heating a relatively small room - 50 sq. m.;
- after a long break, gradual warming up throughout the day is required.
It is believed that not all the secrets and capabilities of the Russian stove have been revealed yet.
Formation process
You can make such a design yourself using prepared drawings. The material used is fire-resistant ceramic brick of high standard. All drawings and diagrams are completed in advance. After completing the order, you can determine the required number of bricks. We suggest watching how to develop a plan for building a stove in the video presented.
Foundation and foundation
The mixture for the mortar can be bought ready-made in bags or kneaded with your own hands from cement, sand and clay. In accordance with the design, a cast-iron cooking plate, doors for the firebox, valves, and a grate are purchased in advance.
Like all furnaces, the unit requires a separate foundation, because the total weight reaches 10 tons. You can do it yourself by calculating the depth of the pit, provided that every 5 cm corresponds to 1 ton of weight, and the area of the foundation should be 15 percent larger than the base of the furnace. A layer of sand is poured into the bottom of the pit, compacted, covered with a layer of crushed stone, reinforcement is installed and concrete is poured below floor level. The foundation takes at least two weeks to harden, after which waterproofing is done to prevent moisture from entering the oven. A clear example of creating a foundation in the video instructions.
Based on the developed order, the base of the stove is laid out first. It should be made of several rows of bricks, horizontally aligned, with right angles. The distance from the masonry to the wall must be at least 15 cm. In the next row, a vent and air ducts are laid.
Main design elements
Due to the serpentine winding duct, the air heated in the firebox rises, passes through the entire body of the stove and heats the stove bench. On the eighth-ninth row, an overlap is made on the bed and firebox. Then the rows for the oven and hob are laid out, as well as the row separating the hob from the wall. After this, jumpers are laid out. Above the oven, simple or figured masonry is used (arch, wedge), and metal corners are used above the stove casing, and a decorative shelf is made.
The next rows combine all the chimneys into one, and windows are made on the walls, next to the oven there is a “letnik” to maintain combustion in the warm season, and those located higher are for stronger heating of the room in the cold season. The pipe is laid higher, has a square cross-section, the best masonry size is 2.5 bricks. The ceilings through which the chimney passes are insulated with basalt slabs in several layers.
Shutdown
It is better to lay the outer part of the chimney from sand-lime brick; it is more resistant to temperature fluctuations and precipitation. After the chimney is built, all cast iron and other fittings are installed. For accuracy of work, each layer of brick is checked against the drawings of the order, which can be hung near the construction site. An example of creating a simple stove with a stove bench is presented in the video.
If you are planning simple brickwork, then it will be enough to simply clean the surface of the stove with a stiff brush and level the seams. The brick oven can be painted with heat-resistant paint in the desired color and you can add Russian traditional ornaments and designs made by yourself.
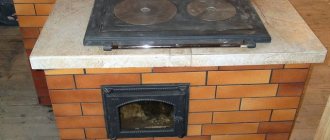
A stove with a stove bench, decorated with tiles, has a very rich appearance and will become the main decoration of the house. The cost of such finishing depends on the quality of the tiles. In addition to their decorative function, tiles retain heat well and are easier to care for than other coatings.
The stove has a high level of efficiency (up to 60 percent), it evenly heats one or more rooms, is safe to use, has a long service life, and produces a healing effect.
When starting work, you need to evaluate your strengths, because building a stove with a stove bench is not cheap. A good home craftsman can complete many stages of construction with his own hands, but a professional stove maker will correct the work or, based on his experience, help correct mistakes.
Firebox installation stages
Cast iron firebox
Practice and time have shown that cast iron is considered the best firebox. Don’t try to make complex heating equipment with your own hands; it’s better to earn money and buy a quality product.
https://youtube.com/watch?v=WJB-frciFE0
Fireplace installation: expert recommendations
Preparing the base
For a cast iron firebox, it is necessary to properly prepare a reinforced foundation or screed. Thermal insulation material – fire-resistant brick or aerated concrete block – is laid on top of the floor. Fire-resistant materials are laid with your own hands on ordinary cement mortar or special mastic, sold in construction stores.
Installation of the firebox
A correctly selected firebox for the overall design will become a harmonious addition to the design of the house. Before installing it, you need to decide on the facing material. The firebox often comes complete with facing material, however, not all manufacturers provide such a service. In some cases, buyers have to choose the facing material themselves. Before choosing it, consider its compatibility with a cast iron firebox.
The second step is to become familiar with the instructions and features of the firebox.
Construction of a cast iron firebox
The third step is installation of heating equipment. The brickwork is covered with cast iron U-shaped tiles. The plate is fixed using heat-resistant glue or mastic. The side arms of the device must be mounted a few centimeters into the fireplace wall. The tiles are checked with a building level before the glue and mortar have time to set.
The fourth step is to install the fireplace insert on the stove. Maintain a distance of 4-6 cm between the firebox and the wall. After work, the distance between the wall and the heating equipment must be checked again, since it is often broken with your own hands.
The fifth step is lining the firebox. After installation, the fireplace must be beautifully covered. First, the joints are treated with sealant and gypsum plaster. After the plaster has dried, you can begin cladding. It is worth noting that the cladding is made by hand exclusively from heat-resistant materials.
Scheme for installing a sandwich chimney
Step six - installation of the chimney. After facing work, all that remains is to attach the chimney to the stove. Its installation is accompanied by additional work - in the firebox it is necessary to cut a hole of the required diameter for a metal pipe (in most cases this is a circle of 70x50 centimeters). The same cutout is made in the canvas.
If the corner fireplace is too close to the vertical, be careful not to damage the wall when working with a hammer drill.
Step seven - sealing the joints. Practice has shown that ordinary silicone sealant cannot cope with the constant action of high temperatures, so for high-quality sealing it is necessary to select only heat-resistant materials. The cracks treated with sealant are covered on top with heat-insulating material with your own hands.
Step eight - finishing. After bringing the chimney to the roof, you can begin finishing the stove with your own hands. The foot of the firebox is traditionally sealed with decorative stone or ceramic tiles. You can choose any building material you like.
Professionals recommend not laying laminate or linoleum close to the fireplace, especially for open fireboxes. The distance between the open fireplace and the floor covering should exceed 80-100 cm.
Figured firebox grate
For additional security, it is recommended to install an openwork metal grate in front of the fireplace. The wall must also be protected from fire. The wall behind the fireplace is sealed with fire-resistant decorative elements.
The decor is completed with fireplace tongs, a stand, a poker and other accessories. The following decorative elements look very beautiful, and, most importantly, correctly, on the mantelpiece: statues, toys, vases, paintings or homemade trinkets.
Important criteria for preparatory work
In order to complete all the preparatory work, avoiding the most common mistakes, which are very difficult to correct later, the following instructions will help you:
- Due to the large mass of brick kilns, there is a need to build a separate foundation. At the same time, it is not tied to the house, since subsequently it will undergo mandatory shrinkage, which should not appear on other elements of the building;
- The size of the foundation should be slightly larger than the fireplace itself on all sides (10-25 centimeters);
- To perform masonry work, you will need to buy both cheaper ceramic bricks, from which the main part of the structure will be made, and fire-resistant fireclay bricks. The second is needed to lay the elements of the firebox and chimney, which are subject to the most intense heat. It is worth noting that the price of fireclay bricks is quite high, and a lot of material will be needed;
- The seams between ceramic and fireclay bricks must be at least 5 millimeters, and the adhesive mortar itself is mixed based on clay and heat-resistant cement;
Stick to the same thickness of seams: optimally 5-7 millimeters
Stick to the same thickness of seams: optimally 5-7 millimeters
Corresponding recesses are left for each decorative element and fittings
Corresponding recesses are left for each decorative element and fittings
- Additional fittings and components (grate, ash pan, doors) are installed according to the diagram and are pre-purchased in a specialized store or made to order;
- For additional fixation of the doors, grate or ash pan, you will need to use annealed wire, which is installed between the bricks, after which it is filled with a solution for additional fixation and adhesion (preliminarily threaded into specially prepared holes and twisted with a bundle);
- In order to avoid too much variation in temperature conditions in the area of the combustion chamber, before installing it, be sure to extend a special asbestos cord between it and the bricks;
- In order to save effort and free time, the chimney can not be laid out with bricks, but give preference to a ceramic block variation (sold in a fully assembled state);
- If the brick does not have a very attractive appearance, you should take care of finishing such a surface. For these purposes, you can use any fireproof materials (tiles, ceramics, decorative plaster, heat-resistant paint, natural and artificial stone). Finishing a fireplace is not only a way to give the unit a unique style and individuality, it can also significantly increase the overall efficiency of the stove.
A brick fireplace stove for a summer cottage is an excellent opportunity to quickly and economically heat both a small and a two-story house with several rooms. In order to familiarize yourself with the variations of ready-made arrangements, we also recommend reading the article “Corner brick fireplace stove.”
Fire safety requirements for chimneys
The fireplace and its chimney are sources of increased danger. Therefore, compliance with fire safety measures is the main condition for their installation and operation.
Areas of the floor, walls and ceilings in contact with the chimney are insulated with fireproof materials (metal, asbestos cement, plaster, basalt wool, etc.).
- The thickness of the insulating layer is at least 13 cm for sandwich chimneys and 25 cm for single-wall chimneys.
- A convection chamber with a thermal screen and ventilation vents is installed in the area between the cladding and the ceiling.
When operating fireplaces and chimneys, it is prohibited:
- Make kindling with flammable liquids and other flammable materials and substances.
- Use wood for kindling that exceeds the size of the combustion chamber.
- Use the chimney to dry clothes or shoes.Q = CA 2 g HT i − T e T i {\displaystyle Q=C\;A\;{\sqrt {2\;g\;H\;{\frac {T_ {i}-T_{e}}{T_{i}}}}}}
Preparation of oven mortar
To lay a Russian stove with a stove, you will need a special stove mortar, the main component of which is clay. You will need the fattest clay you can find.
The clay is cleaned of debris and filled with water for at least a day. After swelling, it is ground on a sieve with a mesh size of 5 mm.
The second integral component of the solution is sand. It must be thoroughly washed and free of dirt, and then calcined before kneading.
As a rule, the proportion of sand and clay in the solution for a Russian stove with a hob is 1:3. However, a lot depends on the fat content of the clay, so you need to select the exact ratio experimentally. It is worth trying several variants of the solution, making balls the size of tennis balls from each. After three days of drying, we evaluate the results. It is desirable that there are as few cracks as possible, and that at a break the clay does not crumble into dust. It doesn’t hurt to know that Kuznetsov furnaces are built in approximately the same way.
Brick stove: laying in rows
Before you start laying, you need to draw up a correct work plan and if you stick to it, you will get the desired result.
The rows of masonry are as follows:
- We lay out the first row without mortar, leaving 5 mm gaps between the bricks. After laying out the first row, you need to check the evenness of the walls with a level or rule and measure the diagonal of the laid out rectangle. If the diagonal is the same, then the angles are right angles.
- Next, we place the 2nd row on a solution of clay and sand with bandaging of the seams. Laying the firebox of the fireplace stove begins from the 3rd row. Starting from the 9th row, the firebox window is covered with an overlap of bricks. The ceiling can be made in the shape of an arch, that is, the bricks can be laid out in a semicircle.
- We cover the 13th row with a wedge overlap. But until the 14th row is laid out, which will press the overlap, it will not hold. And it is for this reason that before laying the 13th row, it is necessary to make a wooden shield and secure it in the firebox using wooden supports at the level of the upper edge of the 12th row, and only then do the laying of the floor, that is, the 13th row.
- At the end of the ordering, you don’t have to take out the shield, as it will burn out after the first fire of the fireplace stove, but the ceiling will be held in place due to the pressure of the upper rows of masonry. And together with the overlap on the 13th row, they also begin to push the fireplace shelf forward. This shelf is pulled out by 5 cm, and on the next tier it is pulled out by 7 cm. bricks placed on the ceiling significantly increase its strength due to the bandaging of the seams.
If the description seems difficult to you, the diagram in the photo can always come to the rescue, where all the rows of masonry are indicated in detail.
Date: September 25, 2022
Video description
This video shows how to make masonry for a fireplace:
After completing work on the fireplace, given its unpresentable appearance, you can finish the outer surface. In this case, various fire-resistant materials are used, for example, ceramics, heat-resistant paint, decorative plaster, tiles (clay tiles with a base, which are a type of tile), artificial and natural stone.
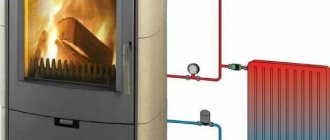
If you need a fireplace with a heating function, you can use the air heating method; in this case, it is recommended to use a cast iron firebox rather than a fireclay firebox. To heat the entire house, you need to install an air duct system distributed throughout the entire residential building. In this case, cold air should be directly directed into the firebox, after which the heated air passes up through the pipes.
Another heating option from a fireplace is water. At the same time, they also provide for the presence of a hob on the fireplace. Such fireplaces-stoves with a heating function are widely used not only in private homes, but also in bathhouses.