Despite the rapid development of new technologies and improvements in home heating methods, the old proven brick stoves for wood-burning cottages still do not lose their relevance.
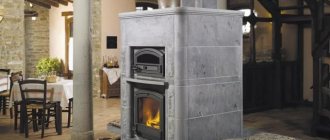
Wood burning stove
Indeed, often in houses remote from civilization or located in areas where there are power outages and gas supply is not expected at all, wood-burning brick stoves are the only possible means of heating the room.
Wood-burning stove for a summer cottage
But sometimes people deliberately choose brick stoves for their country house, despite all the benefits of civilization. After all, they help create that unique comfort, give the warmth and atmosphere of solitude that we all look for when going out of town.
We’ll talk about the advantages, design principles and features of laying a brick stove with your own hands today in this article.
Types of brick stoves for summer cottages
The experience of folk craftsmen and engineer-inventors has given the world a considerable number of types of stoves, from which it is not difficult to choose the only one for the dacha that will quickly warm up the room in the winter cold and help prepare food.
But, despite all the variety of stone stoves, they can all be divided into 3 categories:
- cooking;
- heating and cooking;
- heating structures.
In addition, you can also find multifunctional designs that combine a fireplace, water circuit, etc. Therefore, before you start building a brick stove in your dacha, you should immediately decide on the type of construction.
- Cooking type of construction. This type of stove is chosen by cottage owners only if the house is used only in the summer. This option works well in combination with a water heating tank. Often, owners install such a stove in a house where there is gas and electricity supply, but in order to save money, it is more rational to use a wood-burning stove in the summer.
Brick stove design
The design is a stove with a hob, a water-heating tank and an oven.
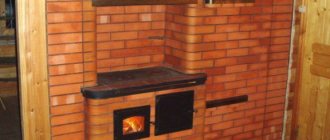
- Heating and cooking stove. This type of design can already be considered multi-functional. The stove includes a hob, oven, fireplace, shelf for drying things, etc. Dimensions and functionality depend on the area of the room and on the purposes for which the cottage is used. Typically, this type of stove is installed in houses where no other type of heating is intended.
- Heating stove. As the name suggests, this type of structure is installed solely for heating purposes. Installation is quite simple, as it is not particularly complicated. The design includes a combustion chamber, an ash pan, and a chimney.
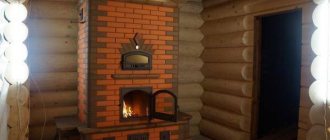
Stove with fireplace
- Stove with fireplace. Of course, this design serves not only for decorative purposes, but also for heating. But such a stove can usually heat no more than one room.
Furnaces for summer cottages are also divided according to the type of construction:
- Russian;
- Dutch (Dutch);
- Swedish (Swedish).
Of course, today you can find many other variations of wood-burning stoves, but these are the most common, which have proven themselves well due to their high efficiency, reliability and efficiency.
Russian stove
This design has been used by our ancestors for centuries, and its main feature is the arrangement of a bed and shelf for drying shoes and clothes. If the house is used all year round, then this option is very effective. But for a summer dacha it is better to abandon the Russian stove.
Russian stove
The fact is that the high efficiency of the Russian stove is achieved only with constant combustion. If you leave such a stove for the winter, then it will take more than one day to then dry it and “put” the stove into operation. Due to its technical features, it quickly gains moisture without a firebox.
In addition, when a wet brick is fired for the first time, it may crack.
The Russian stove is a fairly massive structure, so it will not always look appropriate in a small dacha.
Modern Russian stove with a stove bench
The only advantage is the unpretentiousness of the material itself for the construction of the furnace and a fairly simple masonry scheme.
Dutch
One of the most popular types of stone stoves, the design of which involves the presence of a smoke channel. Thanks to this, the Dutch oven effectively heats several rooms at once.
Dutch oven
The advantages include:
- small dimensions;
- high efficiency;
- fuel efficiency.
But the disadvantages of such a stove are high requirements for the quality of building materials and the quality of firewood. In addition, at sub-zero temperatures outside, such a stove takes a long time to warm up, so it is better to constantly heat it.
Swede
This stove is deservedly popular in our country, as it was designed taking into account the harsh climate of the northern countries. The advantage of the Swede is its compactness, high performance, fast heating and the ability to heat several rooms at once.
Swedish stove
This is achieved thanks to the special design of the furnace. The back side with the fireplace usually opens into the living room, and the front side has an oven and hob. For a summer residence, this type of stove is the most optimal choice.
The only drawback of the Swede is the high requirements for the quality of the material. If a Russian stove can be made from leftover material, then for a Swedish stove you will have to purchase high-quality red ceramic bricks.
Also, high demands are placed on Swedish firewood. They must be well dried, otherwise the stove will not give off heat.
What you need to purchase to build a stove
First you need to purchase masonry mortar and bricks. The amount of material will be calculated by a specialist. Do not forget about constructing a separate foundation for installing the furnace. The equipment will require cast iron elements: a door for the firebox, a blower (ash pan door), rings for the burner, a chimney valve, a grate and a hob.
In addition, it is necessary to purchase steel elements: a hot water tank and an oven. When building a structure, you will need strips made of metal of different widths and lengths. A corner made of metal of standard size 0.5 x 0.5 cm. Annealed steel wire with a diameter of 0.2 - 0.3 cm. A sheet of steel must be placed before the firebox.
Some designs may require roofing iron to cover the cooking chamber.
The required amount of material is calculated by a specialist based on the size and type of oven.
Long-burning wood-burning brick stoves for homes are built from fireclay and red bricks, clay and sand. To build the foundation you will need sand and cement, crushed stone, roofing felt, as well as boards for formwork.
Doors and gratings (grids) are mounted along the masonry of the main structure Source extracraft.ru
Features of the design of a brick stove for a summer residence
Depending on the type and design, the oven can perform the following functions:
- Cooking (frying, boiling, stewing, baking, etc.).
- Drying shoes and clothes, as well as preparing food for the winter (mushrooms, berries).
- Heating of beds.
- Opportunity to admire an open flame on winter evenings.
In addition to the functional classification, before building a brick stove for a summer residence, you need to decide on the configuration.
Variety of oven shapes
- rectangular heating stove;
- T-shaped;
- round oven;
- Russian stove with a stove bench;
- little one.
The size of the oven is also important. The large oven design with thick walls can distribute heat over 50 square meters. But in order to warm them up well, it will take at least two hours, which is not always convenient.
This especially causes discomfort at the dacha, where the owners only visit on weekends. A cold house will warm up for at least 3-4 hours before the room temperature returns to normal.
A small stove cannot heat a large house. Its heat is enough for a room of 15-20 square meters. meters. At the same time, it will warm up in 30-40 minutes, giving off heat around. In addition, we should not forget about the efficiency of the stove. For a large stove, you need to take care of the supply of firewood in advance and prepare a large firewood rack in the summer.
A stone stove also has a significant drawback - the inability to heat distant rooms of the house. That is why in large houses with several rooms, 2-3 stoves are placed, each of which has its own chimney and performs its own function.
According to the principle of construction, brick ovens can be:
- Duct with forced movement of gases.
- Bell furnaces with free gas movement.
Channel stoves include the usual “Dutch” or “Swedish” stoves. The combustion of wood occurs in the firebox, from which a smoke channel extends. Under the influence of draft, combustion products are discharged through this smoke channel.
The main objective of this design is to maximize the heating of the furnace wall, and after that the heat will spread throughout the entire room for a long time.
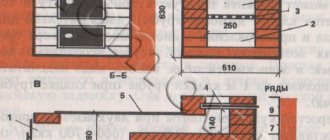
Sectional view of a duct furnace
Despite the simplicity of the design, such a stove has a number of disadvantages.
- It all depends on the traction force. The narrow channel obstructs the air flow and requires a high enough chimney to overcome this resistance to the flow. In houses with low ceilings, this is not always convenient. And as a result, after installing the furnace, the owners are faced with the problem of poor draft in the furnace.
- In addition, the principle of the channel structure of the furnace involves the concentration of hot air at the top of the furnace. That is, most of the heat is transferred to the upper part. Because of this, downstairs, near the floor, it can be quite cold.
- The efficiency of such units does not exceed 60-65%. And the average, with standard traction, is even less - 40-45%.
- Due to the large design, such a stove takes a long time to heat up. To heat a structure “from scratch” will take 2.5-3 hours.
Furnaces with free movement of gases show themselves in a completely different way in everyday life. Their principle was first described by Lomonosov, and later refined by Kuznetsov, which is why in everyday life such furnaces were called “blacksmiths”.
The operating principle is based on the movement of free gases. As we know from physics, hot air rises, displacing cold air. In such a furnace, the firebox and combustion chamber are combined, and hot air circulates freely from one chamber to another.
Such ovens also have a second and sometimes a third chamber, which are connected to each other by a dry seam located at the bottom of the chamber.
Operating principle of a bell furnace.
Experience of FORUMHOUSE craftsmen
Among the participants of our portal, mainly outdoor modifications of the Russian stove, intended for preparing pickles in the fresh air or in closed complexes, are popular. The use of a classic design as a heating unit is much less common: its style cannot fit into every interior, its execution is complex, its efficiency is low, and it takes up more space than modern solid fuel units. But the taste of dishes cooked in such an oven is superior compared to derivatives of gas or electric ovens and iron grills. Because of this, it is outdoor stoves or complexes that have become most widespread.
Features of laying a brick oven with your own hands
What nuances do you need to know before starting to lay the stove?
- The foundation for the stove must be strong and solid. But at the same time, in no case should it be connected to the main foundation of the house. The fact is that the house shrinks over time, which is reflected in the foundation, so it is very important to separate these two elements. With seasonal soil movements and general shrinkage of the house, the design of the stove may suffer.
- The foundation should exceed the dimensions of the stove by 15-20 cm on each side. It can be made of ordinary concrete, cement mortar or made of concrete blocks.
- To lay the furnace, you need to purchase 2 types of bricks: regular solid bricks made of ceramics and fireclay (fireproof), from which the firebox, smoke ducts and all heated elements will be built. The cost of such material is much higher than the price of ordinary red brick, so it is usually used only on those surfaces that will have direct contact with fire.
- All other elements are laid from red solid brick, using a mortar based on red oven clay. The composition of such a solution must include heat-resistant cement. But between the ceramic masonry and fireclay bricks it is necessary to maintain a gap of 5 mm. As the fireclay brick heats up, it will expand. Therefore, to ensure that the furnace structure does not undergo deformation during operation, it is necessary to take this gap into account.
- All purchased elements for the stove (grid, door, hob, oven, etc.) are installed in accordance with the general layout and purpose of the stove.
Grate
- When inserting the door of the combustion chamber or ash pan, it is necessary to tie it with annealed steel wire. In this case, one end of the wire is inserted into a specially designed hole, and the second is twisted into a bundle and laid between the bricks, tightly clamped with mortar.
- When installing a cast-iron firebox or cast-iron stove, it is necessary to lay an asbestos cord between the brick and the metal element to compensate for the different temperature expansion of the materials.
- The chimney for the stove can be made of red ceramic brick, or you can use a ceramic block chimney, which is purchased ready-made.
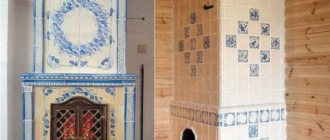
- Cladding is the final stage of building a brick oven. To give a beautiful aesthetic appearance, the stove can be lined with red ceramic bricks, clinker bricks (like wild stone), and decorative tiles. This coating gives the stove a unique, authentic look and also protects it from the negative effects of the environment.
Materials needed for laying the stove.
- Red solid ceramic brick (M-150.)
M 150
- Fireclay (fireproof) brick.
- Masonry mortar (sand, red oven clay).
- Foundation material (cement, graphite, sand).
- Ruberoid.
- Asbestos cord, galvanized wire.
- Boards for creating formwork.
- Reinforcing mesh.
- Grate.
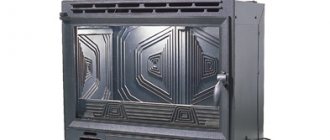
- Cooking surface (stove).
- Ash pan and ash pan (blower) door.
- Fire door.
- Chimney view.
- Chimney duct damper.
Tools needed for laying the stove:
- Building level.
- Shovel
- Construction marker.
- Measuring tape (roulette).
- Construction plumb.
- Goniometer.
Important! A lot when laying a stove depends on the quality of the clay. It should be moderately thick and have medium fat content. Red river clay, which has lain in the open air for at least two years, is considered ideal for constructing a stove. Clay, under the influence of precipitation and natural factors, becomes plastic, homogeneous and will firmly hold the masonry.
Foundation
The integrity and strength of any structure largely depends on the foundation. As in most cases, it should be laid under it to a depth of about 50 cm. The dimensions are increased by 10-25 cm on each side and standard layers are filled. Sand, crushed stone and crushed with a rammer, spilling with water. Filling with cement with rubble stone or other filler. Dry and hard soil will allow the use of more intact bricks and chips, provided there is good waterproofing. If the soil is pliable, then a more rigid base is needed, possibly with reinforcement.
Useful tips for laying a brick stove for a summer cottage
- Always monitor the thickness of the seam while laying bricks. It should be 5 mm.
- Check the first row not only with a building level, but also diagonally.
Checking the diagonal of row 1
- Start placing each new row on the previous row only when you check it horizontally with a building level and vertically with a plumb line. To ensure even angles, use a protractor all the time. Then it will be difficult to correct your mistakes.
- When laying a cast iron hob on a brick, it is necessary to lay a layer of clay mortar on it. This will protect the brick from heating.
- To ensure good draft and prevent the formation of condensation, you need to make a short gas exit path. The so-called summer run. Through this path, gases enter the chimney. After the stove lights up well, close the damper.
- Start each row from a corner.
- When laying out each new row, make sure that the new brick overlaps the joint of the previous brick.
- The size of the chimney and chimney must be the same diameter.
At the end of the article, we recommend that you read the instructions for laying a wood-burning stove for a summer house.
The video describes in detail the process of laying a simple brick kiln on a dry
A little history and facts
The stove is part of Russian folklore! There is no exact information when the prototypes of these structures first appeared. However, at first they had a completely different appearance, little reminiscent of the Russians we are used to. And only recently people began to build them in design and appearance similar to their analogues. Today, such structures are part of houses in Russian villages, where there is only stove heating and there is no talk of any gas. People use them to heat their houses, cook, heat food and bake with them.
The stove is part of Russian folklore
Using the "Economy"
For predicted results of use you should know:
- You should not light both fireboxes at the same time, since the performance of the larger one can lead to smoking of the smaller one through the stove rings and door leakage.
- If a fire is lit in the main firebox, the small door and the vent should be closed tightly. You will avoid rapid consumption of firewood and will be able to regulate combustion.
- During combustion, the damper must be closed, and when opening, the ventilation valve must be opened. This minimizes the possibility of smoke and gases entering the room.
- Effective use of the “crucible” is possible after a good warm-up. You can put the dishes on the stove after 5-10 hours. For baking, you will need to determine the heating of the surface of the hearth. If a pinch of flour thrown on it turns brown, the temperature is right. White or black color will indicate overheating or vice versa.
Materials
The composition of the mortar on which the masonry will be laid cannot be underestimated. Naturally, the easiest way is to buy a proven dry mixture for masonry. But if you are forced to save, you will have to study ways to determine the fat content of clay and the mixtures necessary for masonry. Don't miss the fact that you will need three different formulations:
- Durable, heat-resistant using fireclay, in the area of fireboxes.
- Moisture-chemical resistant, lime for smoke passages and pipes.
- Durable and at the same time elastic, clay for the base.
Methods for determining the fat content of clay by dried balls, the degree of sticking on a stick, or by throwing cakes are easy to find on the Internet. The thickness of the seams should be within 3 - 4mm. The masonry will be more stable, and the solution will have much less chance of crumbling.
Brick should also be given its share of attention. Not every clay one is suitable. In short, a truly suitable one can be determined visually by the way it is produced.