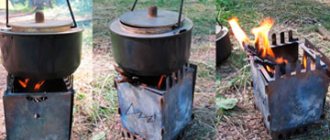
Repairing a brick stove in a country house with your own hands is quite possible. Is it possible to give a second chance to a heating stove that stood at the dacha for ten years without major repairs and was the only source of heat for the dacha house. In principle it is possible. Here we will introduce you to how you can repair a brick oven without the expense of calling specialists. We repair the stove ourselves!
To do this you need:
1) conduct a visual inspection of the furnace.
2) Decide what needs to be changed.
3) Determine what else may well serve.
Today we will repair a brick oven. In this case, a stove complex, which is located on two floors of a dacha.
The secret of lining the firebox
To prevent the row of tiles from sagging down, we place a 25 mm angle into the masonry groove. Its thickness is approximately 4 mm, which is the row spacing of the tiles. The door fittings will completely cover the space not covered by tiles, and the corner itself will prevent the tiles from sliding off. After the glue has set, carefully remove the corner from the masonry.
Here is the secret to gluing the tiles - the corners are installed above the view and above the firebox.
Pay special attention to the “synchronism” of the rows of tiles; they should go one after another from one wall of the oven to the other.
Grouting joints
Approximately 10 - 12 hours later, after the glue has completely set, we need to grout the joints. We remove all the crosses (spacers between the tiles) and apply grout. You can use Ceresit Grout - it is heat-resistant. It is sold ready-to-use, white, so that its color matches the color of the tile - add a little chocolate color to give the desired shade. Apply using the continuous method. As much as necessary will sit in the seams, the rest of it will then be removed from the surface of the tile.
We grouted the seams of the stove façade. We wait three hours and remove the grout with a damp cloth or sponge. Everything should be easy to remove from the surface of the tile.
Be careful. Once you leave the grout on the tiles too long, you will no longer be able to remove it without the help of abrasives. And this, in turn, can seriously ruin the appearance.
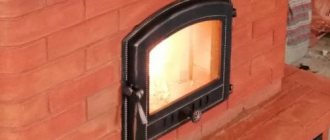
Installation of furnace fittings
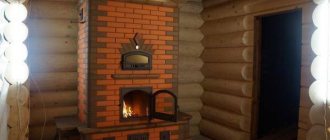
Let's start installing the furnace fittings. We take all of it from one manufacturer, I used the Finnish company SVT. For decoration we use Senegal porcelain stoneware steps 50*50 mm. This is a fairly durable and heavy material, but it looks very expensive.
We finish the pipe and the top of the stove with porcelain stoneware.
The technology is like this. We apply glue, the same as for tiles. We screw self-tapping screws into the masonry seam, place the slabs on them and then tighten everything with tape around the pipe. We leave it for a day, remove the tape, check the reliability, unscrew the screws - it turned out very impressive!
End view of the second floor oven.
The final touch. We install the cooking accessories - the hob, the firebox door and the vent. We secure everything using concrete dowels.
If you compare what was and what has become, I can’t even believe that repairing a brick oven was able to bring it back to “life”!
We invite you to watch the video:
Troubleshooting minor problems
We advise you to remember that regular inspection of the stove before the heating season and routine repairs are a way to prevent possible serious damage to the structure in the future.
What minor problems can you encounter while operating your oven and how can you fix them?
Impossibility of kindling due to lack of draft.
This problem may occur due to the following reasons:
- the stove had not been used for a long time, and cold air had accumulated inside the chimney;
- there is no air flow to support combustion;
- exposure to strong wind from the street;
- soot clogged the chimneys.
Solution: we light the stove not with paper, but with a piece of rubber or dry fuel.
Attention! The use of kerosene or other flammable liquids is prohibited.
In case of a clogged chimney, the following measures must be taken:
- light the stove;
- pour coarse salt into the firebox (about a handful);
- close the damper immediately;
- the soot will fly out in pieces into the chimney pipe.
If this method does not help, then you need to clean the pipe yourself by opening a special door or taking out knockout bricks. Experienced stove craftsmen will always leave the doors or knockout bricks behind for cleaning.
To determine where these same bricks are located , do the following:
- carry out an external inspection of the furnace; especially in places where smoke ducts pass;
- knockout brick is usually offset slightly outward, in contrast to the main masonry;
- clean out the old mortar and remove the brick. This will make the smoke channel accessible and you can clean it;
- then reinstall the knockout brick and coat it with clay mortar.
The seams of the brickwork are leaking,
As a result, the stove began to smoke.
In addition, her appearance is ruined.
How can this defect be easily recognized?
Fire up the stove and you will notice cracks that will have to be covered by hand.
Sequencing:
- soak the seams and then clear them by 2 - 3 cm;
- brush the walls using clean water;
- prepare the solution by mixing clay, sand, asbestos fiber and salt (at the rate of 100 grams per 3 liters of mixture); an indicator of a quality solution is average viscosity. You can purchase ready-made mortar at a hardware store;
- fill the seams with a clay mixture, compact it, wiping out all the voids;
- if necessary, plaster the walls, whitewash or tile.
A brick fell out or burned out.
It needs to be replaced with a new one.
Sequencing:
- clean clay and dust from the place where the old brick lay;
- moisten the area with water and place a clay cake on it;
- wet the new brick, coat its top and sides with a clay mixture (we prepare it first in the same way as for filling cracks);
- lay it instead of damaged old brick.
How to prevent cracks in your cooktop
In heating and cooking stove designs, the “sore spot” is the cast iron hob. Cracks in the panel themselves do not interfere with the operation of the stove. If it is folded correctly, it has good traction and cracks do not cause any inconvenience. But - for the time being. If the design of the stove is broken or there are errors in the masonry, then carbon monoxide can leak through these cracks. And this is a big threat to the lives of people who are in the room.
As a rule, high-quality cast iron panels almost never crack. But it's better to be safe.
In order to prevent cracks from appearing on the panel, the first heating of the stove with a new hob is done carefully, warmed up slowly, without loading the entire firebox. To distribute heat evenly over the panel, pour a thick layer of sand on it, or lay out a brick. Remove the sand or remove the brick from the panel only after it has completely cooled. A uniformly loaded panel will “sit down” without distortions, which means there will be no “stress” cracks in it.
Elimination of serious defects
Sometimes the damage to a brick kiln is so serious that it is necessary to restore it to full functionality, replace or improve the broken parts.
We replace the lining.
Lining is nothing more than protecting the surface of the furnace from various mechanical and thermal damage. In our case, this is the use of fireclay bricks.
If the firebox lining is damaged, it must be replaced.
Important! For old and new masonry, use uniform bricks so that the coefficient of thermal expansion does not change.
Simple work can be done through the firebox door. To do this, it is enough to restore the damaged areas with a clay mortar or a factory-made fireproof mixture.
Partial replacement of bricks is carried out in the following sequence:
- prepare the mortar that was used during construction;
- soak and clear the old mortar in the required area;
- remove an element that has been damaged;
- insert a new brick into the empty space and cover it well.
For these manipulations, a ready-made refractory mortar can also be used - Chamotte Mortar, which consists of chamotte and refractory clay. Then the seams of the furnace will be able to withstand more than 1700 degrees.
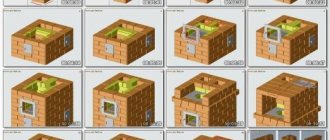
Complete replacement of the lining is carried out only after dismantling the wall. The main masonry should not be affected.
Sequencing:
- disassemble the wall from the hearth to the ash hole; do not touch the oven ribs;
- remove remaining crushed stone;
- lay out a new lining of fireclay bricks so that it does not tie with the material of the stove body. Maintain a seam thickness of no more than two millimeters.
- if the oven is large, lay the brick flat. If small or medium - on the edge.
We repair the chimney.
This may require plastering the masonry or even rebuilding it in case of destruction.
We switch the stove to another type of fuel.
The basic method is to line the firebox walls with fireclay bricks using fireproof mortar. Install slopes on the sides of the firebox. During the heating process, hot coals will fall down along them and close the grate.
It is important to use only high-quality bricks.
How to cover up cracks to make it secure
To eliminate all kinds of holes that have formed during regular operation of the furnace, they try to use reliable compounds that cope with the problem the first time. In this section we will look at some of these tools.
Fireclay clay
Ready-made fireclay clay provides reliable sealing of joints that do not deform under constant exposure to high temperatures. The dried composition is characterized by a high level of vapor permeability and endurance when exposed to wet steam under high pressure.
Deep cracks on a brick wall from a home stove Source pechdoc.ru
The material is also considered environmentally friendly, since it does not emit toxic fumes when heated, and accordingly is harmless to people and animals. In order to prepare such a solution, you will need:
- one part of cement (grade “500”);
- two parts of fireclay clay (can be purchased at a special store);
- seven parts of river sand.
How to cover up cracks: stages of work
When the solution is ready, you can begin to cover up the defects.
The steps for repairing cracks are as follows:
- preheat the oven (until warm, not hot);
- the cracks are widened;
- thoroughly cleaned from dust and dirt;
- be sure to moisten with plenty of water;
- cover with the prepared solution.
Further heating is possible only after the solution has completely dried. But this should be done at most halfway through the fuel load. After the fuel has burned in the “light” mode, you can heat the stove as usual.
Attention: it is better not to simply cover the cracks in the brickwork with mortar, but to first lay them with asbestos cord. When working with asbestos, you must use a protective mask.
Thus, to learn how to repair a brick stove with your own hands, you must study the procedure and composition of the solution.
Troubleshooting Medium Problems
Sometimes, if the oven is damaged to a moderate degree, it is impossible to do without independently repairing and strengthening some parts.
Gaps around the firebox door.
Mechanical stress and temperature changes can lead to the formation of cracks around the firebox door or hob. As a result, dangerous gases penetrate outside.
These places need compaction.
Sequencing:
- clean the surface, remove the old solution;
- rinse and prime it with heat-resistant glue diluted with the same volume of liquid;
- secure an asbestos or ceramic cord around the door or hob to prevent the clay from cracking.
- rub the necessary areas with the repair mixture;
- dry for at least a day.
Tip: to check whether the fire cord has been tampered with, light it right at the cash register.
You can eliminate cracks around the hob using the same algorithm. Before removing the stove, heat the oven. Then pry up the metal using an axe. It is permissible to replace asbestos cord with basalt wool or felt. If the old stove is completely worn out, replace it with a new one .
Strengthening the frame.
This becomes necessary if gaps and cracks are located around the entire perimeter of the stove . In this case, it is best to re-arrange the masonry, but if there is not enough time, you can resort to screeding the frame using metal wire.
Sequencing:
- we dig special channels in the oven with a depth of 15 to 20 millimeters strictly horizontally;
- we lay wire in the grooves so that it provides a tie to the frame;
- we stretch the wire, twisting it with a beard or a thick nail so that it does not break;
- Plaster the stove.
Replacing the grate.
When replacing the grate, keep in mind that there must be a gap between the masonry and the grate. It must be covered with sand. The new grate should be exactly the same size as the old one.
Replacement of pre-furnace sheets.
This manipulation should only be performed when the sheets become perforated or rusty. Sequencing:
- removing the old sheet;
- removing nails;
- laying a piece of felt that was previously soaked in a clay solution;
- nailing a new sheet.
Video description
Plastering a brick oven with your own hands.
Special oven glue is not diluted in large quantities as it tends to harden quickly. After this, it cannot be used a second time, since repeated dilution will cause the composition to lose its strong qualities.
Using special oven glue to seal joints between brick joints in a home oven Source waysi.ru
Video description
Oven for frying. How to put terracotta on glue.
On a note! In order not to make a mistake with the choice of grout, it is better to use ordinary clay, but first it should be checked for fat content. They do it this way: take five parts of clay and mix each of them with sand in different proportions, diluting with water. Then they make a bun from each mixture and throw it on the ground. The one that crashed is the fattest. Accordingly, the composition is ideal for sealing furnaces.
All about do-it-yourself mortar for masonry and grouting cracks
What mortar should I use for laying stoves?
Stages of removing old whitewash: a – moistening with a roller; b – removing the whitewash layer with a spatula.
For ovens, it is necessary to use a clay solution. It is perfect not only for cleaning cracks, but also for laying bricks. The proportions of the solution should be calculated as follows. Depending on the fat content of the clay, 1-3 volumes of sand are required per volume of clay, and you will also need water.
A day before starting work, the clay needs to be soaked, then add as much water until you get a consistency similar to a creamy mass. All light impurities will float to the surface, so the solution must be filtered through a special sieve. Only after this can sand be added to the clay and mixed until all the puddles disappear.
You should not add the entire volume of sand at once; it is better to add it in small portions. A good oven mortar should not eventually crack.
How to avoid cracks in stove plaster?
Since the plaster must withstand constant temperature changes, the solution must be durable and resistant to cracking. For plastering the following are most often used:
- lime-clay;
- lime-gypsum;
- cement-clay-sand mortars.
To any type of mixture, additional materials must be added: fiberglass, foam, asbestos or straw.
There is no consensus on salt, so its use comes down to personal discretion. Date: September 25, 2022
What is oven refurbishment?
This is a service provided by professional stove makers in relation to an existing stove or other fireplace with controlled combustion, as well as its territorial arrangement within the already implemented communication engineering systems. The scope of work also includes checking traction, as well as warranty obligations to eliminate operating defects.
The guarantee for such work will only be valid if the initial operating parameters are observed: the first kindling is 20% of the power, the second is 50%, the third is 70-100%.