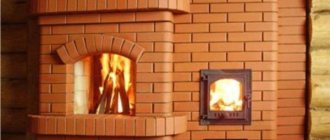
This article presents the order of the single-bell heating stove PTO-2300. Its size in terms of 2 by 3 bricks or 510x770 mm (including seams). The height of the oven is 32 rows, which is 2240 mm. The power of this furnace is 2.3 kW with two fireboxes per day.
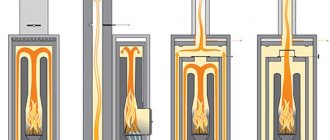
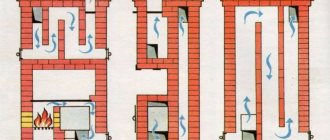
The furnace hood is formed by a square channel of 260x260 mm. Flue gases rise through this channel to the ceiling formed by three rows of masonry, then, cooling down, they fall down and go through the ceiling into the chimney.
The figure below shows the facade and sections of the PTO-2300 furnace:
This stove heats up well after a long period of inactivity, and also does not require a high pipe, which is a big plus.
If the stove is heated not with wood, but with coal, then when installing the firebox (row 5-15), it is necessary to use fireclay bricks.
Selecting a location
Before you begin construction, you should decide where the stove will be located. If there is only one small free area in the house, there is nothing you can do about it. But to obtain maximum heat transfer, it is recommended to place the stove in the central part of the house or room. Thus, none of its elements will touch the street wall, and accordingly, warm air will not escape outside. In addition, when adjacent to the supporting structure, temperature changes may occur, which negatively affects the durability of the heating device and the operation of the chimney.
Additional requirements for choosing a furnace
Since we suggest doing everything yourself, rather than buying a ready-made stove in a store, when choosing the required design, we recommend paying attention to the following parameters:
- Easy to use . The heating process should be a pleasant and uncomplicated task that every family member can handle.
- Economical . This point is especially important if you plan to use only this stove to heat the house on an ongoing basis (in winter). In this case, one unit of fuel will provide maximum heat transfer.
- Simplicity of design . If a person who does not have experience in masonry takes on the construction of a complex model of a device, difficulties may arise that will subsequently lead to incorrect operation of the stove.
- Appearance . The design of the structure should please the eye and create coziness in the room, so it is worth paying special attention to the quality of the brick.
- Presence of a water circuit . It is known that even a small heating stove with a built-in heat exchanger for heating the coolant is much more productive than other models without this device.
Final stage of construction
Upon completion of work, the fresh structure must be given time to dry. This will take 3 to 5 days. After this, the oven is ready for finishing work.
This article certainly provides information on some of the key points of building a small stove, but to cover all the elements, you will need to not only read additional materials, but also do some tests on your own. For example, if in the past you have not had the opportunity to work with bricklaying, then before building a small-sized stove at home, it is better to practice and lay the test first stage of the stove outside. This will give you the opportunity to better understand what tools are needed, how to level and bandage the masonry, and will also help you better select the proportions of the solution. You should also familiarize yourself with some issues related to construction. For example, in what cases is it not necessary to build a foundation? How many rooms can a small stove heat?
Building a small-sized brick oven is an excellent project, even for those who have never encountered bricklaying before. By carefully planning each stage, you can complete the construction of a 2 by 2 or 3 brick oven in less than a week. And most importantly, you will have the opportunity to save on heating your home.
0 0 vote
Article rating
ready-made drawings of 20 furnaces
This section presents the 40 most common stoves in Russia, detailed drawings, diagrams, orders, videos and descriptions of the characteristics of each stove and fireplace . We guarantee with full responsibility that all finished drawings of stoves from this section have been tested by time, by experienced stove makers and comply with SNiPs. Thanks to them, with basic theoretical knowledge of stoves and fireplaces, anyone can build their first stove with their own hands. Each drawing is accompanied by a detailed description of the masonry order and the main errors that occur when working with clay mortar.
Features of creating a 3 by 3 stove
Today it is possible to create ovens of completely different sizes and parameters. Since in any case the ordering must be used in the process, you need to know exactly what features and parameters it should have for the chosen option. Creating it yourself is actually quite difficult, so it often becomes necessary to contact a specialist with this question. However, if you know the correct sequence of all stages of masonry, you can tackle this issue yourself.
You must first decide what size the stove will have. The most popular designs are those that are created with 3 by 3 bricks. However, if it is necessary to heat a fairly large room, a 4 by 3, 4 by 5 or other types of masonry can be chosen.
The order itself is a special diagram that clearly indicates the sequence of laying each brick in the structure. When using a high-quality arrangement that is suitable in all respects, a high-quality and safe heating structure will be obtained. At the same time, this work can be carried out by a person who does not have any experience at all in creating a 3 by 3 brick structure.
Also, the positive results of using high-quality and correct ordering include the efficiency of all work and the excellent efficiency of all efforts expended. As a rule, builders are involved in creating the order either before the actual formation of the furnace, or already in the process. A special document must clearly and clearly state absolutely any action, and must also indicate what materials are used in the work process.
Usually, orders are clear diagrams that have simple and logical explanations, so they are very easy to use. Anyone can carry out construction, regardless of experience and skills.
Where and how to build a 2x2 brick heating stove?
Location determination
Before starting construction activities, it is important to decide where the future structure will be located and whether it violates fire safety standards. If according to the rules the placement is permissible, then it’s time to move on to the next steps
It is important to take into account that small-sized stoves produce maximum thermal energy, so it would be appropriate to place the structures in the center of the room. And also, do not forget about the risk of temperature changes with nearby load-bearing walls, which leads to gradual destruction in the case of proximity to heating stoves.
Determining the type of future design
The best option for a compact, small-sized stove is considered to be a single-bell “baby” stove. Such a device is an ideal design for summer residents. The layout scheme is very simple and understandable, the dimensions of the structure are not very large, which is why summer residents often use a similar structure as the main option for heating the room. The “baby” stove works on almost any material, be it coal or wood blanks, fuel consumption is considered minimal.
Foundation
Once everything has been decided on the oven type and location, it’s time to start laying the foundation. As a rule, it is laid separately, without being connected to the foundation of the house. The foundation is laid with rubble concrete, brick or rubble. In terms of size, the trend should remain that the foundation indicators are 7-9 cm larger than the base of the structure. After marking is carried out outlining the boundaries of the furnace, a pit is dug out and small stone or crushed stone is poured onto the bottom. After compaction, a concrete screed is made, having previously limited the edges with formwork.
Order and chimney
A two-brick heating stove is made according to an easy laying pattern, which even an inexperienced construction worker can understand. To fasten the bricks, a solution of clay and sand is prepared in a ratio of 1:3. To ensure a strong structure, it is not recommended to make seams thicker than 5 mm. Before work, bricks must be immersed in water to get rid of excess air, excess mortar is removed from the walls with a rag, and after each row the slope is measured using a building level. On the last rows a chimney is formed to remove gases. Do not allow more than 3 pipe branches. To prevent heat loss, the walls are insulated from the inside.
We build quickly and reliably
The foundation is usually made of rubble concrete or brick with cement mortar. Please take into account that the foundation must be separate and not connected to the foundation of the house itself. It is better to make the dimensions of the foundation 5-8 centimeters larger than the base of the stove and 15 centimeters below the floor level.
For brickwork, clay-sand mortar is used in a ratio of 1:3. The thickness of the seams should be approximately 5 millimeters. Do not forget about bandaging the seams, this will give it the necessary strength. At each stage of construction, measure the masonry horizontally and vertically using a level. Remember that if the masonry is made without errors and from high-quality bricks, then the stove will ultimately have excellent decorative qualities and will not require excessive additional finishing.
For the walls of the fuel chamber and ceilings, only fire-resistant bricks must be used. The inner walls of the masonry must be perfectly smooth, so during construction, rub the protruding seams with a wet rag.
The chimney pipe is built from the same brick, except that cement-sand mortar is used for masonry. In the place where the chimney vent passes the roof slab, a cut should be made to increase the distance between the walls of the chimney vent and the flammable materials of the slabs.
Marking and arrangement of the foundation for a brick kiln
- If the stove is made in a house on a columnar or strip foundation, then the floor must be opened, if it is made of wood, and a foundation must be laid on the ground.
- When choosing a compact model for a house on a monolithic foundation, heating is done on it, only by making a layer of waterproofing
- The foundation of the stove and the house should not be common. Moreover, they should not be connected. The shrinkage of the foundations of the stove and the house itself are different, and it may turn out that with a connected foundation, one building will pull another along with it.
- The foundation must be 140 mm below the finished floor level.
First, there is a marking of the place where the base for the stove will be installed - the foundation. It should be taken into account that the chimney pipe, when passing through the attic floor, must pass at a distance of no less than 120-150 mm from the wooden beams. On wooden floors, the contours of the foundation are outlined by sawing out part of the boards. To accurately determine the place where the floor boards will be cut for the foundation, a plumb line is used, which is fixed to the ceiling, at the required distance from the floor beam. After the plumb line stops, a mark is made on the floor at one of the corners of the stove. Also, the remaining corner parts are marked with dots, and then the resulting plan is verified with a building level and a corner. Next, you should draw on the floor the shape of the future foundation (as already mentioned, it should be wider than the stove base). Based on the resulting markings, the floor boards will be cut out so as to reach the ground. A hole of the required dimensions is dug in the underground soil; the depth must be at least 50 centimeters from the surface of the earth. The foundation can be made of rubble stone or brick. If the base is built from rubble stone, then installation of formwork in the pit is not required. It is enough to lay the dirt-free stone in layers, each of which is filled with concrete mortar (each layer covers about 1/4-1/3 of the pit space)
It is very important to ensure that there are no unfilled voids between the masonry stones. Some advise laying sheets of roofing material around the perimeter of the pit, which will simultaneously serve as formwork and waterproofing. The masonry above the ground continues in the formwork, made in the form of a box, the boards of which must be tightly fitted to each other. To ensure that the solution dries evenly and the liquid is not absorbed into the wood of the formwork, it is recommended to cover it from the inside with thick polyethylene, which is secured with staples on the boards. The surface of the rubble-cement base is leveled for the next stage of work. The surface of the rubble-cement base is leveled for the next stage of work. Two rows of brickwork are installed on a flat and dry surface, and after the mortar has dried, two layers of roofing material are laid on it, which acts as waterproofing.
It is also quite possible to have the foundation slab completely poured into the formwork, with the installation of a steel reinforcing structure. True, the consumption of concrete solution in this case will be much higher. Then the order of creating the foundation will be as follows:
- Mark and make the foundation as described above
- The soil is thoroughly compacted, sand is poured in, moistened with water and compacted again to 10 cm.
- Sheets of roofing felt are placed around the perimeter of the pit, which is both formwork and waterproofing, and filled with concrete. As soon as the solution hardens, the formwork is removed.
- The sand-crushed stone mixture is compacted, and reinforcement made of wire or mesh is placed. All joints are tied together.
- The solution is poured into the pit, covering a third of the space.
- Then the second and third layers are poured. The second layer is done almost to the very top, leaving 50 mm needed to level the layer.
- Pour the top layer and level it with the rule.
- The base is left for three weeks, covered with polyethylene and moistened with plenty of water during this time. This method will make the concrete strong and durable.
- As soon as the formwork is removed, several layers of roofing material are laid as a barrier to the brickwork of the furnace from moisture from the soil or cold created by the underground.
Rules for laying the furnace vaults of an outdoor stove
When laying furnace vaults, it is necessary to block the combustion openings, fireboxes, and chambers using simple and complex shaped lintels. The ceiling in a wall is called an arch or arched lintel, and the ceiling between the walls is called a vault.
To cover large spans, an arched ceiling is used.
Vaults can be steep, flat or gentle. The semicircular arch is equal to half a circle. A gentle vault is less steep. The three-center arch is even flatter, thanks to its design, heating occurs evenly over the entire surface
This is important when baking pies. The number of bricks in the arch and rows in the vault must be odd
The middle odd brick is called a castle brick. The bricks on which the lintel or arch rests are called heels. To give them the desired shape, such bricks have to be trimmed. The space covered by any jumper is called a span. The lifting height of a vault or arch is the lifting boom.
The construction of any lintel must begin with the laying of bricks on which it will rest. They should be hewn out according to a template. Since the height of the arch or vault can be different, the angle of the heel changes. You cannot use one heel shape for all arches and vaults.
The laying of the furnace firebox begins with the preparation of circles and foot templates; for this, on a sheet of paper, cardboard or plywood, it is necessary to draw a vault of the desired shape so that an odd number of rows of masonry can fit in it.
You can easily and quickly build a vault on two boards. An axis should be drawn in the middle of the narrow board so that it intersects the wide board. At a distance of 3-5 cm from the bottom edge of the wide board, you need to draw a straight line A-B, marking the width of the firebox on it. The axis should run in the middle of the firebox, between points B and D. On the axis from line A-B, the height of the arch lifting boom should be measured upward. The resulting point can be designated by the letter D. After this, you need to select the center O in such a way that the circle passing from it, forming the arch, runs through points B, D and the upper point of the arch lifting arrow.
The rules for laying a furnace recommend using formwork for the arch, which is laid on prepared circles.
After installing and securing the formwork, a nail should be driven into the central point O, from which the circle was drawn, and strong twine should be attached to it, which is necessary for checking the rows of the vault and marking the bricks to be laid. The brick for laying the vaults must be hewn, giving it a wedge-shaped shape.
In this case, the seams have the same thickness. When using regular brick, the seams will be thinner at the bottom and thicker at the top. They must be completely filled with solution.
The heels should be trimmed and laid very carefully, since filling large voids with mortar and crushed stone can lead to settlement of the vault or arch and their destruction.
The laying of the vault should begin from the edges, from both heels at the same time, moving towards the middle of the vault or towards the castle. The bricks need to be fitted tightly, so that they almost touch each other on the side of the firebox.
The last thing to be inserted into the row of masonry of a vault or arch is a castle brick, greased on both sides with clay mortar. It is advisable to strike only with a log or a mallet, since an ordinary hammer can split the brick.
Furnace foundation
furnace masonry
- • the first one is periodic. In this case, the hearth is used from time to time. Such fireplaces are installed in country houses, bathhouses and gazebos. Typically, the soil in such rooms freezes strongly during the cold season and experiences seasonal movements, that is, shifts;
- • the second is permanent. In this case, the stove is installed in a room with constant year-round use. The soil here does not freeze, but there is a danger of groundwater approaching.
- – the dimensions of the slab should be twenty percent larger than the area of the hearth foundation itself,
- – use ten centimeters of reinforced concrete for approximately one ton of fireplace, and lay it also every ten centimeters,
- – the base level should be ten to fifteen centimeters higher than the ground level, with mandatory waterproofing in the form of special construction mastic or roofing felt.
1. place the foundation in the form of brickwork. Since the material (bricks) is placed in the foundation pit and is firmly reinforced. Brick is characterized by less uniformity, high water absorption and susceptibility to mechanical destruction
It is important to take into account the fact that brickwork has less strength than the same concrete reinforced with a metal mesh, and therefore cannot withstand seasonal ground fluctuations.
2. lay the foundation of the heating device from wooden elements, for example, a log house, racks, logs and similar options.
Order diagrams-drawings of stoves and fireplaces
Below you see an open menu of ready-made drawings of stoves and fireplaces posted on our website absolutely free of charge:
Types of orders and drawings of the section:
-color-graphic indicating the quantity of materials
- volumetric black and white
Let me remind you that this section will be equally useful to both beginners and experienced stove masons. Study in detail, choose the most suitable one and, without delaying things for next year, start laying, don’t forget to post in the comments about your successes
35 Comments
The site is interesting, but I have a question for the author of the site: firstly, do you install the stoves yourself and if you do, how much do you charge for the work and in what city. And if you do, I would like to see a detailed video of the laying of your stoves, preferably from the order that is on your website. Well, I think I learned the whole theory and chose the appropriate drawings, but I’m not sure that everything will work out and I don’t have anyone nearby to ask questions at each new one. I would be glad to see a detailed video on how to make clay mortar and the ovens themselves.
Yes, I’ve been installing stoves myself since 1998, but not very often, and I haven’t filmed anything worthwhile on video. I live in Izhevsk, so I installed the stoves mainly there; not one stove maker will tell you about the prices; each stove is individually discussed with the customer. Now that the construction season is about to open, I will try in the next month to shoot several videos of the laying of furnaces from beginning to end without cutting anything out so that everything is clear.
Hello, I also live in Izhevs and would like to know how much it will cost to lay a Shvedka or Moskvich type stove without a foundation and pipe in your design and how to contact you.
I sent you a private message, I think we’ll come to an agreement.
How much did you agree, write down, people also want to know.
with a discount (who orders through the site) without pipes and foundation 10 tr.
I live nearby in Naberezhnye Chelny. I am interested in ordering a barbecue complex for you. The foundation is ready, 1mx3m. Yours sincerely, Ruan
Hello, unfortunately we work only in our UR; in other regions there are enough stove makers without us.
Good afternoon If possible, please tell me. For the dacha you need a heating stove with oven ventilation, 2.5 bricks in size, 4 (preferably 3.5) bricks. There is only one burner. Load from the narrow side, the oven door is above it. Is there such a scheme? I really don't want to cook from metal. Sincerely, Evgeniy.
Furnace structure
As a rule, a small-sized DIY oven measures two by two or three bricks at the base and has the shape of an elongated rectangle. For heating efficiency, it is most often located in the center of the house, and due to its small size, this is usually not a big problem. It consists of a fuel chamber and an upper cap. Flue gases are released through a special channel, which at the top of it makes a 180-degree turn; such a system is called a pass. Thus, the flue gases have time to transfer more energy to the walls, increasing its efficiency.
To build the stove, it is necessary to use fire-resistant materials. The foundation is usually made 5 centimeters larger than the base of the stove. But thanks to the lightweight design, in some cases, you can do without a foundation. As a rule, a metal sheet measuring 50x50 cm is installed in front of the combustion door.
Advantages of a small stove
Among the main advantages the following are noted:
- The simplest design allows even a non-professional to build a stove independently.
- The device occupies an area of only 0.4 m². Thanks to these dimensions, this heating device is popular in country houses.
- A strong foundation is not required since the weight of the structure is light.
- The efficiency of the stove allows you not to make large stocks of firewood. In addition, it can be heated with other types of fuel: coal, peat, anthracite.
- The device does not contain heating channels. Their functions are performed by the fuel cap.
- Can heat a room up to 35 m². In the spring and autumn, one firebox will be enough to heat the room, and in winter – two.
- The structure can be installed in a wall, thereby saving space and uniformly heating two rooms.
Buslaevskaya stove: projects
The design has a built-in hood. The oven is small in size. It is ideal for any private home, as it allows you not only to heat the premises, but also to cook food. Despite its compact size, the stove heats spacious rooms well, which is why there are ready-made designs for houses with a stove.
Special schemes for laying brick stoves will help you complete the work without carrying out complex calculations.
For installation you will need the following materials:
- doors - firebox (0.2x0.25 meters), VK (0.39x0.5 meters), blower (0.14x0.14 meters);
- refractory - 43 pieces;
- solid brick – 382 pieces;
- oven-cabinet 28x33x50 centimeters;
- cast iron stove 0.7x0.4 meters with burners (removable rings of different diameters);
- valves - steam exhaust (12x13 centimeters) and smoke (12x25 centimeters);
- grate - grate 30x20 centimeters;
- corner - three equal-flange blanks 1 meter long and 45x45 millimeters in size;
- steel - piece 0.3x0.28 meters;
- strip - 4 pieces of meter (4 graph paper), 0.25 meters (2 graph paper), 0.35 meters (3 graph paper);
- cast iron plate – 0.4 x 0.25 meters; 40x15 centimeters.
Projects for brick stoves of this type look like this:
- Full row.
- Blower door.
- Window opening for cleaning.
- The bottom of the oven is lined with refractory, three sides are lined with iron.
- Installation of the combustion door, grate, refractory under the firebox, cleaning cover, ash door.
- Installation of DS.
- Laying refractory on the edge around the door.
- Laying according to the scheme.
- The oven is top coated with clay (1 centimeter), the heater is covered, and a stove with burners is attached.
- Installation of smoke circulation with cleaning windows, the stove is not laid. Subsequently, the brick is placed on its edge.
- The cleaning is overlapped, channels are created, and 25-centimeter strips are laid.
- The cleaning is completed and the fastening wire is installed.
- The cap is installed.
- Installation of the VK ceiling, while the hoods remain.
- The stoves are laid out according to the diagram.
- The small stove ends in sheet iron, the masonry is done in the same order as a brick stove.
- The cleaning hole of a large stove is laid out, the edges of the side walls of the channels are cramped.
- Laying protrusions.
- The projections are duplicated and the corner is installed.
- The BP chimney is closed in the same way as row 19.
- A three-row neck is made, the size of the chimney is reduced to a section of 26x13 centimeters for the top valve.
- A chimney is created with grooves on this and subsequent rows.
The dimensions of the structure increase when using clinker facing bricks, so using them instead of solid material is not recommended. When finishing with tiles, durability is ensured (the material lasts for decades), in addition, it can be dismantled for cladding other heating structures.
FAQ
Question: Is a 14x14 chimney section sufficient for this project? Answer: The device power is 1760 W. With this parameter, the chimney cross-section is quite sufficient.
Q: On what mortar is it better to lay fireclay bricks? A: It is recommended to use a ready-made mixture for refractory masonry, which is sold in any specialized store. As a rule, the packaging contains instructions for its use. You can use a regular solution, but it is recommended to add fireproof mortar to it in the amount indicated on the package. There may be pieces in it, so you should either sift it or grind it further.
Q: The power of such a stove will not be enough for a 6x6 m house consisting of three rooms? The walls are made of adobe blocks or frame-panel. In winter, the average temperature is -10 °C, but there are frosts and up to 35-40 degrees below zero. A: For such conditions this will not be enough. You need to use something the size of a Swede.
Q: If the oven is extended by four meters, stretching the hood higher, will it function normally?
A: In practice, it has never happened that the furnace was extended to four meters. The design, of course, provides for a change in height due to the upper cap, but 4 m - this needs to be tried.
Q: Is it possible to make a stove without a foundation by placing it on the floor? A: The weight of the structure excluding the pipe is almost 1.5 tons. See for yourself whether the floor can withstand this.
Q: Can the height be reduced? A: This can be done using rows 19-22 and 27-30. If any two consecutive levels are removed from the presented range, the design will not be broken.
Q: Tell me, will this stove be enough to heat two rooms (20 m² and 15 m²)? A: It all depends on how well the house is insulated and at what outside air temperature you will heat it. If you are going to live in this house in winter, it is better to choose a larger stove.
Q: What is the advantage of having 2 dampers? Is it possible to leave only the top one to simplify the design? A: Two valves hold heat better. You are allowed to place one, but it must close tightly.
Q: Can these ovens be made entirely of refractory? Will it be possible to lower the firebox and what will this affect? A: Laying a furnace from refractory bricks is possible. There is no need to make the firebox lower. In this case, the fuel may not burn completely and soot will form.
Q: How is the difference in size between regular and fireclay bricks resolved? A: Due to the better geometry of the refractory material, the seams are thinner when laying. This hides the difference in brick sizes.
Tips for choosing
Selecting and purchasing good quality material is the first priority when preparing to lay a stove and chimney. First, the material must be carefully inspected and tested. How to do this is described below:
Parameters such as color and correctness of shape are assessed. Thin small cracks are not considered defective. The surface must be rough so that the mortar has good contact with it, providing a strong adhesion. Take random bricks and measure them.
If the data varies, then such material will have to be handled more than usual. The quality of the masonry will be low. Several copies need to be hit with an iron hammer. The sound should be clear and clear.
A dull sound is a sign of internal defects. A stove made of such bricks will last less than expected. Break several bricks. If they fall into large pieces, then this is a sign of quality.
Defective products crumble into small pieces. The color when scrapped should be uniform. Dark spots indicate that the brick is of low quality. If the brick is taken from a disassembled stove, then you can use those that lined the chimney, bottom and groove.
Worker or stove?
The easiest way, of course, is to buy a special stove brick. But, firstly, not everything is so simple. Kiln brick is, in general, the same ceramic made from selected raw materials, except for heat-resistant for the combustion part, see below. Many manufacturers, taking advantage of the demand, add additives to the brand of brick, but they “forget” that the stove must breathe, fortunately, there are no standard methods for determining the frequency and depth of its breathing.
Secondly, which directly follows from the first – price. Special stove bricks are most often sold individually, depending on the brand and manufacturer - 16-60 rubles/piece. Sometimes - in pallets of 320-360 pieces, from 12,000 rubles. per pallet. Or by weight, somewhere from 14,000 rubles/t; There are also about 300 bricks in a ton. Used ones from a disassembled stove can be found for 8-12 rubles/piece. But for a more or less decent stove you need 1,500 ordinary and 200-400 refractory bricks, which are 1.3-3 times more expensive.
Therefore, we will proceed from the fact that the most ordinary ceramic brick will be used for the furnace: a working one for the main structure and a facing one for the cladding. The methods for rejecting it are the same as for the stove; Quality can be determined in advance in most cases without visiting the warehouse, from photographs of samples. Of course, you need to shell out your hard-earned money only after inspecting the lot.
As for the discrepancy between the module (basic size) of ceramic and refractory bricks, this is a thing of the past. Current refractories are manufactured in different modules, and it is easier to determine their quality by external inspection than working bricks.
Iron elements of the furnace structure
- 1. According to the dimensions of the fuel door, an opening is made with a margin of five to seven millimeters. The gap is filled with basalt cardboard insulation, which will avoid smoke in the home and will become an excellent thermal insulator between the iron and the brickwork of the heating furnace, allowing the pressure of the expanded iron to be alleviated on the furnace masonry.
- 2. We place the door for a while, while laying an incomplete row of bricks on top of it, and wedge a brick in the middle.
- 3. We fix the passage row with the top row, after which we leave the entire structure until the solution dries completely.
Stove door installation steps:
- – using a grinding machine, the fastenings on the door, such as twists or wires, metal strips or strips, are cut off,
- – then the door is removed from the masonry and the ends of the fasteners sticking out are cut off flush with the brick,
- – marks are applied opposite the seams exactly along the perimeter of the structure,
- – in the place of the marked points, through holes are made approximately seven millimeters in depth. The hole must be made in the form of a cone in order to subsequently install a self-tapping screw into it,
- – the door is put in place, ceramic self-tapping screws measuring six by one hundred and twenty millimeters are screwed in. The optimal number of self-tapping screws used in this case is six pieces.
- 1. A pair of holes are made in the element in two passes. Initially, they drill with an eight millimeter drill using a drill without a chipper, after which they drill with an eighteen millimeter drill.
- 2. Bundle the bricks into a pallet.
- 3. Intercept two bolts using one wide washer.
- 4. Place the pallet in the brickwork of the hearth (stove or fireplace).
Preparation and calculations
Consider carefully how best to position a small oven. For example, if it is built right next to an external wall, then most of the heat will go to heating the street, so it is best to place it in the center of the house
Take into account in which part of the house the heating chamber door will be located. It will be easier to add fuel and clean the stove if the door of the fuel chamber opens into the corridor or hallway. This way you will have fewer problems with ash and dust.
This way you will have less problems with ash and dust.
A small-sized brick oven does not require a lot of materials. Most likely you will need the following:
- Ceramic bricks – 200 pcs.
- Fire-resistant brick – 70 pcs.
- Ordinary clay - 0.2 cubic meters. meters.
- Fireclay clay – 15 kg.
- Fire door 250x250 mm.
- Blower door 130x140 mm.
- Cleaning door 130x140 mm.
- Viewing valve 130x130 mm.
- Roofing felt for waterproofing 800x500 mm.
If you are building a small-sized stove for the first time, you will need a detailed drawing so that you don’t have to invent anything. The most popular type is the 2x2 brick oven, Malyutka or Single-bell oven PTO-2300. You can easily find and print a drawing of this design on the Internet.
How much material is needed and what kind?
A small-sized brick kiln does not require deposits of construction products and equipment for production. To work you will need:
- ceramic brick 150-220 pcs.;
- fireclay fireproof brick material 70 pcs.;
- building clay 0.2–0.3 m³;
- sand, crushed stone;
- fireclay clay 10-15 kg;
- firebox and ash door;
- cleaning door;
- valves;
- waterproofing material;
- building level;
- corner;
- shoulder blade;
- nozzles and device for mixing the solution;
- container for mixture;
- Bulgarian;
- hammer.
Dimensions
The dimensions of the firebox are designed for a single loading of approximately 50 kg of dry logs 50 cm long and up to 10 cm thick. Moreover, the logs are placed vertically in the firebox. From the firebox, gases rise upward through the first ascending chimney. At a height of about 3.2 m from the floor level, part of the gases is separated into the smoke circulation of the heating panel of the first floor, and the other rises to the top of the stove and enters the smoke circulation of the second floor. In the lowering channels of the smoke circulation of the heating flaps of both floors and in the last lifting channel of the first floor, special heat-exchange nozzles (outlets) are made - bricks protruding from the masonry into the channel. They increase the heat-absorbing surface in the smoke circulation and the rate of heating of the furnace masonry. The last lifting smoke channels of both floors (see rows 60 to 88 in Fig. 1 and 2) have a cross-section of 120x190 mm and end in the upper part of the furnace with a common chamber (rows 89 and 90 in Fig. 2). In this chamber, control bricks are installed, with the help of which the corresponding quantities of flue gases are distributed into the smoke circulation of each floor. These adjustment bricks rest on special protrusions 1.5-2 cm wide, made when laying out the channels in the 88th row. Adjustment of the distribution of flue gases is done once during the first test fires, moving the bricks and achieving uniform heating of the furnace masonry on the lower and upper floors. After the final installation of the adjustment bricks, the side windows of the chamber are tightly closed and covered with clay. The chimney is a mounted one, built directly above the stove. The pipe channel is closed and the draft is controlled by two valves installed in series. In places where soot may accumulate and ash settles in the chimneys, cleaning holes are made, closed with cleaning doors.
Small bell-type heating stove
This article discusses a small-sized bell-type heating stove. The size of the stove in plan is only 51x51 cm, and the height is 182 cm. The weight of the stove is about 700 kg. The power of this stove is 1.1 kW (with two fireboxes), which is suitable for heating a room with an area of 15 m2.
The combustion chamber is laid out in half a brick, and the cap is laid out in a quarter of a brick. On the 15th row there is a hole for the release of gases, and it can be turned in any direction (by turning rows 15-20 accordingly).
Materials required for laying a small-sized heating stove:
- Red brick - 180 pcs.;
- Clay - 0.06 m 3;
- Sand - 0.1 m3;
- Fire door 23x26 cm - 1 pc.;
- Blower door 14x14 cm - 1 pc.;
- Cleaning door 14x14 cm - 2 pcs.;
- Grate 25x18 cm - 1 pc.;
- Knitting wire - 8 m;
- Stove valve - 1 pc.
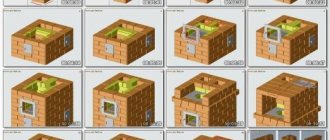
Procedures for a small bell-type heating stove:
1st row.
We form a base 510x510 mm:
2nd row.
We install the blower door and begin to form the cleaning chamber:
3rd row.
We continue to form the cleaning chamber.
4th and 5th row.
We form the base of the combustion chamber. We install the grate.
6th row.
We install the combustion door.
Rows 7-12.
We form the combustion chamber.
Rows 13-14.
We cover the combustion chamber.
15 row.
From this row we begin the formation of the heating furnace hood. The brick is installed on the edge. We also install two cleaning doors on this row and create a hole for the smoke to escape.
Rows 16-19.
Formation of channels. Please note that the 16th row is similar to the 18th, and the 17th is similar to the 19th.
Rows 20-22.
Formation of the furnace roof. Completion of masonry.
Firestone
Fireclay bricks can be used to complete the entire masonry of the furnace.
But this is the lot of wealthy people, because this option will not be cheap. From the point of view of economic efficiency, it is better to construct the stove mass and chimney from refractory bricks. It is made from a mixture of red clay and quartz sand, which is then fired.
It is characterized by resistance to high temperatures (up to 1000 degrees). The heat capacity of refractory brick is also greater than that of ceramic brick, so the stove will remain warm longer. This brick can be found in two standard sizes: 250×120×65 mm and 250×85×65 mm.
This material can be used to line a steel chimney. Metal is resistant to strong chemical compounds, and brick complements it with greater heat capacity and reduces heat loss. Fire-resistant stones can have a red and brown tint.
Oven 2 by 2 bricks
The unfavorable economic situation and the rapid rise in gas prices are forcing homeowners to seriously think about alternative options for heating their homes. In this article we will look at the advantages and technology of building a small-sized brick oven. They simultaneously provide several useful qualities, the main of which are: ease of operation, low fuel price, and high heating efficiency. They can also operate on many inexpensive types of fuel, such as coal, firewood, peat, and so on.
Calculation of brick volume
In terms of laying a stove, they usually indicate the required number of bricks, and many professional stove makers know this. But there are options in which you can easily calculate how much material is needed for any stove, for example, a Swedish brick stove, for any home.
The calculation sequence will be as follows: multiply the amount of brick laid out completely in the first row by the height (number of rows), and then subtract 1/3 from the result obtained. This way you can make an accurate calculation of the amount of material for the project.
Brick oven diagram.
To make a more accurate calculation, you can use numerical data. Here's an example:
- The base is 3x4 bricks, which means the continuous row will be 24.
- The height is taken as the distance from the floor to the ceiling. This can be 2 m 40 cm. But approximately 30 cm should be subtracted from this height, taking into account the cutting height. In this case, 2 m 10 cm will remain.
- Knowing that the height of one row is 7 cm, you need to use the following formula: divide 210 by 7. We get 30 rows.
- Now 1/3 is subtracted from this number. As a result, 20 rows will remain.
- This number of rows is then multiplied by the base of 24 pieces, resulting in a total of 480 pieces. But you also need to remember about cutting, for which you will need 50 pieces. Total - 530 pieces.
Any stove has a pipe. If in the project it is brick, then it also needs to be calculated. In 1 m of pipe there are normally 14 rows, and in 1 row - 6 pieces. This means that you need to multiply 6 by 14. The result is 84. Now this value should be multiplied by the height of the pipe in meters, and we will get the required volume of the required building material. For example, we multiply 4 m of pipe by 84. The result is 336 bricks; for the construction of a Dutch oven, the calculation will be different.
The obtained values are, of course, conditional. There will still be an error, but these numbers will give you an idea of the total number of bricks and allow you to plan future costs. When the volume of material has been calculated, you need to select its type.
Proper completion of the laying of a wood-burning stove for a summer residence
At this point, the laying of the outdoor stove is almost complete, but there are a few technological aspects remaining. Grate bars and grates should be located 7-14 mm below the combustion opening. A gap of at least 5-10 mm should be left between the grate and the masonry of wood-burning stoves along the entire perimeter, filling it with ash or sand so that the expanding metal does not damage the masonry when heated. When laying the grates, it is recommended to tilt them towards the door by 2-3 cm, which will ensure that unburned fuel rolls off the back wall onto the grate. The grate slots must be placed along the firebox (from the door to the rear wall).
Proper laying of the furnace implies that the structure must be dried naturally, or, in extreme cases, artificially. During the drying process, all valves must be open around the clock. The pipe can only be closed during a thunderstorm. This drying process takes approximately 10-12 days.
Artificial drying is faster. To do this, it is necessary to heat the stove with a gradual increase in the amount of dry fuel: shavings, straw, wood chips, finely chopped firewood. It is forbidden to dry the stove by burning a large amount of wood at once, since the water in the brick, turning into steam, can destroy the masonry.
The first addition of fuel should not exceed 20-25% of the amount required for normal combustion. For the second furnace, the volume of fuel can be increased to 30-40%, for the third - to 60-70%, etc. up to the full norm. After each firebox, all stove devices must be open, and the temperature of its outer surface should not exceed 50-60 °C.
Laying a stove for a summer residence and drying is considered complete when damp spots no longer form on the surface of the stove and there are no traces of condensation on the valve.
Calculation of the number of bricks
Regardless of the type of brick block, they all have the same standard dimensions. This makes it possible to use several varieties at once in one masonry, without having to rack your brains trying to align the rows.
Bricks have the following dimensions:
- single (standard) - 250x120x65 millimeters;
- one and a half - 250x120x88 millimeters;
- double - 250x120x138 millimeters.
There are also other options, but these are, as a rule, European standards that are not applied in our country.
For kiln construction, as a rule, single bricks are used, sometimes one-and-a-half bricks. Double is not suitable in this case. The fact is that it is usually hollow, that is, it has a large number of holes in the structure. This is done in order to reduce its weight.
We only need solid blocks. Hollow ones accumulate heat much worse and are destroyed more quickly under the influence of various aggressive factors.
Let's move on directly to the calculations. For them, we need only two indicators: the number of bricks from which the lowest continuous row is laid, that is, the base, and also the number of rows. All this is easy to calculate if you know the dimensions of the blocks you are going to use.
Having calculated the amount of material in the base, multiply it by the number of rows of which the oven will consist. In this case, only those departments that go up to the chimney are taken into account. Subtract a third from the resulting product, and you will have the required number of bricks.
We carry out calculations for the chimney separately. There you take the number of bricks in one row, multiply by the number of rows and do not subtract anything.
That's all. All that remains is to add up the results. Now you know how many bricks you will need to build a fireplace. Don't forget to add about 5% in case of replacing blocks broken during construction. Good luck and warmth in your home!
No. 3. What should ceramic bricks be like for a stove?
Ceramic brick actually underlies the construction of the furnace and also serves for its cladding. It is not difficult to guess that the durability, safety and correct functioning of the stove depend on its quality and compliance with the requirements. For masonry, it is better to choose a brick with the following characteristics:
- The strength grade indicates what compressive load the material can withstand (kg/cm2). The market offers bricks from M75 to M300 and even higher grades. The denser the brick, the slower it cools, but at the same time, the slower it heats up, so here it is necessary to adhere to the golden mean. It is better to choose a brick of a grade no lower than M150 and no higher than M250, and for a two-story oven it is better to use M200-250. Bricks M100 and lower are not suitable, since they do not have sufficient strength and thermal properties, and bricks higher than M300 grade cannot be obtained from natural raw materials - additives are used for its production, which are justified in housing construction, but are harmful for stoves;
- frost resistance is indicated by the letter F and the number following it, indicating the number of freezing and thawing cycles that the brick can withstand. This parameter is especially important when installing a chimney that will constantly be exposed to temperature changes. It is better to choose a brick with frost resistance of at least F75;
- fullness. For masonry and lining of the furnace, only solid ceramic bricks are used (with the exception of the above-described case of arranging a pipe in cold regions);
- preparation method. Plastic molded ceramic bricks are suitable for laying and lining the furnace, which involves squeezing out a clay mass with a moisture content of about 20% through a die and further cutting the layer into modules of the required size. Semi-dry and dry-formed bricks are made from pre-dried clay, which makes it possible to obtain a product with the most accurate dimensions, but such bricks are inferior in strength to plastic bricks. You can recognize a dry and semi-dry brick by its even cut on all sides.
Ceramic bricks are divided into grades, and each of the three grades has the right to be used in the construction of a furnace, but only for certain work:
- the first grade is a brick with precise geometry, moderately fired, uniform bright color, gives a ringing metallic sound when tapped, edges do not crumble, cut marks do not have burrs, strength and pore size are sufficient. Such bricks are used for construction and lining of the furnace;
- the second grade is a slightly unburned brick with a lightish tint, when tapped it gives a clear but dull sound, can be used for cladding;
- the third grade is burnt brick, whose frost resistance and heat capacity do not meet the requirements for masonry and lining of the furnace, but the foundation for it can be made from such material.
Installation of stove cast iron and metal elements
All metal elements of the furnace, as is known, expand when heated, so thermal gaps must be formed around them, which are created using asbestos material. In some cases, asbestos cord is used, in others, strips of the required width and length are cut from a single sheet of this material. Thus, the door of the combustion chamber and the oven are wrapped with asbestos cord, and strips are laid under the hob.
The metal doors are secured to the masonry joints using wire twists. On the back wall of the metal door frame there are always special “ears” into which the wire is inserted, and then its ends are twisted together. The wire attached to the lower “ears” is embedded in the seams of the row on which the door is installed, and the upper twists are placed between the rows, one of which will be located flush with the top of the door frame, and the second above it. Before fastening in the seams, the door is aligned to the building level or using a plumb line.
The blower and cleaning door does not require wrapping with asbestos cord, since it does not heat up to very high temperatures. The gaps between them and the brick can be sealed with clay mortar.
If a metal strip is to be used to cover the fire door, then a gasket of asbestos strip must be made between it and the frame.
The smoke valve frame is also mounted on a clay mortar, but this work must be carried out carefully so that the solution does not fall into the grooves of the frame along which the valve must move.
Order
Before the floor is finished, 2 rows of bricks are made with the seams bandaged, and only then the laying of the first row begins.
The first row is counted from the finished floor mark. The two middle bricks are beveled towards the ash pit. The space between the wall of the ash pan and the rear wall of the furnace is filled with dry sand from the first to the third row inclusive.
In the second row, a blower door is inserted with a gap of 3–5 mm, filled with asbestos cord. The steel legs or wire of the door are embedded in the masonry.
The third row repeats the laying of the second, taking into account the dressing of the seams in 1/2 brick. Bandaging of shortened bricks is allowed less.
The fourth row involves partial covering of the ash pan. A 35x4 mm steel strip is laid under the brick to cover the ash pit. At the back of the oven, the sand is covered with a brick.
Fifth row. A grate is placed on the open part of the ash pan with gaps along the firebox and a gap of 5 mm, which is compacted with sand or ash. The bricks here are beveled according to the order.
In the sixth row, a furnace door is installed with a gap sealed with asbestos cord. The bricks of the back wall are chamfered.
From the seventh to the twelfth row, the firebox is laid with the seams bandaged according to the order.
From the thirteenth to the fifteenth row, the firebox is blocked and the rear smoke channel is laid out.
The sixteenth row involves the installation of cleaning.
From the seventeenth to the twentieth row, the laying of channels is underway.
The twenty-first and twenty-second rows combine two channels: lifting and lowering.
The twenty-third and twenty-fourth rows involve overlap of the middle and posterior canals.
A cleaning system is installed in the twenty-fifth and twenty-sixth rows.
From the twenty-seventh to the thirtieth row, the laying of channels is underway. A valve is installed in the twenty-eighth row.
On the thirty-first row, bricks are laid with releases for future reroofing.
In the thirty-second row, a ceiling is made and a valve is installed.
The thirty-third and thirty-fourth rows continue the laying of the roof and smoke duct.
Furnace order
Below we will consider in detail the order of the heating furnace.
Row 0. As described above, you first need to lay out two levels to the floor mark. They are placed on the waterproofing layer of the foundation. For this purpose, roofing material is used.
Row 0(1) is continuous. The number of bricks in a row is 12 (red).
Row 1. An ash chamber is formed, where ash from products burned in the oven will be collected. To make it easier to remove the combustion residue, two bricks are cut down to the middle in the front part.
1 row. The number of bricks is 11 and ½ (red).
Row 2. We continue to form the ash chamber, to access which we install a hole for the door. Its size is 140x140 mm.
2nd row. Number of bricks – 12 (red).
Row 3. Identical to the previous row and continues to form the ash chamber.
3rd row. The number of bricks in a row is 10 and ½ (red).
Row 4. Here the ash chamber is blocked and grooves are cut out in the bricks for installing a grate measuring 200x300 mm. It is recommended to do this as follows: apply the existing grate to the row without mortar and trace it along the contour with a margin (usually about 5 mm is left, which is necessary for temperature deformation of the metal). Next, each brick needs to be processed and hewn. Then an estimate is made and everything is put into solution. After this, the grate is immediately placed.
4 row. The number of bricks is 11 and ½ (red).
Row 5. Refractory bricks are laid and a fuel chamber is formed. At the front and rear it contains bevels of the inner surface towards the grate. This is necessary so that combustion products can roll down to where there is sufficient air access.
5 row. The bricks installed in the front and back of the chamber are cut at an angle of 45 degrees. Number of bricks – 11 (fireclay).
Row 6. Continuation of the fuel chamber. Here the door for the combustion chamber begins to form. Its size is 250x210 mm. It is worth noting that the rear brick has a slight slope towards the combustion area.
6th row. We cut the brick of the back wall of the chamber at an angle of 45 degrees. Number of bricks – 8 (fireclay).
Rows 7 and 8. Continuation of the fuel chamber.
7th row. Number of bricks – 7 (fireclay). 8 row. Number of bricks – 7 (fireclay).
Row 9. The fuel chamber door is closed and its height continues to increase.
9 row. Number of bricks – 8 (fireclay).
Rows 10 and 11. The fuel chamber is formed. It turns out to be quite voluminous. It is necessary to pay attention to the different placement of bricks on levels 10 and 11.
10 row. Number of bricks – 8 (fireclay). 11 row. Number of bricks – 9 (fireclay).
Row 12. The chamber begins to overlap. Three-quarter bricks with an edge are installed, leaving a vertical channel that will be used for the escape of gases.
12 row. Number of bricks – 11 and ½ (fireclay).
Row 13. Complete closure of the fuel chamber continues, leaving only the vertical channel. Its size is similar to the parameters of a whole brick.
Row 14. The formation of the vertical channel continues. The chamber is covered with another level of fireclay bricks.
14 row. Number of bricks – 12 (fireclay).
Row 15. The formation of a new vertical channel and a hole for installing a door for cleaning begins. Its size is 140x140 mm.
15 row. Number of bricks – 9 (fireclay).
Row 16. Regular brick is used here. It should be noted that it is not placed in the center, since a connection is formed there between the first and second channels to ensure the passage of hot gases.
Types of kiln bricks
Kiln bricks can be divided into three types:
- Quartz contains a small sand content.
- Fireclay is made from fireproof clay.
- The main one contains a lot of limestone-magnesia mass.
Refractory brick can withstand high temperatures for a long time. It has high strength, which makes it difficult to machine. Fireclay clay is used in its production. Available in different forms, it does not have cavities or voids inside. A distinctive feature is a metallic ringing sound when you tap on it. When broken, it splits into large pieces without forming crumbs. Its resistance to high temperatures and chemicals makes it an ideal candidate for firebox lining.
The outer layer of the stove can be made of ceramic bricks. It is not so resistant to high temperatures, but it also has some advantages: it is easy to process. It can be given any shape using a pickaxe. When choosing such a brick, you should carefully study its appearance: there should be no cracks, and the geometry should exactly repeat the standard. The shade of the product should not differ across the entire surface.
No. 9. External inspection of brick
When choosing a brick for a stove, it is necessary to look at the certificate of conformity, which should indicate the basic properties of the material and necessarily emphasize the fact that this brick can be used in the construction of a stove. In addition, a visual inspection is essential:
- the brick must have precise geometry with a maximum deviation of 2 mm;
- If you take a brick in your hand and, holding it up, give a weak blow with a hammer, the tool should bounce off the surface with a ringing sound. This indicates that there are no cracks inside the brick;
- It is not always possible to perform a crash test, but the way a brick breaks and what its internal structure is can say a lot. Crushing and uneven coloring of the cut is unacceptable;
- fireclay bricks must contain a minimum of shells formed during the release of gases during firing. There should be no more than 4 of them, and on different faces.
Correct laying of the stove
Chimney laying diagram.
The most important thing is the correct laying of the chimney. For it, you should choose the most frost-resistant bricks. This is necessary so that when the stove is heated, the brick does not burst and retains heat well.
If the chimney is laid out correctly, then you will never have smoke in the house. Also important is the construction of the correct chimney. Ideally, when lighting wood in a stove, there should be good draft (that is, air should circulate freely, which fans the fire in the stove).
If you lay out the chimney and chimney correctly, then consider that half the battle is done. You can start building the furnace itself. To build a foundation, a brick should be chosen of medium density (and for a cast iron stove it is not needed at all).
They lay a brick for the foundation, but if you don’t want to lay it, you can lay out special metal supports. Once its laying is complete, you can proceed to the construction of the outer walls. For laying outer walls, it is necessary to choose bricks with medium density and the ability not only to retain, but also to give off heat.
When laying bricks, you should never skimp on the fastening material #8211; clay and sand. When heated, it tends to burn and tightly fasten the bricks together. The need to apply a large amount for bonding is due to the fact that this will provide a greater guarantee of the absence of holes.
And now the oven is almost ready.
It is only necessary to cover it with whitewash on top, in order to once again be on the safe side about holes in the brickwork, and also to give it an attractive appearance. It is necessary to dry it thoroughly. To do this, you need to heat the oven.
Foundation installation
On the flooring you need to make markings for the future foundation. Then a piece of floor is cut out along the marked path and a recess is dug.
The cut hole is made 10-15 centimeters larger than the planned foundation.
- Next, a hole is dug and filled with sand mixed with water.
- A layer 10-20 centimeters thick is sprinkled with crushed stone on top.
- Formwork is installed on it, covered with plastic film and filled with concrete solution.
- Then the reinforcement is placed directly into the uncured concrete and filled with cement.
A reinforcing mesh is placed on top and a concrete layer is created. The hardening process will take about a month. After this, the foundation is ready and you can begin laying bricks.
Selecting a location
Before you begin construction, you should decide where the stove will be located. If there is only one small free area in the house, there is nothing you can do about it. But to obtain maximum heat transfer, it is recommended to place the stove in the central part of the house or room. Thus, none of its elements will touch the street wall, and accordingly, warm air will not escape outside. In addition, when adjacent to the supporting structure, temperature changes may occur, which negatively affects the durability of the heating device and the operation of the chimney.
What are we going to build?
The stove that we propose to build with our own hands has several names among the people: “Baby” or the single-bell stove PTO-2300. Its dimensions are 770x510x2380 mm. This design is well suited for country house construction. The firebox is made of refractory bricks. The device can operate on almost any solid fuel, namely wood, coal, peat, anthracite.
PTO-2300 is the most compact of all thick-walled models. Below you can see a 2x3 brick oven with a fairly simple design. The name itself speaks about its power, i.e. the device can produce up to 2300 watts per hour. One firebox is enough to heat a room measuring 25 m² or two adjacent rooms measuring 35 m².
Basically, a similar structure is installed in the central part of the house. Thanks to the shape of an elongated rectangle, it acts as a partition between rooms.