A small country house or cottage must be heated in the off-season and winter for people to stay comfortably in the premises. Due to limited space, the best option is a mini brick oven. Let's consider the advantages and common schemes of such a heater. We will also analyze the process of construction by professionals of one of the options for a small stove structure.
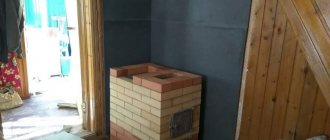
Construction of one of the options for a small brick stove Source na-dache.pro
Advantages of a small oven
For many decades, properly constructed brick heating structures have not let homeowners down. Although their configurations have changed over time, they are still one of the best options for space heating if built with skill. Therefore, even a small stove must be developed and rebuilt by professionals.
One of the advantages of a compact heating design is the small area it occupies. That is why such a stove is the best option for a country house. After all, it is usually a small building. At the same time, a wood-burning brick heater of a compact size is characterized by high heat transfer, which is why it is found not only in homes. Its laying is also carried out in bathhouses and even in buildings for utility purposes.
To build a compact stove, a minimum of materials is required. Therefore, its construction will not burden the budget of a standard family. Moreover, it is a practical option if it is built with a hob. This model will not only warm people, but also allow them to prepare hot food and heat water.
To build a small furnace, a minimum of material is required Source build-experts.ru
Another advantage of a brick compact heater is the minimum time required for its construction. Professionals need approximately 1 day to lay a small model. In extreme cases, work is completed within 48 hours. However, for quick and high-quality construction, it is necessary to first carry out thorough preparatory work. This is another reason why you need to seek help from professionals.
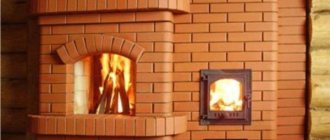
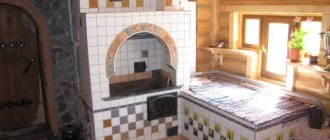
A small brick stove for a summer cottage looks much more attractive than a “potbelly stove”. If desired, a structure made from building blocks can be decorated with tiles. In this case, it will warm the house and decorate the room. They even create models with a niche for drying vegetables or a built-in tank for heating water. In fact, there are a great many options, and professionals from a specialized company will always help you sort them out.
Selecting a location
Before you begin construction, you should decide where the stove will be located. If there is only one small free area in the house, there is nothing you can do about it. But to obtain maximum heat transfer, it is recommended to place the stove in the central part of the house or room. Thus, none of its elements will touch the street wall, and accordingly, warm air will not escape outside. In addition, when adjacent to the supporting structure, temperature changes may occur, which negatively affects the durability of the heating device and the operation of the chimney.
Common designs for miniature brick ovens
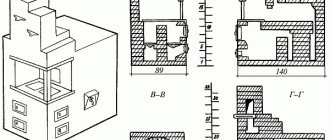
For small stove structures, the dimensions of the bases are usually 500-700 mm in width and 650-1000 mm in length. Moreover, their height varies from 1500 to 2300 mm.
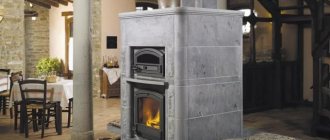
The height of small stoves usually does not exceed 2300 mm Source aviarydecor.com
Small heating stove
This option is the simplest brick structure for space heating. Its standard width, length and height are 510, 890 and 2380 mm, respectively. Installation of this heater is usually carried out in the kitchen near one of the walls or in the middle of the room. It is capable of heating an area from 20 to 35 m². If it is placed against the wall, then not only the kitchen, but also the adjacent room is heated.
A small brick stove for heating only consists of the following parts:
- combustion chamber;
- smoke exhaust channels through which combustion products go into the chimney;
- blower with a door measuring 140*200 mm.
When developing a project, a combustion door of 200*300 mm is selected. It can be made of heat-resistant glass or cast iron only. The choice is made based on the homeowner's aesthetic preferences. If you install a glass door, then the process of burning wood will be visible through it. After its installation, the heating structure will look a little like a fireplace.
Glass combustion door option Source navetkah.ru
See also: Catalog of companies that specialize in the design and installation of fireplaces and stoves
This model also contains 2 smoke valves. They are located at the top and in the middle of the stove. To clean the smoke channels, the design provides one door measuring 400*200 mm. To build this model, use:
- ceramic bricks – 260 pieces;
- fireclay brick blocks – 130 pieces;
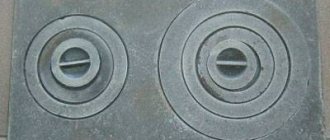
- grate 230*400 mm;
- a sheet of metal measuring 500*700 mm, which is placed in front of the firebox on the floor;
- sand and clay for preparing masonry mixture;
- two roofing felt sheets 600*1000 mm.
On a note! Due to the use of masonry mixture, the overall dimensions of the heater are increased by the total thickness of the seams.
The lower part and the top of a small stove for a summer residence are created from ceramic bricks. Fireclay brick blocks are used for masonry of the combustion chamber. The long side of the bottom of the structure consists of 3.5 bricks, and the short side - of 2 pieces of a standard length of 250 mm. 35 brick rows are being installed in height.
Fireclay bricks are used to lay the firebox, and the top and bottom of the stove are made from ceramic blocks Source na-dache.pro
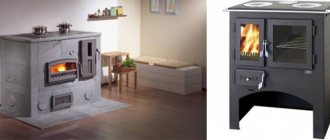
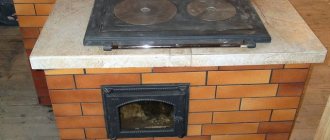
Small heating stove with hob
This option is suitable for heating from 20 to 25 m². The standard length, width and height of this structure are 640, 510 and 2150 mm, respectively. In addition to the firebox, vent and smoke exhaust ducts, the stove also has a hob. You can also build a model with a niche for the oven.
The hob is a finished product. Manufacturers create it from cast iron with a hole that is covered with a disk, or in the form of a continuous flooring. A more practical option is a stove design with a niche. After all, it can be used not only to place a metal oven, but also to install a water heating tank. In addition, often the niche is not occupied by anything. In this case, things are dried in it.
When constructing a heating and cooking furnace, use:
- ceramic bricks – 222 pieces;
- combustion door with dimensions 200*200 mm;
- grate with dimensions 250*400 mm;
- hob 350*380 mm;
- a square door of the ash compartment, the height and width of which are 140 mm;
Option for a square blower door Source pechi-kamin.ru
- pre-furnace iron sheet measuring 500*700 mm;
- steel corner;
- sheet of flat slate;
- valves in the amount of 2 pieces;
- two doors measuring 140*200 mm to cover the cleaning holes.
The laying of such a mini brick stove for a summer residence is also done using a mixture of sand and clay. A ready-made special solution is also used for installation.
Preparation and calculations
Consider carefully how best to position a small oven. For example, if it is built right next to an external wall, then most of the heat will go to heating the street, so it is best to place it in the center of the house. Take into account in which part of the house the heating chamber door will be located. It will be easier to add fuel and clean the stove if the door of the fuel chamber opens into the corridor or hallway. This way you will have less problems with ash and dust.
A small-sized brick oven does not require a lot of materials. Most likely you will need the following:
- Ceramic bricks – 200 pcs.
- Fire-resistant brick – 70 pcs.
- Ordinary clay - 0.2 cubic meters. meters.
- Fireclay clay – 15 kg.
- Fire door 250x250 mm.
- Blower door 130x140 mm.
- Cleaning door 130x140 mm.
- Viewing valve 130x130 mm.
- Roofing felt for waterproofing 800x500 mm.
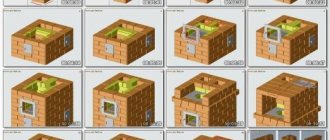
If you are building a small-sized stove for the first time, you will need a detailed drawing so that you don’t have to invent anything. The most popular type is the 2x2 brick oven, Malyutka or Single-bell oven PTO-2300. You can easily find and print a drawing of this design on the Internet.
The process of building a small stove
At the initial stage, preparatory work is always carried out. The quality of construction of a small brick stove for a summer cottage largely depends on them.
Project selection
When contacting professionals, you can choose one of the ready-made stove designs. Highly qualified specialists will also, if necessary, develop individual drawings taking into account the customer’s wishes. When choosing a specific option, consider:
- heated area;
- number of heated rooms;
- winter air temperature outside;
- purpose of a small stove;
- heater heating frequency;
- construction costs.
When choosing a furnace design, construction costs are taken into account Source ark-eng.ru
How the Dutchwoman works
A distinctive feature of the Dutch oven is a six-channel chimney system through which heated gas circulates.
Coming out of the combustion chamber, the smoke rises upward along the upward flow. During his journey, he manages to heat the walls of the furnace. Then it cools down and goes down to the firebox. When heated, it rises through the second channel, etc. The sixth channel already removes smoke outside through the chimney.
Dutch woman's work system
The six-channel system allows the oven to heat up evenly, without sudden changes, and retain heat for a long time.
If we talk about the design of the Dutch woman, the main elements here are:
- large firebox;
- chimney;
- 6 smoke channels.
Whatever the dimensions of a Dutch oven, its firebox is always large and has a rectangular shape, while the design of the Dutch oven itself can be semicircular, triangular, etc.
Dutch oven elements
A large firebox significantly increases efficiency and makes it possible to later supplement the design with a water heating system.
The Dutch chimney is connected at the side to the chimney, and their connecting link is a metal pipe.
If the oven needs to be cooled quickly, just open the damper.
Standard furnace diagram
Video description
The video will help you understand how to install one of the options for a small brick stove for a country house:
- On the 16th row, a continuous masonry is made above the cooking chamber and the smoke exhaust channel continues to be laid out.
- When installing the 17th row, a door is installed through which the chimney will be cleaned.
- During the laying out of the 18th row, the final fastening of the door is performed to clean the chimney.
- The laying of rows 19-22 is carried out according to the scheme depending on the selected furnace design.
- When installing rows 23-27, a wind niche is created. At the same stage, the oven itself is installed. It is first wrapped with asbestos rope. It allows you to improve the accumulation of thermal energy.
- When laying the 28th row, a second cleaning door is installed.
- During the laying of the 29th row, a chimney valve is installed.
- On the 30th row, the previously selected pattern is laid out.
- When installing 31 rows, a second chimney valve is placed.
Finally, the 32nd row is laid out, which serves as the basis for the chimney. Usually it is also mounted from brick. However, some homeowners choose to install a metal chimney.
We build quickly and reliably
The foundation is usually made of rubble concrete or brick with cement mortar. Please take into account that the foundation must be separate and not connected to the foundation of the house itself. It is better to make the dimensions of the foundation 5-8 centimeters larger than the base of the stove and 15 centimeters below the floor level.
For brickwork, clay-sand mortar is used in a ratio of 1:3. The thickness of the seams should be approximately 5 millimeters. Do not forget about bandaging the seams, this will give it the necessary strength. At each stage of construction, measure the masonry horizontally and vertically using a level. Remember that if the masonry is made without errors and from high-quality bricks, then the stove will ultimately have excellent decorative qualities and will not require excessive additional finishing.
For the walls of the fuel chamber and ceilings, only fire-resistant bricks must be used. The inner walls of the masonry must be perfectly smooth, so during construction, rub the protruding seams with a wet rag.
The chimney pipe is built from the same brick, except that cement-sand mortar is used for masonry. In the place where the chimney vent passes the roof slab, a cut should be made to increase the distance between the walls of the chimney vent and the flammable materials of the slabs.
Briefly about the main thing
A small stove for a country house will take up minimal space in the room. Despite its compact size, it has high heat transfer and a more attractive appearance than a “potbelly stove”. Its construction requires a minimum of materials and time.
A small stove structure can be intended only for heating a room. The construction of models is also carried out, in which there is a hob and a niche for an oven or a water tank. For the construction of any of the structures, ceramic and fireclay bricks are used. The construction process begins after selecting or developing a project, preparing the necessary materials and foundation. The masonry itself is carried out using a solution of sand and clay according to a pre-selected pattern.
Base - monolithic concrete foundation
It is better to make a separate foundation for the stove. It can also be installed on the ceiling if its load-bearing capacity is sufficient, which is verified by calculation.
In rooms where the temperature is positive all year round, the depth of the foundation is influenced by the strength of the soil and the depth of groundwater. Under favorable conditions, the minimum distance between the bottom of the foundation and the planning mark at the outer side of the wall should be 0.5 m.
If the building has interruptions in heating in winter and there are soils with water within 2 meters under the stove: sandy loam, silty and fine sand, loam, clay, the depth of the foundation is greater than the calculated freezing depth of the soil. For sands it is 1.8 m, for loams and clays - 1.6 m in central Russia.
1 - sand and gravel cushion 150–200 mm; 2 - concrete foundation; 3 — waterproofing 2 layers of roofing material; 4 - brickwork of the furnace
If the concrete mixture is prepared independently, then for 1 m3 of concrete you will need:
- Cement M400 - 325 kg.
- Medium coarse sand - 1300 kg.
- Crushed stone or gravel - 1300 kg.
- Water - 205 l.
Important! All ingredients are subject to requirements that comply with SNiP and GOST standards. For concreting you will need the following tool:
For concreting you will need the following tool:
- Shovel for laying the mixture.
- Trowel for smaller jobs.
- Homemade tampers or vibrator for compacting fresh concrete.
- Concrete mixer or container for preparing concrete mixture.
- A trowel for leveling laid concrete.
In dense, non-crumpling soils, formwork may not be installed for laying concrete. The hole is dug according to the size of the foundation. In plan, it exceeds the size of the stove by 10 cm around the entire perimeter. A gravel (crushed stone), sand-gravel or compacted sand cushion 15–20 cm thick is laid on a compacted soil base.
In crumbling soils, formwork is required. If the stove is installed near a wall under which a solid strip foundation is laid, then the concrete base of the stove should be 5–10 cm away from it. The groove between them is filled with compacted sand. It is better to lay both foundations together so as not to weaken the wall structure.
To ensure the strength of the entire foundation of the furnace, it is better to lay the mixture at one time. The process of laying concrete is carried out in layers with mandatory compaction using tampers or an internal vibrator.
Stripping can be done if there is no danger of destruction of concrete that has not gained sufficient strength. At temperatures above +5 °C this is possible after 1–2 weeks.
From the moment fresh concrete is laid, it needs to be provided with normal hardening conditions. It is insulated at temperatures below +5 ° C and watered when it is hot and windy, at least 3 times a day.
Concreting of the foundation ends at a level 15 cm below the level of the finished floor. Next, 2 layers of waterproofing (roofing felt) are laid on the surface of the stove base.
Tools and materials used in the construction of a Dutch oven with stove
A prerequisite for a good stove is high-quality masonry mortar, which is recommended to be mixed from red clay and brick. The main composition for Dutch masonry is sand, red clay and water.
In this case, the ratio of proportions for each type of clay will be different. The less sand is present in natural clay, the correspondingly less is needed for the solution.
Clay
For oily clay we take the proportion: 1 part clay and 2.5 sand.
For medium clay - 1 part to 1.5 sand.
For skinny ones you will need 1 to 1.
Materials for laying a Dutch oven with a stove:
- Fireclay refractory brick for combustion chamber.
- Red ceramic brick.
- Foundation mortar (cement, sand, gravel and water).
- Mortar for laying bricks.
- Roofing felt for foundation waterproofing.
- Boards for the construction of formwork.
- Grate.
- Blower.
- Metal door.
- Damper.
- Metal rods and wire for reinforcement.
- Metal wire 0.8 mm for dressing.
- Asbestos cord.
- Hob.
Prepare the following tools:
- Trowel for laying bricks.
- Building level, protractor and plumb line.
- Construction stapler.
- Tape measure and marker.
- Rule.
- Grinder for turning bricks.
- Shovel and bayonet shovel.
- Bucket for solution.
- Construction mixer or drill with attachment.
- Rubber hammer for laying bricks.
- Construction hammer for erecting formwork.
Dutch design features
- Lack of grate.
- The presence of several smoke channels.
- There is no ash vent, which is why the fuel does not burn intensely, but allows the wood to burn slowly, releasing heat into the room.
- Long elongated shape.
- The Dutch oven can be classified as a long-burning structure, since due to the lack of a blower, the firewood slowly smolderes. But at the same time, if you do not close the view, the oven will instantly cool down. Only the firebox door allows oxygen to pass through.
- The firebox is rectangular in shape.
- The classic version involves only a heating function. Over time, craftsmen supplemented and modified the standard type of stove, adding the necessary elements in the form of a stove, oven, stove bench, etc.
Stove is an optional feature
- The thin walls of the oven are only ½ brick, thanks to which the oven heats up quickly.