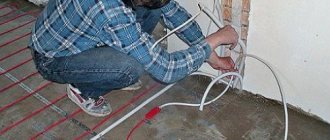
At the moment, many people are looking for non-traditional heating systems for installation both in a private house and apartment. There are many heating options that reduce your electricity consumption while still heating your space efficiently. In order to save the family budget and obtain high-quality heat in the house, the optimal solution is to connect an infrared heated floor, which embodies all the requirements and wishes of the home owner.
There are several stages of installing a warm electric floor, but connecting the system to a centralized power supply is considered the most labor-intensive. The procedure for installing and connecting infrared floors is not too complicated and can be done without the involvement of specialists. If the connection of the infrared heated floor is not done correctly, then the equipment may soon fail or malfunction.
The design of heated floors provides for the use of a thermostat, which maintains a certain temperature for heating the room. The thermostat is used in the design of heated floors to turn the power on and off depending on the readings of the heat sensor installed directly on the IR film. This material will tell you the features of connecting an electric infrared floor.
Do you need a thermostat (thermostat)?
In theory, it is possible to connect an infrared heated floor without using a thermostat, but if you take into account the fact that in order to maintain the temperature in the house you will have to constantly turn the heating on and off yourself, there is no reason for this. If the control system does not have a thermostat, then electricity consumption will increase significantly, which will lead to unnecessary waste. It is also worth considering that if you do not use a thermostat in the heating system, there will be difficulties connecting to the main power supply.
When it comes to choosing the right thermostat, it is important to choose the right power of the device. In most cases, preference is given to devices with a power of three kilowatts, which is quite enough for high-quality and reliable operation of the heated floor. The thermostat can be connected either to an outlet or directly from the electrical panel. When purchasing a device, it is important that it comes with detailed instructions, thanks to which you can connect the entire system without significant difficulties. The connection diagram for an infrared heated floor is, in fact, not complicated, and anyone can figure it out, but it is better to trust such work to professionals.
As for installing the thermostat, there are no special requirements for this. It can be installed in any accessible place where it is convenient; the only thing worth considering is the location of the infrared film. The connection contacts should be located on one side in close proximity to the regulator.
The correct location of the device allows not only to minimize the number of wires used, but also to ensure, if necessary, free access to the control system regulator. Today, two installation options are used: external and hidden.
The external installation option involves fixing the device directly to the wall. The main advantage of this method is the ease of operation, however, from an aesthetic point of view, the second option is more suitable. The hidden installation option requires the manufacture of a special recess in the wall in order to position the device as neatly as possible. During this installation, grooves are made in the wall for wiring, after which everything is leveled to its original form.
In most cases, the thermostat is located at a level of 1.2 or 1.5 meters, however, there are models that are installed no higher than 30 cm from the floor surface. Such devices are equipped with ultra-sensitive sensors that guarantee high-quality and reliable operation of the entire heating system.
Possible installation errors
For the proper functioning of the film heating system, perfect accuracy of installation and connection of the entire device is required. In the process of performing independent installation work, mistakes are often made. Therefore, you should know what not to do when installing such equipment:
- lay the film overlapping;
- install one thermostat on two separate circuits;
- attach the film to the base using nails or other sharp fasteners;
- install equipment near other heating devices;
- connect the device without isolating the contacts to the electrical network;
- use a material containing foil as a substrate;
- cover the system with cement mortar;
- install large pieces of furniture in places where the film passes;
- bend the material with the carbon mixture at a right angle.
To avoid damage to the film during renovation work indoors, it is recommended to maintain precise laying diagrams.
Compared to many other floor heating systems, installation of film heating equipment is much simpler. Following the diagrams and instructions provided by the manufacturer, you can install the device yourself. But connecting the system to the network requires certain professional skills. Therefore, the process of connecting all devices must be carried out by a qualified electrician.
Wire cross-section for heated floor
The first thing I want to note is that all wires MUST be copper. The mats use a copper busbar, and when copper is connected to aluminum, oxidation and burnout of the contact occurs. Therefore, if you don’t want problems in the future, we use only copper wires.
When choosing wiring for infrared heated floors, it is important to take into account the square footage and power of the heated film. It is important to correctly calculate the total consumption of each meter of material. Today there are different types of IR films on the market, their power can vary from 150 to 500 watts per square meter.
For example, in a house, a room of 18 m2 is covered with infrared film. Film power 150 W/m2. We get the total power of the heated floor - 2.7 kW (150 W * 18 m2). For this power, a wire with a cross section of 1.5 mm2 is suitable. You can verify this by looking at the GOST calculation tables. But I still recommend taking the cross-section of the power cable at least 2.5 mm2. Since manufacturers often underestimate the cross-section, so to speak, with a margin.
What brand of wire is best to use? to connect electrical underfloor heating strips using stranded copper wire. Unlike single-core (monolithic), it has good flexibility, which will come in handy for laying under a laminate. One of these is the PV-Z brand wire, which has many cores in its design. This wire is convenient because it is more flexible and there will be no difficulty in laying it.
What should be the basis
The requirements for the subfloor are minimal. This is a big advantage of installing an infrared heated floor over a water one. It is enough to clear the subfloor of debris and make sure it is dry. Fill out small holes.
How to install infrared heated floors if the unevenness is large? It is advisable to pour a thin screed if the differences in unevenness exceed 3 mm, but begin installation only after the concrete has dried.
It is recommended to lay a waterproofing layer on the subfloor of the first floor in a private house - a regular polyethylene film of about 50 microns. Seal the joints with tape.
Then heat insulating mats are laid. Hydro and heat insulating layers are spread over the entire surface of the room.
Connection terminals
Each set of film heated floors has special terminals that connect to the power system. The design of the terminals is quite simple and there will be no difficulties with their installation. The power wire is inserted into the clamp and laid directly on the copper element of the film material, after which it is crimped with pliers.
Also included in the IR film kit is bitumen insulation, which serves as an additional fixing element and protects the connecting components from moisture and debris.
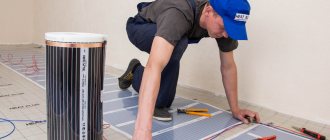
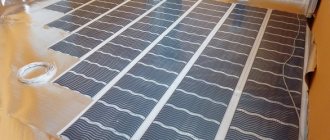
Laying infrared film and connecting heating elements
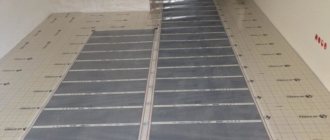
The film is carefully cut along the lines intended for this purpose to obtain pieces of the desired size. Place the thermal film towards the thermostat. You need to make sure that the copper strip is at the bottom. The film is fixed together with construction tape.
To connect the heating elements together, proceed as follows:
- the stripped tip of the wire is installed inside the contact clamps;
- a clamp with wires is attached to the heating element of the film (one end is located on the copper busbar, the other - inside the structure);
- fix with pliers;
- insulate the places where the tires are cut and where the electrical cable is connected with bitumen tape.
Advice. You need to plan the sections of infrared film so that there are a minimum of connections. The length of one strip should not be longer than 8 meters.
To prevent the joints of the heating elements from sticking out, recesses are cut out for them in the heat-insulating layer.
Installing a floor temperature sensor
The heat sensor is mounted directly under the heating film in the lower part of the heating element strip using bitumen tape. It is worth considering that for a perfectly flat floor covering it is necessary to make a recess in the area where the sensor is located.
It is better to install the heat sensor under soft floor coverings in a place where there will be minimal load, so that the device is not damaged during operation. A good option would be to be located in a place where people will not walk. Proper installation of the sensor can guarantee your floors a smooth and even surface.
Constructions
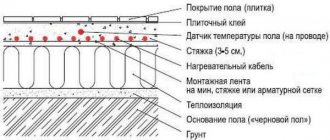
The room in which you are planning to install a heated floor must be reliably protected from the formation of drafts and other types of heat loss. Therefore, all heating components should be installed exclusively on a heat-insulating layer, which does not allow energy to be wasted on heating the floor slabs, along with the loss of heat into the atmosphere.
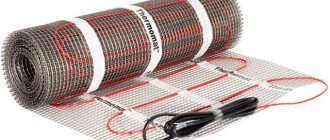
If we talk about the design of a heated floor, then the heating cable must be placed on a thermal insulation layer and secured with mounting tape. Inside the cable there is a snake in which a corrugated pipe is laid at the same distance between the turns. A temperature sensor is placed in this pipe, which is responsible for the heating level of the entire system in the house.
When all the heating components are laid, the screed can be poured on top. The layer thickness is determined based on the cable structure
It is important that the layer has a smooth surface without voids. Tiles or other floor covering are laid on top of the screed
The thermostat is on the wall. The location should be chosen taking into account his comfortable work. The automated operation of the electrically heated floor depends on it.
To protect the electrical circuit from leakage, you need to connect an RCD to the circuit breaker.
Connection diagram for infrared heated floor
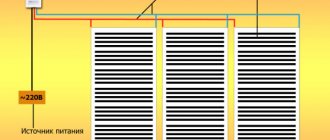
Two wires should come out of each section of the infrared film and connect to the contacts of the thermostat. There are two ways to connect wires to an infrared heated floor. In both options, a parallel connection scheme between sections is used.
The first method is that from each piece of film the supply wires (phase and neutral) are led out into a socket box or distribution box, where the wires are connected in parallel to each other. After which their conclusions are connected to the thermostat.
The disadvantage of this connection is the large number of connected wires. In addition, to connect the wires you need to put them in some kind of box. Where can I get it if the renovation has already been completed?
The second method is simpler. The connection is made using the daisy chain method. For example, a phase wire approaches the busbar of one piece of film, is connected to a terminal and then goes to the terminal of another piece of film. And so on. Moreover, the connection should be made with a single wire (there is no need to cut it near the terminals).
The neutral wire is connected in the same way. As a result, we get a parallel connection without desoldering.
Features of laying IR film under different coatings
Depending on the coating materials, the installation principle of the heater may differ. Let's look at each of them.
Under laminate
Infrared film floor heating systems emit a small amount of electromagnetic radiation during the heating process. The intensity of this radiation is low and does not pose a threat to health.
No special conditions are required during operation. First, the floor is leveled, a thermal insulator is installed, and then the heated floor is laid. Then the laminate itself is applied.
Under tiles
You can cover the thermal film with polyethylene on top, but only if it is environmentally friendly. Otherwise, heating may release toxins.
When laying insulation under tiles, certain features must be observed. To glue tiles, you must use a special glue that will not melt under high temperatures.
Under linoleum
Manufacturers and craftsmen recommend laying the film along the longer side; this will reduce the number of cuts of the heating film at turns.
To ensure the optimal level of heating, you should buy low-power film up to 150 kW. Then the linoleum will retain its properties and will not delaminate. The installation principle is no different from previous methods.
Connecting the terminals to the film
Initially, the connection of the infrared heated floor is made in a certain correct sequence. The heating film must be positioned correctly during installation. The best option would be if all connection contacts are located near the wall in close proximity to the thermostat.
Thanks to this arrangement of heating strips, you minimize wire costs, which will help you save some money on installation. Strips of infrared heating film are laid with the copper conductor down so that the matte part of the material remains on top.
To connect the terminal, it is necessary to separate the lamination by 8 - 10 millimeters in order to delaminate the copper and silver busbar; only in this case can reliable and high-quality fixation and power conduction be obtained.
The contacts to the bus are installed exclusively in the center, so that one part is in contact with the copper conductor, and the other is located on the inside of the film. When everything is aligned, you can crimp it with pliers, but it is important that the terminals do not spark and that the fixation is secure.
If during installation it is necessary to cut off part of the heating fabric, then all areas of the copper busbars must be well insulated. The copper and silver elements are completely insulated with bitumen film, which is included in the kit.
When laying heated floors, it is important to initially take care of the location of the wires in the heat-reflecting material. It is necessary to make a recess or cutout so that at the end of all work the surface of the flooring is perfectly flat. You can place the wires along the seams of the heat-reflecting film, thus saving installation time.
In order to connect the wires to the contact terminal, they should first be cleared of insulation. Especially for such cleaning, an appropriate tool is used, which is available to any electrician. It is necessary to connect a heated floor to electricity with skill, since the service life depends on the professionalism of the technician.
The wire, stripped of insulation, is inserted directly into the contact clamp, after which it is crimped with pliers or another tool. After crimping, you should definitely check the fixation of the wire and the clamp.
All connection points are insulated with bitumen tape, which is included in the kit. Each connection requires two pieces of tape, one on the outside and one on the inside where the wire connects to the copper strip.
Connecting a heated floor to a thermostat
In parallel with calculating the location of the heating film, you need to decide where the thermostat will be installed. The procedure for connecting the thermostat is not complicated, and it should be done in accordance with the diagram that comes with the device. Each thermostat comes with instructions and a diagram describing the correct connection and operation of the device.
If you do not have special education, then it is better to entrust the connection of the thermostat to the electrical network to a qualified specialist.
It is important to consider the power of heating equipment and additional electrical appliances that will be powered from the network. If the total amount of power exceeds 2 kW, then it is better to install a separate machine, thereby ensuring reliable operation of the electrical wiring in the house.
Connection from a nearby outlet
This option involves powering the thermostat from a nearby outlet. The socket must be connected with a wire of at least 2.5 mm2. Installation is carried out in a regular socket box. To do this, you need to make a hole in the wall for the box and grooves for the wires. It is convenient if the wall is made of plasterboard. Then there is no need to make any grooves.
For example, you decide to install a thermostat near an outlet. The phase and neutral from the adjacent socket are supplied to the place of its installation. We put the power wires of the heated floor and the wire from the temperature sensor into the groove.
After this, all wires are connected to the thermostat according to the instructions that are included with the diagram. The phase and neutral from the socket are connected to the corresponding terminals of the temperature controller (outer terminals). Two terminals on the opposite side for connecting the sensor. The remaining two terminals are connected to the phase and zero from the infrared film. On the reverse side, everything is quite clear: 220 Volts – Load – Sensor.
It must be taken into account that if powerful devices are connected to the outlet and at the same time, the heated floor will operate, the outlet line may be overloaded, which will lead to the circuit breaker in the switchboard turning off. It all depends on the power of the floor and the connected device.
Connection from the panel with a separate cable
If the film heated floor is installed over large areas (20 m2 or more), it is recommended to connect the infrared heated floor with a separate line. A separate cable line is laid from the electrical panel to the location of the thermostat. This line is connected through its own circuit breaker.
For safety, I recommend installing an RCD (residual current device) or differential circuit breaker on the thermostat line.
If you liked the article, share it with your friends!
How does the IR system work?
Infrared heated floors are a rather complex system that you cannot make yourself at home.
The system is based on a unique nanostructure that is capable of generating infrared radiation invisible to the human eye.
Depending on the type of heating elements, IR systems are divided into two main types: rod and film
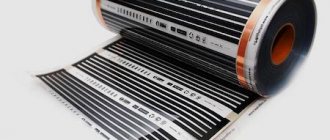
Film systems are made of strips of carbon paste - high-strength carbon fiber, which are hidden under a heat-resistant polyethylene film.
All strips, the thickness of which does not exceed ten millimeters, are located at an equidistant distance of 10-15 mm and are parallel connected to each other by flat current-carrying busbars protected by a silver coating.
Under the influence of electric current supplied to the tires, carbon elements begin to emit infrared radiation, the wavelength of which in the bioresonance range varies between 9-20 microns
The core systems are based on graphite-silver rods, inside of which carbon material is laid. They are connected to each other by stranded wires and sealed in a protective copper sheath. The systems are produced in the form of individual cables or ready-made coils.
Infrared rays in such systems act linearly, and therefore cause heating not of the surrounding air, but of objects located inside the room: flooring, furniture, walls and ceiling. Thanks to this property, the speed of infrared heating is much higher than traditional analogues - electric and water systems.
Among the undeniable advantages of infrared film heated floors are:
- Environmental friendliness. Infrared rays are similar in effect to sunlight and therefore have a beneficial effect on all living organisms. They have no side effect.
- Easy to install. The design features of the system make it possible to carry out high-quality installation with minimal cost and effort, possessing only basic construction skills.
- Compatibility with different types of coating. Installation of infrared heated floors can be done immediately “dry” under carpet, parquet boards, linoleum or laminate.
Due to the fact that the heating elements in the film system are tightly laminated with a polymer layer, they are not afraid of accidental dents and punctures, as well as exposure to moisture. But even if one of the carbon strips is damaged, due to the parallel connection circuit, the remaining elements will continue to work.
The thickness of the thermal film does not even reach 5 millimeters, and therefore practically does not “eat up” the height of the room. Thanks to this, it can be safely installed under almost any covering. In addition, such film can be placed on vertical surfaces, fixed to walls and ceilings, providing zonal heating of the room.
The weak point of the system is the fear of “locking”, in which heated areas can fail under the weight of large objects installed on them
For this reason, film material is laid only in those areas where large equipment and furniture will not be located.
Caution should be exercised when using IR systems in damp areas, as there is a risk of electric shock.
Electricity consumption for operating an infrared heated floor directly depends on the operating mode of the system and the working area of the room. We also recommend that you read our other article, which describes in detail the film type of heating for rooms.
Infrared heater Ballu BIH-0.8. Kirovograd
Specifications:
Power consumption: 0.8 kW
Minimum installation height: 1.8 m
Min. distance when staying in the heating zone for a long time: 0.7 m
Net weight: 3.8kg
Gross weight: 5.0 kg
Device dimensions (WxHxD): 1190x45x150 mm
Dimensions in packaging (WxHxD): 1210x58x170 mm
Infrared heaters BALLU BIH-0.8 are modern, economical heating devices for directional heating. They are indispensable for local heating of work areas in rooms with high ceilings or poor thermal insulation, where the use of traditional heating methods is ineffective. The possibility of local installation above the place where people are located ensures economical energy consumption.
The thermal radiation of infrared heaters, like sunlight, is not absorbed by the air and reaches the heated surfaces with virtually no loss. Heat is transferred to dense objects (floors, walls, furniture), and from them to the air, which allows you to quickly and evenly warm up rooms. In addition, a lower air temperature in the room (at a comfortable temperature - on the surface of objects, floors and walls) creates the effect of freshness. Infrared heaters operate silently, do not overheat the air, and do not create a burning smell or dust circulation. And their placement on the ceiling allows you to keep the work area free and prevent the possibility of burns.
Purpose
Main: main and additional heating of premises, local heating of working areas in premises.
Additional: cleaning surfaces from ice and snow and maintaining them in this condition, heating and drying materials.
Scope of application
Workshops, warehouses, industrial premises, construction, repair, unloading sites, transport hubs and entrances to them, greenhouses, livestock farms, winter gardens, storage facilities, sports complexes, shopping and exhibition centers, shops, cafes, offices, private houses, terraces, gazebos etc.
Distinctive features
- Efficient heating of rooms with high ceilings or poor thermal insulation
- Possibility of local application
- Comfortable, even heating
- High energy efficiency
- Does not burn oxygen and does not create a burning smell
- Ceiling installation keeps work area clear
- Highly efficient radiant panels made of a special aluminum alloy with longitudinal corrugation and anodizing (coating thickness 25 microns!)
- Double-layer lining made of heat-reflective materials
- Easy to install, mounting brackets included
- Possibility of connection to a thermostat
- 2 year warranty.
