Automatic temperature control in living and working spaces is a modern and effective means of saving energy resources and saving money on heating. The use of heaters and thermostats for them is especially important for owners of private houses in winter, because maintaining a certain temperature in the room is always more profitable than warming up the room when the temperature is below zero. We talk about the best models of thermostats for heaters, as well as how to choose them.
Features and types of thermostats
Rod thermostat for boiler
The thermostat performs 3 functions:
- turns off water heating when the liquid temperature reaches the desired level;
- when the water temperature drops below the specified value, the thermostat turns on the heating elements;
- When the boiler overheats, the thermostat turns off the device to prevent its breakdown.
The principle of operation is simple: the device closes the contacts when the water cools and opens when it is sufficiently heated. The thermostat is equipped with a signal indicator. When the device is working, the indicator lights up, when it turns off, it goes out.
There are 3 main types of regulators.
Rod
The simplest and most affordable option. This is a tube made of a material capable of linear expansion. As the temperature rises, it increases in size, puts pressure on the contacts and opens them. When the water cools, the rod shortens and closes the contacts. Depending on the set temperature, the thermostat is located closer or further to the connection point.
The disadvantage of the rod model is its inaccuracy. The device is installed near the cold water supply system, so it is cooled to a greater extent than the heated liquid. As a result, the water is heated to a higher temperature than specified.
Capillary
It consists of a tube made of anti-corrosion materials and a capsule inside filled with a contrast liquid. When water heats up, it expands and puts pressure on the membrane. The membrane opens the contacts. When cooled, the liquid decreases in volume and closes the contacts.
A capillary thermostat is more accurate because liquids are cooled and heated at the same time and equally.
Electronic
The electronic temperature sensor for the boiler is the most accurate. The water is heated to the specified temperature. Thanks to its own protection, the device lasts longer. There are adjustment and protective options. The latter is connected to the protective relay. The device turns off the device if there is no water in the tank.
Bimetallic
The measurement indicator here is not the liquid in the capsule, but plates made of two different metals. When heated and cooled, metal plates expand differently and change their location. At the same time, they close or open the contacts of the heating elements. The advantage of the device is greater reliability and simplicity. This type of thermostat can be repaired, since its main failure is a loose circuit.
Electronic
Bimetallic
Capillary
Wi-Fi controlled devices
This option implies increased expenses compared to all previous ones. At the same time, such a thermostat can be controlled via calls or SMS, and via the Internet.
It is only required that Wi-Fi function in the space where the device is located.
How to choose a thermostat
When purchased, the boiler is equipped with a control device. But when it fails, the owner has to purchase a new one.
The thermostat for the boiler is selected taking into account the following parameters:
- The model must match the dimensions of the water heater, the dimensions of the tubular electric heater and its power. To be on the safe side, it is better to take the technical data sheet of the product with you in order to find out all the parameters on the spot.
- Do not throw away the relay along with a deteriorated device. It will also help in choosing the right thermostat.
- It is necessary to take into account the dimensions of the device itself, the permissible current, resistance and other characteristics.
An electronic thermostat ensures water heating and reduces current consumption.
GSM controlled devices
These thermostats have a connector into which a SIM card from a telecom operator is placed. After that, it can be controlled from a smartphone remotely; it is only necessary that there is mobile coverage at a given point.
These devices are capable of combining a number of additional functions. Along with maintaining the microclimate in the room, they can take on monitoring the operation of an electric kettle, coffee maker, as well as a boiler and other household appliances.
Replacement and connection
Location of the thermostat in the water heater
Failure of the thermostat is a common problem. Diagnostics is not difficult; the boiler owner can perform it. How to ring the thermostat on a water heater is described in the instructions.
- The device is removed from the boiler and switched to resistance measurement mode.
- The maximum permissible temperature is indicated and the resistance at the contacts is measured. If the thermostat does not respond, it has become unusable. It cannot be repaired, it must be replaced.
- If the thermostat responds, set the minimum temperature and measure the resistance again with the tester. Then use a lighter to warm up the body of the device.
- If the thermostat is working properly, it should open its contacts when heating. In this case, the resistance at the input and output should increase. If the water continues to heat up, the device needs to be replaced.
To test the thermostat, use a multimeter.
It is much easier to install a thermostat for any boiler than a pump or heat exchanger. It is best to buy the same model, but if the brand of the device is rare or this model is outdated, you can find another option that matches the parameters.
- Disconnect the device from the power supply, turn off the water supply and drain the water.
- Remove the lower part of the boiler, thereby gaining access to the heating elements. Remove the pressure ring of the heating element.
- The temperature sensors and control module are removed. Remove the thermostat and install a new one in its place.
- Return and fix the pressure ring and replace the bottom panel.
- Check the operation of the device by filling the boiler with water and setting the minimum temperature. If, after heating to the specified value, the device turns off, everything is in order.
The markings of a broken thermostat make it easier to find a new one. Do not immediately throw away the boiler parts.
Advantages of thermostats
These devices provide the owner with the following benefits:
- Energy efficiency, with their use the owner can optimize energy consumption to maintain a comfortable microclimate in the house, since the thermostat will not allow heaters to heat the universe;
- Possibility of optimal settings with precise determination of operating parameters;
- Easy to install.
Do-it-yourself troubleshooting
Scale in the boiler can cause the thermostat to break down.
A water heater is a fairly simple device. Some faults in it can be eliminated, and you can also perform diagnostics yourself. If an electronic or programmable control unit is installed, the latter will also notify the owner of the nature of the failure.
Signs of trouble:
- the water does not heat up - the thermostat, the temperature sensor, or the heating element may be to blame;
- heating data that does not correspond to the truth appears on the display;
- the boiler heats the water, but does not turn off when the liquid temperature reaches the specified value; the device overheats, you can only turn it off manually by disconnecting it from the power supply;
- on mechanical boilers the indicator indicating the functionality of the thermostat does not light up.
How to check the operation of the thermostat on a water heater is indicated in the instructions. The causes of the problems are as follows:
- wear of the copper tube in the thermostat - it is easier to buy a new device than to restore the old one;
- loose connection of the three-contact thermostat and heating element - the position of the contacts can be adjusted;
- failure of the control unit - the element must be replaced;
- the appearance of scale on the heating elements, due to which the contact between the heater and the thermostat is broken - just clean the heating elements;
- The device has failed due to a power surge - it cannot be repaired.
You can do the replacement yourself. However, if the boiler is under warranty, you need to contact a service workshop.
Editor's Choice
"Teplolux" BiZone
The device controls heated floors, convectors, fan coils, and heat curtains based on data from two remote floor temperature sensors in two control zones and one air temperature sensor in the device body. Sensor type TST02-2.0 or third-party sensors with resistance 10 kOhm, 12 kOhm, 15 kOhm, 33 kOhm, 47 kOhm.
"Teplolux" BiZone. Photo: Teplolux
Key features of the BiZone thermostat:
- Setting a schedule for turning on and off;
- Timer operation;
- Creating scenarios for a smart home in the Tuya Smart application;
- Control of rotation speed of fans of fan coils, thermal curtains and convectors;
- Information about energy consumption is provided in graphical form.
Thermostat operating modes are indicated by colored LEDs. To connect the device to a cloud service or smart home system, you need to scan the QR code in the device passport or on the manufacturer’s official website with your smartphone.
Specifications
| Operating temperature range | from 5°С to 45°С |
| Supply voltage | 230 V |
| Maximum power | 3.6 kW x 2 |
| Maximum control circuit current with active load | 5 A |
| Maximum control current with inductive load | IP44 |
Advantages and disadvantages
Compatible with a large number of controlled climate control devices
Not detected
Editor's Choice
Teplolux BiZone
Dual zone thermostat
Independent control of two zones remotely via WiFi via the TUYA application, integration into the smart home system and IP44 moisture protection class.
OrderDelivery terms
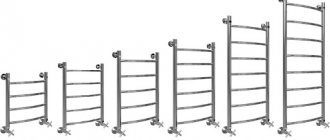
Range of thermostats for boilers
Thermostats differ from each other in size, shape, and design. However, among the manufacturers of these devices, the best can be distinguished. These are high-quality, durable and reliable products:
- Devi is a company from Denmark that has been operating on the heating element market since 1942. At first, the company produced devices for industrial needs. But already in the 60s the range was expanded. It now supplies both domestic and industrial heaters and thermostats.
- Mondail Electronics Co is a Chinese manufacturer offering household and electrical appliances and products for light industry. The range also includes thermostats for different types of boilers. According to reviews, the products are quite reliable and resistant to stress.
- RTCEelectronics is a South Korean company. Specializes in various types of household electrical appliances. A special feature of the product is adaptation to unstable operation of the electrical network, power surges, and poor-quality water. The company's thermostats are very popular in the Russian market due to their resistance to adverse operating conditions.
- Techem is a Swedish company. The main offer is automated metering devices for heat, gas, water and devices for regulating parameters. The products are high quality, but expensive.
- Valtec is an international organization that produces engineered plumbing and electrical appliances for household use. The products are adapted to Russian conditions. This is a very common brand in Russia.
A water heater cannot operate without a thermostat; this is a mandatory element of the device. Mechanical models are often equipped with a simple rod device. More modern boilers are equipped with electronic devices that can accurately regulate the temperature of the liquid.
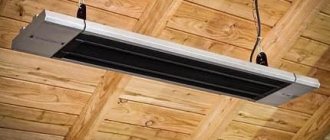
Nikaten 200
Nikaten 200 is considered one of the new infrared heating devices. Air temperature is controlled using a built-in thermostat. The device is equipped with a safety system that allows you to turn off the device in the event of an emergency.
The advantages of the device are as follows:
- Details about scissor lift
- How to choose a monument?
Why do you need online personnel testing?
- panel made of ceramic material;
- dimensions 0.3 m by 0.6 m;
- The heater cools down period is 90 minutes while maintaining heat generation;
- low noise level;
- Quite simple installation of the device.
Heating devices of this brand are presented on the market in a wide selection at a low cost of about 3,500 rubles.
Installation of the thermal relay-starter-heater system
I’ll start the explanation by connecting the “heatphone” system to a three-phase network according to the following diagram.
Between the neutral wire of the network and the first phase, the thermostat T1 and the starter coil K1 are switched on in series. Heater elements R1-R15 are connected evenly between the neutral wire and each of the network phases through the normally open contacts of the starter K1.1 - K1.3. The starter, in this case, was chosen brand ABB 20-40, 4r.
The scheme works like this:
When the temperature of the controlled room approaches the switching threshold of the thermostat (lower setting), the latter is activated and with its contacts connects the heating elements (heaters) of the heater to the power supply network.
Once the room temperature reaches the upper set point, the thermostat releases, cutting off power to the starter, which in turn de-energizes the heaters.
There are many different options for thermal relays, including very miniature ones, however, their maximum switching power is quite small (no more than a couple of kilowatts), and even less can be connected directly to them (for reasons of power reserve).
The most ideal option for controlling heating elements is one in which the “heater” will, through a small electronic unit, control a magnetic starter (for example, PME type), which, in turn, will control heaters, the power of which can easily exceed 1500 watts.
This scheme works as follows. When the thermostat is triggered, the signal from it is sent to a powerful transistor switch, made on the basis of a bipolar transistor, into the collector circuit of which an electromagnetic relay is connected (for example, RES-9).
The circuit is powered from an unstabilized source assembled from transformer T1 and rectifier VD1-VD4.
The relay, when activated, supplies power to the PME starter, which, in turn, with its normally open contacts K2.1 and K2.2, supplies power to the heating elements.
The entire circuit is powered through fuse FU1.
After assembling the adjustment-switching unit, it is necessary, first of all, to check the correct installation, and only then proceed to setting up the entire system. With an error-free assembled system, no adjustment work is required.
After this, you can start setting it up.
The only thing that needs to be done to properly configure the system is to set the reference voltage of the comparator (comparison device) at pin 2 of the device, corresponding to the required response temperature. For this purpose, you will have to do a little calculation.
Let's say that we need to maintain the room temperature around +22 degrees Celsius. In this case, it is necessary to convert the temperature value to the Kelvin scale, and then multiply the resulting value by 0.01 V. As a result of these calculations, the value of the reference voltage will be obtained, which is also the temperature setpoint (273.15+22)*0.01=2 ,9515 V.
I hope my article shed light on some of the confusion on this topic.
Write comments, additions to the article, maybe I missed something. Take a look at the site map, I will be glad if you find anything else useful on my site. All the best.
↑ 3. Settings
An MMT-4 thermistor with a nominal value of 6.2 kOhm was chosen as a temperature sensor. Firstly, it was available and not in short supply, secondly, it has a sealed design, and thirdly, the nominal value in kOhm units is optimal.
This is what a protected leaking thermistor MMT-4 with index B looks like
And these are sealed, vitrified MMT-4, with indices A and B
Next, I had to again take an alcohol thermometer, a glass of hot water, dip the thermistor into it and record the dependence of resistance on temperature. It immediately became clear that insulating the resistor terminals from water is absolutely necessary, otherwise the results will be unpredictable. Here is a table with the results of my measurements of a thermistor electrically isolated from water.
Please note that the dependence is nonlinear, but given the narrow temperature range, this nonlinearity can be neglected when manufacturing the scale.
Fragment excluded. The full version of the article is available to patrons and full members of the community. Read the terms of access.
↑ 4. Construct
The device is assembled in a standard mounting box measuring 100x100 mm.
A standard socket for external wiring is fixed on top; it should ensure good contact with the plug of the heating element.
The socket mounting screws attract the printed circuit board, thereby achieving reliable fastening. Printed circuit board.
Holes for screws and wire routing are shown in blue on the board.
Fragment excluded. The full version of the article is available to patrons and full members of the community. Read the terms of access.
The parts database in the layout program must be used carefully. I relied on it and made two mistakes - in the outputs of the optocoupler and... such a common element as the 7809 stabilizer. On my boards it is shown correctly, but 7809 had to be placed with the metal flange up (you can see it in the photo). I'm not even saying that the dimensions of parts and pins are often indicated incorrectly.
It is convenient to attach the cable from the sensor to the board with a screw-on connector. It is better not to solder the network cable to the switch, but to connect it through plastic-insulated clamps.
A small power board with a triac is attached to a duralumin plate, and the plate itself is attached to the box with screws.
For greater safety, this board is specially made with the tracks facing upwards, away from the metal of the radiator; the pins of the parts are bitten flush with the board. The triac on the board is flanged down towards the radiator. Its leads are passed up through the board and soldered. To ensure even installation of the board, washers are installed between it and the metal flange of the triac.
Considering that condensation and dew may appear outside, the boards are treated with a special aerosol composition “Plastik” Cramolin. The composition has high insulating properties and allows soldering directly through the varnish (with subsequent restoration of the protective coating).
It is necessary to ensure reliable insulation of the central terminal of the thermistor from water; I did this by filling it with a special compound. It is also advisable to insulate the thermistor body, but not with a thick layer, so as not to impair heat transfer.