Date of publication: June 05, 2020
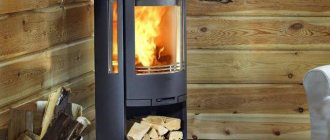
The optimal location of the heating device is of considerable importance for both efficient heat generation and user comfort. Thoughtful placement of the stove can not only bring a special atmosphere and comfort to the house, improve the ergonomics of the space, but also cause inconvenience if the installation location is chosen incorrectly. So where should you put the stove in the house? In this article, we will consider various installation options, as well as some of the nuances that affect this process.
Main factors influencing the choice of location
There are several main parameters that must be taken into account when choosing a specific point in the house to place a heating product:
- A room in which it is desirable to have a heater
- Total number of rooms requiring heating
- Total footage of premises requiring heating
- Location of the smoke route and its exit in the installation room
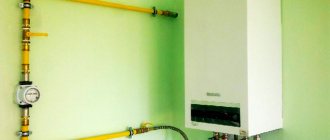
- Operating principle and equipment of the furnace (water heating, air heating)
- House layout
- Ease of operation and maintenance
- Materials for making walls and floors of a house
- Model design and weight
- Designer execution
How to place the stove for maximum heat transfer?
The location of the stove in the house must be such that its entire surface transfers heat to the maximum number of rooms (if such a possibility exists), but so that the structure itself occupies a minimum of usable space. For this reason, it is recommended to install the stove in a corner, next to a wall or in an interior partition. As noted above, it is undesirable to install the heating device close to the walls, since the side surfaces will not take part in heat transfer, which means that part of the thermal energy will be wasted. There should be an air gap of 150-200 millimeters between the walls of the structure and the surface of the walls. The air in this gap will actively circulate, and the walls, in turn, will also take part in the heat exchange.
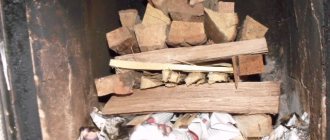
DIY potbelly stove
Previously, we talked about how to make a potbelly stove on your own; in addition to this article, we advise you to read this information and see the instructions here
Selecting a location based on the configuration of the unit and its operating principle
There are several types of organizing a home heating system. In the classic version, one stove is designed to heat one room.
Modern manufacturers have greatly increased the traditional capabilities of such equipment by equipping it with special devices that make it possible to generate heat not only for one, but for two or more rooms, as well as perform some other functions. Based on the equipment of the product, you can plan the type of heating:
- One room (the simplest configuration) or two rooms (when installed between two rooms)
- Several or more rooms: air heating using special pipes and air ducts, which at one end are connected to heat-generating equipment, and at the other end are discharged into rooms requiring heating. Heated oxygen is supplied to selected spaces through air ducts.
- Several or more rooms with the function of preparing sanitary hot water: water heating. The organization of this type of utility networks is possible when choosing a furnace with a hydraulic circuit and a system for distributing water heated from the firebox of the product through radiators, radiators, boilers and even heated floors.
Preparing for installation
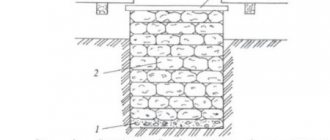
Preparation for installation must include mandatory compliance with the principle of fire safety, which is especially important when constructing a fireplace in a wooden country house. Installation of the base in wooden houses should be done with a heat-resistant layer - a minirite sheet with a thickness of 15 cm or more. Ceramic tiles or porcelain stoneware will already be laid on it.
For a brick house, it is enough to lay the foundation on a concrete screed with tiles; an additional reinforced foundation does not need to be erected.
Traditional heating of one room with one stove
The classic heating method is implemented using models similar to traditional “stove stoves”. The optimal installation location for such products is where convection air flows move without obstacles or obstacles. Often choose that part of the room that is closer to its center.
Of course, the placement of the product will greatly depend on the chimney outlet. You can heat more than one space with such devices if you place the unit between two rooms: in a special niche, partition or hole. Then the heat will be distributed to both spaces at once.
Air heating
Organized by choosing a model with several or more pipes for connecting air ducts. The heat will flow through them into the selected rooms through special holes in the wall. In the case of such equipment, the installation location will depend on:
- length of air ducts from the heater to the desired room
- product power
- house plans
- Possibility of installing air ducts to the desired length
- the outlet locations of the pipes in each specific room and their area (these parameters help to calculate whether the amount of incoming heat will be sufficient or not)
DIY fireplace installation diagram
In general, the instructions for installing a fireplace yourself include the following steps:
- preparation of floor covering;
- installation of a pedestal;
- laying out the slab near the firebox and laying the side plumbs;
- installation of the firebox;
- laying thermal insulation;
- box masonry;
- pediment masonry;
- installation of insulation in the chimney and its final finishing.
The final and mandatory stage is a fire test, which is carried out 3-4 days after the completion of the masonry of the box.
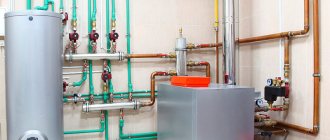
Water heating
The most complex type of heating from the point of view of engineering wiring, but at the same time, the most powerful and efficient. If the equipment is equipped with a water circuit and a heat exchanger, its installation location is calculated based on the following parameters:
- power of the water circuit and the product itself
- number of rooms requiring heat and the total area of each of them
- total number of batteries and radiators that will be connected to the hydraulic circuit
- access to process water
- number of boilers into which hot water is planned to be supplied for sanitary and hygienic needs
- total area and arrangement of the underfloor heating system
- possibility of connecting distribution pipes
- total length of distribution pipes
- house layout to identify the most optimal wiring methods
- chimney outlet
Depending on the layout of the house and the length of the pipelines, the required power of the heating product is determined. The location of its position itself is not critical, but it must be organized so that the circuit of the unit is located at the lowest part (point) of the heating system.
Attention! Models with a water circuit and their wiring require the organization of complex engineering systems, so it is recommended to trust their installation and connection to professionals to comply with all fire safety and technical standards, as well as for the efficient operation of all equipment and wiring systems.
Types of fireplaces
Regardless of the design features, they can be divided into two large groups:
- ready-made models - manufactured industrially, which only need to be installed indoors;
- homemade structures - require construction from scratch directly in the room itself.
Relatively recently, building a fireplace indoors was equated to art, and craftsmen capable of implementing such a design were worth their weight in gold and were in great demand.
But progress does not stand still, and now components have appeared that are manufactured using a production method, which significantly facilitate DIY construction, for example, ready-made combustion chambers. Now almost everyone, with some effort and sufficient knowledge, can install a fireplace on their own.
Selecting an installation location based on the design, dimensions and configuration of the furnace
The design and dimensions of the heater are selected to suit the overall footage, layout and interior of the space. The larger the room, the higher the power. The formula for identifying the required power: 1 kW is designed to heat an average of 10 cubic or square meters of a well-insulated house. The dimensions of the heater are often related to its power and configuration. For small rooms, you can choose a compact stove - its power is enough for heating, and for large or several rooms at once - a model of large dimensions and power.
Attention! Incorrect identification of the “power-footage” ratio will provoke an excess or shortage of thermal energy. Both options can lead to rapid breakdown of the heating equipment, which will constantly overheat (with excess power for a small area) or constantly operate at maximum power (with insufficient power for a large area).
The layout and interior of the space influence the choice of configuration and, accordingly, the method of placing the hearth. The following designs are distinguished:
- Wall mounted
- Corner
- Wall-corner
- Double sided
- Round
- Cylindrical
- Central
- Built-in
- Hanging
Correct location in the interior
The fireplace in the house must be positioned so that there is no corridor in front of the people sitting by the fire. Otherwise, those who move along the created passage will begin to cross the “rest zone” and disturb the peace of those who are resting.
Location of the fireplace in the interior
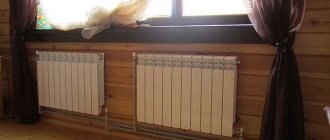
Drafts negatively affect the functioning of the entire structure, so you should not install them near doors, windows or near stairs. It is not recommended to place the fireplace opposite the windows, as the intensity of air flow will increase. However, these rules do not apply to varieties with a closed firebox.
The fireplace portal should be turned to the center of the room so that the fire is clearly visible. It is best to think about a “recreation area” near it. You should not install a TV next to it, as it can distract attention and disrupt the relaxing atmosphere.
Chimney outlet
The most important factor on which to choose a location is the chimney outlet. Wood and gas fires can only function in conjunction with a chimney through which combustion products are safely discharged to the street.
Attention! The use of flammable fuel devices without a chimney is strictly prohibited!
If we talk about modern types of chimneys - modular, stainless steel, “sandwich” design, then the chimney can be connected to the heater in two ways:
- Inside the building
- Along the facade of the house
In both cases, a short section of a single-circuit pipe without insulation is connected to the stove body, and then to the main thread of the modular chimney with insulation. As a rule, the placement of heating products in the case of using a modern steel chimney can be done freely, since the length of such pipes can be of any length and configuration - that is, it allows the construction of a smoke route with offsets, turns and bypassing obstacles.
If there is an existing brick or ceramic chimney, the installation location of the heater is selected in strict accordance with the location of the chimneys.
Recommendation. It is advisable to calculate the location of the passage of the smoke pipe and the connection of the heating unit to it at the initial stages of designing and building a house, as this will greatly save time and money.
Where to place a brick oven. Basic recommendations
As noted earlier, the choice of a particular location for a heating device depends on many factors that are individual in nature. Therefore, you can choose the right location for the stove in your home using universal recommendations.
- First of all, the structure must be positioned so that during operation it releases maximum thermal energy from the entire surface.
- If with the help of the future stove only one room will be heated, then it is recommended to place the structure close to the walls due to the fact that thermal energy in this case will emanate only in 2 out of 4 directions.
- In other cases, it is advisable to install the heating device at some distance from the wall surface.
- We also note that the width of this gap must be at least 150 millimeters, otherwise heat transfer will significantly deteriorate.
- The image below (more specifically, a, b) clearly demonstrates a couple of options for open placement of heating devices in the presence of the recommended air gap (also called a setback). As you can see, the stove is located in the corner of the room or in the middle of the wall.
- If using a stove structure two adjacent rooms will be heated at once, then the ideal (and at the same time the most effective) option is to locate the device in the internal partition between the rooms (as shown in the same image, point c).
- There may be a more serious option. If the heating device will simultaneously heat three adjacent rooms (and this is also possible), then it should be placed in the internal partition separating these rooms, but as shown in the image (subparagraph d). Here, in 2 rooms there will be one side of the structure, and in the remaining third there will be two at once.
- Image d shows another option for heating a pair of adjacent rooms using one stove. This option differs in that the combustion chamber is located on the veranda. This is an ideal option for small country or garden houses.
- One important point: when planning to place a stove between adjacent rooms, you need to take into account the fact that the chimney duct should be built above the partitions only when their thickness is at least 250 millimeters (that is, 1 brick).
Note! Today, many owners of private houses prefer to have a stove in at least one of the rooms. Of course, gas or electric heating has a lot of obvious advantages, but still they can hardly be considered autonomous (unlike stove heating).
If you follow some rules, as well as adhere to the above recommendations regarding the placement of the stove structure, then you will be able to provide yourself with the most comfortable microclimate for the winter period.
Compliance with fire safety rules when choosing a location
Determining the location is closely related to the type of materials from which the house is made. If there are surfaces (walls, floors, ceilings, furniture) made of wood and other flammable materials around the intended installation site, then the safe distances at which the fireplace should be removed from them should be taken into account. At the same time, removing the device from a wooden wall is only one of the fire safety rules. It is equally important to ensure reliable thermal insulation of combustible surfaces and the floor in the area where the heater will be located. Insulation around the stove can be made from:
- basalt wool
- drywall
- ceramics
- bricks
- decorative non-combustible materials
- natural and artificial stones
Attention! Reliable thermal insulation should also be implemented in places where the chimney passes through walls, ceilings and ceilings.
If you want to eliminate the need to install insulating surfaces, you can choose a central configuration oven (suspended, round, cylindrical). But in this case, you will still need to insulate the floor (foundation or sheet of non-combustible base).
Required tool:
- Master OK;
- mason's hammer and wooden or rubber mallet;
- regular and notched spatulas with a width of 50–70 mm and 100–150 mm, respectively;
- buckets for mixing the solution;
- levels and plumbs;
- roulette;
- perforator;
- a construction mixer for mixing the mortar or an electric drill with a mixing attachment;
- screwdriver;
- Bulgarian.
Materials you should stock up on before starting construction:
- red stove brick M-200 and facing bricks in sufficient quantity;
- heat-resistant masonry mixture for stoves and fireplaces;
- heat-resistant mastic;
- cement M500;
- steel angle and strips;
- self-tapping screws, plastic dowels and washers;
- heat-insulating foil plates 50 mm;
- floor ceramic tiles or porcelain stoneware;
- plasterboard and UD and CD profiles;
- decorative grilles for ventilation holes;
- heat-resistant sealant.
Regardless of the design features, you should correctly calculate the consumption of materials, or, if in doubt, buy with a reserve. Most large hardware stores offer a return service for unused building materials provided the packaging is intact.