The installation or reconstruction of a heating system involves the installation or replacement of heating devices. The good news is that, if you wish, you can handle this yourself without the involvement of specialists. How heating radiators should be installed, where and how to place them, what is needed to carry out the work - all this is in the article.
It is possible to install heating radiators with your own hands
Types of water heating
Water heating is a method of transferring heat into a room using a liquid coolant. Heating devices are radiators or pipes in a “warm floor” system. The most common heating system is by laying pipes and installing radiators in all rooms. It is easy to install, practical and inexpensive.
The radiator serves to transfer heat from the coolant to the room using convection and radiation. Efficiency depends on the uniform heating of the batteries. And uniformity is directly determined by the methods of connecting heating radiators in a private house.
Features and rules of placement
Any heating equipment is a complex system where each component has its own role
The most important part of the entire system is the heat exchange units, which are the final link in the transfer of heat energy in the house. These include ordinary radiators, convector devices of open or closed type, water floor heating devices, which are profiles of pipes laid on the basis of certain rules
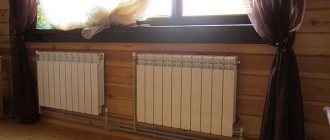
Any type of radiator is installed indoors according to general rules. There is a specific installation procedure that must be followed. The installation procedure will not cause any particular difficulties, but there are many nuances in this matter. So, first of all, they affect the installation site. In most cases, the heating installation is placed in areas of the most significant heat loss, for example, under window openings. Even modern energy-saving double-glazed windows cannot trap warm air in the room. Old wooden frames need not be mentioned.
If there is no radiator structure under the windows, cold air masses descend along the wall and spread across the floor. The situation changes after installing the battery: warm air rising to the ceiling prevents cold air from falling down. Remember that the effectiveness of such protection depends on the size of the heating device: it must be at least 70% of the width of the window. For this reason, small radiators will not provide the appropriate degree of comfort. In the lateral zones there will be areas with a cool air mass descending to the lower level. You will be able to see the “sweating” of glass and walls. The collision points of heated and cold air will become covered with condensation, and dampness will form in the room.
Therefore, do not try to purchase a sample that has the highest heat transfer. They are suitable for areas with harsh climatic conditions. In this case, it would be useful to install a heat curtain at the front door. This is the second problem area in private residential buildings. Residents of the first floors of apartment buildings often encounter it. The principles for placing the heater are simple: installation is carried out close to the entrance. Determine the site based on the layout features and pipe laying capabilities.
The heating installation should be placed exactly in the center of the window. Before installation, find the center and mark it. Then, in both directions, calculate the interval to the fastening points. The gap between the product and the floor should be from 8 to 14 centimeters. If you make it smaller, cleaning under the radiator will be difficult; a larger distance will cause the formation of zones with cool air.
Measure 10-12 centimeters between the window sill and the radiator and begin installation. A closer location will worsen convection and reduce thermal output. The distance between the wall and the back wall of the device is 3-5 centimeters. Thanks to this gap, normal convection and heat distribution will be ensured. A shorter distance will cause dust to settle on the wall.
In addition, batteries can be installed in:
- extended interwindow spaces are a popular alternative option;
- corners and “blind” walls of corner rooms - enhance heating of spaces characterized by increased heat loss due to increased exposure to wind;
- bathrooms, pantries, bathrooms, in which one or two sides are connected by a load-bearing wall;
- unheated entrances, hallways of private houses;
- apartment corridors of the first floors of multi-storey buildings.
Radiator design
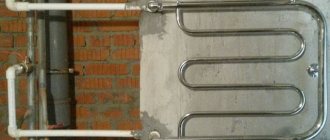
Structurally, batteries can be assembled from several sections or non-removable (panel). Collapsible ones can be lengthened by adding sections, or shortened. Any radiator has a collector at the top and bottom for the passage of water.
In sectional designs, each section has a small vertical channel connecting the upper and lower collectors. Vertical passages are also available in panel models.
The radiator has four inputs. Usually only two are used. Hot water supply and return pipes are connected to them. The remaining two inlet openings are plugged with plugs; a Mayevsky faucet is installed in one of them to bleed air.
Description of operations
Supplying materials to the workplace
C1 and C2 bring the radiator to the installation site. Then C1 brings the floor riser and brackets.
Marking the installation locations of the brackets (Fig. 6)
Fig.6
C2 uses a template to mark the installation locations of the brackets, making marks with chalk.
Installation of brackets (Fig. 7)
Fig.7
C1 places the bracket at the marked location and hammers in the dowels. He also installs and secures two brackets.
Hanging the radiator (Fig. 8)
Fig.8
C1 and C2 hang the radiator on the brackets, after which C1 checks the verticality of its installation with a plumb line.
Screwing in the outlet and installing the floor riser
C2 winds three layers of FUM tape onto the thread of the outlet and screws it into the three-way valve using a pipe wrench. Then screws the radiator plugs onto the connections to the radiator. C1 lowers the floor riser into the opening of the ceiling. C2 goes to the underlying floor, inserts the smooth end of the floor riser into the lower floor radiator outlet cup and supports the riser while C1 dry connects the floor riser to the radiator using radiator plugs. Then C2 applies a plumb line to the axis of the riser and checks its vertical installation.
Sealing of threaded connections
C1 wraps a bundle of FUM tape around the radiator plugs and screws the plugs into the radiator with a wrench, after which, having sealed the threads behind the plug with the harness, tightens the locknuts with a wrench. Then he winds three layers of FUM tape onto the threads of the jumper, screws the coupling onto the prepared thread behind the coupling with a wrench, and tightens the locknut with a wrench.
Welding a joint on the underlying floor (Fig. 9)
Fig.9
C2 uses gas welding to connect the cup with the end of the floor riser inserted into it on the underlying floor.
Pipe routing methods
The effective connection of radiators in a private house and the comfortable operation of the cottage depend on the design features of the pipeline layout.
Types of pipe routing:
- Single-pipe;
- Two-pipe;
- Collector, or beam;
- Mixed schemes.
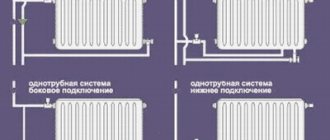
Single pipe system
This system is installed in multi-storey buildings. But it is often found in old one-story houses. As a rule, it is not used in modernly built cottages.
Quite effective when heating a small house or cottage with an area of up to 50 m2. But when installing a single-pipe heating system in large houses, all the advantages of the system are lost.
- The main design feature of single-pipe wiring is that all heating devices are connected in series to one pipe.
- Connection options: parallel to the pipe and in series.
- The second scheme is outdated and ineffective - if the radiator leaks, you have to turn off the heating completely; it is impossible to regulate the temperature of one individual battery. Therefore, it should not be installed in new homes.
Advantages and disadvantages
This heating system has many advantages when used in small houses:
- It is a little simpler in design and therefore cheaper than the two-pipe one.
- Modern thermal valves allow you to regulate the temperature of each radiator individually (when connected in parallel). This makes it possible not to increase the length of radiators in each subsequent room, as was done before.
- Installing taps allows you to disconnect each battery.
- A single-pipe heating system warms up faster than a two-pipe one.
- One pipe looks more beautiful than two.
Flaws:
- The temperature drop on each subsequent radiator is significant. In a large home, there are not enough thermostats to balance the system. Therefore, to heat all rooms evenly, you will have to increase the number of battery sections - by 10% in each subsequent room.
- It is believed that single-pipe wiring is cheaper than two-pipe wiring. But this is true for small houses and cottages. In large ones, the cost of radiators exceeds the savings on pipes.
- When increasing the length of radiators, difficulties may arise with their placement.
- A single-pipe system cannot be adapted to heat a two-story house.
Installation nuances
There are two types of bimetallic radiators: partially or completely bimetallic.
In the first case, aluminum is used for the manufacture of vertical collectors, which requires special care during installation. There are the following requirements for how to correctly connect a bimetallic battery:
There are the following requirements for how to properly connect a bimetallic battery:
When connecting fittings and manifolds, be careful not to use excessive force. As a rule, the accompanying documentation contains detailed installation instructions
A torque wrench is very convenient in this regard, allowing you to control the applied force. When using linen winding, it is important not to overdo it with its quantity. Otherwise, some of the effort will go into it, which will ultimately lead to the appearance of microcracks.
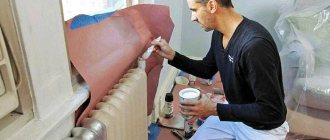
After the coolant gets into them, the process of peeling off the paint will begin. As a result, sooner or later a leak will appear. It is best to apply sealant and a little flax. It is better to avoid using paint in systems where antifreeze acts as a coolant. This will lead to rapid corrosion of the seal and the appearance of a leak.
- The battery must be mounted in a strictly horizontal position. An exception is when an air vent is used, when, for greater efficiency in releasing gases, a slight forward angle deviation along the circulation path is allowed. It is prohibited to make a slope in the opposite direction, because this disrupts circulation.
- When hanging the radiator, you must use three brackets: two on top and one on the bottom. The upper elements take on the entire load. Due to the lower fasteners, the desired direction is set.
- To ensure effective air exchange, the following parameters should be adhered to: distance to the floor - from 60 mm, to the window sill - from 100 mm.
In some cases, the manufacturer may recommend other distances, depending on the design features (the differences are usually a few centimeters). However, the gap between the rear surface of the battery and the wall remains unchanged - 30-50 mm.
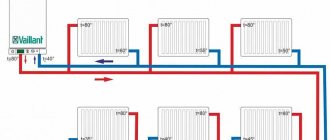
Two-pipe system
With a two-pipe connection system, hot water enters the battery through a pipe directly from the boiler, and the cooled water goes into the “return”. This system is preferable for large modern cottages. Advantages:
- Almost all radiators receive coolant at the same temperature. Therefore, uniform heating of all rooms is ensured. And therefore there is practically no need to regulate the heating of each room. Of course, if the project is done correctly.
- The system is easier to adjust than a single-pipe system.
Main technical characteristics
The physical and operational characteristics of steel batteries allow you to choose the best option for most premises.
Characteristics of panel batteries:
- height – 30...90 cm;
- width – 40…300 cm;
- depth – up to 17 cm (depending on the number of panels);
- working pressure – 6…8.5 atm.;
- pressure testing – up to 13 atm.;
- liquid temperature – 110…120 °C.
Characteristics of tubular radiators:
- height – 19…300 cm;
- width – unlimited;
- depth – up to 25 cm;
- liquid temperature – up to 120 °C;
- working pressure – up to 12 atm.;
- pressure testing – up to 20 atm.
Mixed system
When designing heating for a spacious or two-story building, it is impossible to use a radial connection or a single-pipe system.
The two-pipe system will also be divided into parts - for each floor or wing of the building separately.
In practice, the heating system boils down to the fact that separate lines go from the collector to different parts of the building. The heating system for each part of the building is two-pipe.
- Sometimes part of the system can be single-pipe - for example, for heating an extension, veranda or winter garden.
- In fact, the heating device has a design combined from two or three schemes.
- Disadvantages: requires a competent design and installation of thermal heads on each battery.
- Plus - you can design a heating device for buildings of any number of floors and configuration.
Radiator connection diagrams
There are various options for connecting heating radiators in a private home. The direction of the coolant jets inside the battery and heat transfer depend on them. And accordingly heating efficiency. All types of connecting radiators in a private house to coolant supply pipes are described below.
Diagonal connection: top feed
It is believed that this scheme is the most effective. When designing, the heat transfer of a radiator with such a circuit is taken as one; for other types of connections, reduction factors are used in calculations. Hot water comes from above, is distributed to all sections through the upper collector, cools and falls down. Then it goes into the return pipe. The battery area is heated evenly, and heat transfer is maximum.
Diagonal connection: bottom feed
The reverse connection (hot water is supplied below, water enters the return line from above) is ineffective and incorrect, and cannot be used. A stagnation zone forms in the lower corner of the battery under the return connection pipe. Heat transfer efficiency is reduced by approximately 20%.
Bottom connection
The supply and return pipes are laid under the battery and connected to the lower pipes. This scheme is often used in private homes for aesthetic reasons. The pipes are almost invisible.
Warm water enters the lower pipe and flows upward. The heat transfer efficiency of radiators with this scheme is lower than with a diagonal connection with top supply.
But it is worth distinguishing between the features of heating in a private house and multi-apartment housing. In apartment buildings, for technological reasons, the coolant velocity is high, pumps pump water almost continuously.
Therefore, hot water does not have time to rise, and the radiator does not warm up completely. Accordingly, heat transfer is reduced.
- In private houses, the water supply rate is low.
- The incoming hot coolant manages to rise up and evenly warms up the entire battery.
- In addition, the boiler does not work all the time, but only part of the time.
- As a result, the efficiency of this connection scheme is less than that of the diagonal one by five percent.
- And it can be used in a house with an individual heating system.
Top connection
This is more of an example. Only the upper radiator collector will warm up. The bottom of the battery will always be cold. Therefore, you should not connect the heater in this way.
Side connection
Traditional connection diagram for radiators in multi-storey buildings. Not the most efficient scheme in terms of heat transfer. When connecting the batteries to the return pipe, the supply is from the bottom, when connecting to the supply pipe, the connection is from the top. Unfortunately, this is the only technologically feasible way to connect radiators in multi-storey buildings.
- The method is not very effective, especially with long batteries. Small radiators warm up quite well.
- Long batteries warm up by about half - a stagnation zone forms at the far end.
- There is simply not enough pressure to distribute the water to all sections. The situation is even worse with batteries in which the supply comes from below.
- The loss of efficiency with such a connection can be up to 20% or more.
It is not advisable to use such a connection in a private home. Only in a situation where it is impossible to connect in another way due to the specific placement of the radiator and lack of space.
One way bottom connection
It is used on panel radiators and adapted sectional ones. Almost equivalent to a side connection with a top feed. Heat transfer efficiency is reduced. This connection method is used in cases where it is important to hide the pipes in the floor.
What is needed for installation
Installation of heating radiators of any type requires devices and consumables. The set of necessary materials is almost the same, but for cast iron batteries, for example, the plugs are large, and they do not install a Mayevsky valve, but instead, somewhere at the highest point of the system, they install an automatic air vent. But the installation of aluminum and bimetallic heating radiators is absolutely the same.
Steel panel ones also have some differences, but only in terms of hanging - they come with brackets, and on the back panel there are special arms cast from metal, with which the heater clings to the hooks of the brackets.
These are the arms that hook the hooks
Mayevsky crane or automatic air vent
This is a small device for releasing air that may accumulate in the radiator. Placed on the free upper outlet (collector). It must be on every heating device when installing aluminum and bimetallic radiators. The size of this device is significantly smaller than the diameter of the manifold, so you will also need an adapter, but Mayevsky taps usually come complete with adapters, you just need to know the diameter of the manifold (connection dimensions).
Mayevsky crane and method of its installation
In addition to the Mayevsky crane, there are also automatic air vents. They can also be installed on radiators, but they are slightly larger in size and for some reason are only available in a brass or nickel-plated case. Not in white enamel. In general, the picture is unattractive and, although they deflate automatically, they are rarely installed.
This is what a compact automatic air vent looks like (there are more bulky models)
Stub
The side-connected radiator has four outputs. Two of them are occupied by the supply and return pipelines, on the third they install a Mayevsky valve. The fourth entrance is closed with a plug. It, like most modern batteries, is most often painted with white enamel and does not spoil the appearance at all.
Where to install the Mayevsky plug and tap for different connection methods
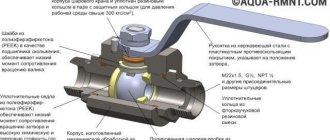
Shut-off valves
You will need two more ball valves or shut-off valves that can be adjusted. They are placed on each battery at the input and output. If these are ordinary ball valves, they are needed so that, if necessary, you can turn off the radiator and remove it (emergency repairs, replacement during the heating season). In this case, even if something happens to the radiator, you will cut it off, and the rest of the system will work. The advantage of this solution is the low price of ball valves, the disadvantage is the impossibility of adjusting heat transfer.
Radiator taps
Almost the same tasks, but with the ability to change the intensity of the coolant flow, are performed by shut-off control valves. They are more expensive, but they also allow you to adjust the heat transfer (make it less), and they look better externally; they are available in straight and angular versions, so the piping itself is more accurate.
If desired, you can install a thermostat on the coolant supply after the ball valve. This is a relatively small device that allows you to change the heat output of a heating device. If the radiator does not heat well, you cannot install them - it will be even worse, since they can only reduce the flow. There are different thermostats for batteries - automatic electronic ones, but more often they use the simplest one - mechanical.
Related materials and tools
You will also need hooks or brackets for hanging on walls. Their number depends on the size of the batteries:
- if there are no more than 8 sections or the length of the radiator is no more than 1.2 m, two mounting points on top and one on the bottom are sufficient;
- For every next 50 cm or 5-6 sections, add one fastener at the top and bottom.
You also need fum tape or linen winding and plumbing paste to seal the joints. You will also need a drill with drills, a level (preferably a level, but a regular bubble one will do), and a number of dowels. You will also need equipment for connecting pipes and fittings, but it depends on the type of pipes. That's all.
How can you improve the efficiency of radiators?
First option: there are batteries designed for the lower connection circuit. They plug the lower hole between the first and second sections.
And the water is forced to rise into the upper collector and is distributed among all sections. Batteries for the top connection are made in the same way. Special valves are produced for the plug device.
Choosing the optimal method for connecting radiators
The efficiency and economy of a cottage heating system is made up of several factors. This is the efficiency of the heat generator, the method of pipe routing and the correct connection of radiators in a private house.
- Proper design will allow you to minimize the number of radiators, pipes, regulators, fittings and use a boiler of suitable power.
- But a lot depends on the quality of installation of all devices and pipelines.
- Therefore, when arranging your home, you need to pay attention to all stages of work - from design to execution.
- Then heating the house will not require alterations and additional balancing efforts. And it will evoke only positive emotions.
For a one-way connection, a flow extension is installed in the radiator plug. This is a fitting with threads with a nominal diameter of 16 mm.
In fact, this is a tube that extends the supply pipe. The coolant is supplied over a greater distance in a long battery. And accordingly, the radiator warms up more.
Safety regulations
When performing work, the following safety regulations must be observed:
a) it is prohibited to connect and weld pipes in a suspended state;
b) punching holes in walls and ceilings should be done wearing safety glasses;
c) it is prohibited to lean pipes and pipe blanks against the wall;
d) it is not allowed to use faulty pipe wrenches, including wrenches with worn jaws;
e) you should not use wrenches whose numbers do not correspond to the diameter of the pipes being screwed together;
f) it is prohibited to put pipe cuttings on the handles of keys to increase the power moment;
g) when welding, fire safety rules must be followed.
1. Persons of both sexes who are at least 18 years old, who have completed training and have qualification certificates are allowed to perform gas welding work.
2. The gas welder is required to undergo quarterly safety training and once a year a 10-hour training program in safe working methods.
3. The gas welder has the right to begin work only after receiving a specific task from the foreman or work manufacturer and receiving safety instructions at the workplace.
4. The gas welder is required to work in fire-resistant clothing and safety shoes.
5. Before work, it is necessary to check the tightness of the hoses and their connections (connection only with clamps).
6. Carry oxygen and acetylene cylinders on special stretchers or carts, protecting them from impacts.
7. Cylinders with oxygen and acetylene must be stored separately at the workplace and must be secured (the distance between the cylinders is at least 5 m).
8. Open fire cylinders must be located no closer than 10 meters and 1 meter from central heating devices.
9. It is prohibited to smoke or light matches within 10 meters of the cylinders.
10. Protect oxygen cylinders from oil and dirt.
11. Hoses must be purged with working gas before connecting to the burner and comply with GOST.
12. In the event of a reverse shock, immediately close the acetylene valve, and then the oxygen valve.
13. It is prohibited to tighten the threaded connections of the reducer or cylinder with the valve open.
14. Do not withdraw gas from the cylinder until the end; leave a residual pressure of at least 0.5 atm.
15. Do not allow hoses to intertwine with welding cables.
16. Removal of caps from cylinders should only be done by hand - hitting the caps with a hammer or wrench is prohibited.
17. When gas welding parts of electrical equipment or when performing work near active electrical equipment, it is necessary to take measures against electric shock. Immediately notify the foreman or foreman about the presence of operating equipment.
18. In place of the container for oxygen cylinders there should be the inscription “Oil Hazardous”, and for acetylene - “Flammable”.
18. Gas welding equipment - burners, cutters, gearboxes should be used after checking every 10 days by a foreman or foreman.