A garage is a specific room that simultaneously performs many different functions. Regular car storage is the main one, but not the most important one. The garage is a workshop, a storage place for winter supplies, a warehouse for necessary but rarely used things. For many, the garage serves as a kind of club, a residence for real men, where meetings with friends and like-minded people take place. They require the creation of comfortable conditions, especially in winter. Heating a garage is a certain difficulty, since the mode is not constant, and the walls have a minimum thickness. But the main problem area is the gate, without insulation of which it is impossible to ensure a normal microclimate.
Which gates require insulation?
Gate designs are varied. They can be:
- swing;
- sliding;
- sectional;
- lifting;
- lift-and-swivel;
- roller shutter gates.
Not all gates need to be insulated. If they are made of sandwich panels, where thermal insulation is already provided, no additional actions are required. A layer of polystyrene foam or polyurethane foam inside the panel retains heat well and serves as excellent protection against hypothermia in the room.
Single-layer fabrics need thermal insulation. The garage is separated from the street only by a sheet of metal, the thermal conductivity of which is very high. In addition to the fact that the room cools down in winter, in summer it can become very hot in the sun. If fuel or motor oil is stored in the garage, the temperature in the containers also increases.
When gasoline is heated above 30°C, it begins to deteriorate and the octane number decreases sharply. In addition, the risk of fire increases, since when stored in heat, flammable liquids release explosive vapors.
The issue of insulating gates is especially acute if the garage is heated in winter. The lion's share of heating costs “flies” through the metal layer into the atmosphere, while the temperature in the room remains uncomfortable and does not correspond to the costs of maintaining it.
When the garage is attached to the house or is located in the basement, uninsulated gates provoke a decrease in the energy efficiency of the building as a whole. Many who live in such cottages have encountered the fact that the walls or floors in the rooms next to the garage are very cold. Therefore, good thermal insulation guarantees more economical heat consumption throughout the house.
Is it necessary to do this
The garage is used for more than just car maintenance. Some owners may use it for storage or make a workshop in this room. One of the possible options is the ability to communicate with friends. No matter what the garage is used for, it is not comfortable to be in it in the cold season without heating.
Temperatures below zero cause damage to the vehicle. If it is overcooled, it will be difficult to start it, and frozen condensation will begin to accumulate, which can damage metal parts. If you know how to insulate a garage door, this can be prevented.
Materials
To insulate garage doors, inexpensive and easy-to-install ones are used:
- polystyrene foam, expanded polystyrene - have low thermal conductivity, do not rot, and are not afraid of frost and moisture;
- mineral wool - the fibrous structure retains heat well, but is hygroscopic, so protection from moisture is required;
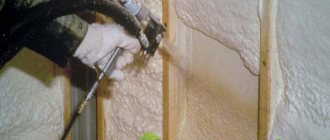
- polyurethane foam - superior to all materials in thermal insulation characteristics, used both in slabs and in sprayed form;
- foamed polyethylene - reduces heat loss, but is more often used as an addition to the main thermal insulation;
- OSB is a sheet material made from wood waste, resistant to rotting due to the high content of synthetic resins;
- wood is not the best material for insulation, it is heavy, can swell and rot, but with regular treatment with antiseptics it is quite durable;
- synthetic felt, polyurethane foam - due to its ability to expand, it fills cracks and joints well;
- sealing materials - elastic cords or tapes of various sections, are attached at the junction of the leaves to each other, to the frame of the gate and wicket.
Insulation can include curtains made of tarpaulin or thick film. They are made in the form of curtains and effectively cut off cold air coming from the street.
FakeHeader
Comments 51
I chose a day where there was not much thaw and foamed the gap between the threshold and the gate, it became better) By the time I had time, the frosts now reached -30.
The bottom can be made with felt
Frozen to the gate.
Then from the heart's sleeve
Hang a curtain made of dornite, we have one of these hanging in every garage and you will be happy
You can put felt padding on the gates, but I also saw that in the neighborhood in garages people wrap a tarp around a board and just lay it down with their hands every time.
Thank you! I am also inclined towards this design, make brackets for the threshold and insert a board with felt there.
I was also intrigued by the question until I saw that people were just using the boards, not just one person, but quite a lot.
such a good corner for a sealant... my toad says that a profile for drywall would be enough, it is noticeably cheaper!
The threshold is coated with the compound and the foam is applied directly into the crack on the closed door. After hardening, the foam will remain on the door itself, creating a seal and will not stick to the threshold.
I support! I did exactly the same thing around the entire perimeter, everything worked out perfectly and it turned out hermetically sealed. Only I didn’t smear it with polish, but with a thin layer of lithol. Three years have already passed, no complaints.
The threshold is coated with the compound and the foam is applied directly into the crack on the closed door. After hardening, the foam will remain on the door itself, creating a seal and will not stick to the threshold.
You can cover it with tape; the foam won’t stick to it either.
I screwed a doubled fire hose around the perimeter. Bend outward. First, you put a galvanized metal strip with holes into the sleeve. Self-tapping screws every 200 mm.
And I have insulation around the perimeter with frost. Just so neatly.
Nope)) I don’t like this kind of insulation, I used it for a while too)
I sewed up the gate first with a wooden sheathing around the perimeter, then with polystyrene foam and then the whole OSB-3 thing on top. So I tried to adjust the OSB so that it would fit right next to the frame. But there’s still such a neat frost around the perimeter. It doesn’t grow and melts when you heat it too much. Or rather , it doesn’t melt, but falls off in pieces. I’ll have to hang a curtain.
I should have taken a photo of the gap at the bottom too, the options depend on its size
I cut rubber inner tubes from Kamaz into strips. I secured these rubber strips in two layers - on one side and the other side of the rail (it turned out to be a double shutter). I did this around the entire perimeter of the gate. Then I trimmed these strips in place (in width so as not to interfere with the closing of the gate).
Polyurethane foam. I did this to myself, everything tightly in a circle. There are a lot of videos on YouTube.
Now on sale there are a lot of rubber profiles for sealing the joints of window doors and gates. Why reinvent the wheel?
I didn't see the rapids.
You can use the same ones for thresholds. Or too small?
Create an anti-threshold! )))))www.antiporog.ru/ustanovka-antiporoga.html
Cool stuff! I'm afraid it will freeze and the mechanism will become clogged with frost.
to seal the cracks at the gate, the first thing you need to look at is that at the exit from the garage - it’s just the ground that rises in winter or thoughtfully poured concrete... and so that it’s straight according to Feng Shui, or make second light doors so that there is a vestibule so that it plays the role of an “air cushion” or a more budget-friendly option for curtains made of felt and there will be a song
The only problem is with the threshold. I got confused with the rubber bands because I didn’t want a curtain.
A huge canvas curtain covers the entire wall, it will have a very cool effect.
I have a 50th corner welded to the prog without insulation and there are no problems.
a dozen mops with the bristles down. But in general, leave it, ventilation has never harmed anyone.
ventilation and draft are very different things... and where there are cracks, in winter there will be frost and quite a bit of it, which then melts and moisture - one wonders where are the advantages of such “ventilation”...
moisture is where the humid air of the garage comes into contact with cold objects; if there is a blow through the gap under the gate, then there will be no frost there, but if there is frost, what is the problem at the frost threshold? This is not a ceiling. Besides, the more ventilation, the less chance of catching the dew point. And I probably won’t list the advantages of ventilation.
Insulation methods
Garage doors are usually welded from metal. They are durable, resistant to burglary, and serve for a long time. But due to their high thermal conductivity, steel becomes very hot in the sun and cools down in the cold. Insulation neutralizes these sharp temperature fluctuations. In winter, the room retains heat better, and in summer it stays cool.
When installing thermal insulation, the following are used:
- Bonding insulation to metal. This method is used to fasten slabs of polystyrene foam, polyurethane foam, polystyrene foam, and mineral wool. An adhesive for external use with high frost and moisture resistance is suitable for fixing.
- Installation on the lathing. All materials can be attached to it, including wood and OSB. The frame is made of wooden slats or bars. Thermal insulation is inserted into the spacer, glued between the sheathing bars or screwed to them with self-tapping screws. The cracks are filled with polyurethane foam.
- Spraying. Used for applying polyurethane foam in the liquid phase. Special devices mix the components, and rapid foaming begins. The mass is supplied to the installation site through a nozzle under pressure and polymerizes in air. This method is not used for self-application of polyurethane foam, but you can call specialists with special equipment.
All materials are installed from the inside of the gate, and the top is finished with moisture-resistant materials. This can be sheathing with metal siding, corrugated board, plywood, clapboard or OSB, followed by painting the wood with a waterproof composition. Cladding not only improves aesthetic characteristics, but also protects thermal insulation from mechanical damage, and to some extent from fire. Apart from mineral wool, all materials are flammable, and therefore require a layer separating them from open fire.
Third stage: finishing cladding
When the insulation work is completed, there is a reasonable desire to make high-quality cladding. Since there is a wooden sheathing between the sheets of insulation, this will not be difficult to do. How to cover garage doors? There are several widely used options:
OSB sheets for insulating garage doors
- Corrugated sheet
- Plastic panels
- Lining
- OSB sheets
Advice. The cladding can be secured using either a construction stapler or self-tapping screws.
Treatment of gates before insulation
Before insulating work with any materials, it is recommended to carry out a protective surface treatment. This measure will reduce the impact of high humidity on the metal. Polystyrene foam and penoplex have very low vapor permeability. On the one hand, this allows you to keep the metal from getting wet, on the other hand, the insulation is not airtight, and water vapor trapped under the insulation will remain on the surface of the steel for a long time and cause corrosion.
Mineral wool not only allows steam to pass through, but can actively absorb moisture from the air. This occurs especially intensively in heated rooms, where warm air is cooled in a layer of wool, releasing condensation. When contacting metal, wet mineral wool provokes the development of corrosion.
The surface of the gate is first thoroughly cleaned of rust. Use stiff brushes, a drill or a sander with an abrasive attachment, such as a flap wheel or a nylon abrasive with integrated minerals. Rust or other loose contaminants can be removed very easily in this way. For large treatment areas, a sandblasting machine is used. It is connected to a compressor and delivers the abrasive mixture through a nozzle under pressure. All loose particles are removed along with the sand.
Phosphoric acid is very effective, but it must be applied after the main layer of rust has been removed. When working with chemicals, care must be taken to ensure that the acid does not come into contact with the skin or eyes. Emitted vapors also pose a danger, so the room must be well ventilated.
Then an anti-corrosion primer or rust converter is applied to the surface. They create a protective film that prevents the metal from coming into contact with oxygen and water - the main “culprits” of rust.
Bituminous varnish and rubber-bitumen mastic give good results, but when working with them you need to remember that most paints and varnishes are fire hazardous. Do not use them near open flames or very hot surfaces, such as stoves. After drying, you can begin installing the thermal insulation.
Carrying out preparatory work
Preparatory work begins with surface development. To do this you need:
- Work on the garage ventilation. If it is installed on the gate, we may accidentally cover it with insulating material. Find both the supply and exhaust openings.
- Now you need to process the inner surface. The gate may be dirty, corroded, or the paint may have started to peel off. We remove everything unnecessary. Rust can be removed using a sanding machine. If corrosion has begun, anti-corrosion protection should be used to coat the gate. Anticorrosive is a primer that protects the gate. It will be better if you can apply it with a spray.
How to insulate a garage door from the inside with your own hands using polystyrene foam
This is the simplest and most common method, since it does not require much labor and time. For installation you will need tools that are found in almost every home or garage:
- knife or hacksaw for cutting slabs;
- electric drill;
- jigsaw;
- drills and screws for wood and metal;
- roulette;
- screwdriver;
- hammer.
If you work alone, a clamp will come in handy. It will help fix the parts in the desired position without outside help.
Material calculation
First you need to measure the gate and find the consumption of insulation, fasteners and finishing:
- foam boards with a thickness of 30-40 mm;
- 9 mm OSB sheets or moisture-resistant plywood;
- bars 40x40 mm for lathing;
- self-tapping screws for metal, wood, screws with a press washer;
- polyurethane foam for filling cracks.
The lumber is pre-treated with an antiseptic and dried.
Installation of sheathing
The bars are cut according to size and attached to the frame of the canvas with self-tapping screws. The lathing is installed around the perimeter of the gate, wicket, around the lock and other protruding elements, so that there is something to fix the foam and trim. The pitch of the bars is determined in accordance with the dimensions of the foam parts, since the insulation must fit tightly to the sheathing.
The thickness of the wooden frame should be greater than or equal to the thickness of the foam. Most often, slabs of 30-50 mm are used; accordingly, the bars cannot be thinner.
Installation of foam plastic
The insulation is cut to the size of the “sockets” in the sheathing and installed in the spacer between the bars. The cracks are filled with foam. If the foam fits tightly and holds well, it is allowed not to attach it additionally. In the future, it will be pressed against the skin. In any case, there should be no gaps. Polystyrene foam is easy to cut with a knife, but crumbles a lot at the edges. To create a spacer, you need to make an allowance of a few mm on each side, and keep the knife strictly vertical when cutting.
You can glue the sheets directly to the metal of the gate, but then you will have to hold the foam until the setting is completed using plywood or OSB pads, supporting them with spacers. It is recommended to glue the slabs to the door leaf using polyurethane foam with a low expansion coefficient, which is used when installing doors where a strong increase in volume is undesirable. You can use silicone-based glue or “liquid” nails, but they should not contain acetone, benzene, dichloroethane and other components that destroy polymer chains.
Seams and gaps are filled with polyurethane foam. After 15-20 minutes, when it sets and gains its initial strength, the excess is cut off with a sharp knife.
In principle, you can do without lathing by simply gluing foam plastic to metal sheets between frame elements - corners or profile pipes. On the one hand, this method allows you to save on bars, but on the other hand, it complicates the fastening of the sheathing. You will have to drill metal, which is more labor-intensive and irrational.
Finishing
Plywood, moisture-resistant MDF or OSB are cut to the size of the gate and fastened with self-tapping screws to the sheathing. The fastener installation step is 10-15 cm.
It is not advisable to use non-moisture resistant materials. They become moldy, rot and quickly collapse. After installation, you can paint the surface with a waterproof wood compound. This will additionally protect the finish from moisture.
Additional element End strip
The end strip for the roof is made in two versions. For flexible tiles and metal tiles
It is very important to know that the end strip for a soft roof is installed during installation of the roof, and for metal tiles, after
The wind (end) bar performs 2 tasks:
• It does not allow moisture and raindrops to enter the space under the roof, resulting in complete sealing of the coating.
• It securely secures the edges of the roof, preventing gusts of wind from lifting the edges of the roof covering
Master sheet bender
manufactures end strips of any complexity and configuration. Product manufacturing time is from 10 minutes.
To calculate the price of manufacturing an end strip, contact our manager, or use the price list
Thermal insulation of gates with penoplex
Extruded polystyrene foam, or penoplex, is very similar in properties to polystyrene foam, but is much more convenient to process due to its denser, homogeneous structure. When cutting, it does not crumble into balls.
The sequence of operations when insulating with penoplex is the same as when working with polystyrene foam. Sheets are attached in 2 ways:
- gluing to metal with polyurethane foam;
- installing them between the sheathing bars, followed by foaming the joints and fixing them with sheathing.
Additionally, you can insulate the gate slopes with penoplex. To do this, strips are cut out slightly wider than the slope itself. Then a small amount of foam is applied to the EPS surface, the part is pressed against a section of the wall and secured with a spacer.
After hardening, the excess polystyrene foam is cut off, and the gap between it and the slope is filled with foam. It is recommended to foam the gap no more than 1/3, since the sealant expands, filling the entire free volume.
Video description
This video shows how to insulate using polystyrene foam
Polystyrene foam
This material is considered the most famous and widespread type of foam. In appearance, such insulation looks like sintered balls filled with gas. This material is preferred for use as insulation. It has its own designation: PSB. Of its varieties, the highest quality is extruded polystyrene (EPS). It has high resistance to sunburn, low hygroscopicity and relatively high strength. This material may be sold under the name Penoplex, Stirex, or in some other way. When thinking about how to insulate a garage door from the inside with your own hands, you need to remember that this material allows for better insulation.
Polyvinyl chloride
It is used not only for thermal insulation, but also for sound insulation. Panels made from it can be of two types: elastic and rigid. This material is highly fire resistant and is comparable in quality to EPS.
How to insulate a garage door with mineral wool
Several materials are produced under the general name - basalt (stone) wool, glass wool and slag wool. All of them are used for thermal insulation work, but stone is more convenient and safe. During installation, glass wool releases tiny sharp particles that injure the respiratory system. You can work with it only in a protective suit, respirator and goggles.
Slag wool is not so dangerous during manipulation, but is prone to severe shrinkage and waterlogging. Due to the residual acidity of slag fibers, metal corrosion quickly develops, so you should not use slag wool to insulate garage doors.
Basalt wool is less hygroscopic, but also prone to shrinkage. It is recommended to use slab rather than roll material. It has greater density and holds its shape better. Small particles are released less intensely when cutting and installing mineral wool. They are not as dangerous as glass wool and have less harmful effects. But precautions are still necessary - a mask, goggles and gloves.
Mineral wool is attached to glue and/or lathing. For gluing, polyurethane foam is used, which holds the insulation well and prevents it from slipping. If glue is not used, the slabs are inserted between the bars in a spacer. The seams and gaps are foamed. Decorative and protective cladding is attached to the sheathing or metal frame.
Features of various insulation materials
Before starting construction, you need to select the most suitable insulation material. In this case, it is necessary to take into account its existing features.
Use of mineral wool
This is a well-known type of insulation. However, it must be taken into account that three different materials are used under this name. All of them are known for their high ability to absorb moisture. For this reason, they try to avoid using them for the purpose in question. Once wet, mineral wool loses its heat-protective properties. Of the variety of such options, only basalt wool covered with a vapor barrier film is considered suitable for this purpose. This is a prerequisite for how to insulate garage doors using this material.
Using mineral wool Source strport.ru
Glass wool
In the production of glass wool, the finest glass strands are used. Their diameter is 5-15 microns. The length of one thread is in the range of 15-50 mm. It has low thermal conductivity. It is equal to 0.03-0.05 W/m*deg. Use can be carried out at temperatures from -60 to +450 degrees. Glass wool has not only high strength, but also elasticity. When planning how to make a garage door, you must remember that working with glass wool without using protective equipment poses a health hazard. Fibers can break and can injure the skin and penetrate the respiratory tract.
Thermal insulation from polyurethane foam
Polyurethane foam is a foamed polyurethane sealant with extremely high adhesion. It adheres firmly to almost all surfaces, including metal. Since the thermal conductivity of foam is very low, many people want to use it as the main insulation.
After analyzing the costs of polyurethane foam and comparing them with the costs of other heat insulators, we can conclude that it is not profitable. The price of sealant compared to polystyrene foam or expanded polystyrene with the same thickness of the insulating layer is much higher, so it is recommended to use polyurethane foam for its intended purpose - for filling cracks or gluing.
Several types of foam are produced, which differ in their ability to expand. Strongly expanding ones increase up to 200% in volume, moderately - up to 50-70%, weakly - up to 30%.
Materials with a high coefficient of expansion are used in construction to fill gaps between concrete or brick structures. Where this property may be detrimental, low to moderate expansion foams are used.
The seams between the metal gate frame and the wall can be filled with any foam without the risk of it damaging or deforming anything. The main thing is to take into account the % expansion so as not to waste material. For gluing insulation boards, polyurethane sealants with low expansion capacity are recommended.
Surface preparation and lathing creation
The first step is to prepare the surfaces for installation of materials. To do this you need:
- Free the sashes from all foreign objects - brackets, hangers, and other elements that are often installed on the sashes. Only the upper and lower latches of the fixed sash and the lock are not removed, which in any case are attached directly to the metal and cannot be moved;
- The surface of the gate is cleaned of old paint, peeling or crumbling areas. It is most convenient to use a drill with attachments - a wire brush or an emery wheel;
- Detected cracks or deep corrosive potholes are repaired by welding. In difficult cases, patches are welded in, after which the seams are carefully cleaned flush with the main surface;
- The prepared surface is covered with a protective layer of bitumen mastic using a brush. The coating is applied in 2 layers in the transverse direction.
After the protective layer has dried, they proceed to installing the sheathing. It is a system of wooden bars installed around the perimeter of each door with several lintels inside.
The sheathing serves as a support system for installing the sheathing, which protects the heat insulator and gives the sashes a neat appearance. After finishing, the inside of the gate can look much more impressive than the outside.
To install the sheathing, a reinforcing corner is used, welded along the perimeter of the sashes, in which holes are drilled for self-tapping screws. In some cases, you have to make holes directly in the sashes, which is acceptable, but undesirable.
The bars under the sheathing must have a thickness no less than the selected heat insulator
This is important because after installing the material, the sheathing will need to be attached to the bars. The internal cavity formed by the sheathing and sheathing must be sealed and not allow air to pass through, so the sheathing must be equal to or even slightly thicker than the insulator. When installing the sheathing, it is necessary to leave the upper and lower latches with a lock and bolt free. These elements are subsequently provided with their own protective covers that cut off contact with warm air. The sides of the bars adjacent to the sashes must be covered with a strip of polyurethane foam before direct fastening.
This will ensure the tightness of the sheathing and prevent the formation of cold bridges. All joints between the bars are also insulated with polyurethane foam. The finished sheathing should completely cover the perimeter of each sash. Inside, the lintels are installed based on the area of the sash and the degree of rigidity of the cladding. Sometimes one jumper is enough, but usually several bars are used. It must be taken into account that installing strips too frequently reduces the effectiveness of insulation and makes work more difficult.
These elements are subsequently provided with their own protective covers that cut off contact with warm air. The sides of the bars adjacent to the sashes must be covered with a strip of polyurethane foam before direct fastening. This will ensure the tightness of the sheathing and prevent the formation of cold bridges. All joints between the bars are also insulated with polyurethane foam. The finished sheathing should completely cover the perimeter of each sash. Inside, the lintels are installed based on the area of the sash and the degree of rigidity of the cladding. Sometimes one jumper is enough, but usually several bars are used. It must be taken into account that installing strips too frequently reduces the effectiveness of insulation and makes work more difficult.
After installing the sheathing, installation of the heat insulator begins.
Installation of seals
To fill the gaps, sealing inserts made of silicone, rubber, nylon or nylon bristles with water-repellent wax impregnation are used. Manufacturers can equip them with a self-adhesive base, then no glue is required during installation.
You can use improvised means - hoses, scraps of car inner tubes, or even disused fire hoses. The materials are attached around the perimeter of the gate and wicket. The thickness of the seal should not interfere with the free closing of the sashes.
Tips for installing foil materials
A film made of foamed polyethylene or lavsan with aluminum foil applied to it has found application as additional thermal insulation of various structures, as well as vapor barrier. The porous base reduces heat transfer, and the metal coating reflects heat rays.
In order for the material to perform its task, you need to install it correctly:
- the metallized side should “look” into the room;
- when fastening, the joints are hermetically sealed;
- There should be a gap of at least 15-20 mm between the foil and the finish.
If the last condition is met, infrared radiation is reflected from the mirror surface and warms the air gap between the insulation and the sheathing. This additional thermal insulation effect is provided by foil-coated materials - isolon, penofol, isoflex and others. If there is no gap, they act as normal insulating substrates, meaning their reflectivity is not involved. When it is not possible to create a gap, it is better to use cheaper heat insulators.
Another purpose of foamed polyethylene is to create a vapor barrier layer. When insulating with mineral wool, its use is completely justified, since it protects the fibrous material from moisture from vapors penetrating from the room.
