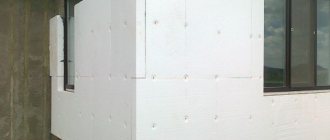
Insulation of wooden walls with penoplex
When thinking about the question of whether a vapor barrier is needed for insulation, it is necessary to take into account that it is easier to equip it with the help of a profile frame.
Experts recommend laying 2 vapor barrier layers on both sides of the insulation. The presence of a profile frame will neutralize negative external influences. Since the vapor barrier is laid on an installed frame, special slats are used to create it, the thickness of which is 25-30 mm. The step between them should be no more than 1 m. The para-insulating membrane is fixed to the slats with nails or a stapler. A ventilation gap should be formed between the wooden walls and the vapor barrier layer due to the slats.
The sheathing is made of timber. The selected material should have dimensions of 25x50, 50x50 mm. For this purpose, you can use a metal profile. When choosing a step between the padded bars, you should take into account the width of the foam sheet. For reliable placement, in the formed openings the size between the beams should be 5 cm smaller.
The heat insulator is laid in the openings between the guides
Focusing on which method of laying insulation is more suitable, you can focus on the following options:
- arrange sheets offset to eliminate “cold bridges”;
- install 2 layers of insulation in a perpendicular direction.
Before finishing work, it is necessary to install another row of sheathing. The slats are nailed to the base of the structure itself, which allows you to create ventilated channels. As a result, the facade of a wooden house, finished according to all the rules, will not require repairs for a long time.
Liquid nails: will be a bit expensive
Liquid nails can be used to attach thermal insulation to a well-leveled and primed base. Glue is applied using a sealant gun pointwise around the perimeter and center of the sheet. Fastening is done by briefly pressing it to the surface.
Expensive adhesive significantly increases installation costs. Even with high-quality bonding to the surface and ease of use, the technology of using “liquid nails” is economically feasible for small areas of insulation.
Internal wall insulation with technoplex
insulate walls from the inside with a maximum thickness of 40 mm
Experts recommend leaving a small gap between the wall and the insulation itself. This will help reduce heat loss, but will lead to a reduction in living space. It is better to leave a distance, because this will provide natural ventilation. Accordingly, condensation will not penetrate inside, which means the humidity level in the room will remain optimal. This will help avoid rotting, and the walls of the house will dry out very quickly after rain.
When the insulation work using technoplex is completed, the wall surface must be finished. Wooden sheathing is often used for these purposes. It is also possible to use sheets of plasterboard, which are subsequently coated with paint or wallpaper.
Among the variety of modern insulation materials, special attention should be paid to technoplex. This material has excellent thermal insulation properties, thanks to which you can insulate your home both inside and outside
In this case, the help of professionals is not needed.
Application area
Technoplex is designed for insulation of foundations, basements, house walls, insulation of balconies, house roofs, insulation of garages, cottages, apartments.
Nano-sized graphite particles are used to produce technoplex. Nano graphite increases its strength and reduces thermal conductivity. Nano graphite gives technoplex a light silvery tint.
technoplex
What makes liquid foam unique?
Balloon liquid foam is a fairly lightweight, cost-effective, durable material for noise and heat insulation, and is easy to install. Using this foam, no additional vapor barrier is required.
They are used to insulate walls, roofs and floors of existing residential buildings and buildings under construction.
Such foam is produced directly on the construction site using foam generator and ejector installations. The main component of penoizol is a polymer urea adhesive resin. The latter may be different. When combined with a hardening agent, the resin is transformed and becomes similar to plastic. Liquid foam also contains other components: water and a foam-forming substance.
The solution is fed into a special installation and foamed in a foam generator with the participation of air supplied by a compressor. The power of the latter should be about 300 l/min. The material is already sent to its destination in the form of liquid foam. Primary hardening is possible after 20 minutes. The foam completely hardens and polymerizes after three to four hours. In this way, a fairly lightweight porous insulation with small cells is produced.
Insulation with liquid foam allows you to save heat much better than with mineral wool or solid types of heat insulators.
When you intend to insulate yourself, a machine for making cast foam can be rented or purchased for long-term use. Its price in various trading companies is equal to the amount starting from 20 thousand rubles. Microprocessor mechanisms are much more expensive. But management in them is much simpler than in conventional systems. Small areas of work allow the use of cylinders with liquid heat insulator.
Polystyrene foam is used to fill hollow house structures or formwork prepared in advance. A 10 cm layer of this material with its heat-shielding properties is equivalent to a 30 cm layer of foam plastic, 20 cm of mineral wool, 2.5 meters of brickwork, and 2.97 meters of concrete masonry.
Balloon foam is endowed with the following characteristics:
- long service life;
- environmental friendliness;
- fire resistance;
- immunity to the influence of organic solvents and microorganisms;
- protection from the spread of insects and rodents.
This type of insulation has an excellent price/quality ratio. Among other things, with his participation, it is possible to carry out wall insulation in already built houses without changing the entire structure.
Treatment of roofs, floors and walls with liquid foam has obvious advantages over other types of insulation:
Foam generator diagram.
- excellent thermal insulation properties;
- wide range of applications;
- shelf life exceeds fifty years;
- wide variability of temperature conditions;
- relative cheapness;
- high degree of density;
- no voids are formed when filling it.
Despite all the advantages, it also has disadvantages:
- linear shrinkage up to 5% when it is poured without pressure in the horizontal direction;
- unpleasant odor of formaldehyde, which evaporates over time.
Technoplex and penoplex insulation: what to look for when choosing
"Technoplex" and "Penoplex" are insulation materials that have high technical properties. They appeared on the market not so long ago, but have won the recognition of many. Let's figure out what the advantages and disadvantages of these materials are, what their features and differences are. Let's find out which insulation is better to choose and what to pay attention to, and compare several options.
Technoplex
Technoplex insulation is an extruded synthetic material that has proven itself well in construction. It is made from polystyrene granules: under high temperature and pressure they are mixed with graphite (it gives the sheets a gray-silver color) and a foaming composition. The mixture is poured into molds and pressed. After hardening, the sheets are cut to standard sizes.
The material is available in 2 versions:
- 118*58 cm;
- 120*60 cm.
The thickness varies - from 2 to 10 cm. The edges of the sheets have a special edge, thanks to which the parts fit together better and do not form gaps.
The result is a homogeneous structure with closed gas cells. Since almost all 100% of the pores are closed, the material has good technical characteristics: being light in weight, it is resistant to deformation and bending, retains heat well and almost does not absorb moisture.
"Technoplex" is used in a variety of areas:
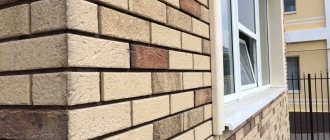
- During the construction of private houses, for example, if the external cladding is made of sandwich panels, as well as when insulating the foundation;
- When arranging outbuildings;
- For insulation of balconies and loggias, floors, including when installing “warm floors”;
- When insulating roofs, attics, interior, internal and external walls.
In addition, insulation is often used in the construction of railways and roads, and in the construction of refrigeration chambers.
Advantages and disadvantages
"Technoplex" is used in various fields of construction and repair due to its high technical characteristics. But, like any material, it has its pros and cons. It is important to know about them when analyzing how penoplex differs from technoplex.
The advantages of insulation include:
- Has high thermal insulation rates. Technoplex is 1.5 times more effective than polystyrene foam and 2 times more effective than glass wool.
- It tolerates temperature changes well and does not deform due to heat or frost. The sheets can withstand from -70 to +75 degrees.
- It practically does not absorb moisture, and therefore does not swell or rot. It can be used in conditions of high humidity.
- Does not shrink and can be used for a long time. Bacteria and mold also do not develop inside the material.
- The insulation is not susceptible to rodent attacks.
- The material is easy to use and process: it does not fray or crumble, the proposed shape and size are most convenient to use. Its installation does not require special skills or the use of special equipment.
- It has low weight and thin thickness. When used, it does not increase the weight of the building and does not reduce the usable area inside.
- The average service life is 50 years. At the same time, the characteristics of the material do not change over time.
Also, Technoplex is an environmentally friendly material. It does not contain substances hazardous to health and, subject to operating conditions, the insulation is completely safe.
Its disadvantages include:
- Flammability. "Technoplex" has a flammability class of G4, it is highly flammable and emits acrid smoke when burned.
- The material is easily destroyed by ultraviolet radiation. Open packaging should not be stored under the sun; keeping the insulation outdoors for a long time is not recommended at all. Installation is best done on a cloudy day.
- When working, do not use organic solvents, as the sheets begin to collapse.
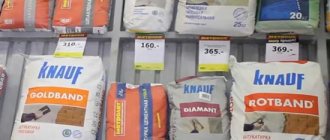
It is also noted that the price of Technoplex is higher than that of other popular insulation materials. If the volume of work is large, the cost of the material may be too high.
Penoplex
“Penoplex” is a heat-insulating extruded polystyrene foam, which is produced by the same name, and is distinguished by high technical properties, thanks to which the material has become extremely popular.
Its production is similar to that of Technoplex: polystyrene granules are heated at high temperatures and mixed under pressure with a foaming agent until a homogeneous structure is obtained. The mixture is passed through extruders, cooled and cut into sheets.
The plates are orange. The material consists of small cells filled with air. They are firmly closed and do not allow heat and air to pass through.
- For floor insulation (under or on a screed, when installing a floor on joists or when installing a “warm floor”);
- When insulating a non-residential basement, thermal insulation of internal walls or facade;
- On roofs (for flat or green roofs);
- For insulation of wells and septic tanks;
- When installing platforms and paths, when constructing a blind area around the house.
When using Penoplex, it is important to remember that it does not conduct moisture, and therefore it is necessary to have a good ventilation system, otherwise problems may arise. It is also necessary to select the thickness of the insulation so that the dew point falls on the material itself, and not on the wall.
"Penoplex" is available in several versions:
- " Wall ". They are distinguished by a rough surface on which finishing materials adhere better.
- " Comfort ". The edge is made in the shape of the letter "G". During installation, this guarantees stronger adhesion and the absence of gaps.
- " Foundation ". Used where structures are subject to high loads (for screeds) or where fire resistance requirements are lower (for floors or foundations).
- " Roof ". They have a “U”-shaped notch, which makes the connection more durable.
These types differ in thickness, density, elasticity and bending strength. For example, “Penoplex” “Foundation” and “Roofing” are more dense and elastic, their tensile strength is higher.
Advantages
If you place a thermal insulation layer inside the house, the dew point will shift. This indicator determines the temperature value below which condensation occurs. In this case, the dew point moves indoors. This means that the humidity will increase, the walls will begin to “sweat” and mold will form. Internal insulation reduces the space of the room.
Even a small thickness of insulation can significantly reduce the square footage, because to thermally insulate a wooden building you will need to install sheathing. Another factor is the deterioration of the internal microclimate. The use of even modern thermal insulation materials will not allow wood to “breathe”. Insulation from the outside eliminates all of the above factors.
Preparing the sheathing - step-by-step installation
To make the lathing, you need to decide on the material from which it will be made:
Wood is more environmentally friendly, but more complex in terms of installation. The aluminum frame is much more convenient and practical. Let's move on directly to installing the sheathing:
- The first step is to clean and prepare the surface for future lathing.
- At the second stage, you will need certain tools to attach the frame to the prepared wall.
- The third step is to mark the entire surface where the sheathing frame will be installed.
- After all the preparatory work, you can begin installing the sheathing elements according to the marked marks.
The principle of thermal insulation with penoplex
Sheathing a house with penoplex requires a special approach, taking into account the thickness of the slabs used. Therefore, first of all, it is necessary to understand the thickness of the thermal insulation layer.
Required thickness of Penoplex
So, it has already been indicated above what thickness this material is produced. This is a fairly wide range of sizes, which is not produced in vain. In order to determine this parameter specifically for your home, it is necessary to carry out a thermal engineering calculation. It is based on the requirements of SNiPs, which indicate that all layers separating the interior from the street must create a heat-protective barrier that would not let the outside temperature into the rooms. And this parameter should not be lower than that specified in SNiP.
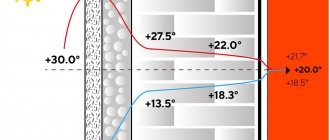
The thickness of the insulation is selected based on the average winter temperatureSource dovidkam.com
That is, each layer, and this is not only insulation, but also the wall itself, decoration, etc., are barriers that have some kind of protective properties. Some to a greater extent, some to a lesser extent, but each layer performs such a protective function. True, not everything is so simple here, so this calculation is carried out by specialists. In this case, there is no need to engage in amateur activities. The only thing we note is that the thickness of the insulation mainly depends on the region where the house is being built. The colder it is in the construction area, the thicker the thermal insulation layer should be.
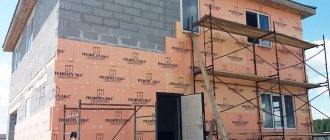
Facade insulation technologies
Today, there are two technological schemes for insulating facades: wet and ventilated. Let's look at each separately, but let's immediately note that the method of laying penoplex on the walls is identical. The technological schemes for installing the remaining building materials are simply different.
Preparing the wall surface
First of all, we clean the concrete and brick from possible dirt, dust, old paint, any random oil stains, etc. If the walls are not smooth, then you will have to work with putty and try to bring them into a plane. We proceed with wood and plaster by analogy (except for putty).
For this dirty work, sandpaper or mesh, spatulas, scrapers, and brushes are used. In a word, whatever tool we have, that’s what we work with.
Cleaned walls should be primed. Conventional deep penetration primers are appropriate here. It often happens that the basement of a building “works” in harsh, damp conditions. Therefore, fungus, moss or other unnecessary vegetation forms on it. A simple method to get rid of it is to treat these parts with a solution of copper sulfate. A proven “old-fashioned” method. But you can also use more modern antiseptics, they are much more effective.
If there are efflorescences on a brick wall, they must be removed. You can read how and how to do this in this article - link. This is done in order to prevent the destruction of the material, which we will not see behind the layer of insulation and final finishing.
Next, along the entire perimeter of the building, strictly along the horizon, we attach the starting plinth. It can be in the form of a wooden block or a special perforated metal profile. The goal is to make it easier and faster to attach the penoplex: it does not accidentally move down and is positioned evenly relative to the walls.
Laminate swelling is another problem that can be solved
Disassembling the laminate and replacing the dies or even the waterproofing layer may also be necessary if swelling appears on the surface of the coating after it has been laid. Repair of the flooring with replacement of individual elements will be necessary if the defect arose due to a large amount of water spilled on the floor.
If there was no excess moisture on the laminate, then most likely the issue was a violation of the installation technology. To remove swelling on the laminate in the second situation, remove the baseboards and see if you or the craftsman who designed the floor left the necessary expansion gaps when the material expanded. The tiles should not lie flush against the wall; there should be a gap of 1-1.5 cm. If there is none, do it, and the laminate will lie flat.
Adhesive foam: quick installation
Adhesive foam allows you to very quickly insulate smooth stone surfaces. Thanks to the high adhesion of the adhesive composition, smooth slabs are perfectly fixed on flat concrete surfaces without subsequent displacement. The application technology is as follows. Adhesive foam is applied around the perimeter and in the middle of the slab along the long side using a foam gun. With the grooves filled with glue, the plate is pressed for 30 seconds. The average setting time for adhesive foam is 20 minutes. Further work with penoplex, installation on dowels and grouting is possible after 2 hours.
Disadvantages of the material
The main disadvantage of penoplex is its dense structure. On the one hand, this improves its thermophysical properties, but, at the same time, makes it vapor-tight. And this leads to disruption of the circulation of moist air inside the room and prevents its free exit through the walls. The result is mold in the corners of the house and condensation on the surface of the masonry.
Another nuance is the solubility of penoplex with some organic substances (gasoline, ethylene, acetone, oil paint).
Video review: Acetone and Penoplex, what will happen?
Acetone and Penoplex what will happen?
https://youtube.com/watch?v=Ttt5ApRuekU
It will be necessary to limit the use of such compositions near the facade.
Dry mixes: simply reliable
The use of dry mixtures allows you to glue penoplex to concrete and brick without much expense or hassle. The dry mixture is added to the water in proportions determined by the instructions for use. The solution is mixed using a drill mixer attachment operating at the lowest possible speed. The resulting mixture is applied to the surface using a notched trowel; the grooves are filled with the trowel. The insulation, installed in place, is held for one minute.
When attaching penoplex to a concrete wall and brickwork, a cement-based mixture is used as the main fastening element.
Extruded polystyrene foam and technoplex: application features
High-quality thermal insulation is necessary for any living space. Therefore, during the construction or renovation of a house, it is advisable to use durable, well-proven insulation materials.
Features of external use of technoplex:
- On the outside, slabs of material 100 mm thick are used;
- Before installing them, the surface is leveled and primed;
- Technoplex is fixed using a certain adhesive composition;
- The slabs are laid starting from the bottom, tightly touching each other;
- Each row should shift by half a sheet compared to the previous one;
- After the glue has dried, the material must be secured with plastic dowels, and the outside must be reinforced with fiberglass mesh and the surface must be plastered.
As for interior decoration, sheets of material up to 40 mm thick are used for such purposes. The insulation itself is glued, leaving a small space between the insulation and the finish for ventilation.
During installation of heated floors, Technoplex is laid directly on the screed and covered with polyethylene. A backing with foil is placed on top, and then the cable mats are fixed. After this, everything is filled with concrete.
When insulating the floor along the joists, polystyrene foam is placed on the waterproofing located between the bars. And all the connecting points are foamed.
Disc dowels: long lasting strength
The use of disc-shaped dowels is justified in the case of a large insulation area or uneven façade surfaces. For fastening to dowels you need: a hammer drill (impact drill), a drill of the appropriate diameter and length, and a hammer. Holes are drilled with a recess of 50-60 mm into the base. The holes are filled with polyurethane foam. Then the dowel is driven in with a hammer so that the dowel fungi do not protrude above the surface of the slab. It is best to use dowels in combination with metal screws to increase the reliability of the connection. Installing 5 dowels per slab is sufficient. Adjacent sheets are fastened with one dowel. It must be installed in the seam between the slabs.
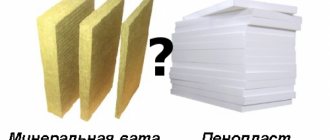
Main Differences
Since almost every developer, in the process of constructing a residential building or outbuilding in our climate, is faced with the need to insulate the house, before the heating installation stage, or even earlier, he has to decide which insulation is better: polystyrene foam or mineral wool. Despite the fact that these two insulation materials are used most often in the construction process, there is a big difference between their main characteristics. Due to its sealed structure, polystyrene foam does not have the ability to remove air masses outside. Therefore, if we compare whether polystyrene foam or mineral wool is warmer, the answer will be in favor of polystyrene foam. Thanks to the closed cells, warm air is retained inside the slab and is not vented outside, unlike porous stone wool.
Vapor permeability
Vapor permeability is the main difference between these two types of thermal insulation. For expanded polystyrene it ranges from 0.13 mg/(m*h*Pa) to 0.03 mg/(m*h*Pa). Stone wool indicators range from 0.4 mg/(m*h*Pa) to 0.6 mg/(m*h*Pa).
Comparative characteristics of insulation materialsSource moybalkon.com
This clearly demonstrates that mineral wool insulation removes vapors much better. During the operation of the insulation in the heating mode of the house, vapors are retained on those layers of the wall pie that have the lowest vapor permeability. This means that when using mineral wool alone, the dew point will most likely be located inside the insulation, which will lead to moisture accumulation inside the insulation. If the insulation becomes damp under the influence of vapors, this will lead to a significant deterioration in its properties. Therefore, it is necessary to install a vapor barrier layer inside the house on top of mineral wool. While polyurethane foam thermal insulation itself is non-hygroscopic and does not require the installation of additional membranes.
Fire safety
When polystyrene foam or mineral wool are compared in terms of flammability, thermal insulation made from mineral wool wins undisputed primacy.
Consequences of neglecting fire safetySource avatars.mds.yandex.net
All types of polystyrene foam insulation quickly ignite and maintain flammability. Moreover, when burning they melt and fall off in burning drops. Stone wool can withstand high temperatures up to 1000 degrees, does not ignite or burn, which makes its use more preferable in rooms with a risk of high temperatures.
Price
When deciding whether polystyrene foam or mineral wool is better for insulating a house, one cannot ignore the issue of price for the material. Currently, for one cubic meter of stone wool you will need to pay about 2.5 thousand rubles
The same volume of polystyrene foam insulation will cost a little more, and will cost 2.6 thousand. This is a little more expensive, but it is also worth considering the price of vapor barrier, which will cost approximately 15 rubles per square meter.
Choosing insulationSource scientificarab.com
Operation and installation
Installation of polystyrene foam thermal insulation is not associated with the release of airborne particles and dust, unlike stone wool, which generates a lot of dust when cutting. To install EPS layers, you do not need to wear personal protective equipment such as goggles and a respirator, which makes the installation process simpler and more comfortable. It is worth noting that when joining polystyrene foam slabs, there will be a small distance between them, or in other words, a cold bridge. To avoid heat loss in such places, it is necessary to carefully foam each of them. While when joining mats of mineral wool insulation, such gaps do not arise. The mats fit tightly to each other, leaving no gaps or cracks.
TECHNOPLEX or CARBON
XPS properties may vary slightly depending on the application. This is largely due to different operating conditions. It is obvious that in loaded structures, for example, foundations, material strength, moisture resistance and thermal conductivity are of great importance.
So what material is best to choose for insulating a floor, balcony or basement? Let's start with the fact that TECHNOPLEX and CARBON ECO are classmates. Both materials are produced by TECHNONICOL, have certificates of conformity, retain heat well, do not absorb moisture, and have a long service life. However, they are slightly different and the main difference is that TECHNOPLEX is designed for private craftsmen, and CARBON ECO is for professionals in the cottage and low-rise construction market. For this reason, CARBON ECO brand material is almost impossible to find in a retail store. That is why, when carrying out minor repairs, during which it is not planned to insulate a structure with a high load, it is most convenient to purchase TECHNOPLEX at the nearest retail store. The material will do an excellent job of thermal insulation of the basement and blind area, balcony and loggia, walls and pilaf in the house.
But in the process of large-scale construction of a house, when insulating a slab foundation or ground floors, you need to pay attention to CARBON ECO, it is more effective in these structures.
TECHNOPLEX is usually used for standard structural loads, while CARBON ECO copes with more complex tasks. The most common applications are shown in the table below.
Where strength is not of fundamental importance (we are talking about vertical structures), you can choose the TECHNOPLEX slab with a strength of 150 kPa at 10% linear deformation, with a thickness of 50 mm. The thermal conductivity of such insulation varies in the range of 0.032–0.037 W/m·K depending on the thickness of the material. This means that with the correct thickness, the insulation will keep you warm in winter and cool in summer.
XPS CARBON ECO has a higher compressive strength at 10% linear deformation and is 200 kPa for a thickness of 50 mm or more. And its special brand, developed for slab foundations XPS CARBON ECO SP, can withstand 400 kPa at 10% linear deformation. The material has proven itself when used in difficult conditions. It is used to insulate structures that experience heavy loads in private housing construction - foundations, garage floors, etc. It has almost zero water absorption and high heat-saving properties.
If we talk about the thermal conductivity of CARBON ECO, this indicator varies from 0.030 to 0.034 W/m K depending on the thickness. However, this indicator is also low and is sufficient for reliable thermal insulation of almost any structure in the house.
Calculation of material for insulating a brick house
In order to properly purchase insulation, first determine the minimum layer of insulation. It depends on climatic conditions, brick characteristics, thermal protection area and is determined by the formula: Sp= (Rq - S1/ Kt.s.) x Kt.u., where:
- Sp - minimum thickness of the insulation layer in m;
- Rq - temperature coefficient for climatic zones, Rq = 3.3 m2 * K / W for the city of Kerch;
- S1 - brickwork, m;
- Kt. With. — thermal conductivity coefficient of the wall material, for solid red brick, Kt. With. = 0.81 W / (m * K);
- Kt.u. — coefficient of thermal conductivity of the insulation material, for Penoplex Kt.up. = 0.04 W / (m * K).
Next, select packaging with a thickness of Penoplex slabs equal to 100 mm:
- number of slabs per package - 4 pcs.;
- area of slabs in a pack - 2.8 m2;
- number of packs with a safety factor of 15%, 120/2.8/0.85= 49 packs.
For a more accurate calculation, you will need to remove the area of the glazing and door blocks.
Plastering and finishing process
After gluing the insulating boards, it is necessary to achieve a smooth surface of the walls on which the finishing needs to be applied. The easiest way is to plaster the foam. The sequence of work is as follows:
- A plaster mesh made of fiberglass is attached to the finished slabs using glue.
- A leveling layer 2-3 mm thick is applied to the mesh.
- When it dries, a sufficient layer of plaster is applied in order to hide the roughness of the insulated walls.
- The plaster composition is applied with a wide spatula. It is advisable to complete this work in one step, since the seams between the layers will not be easy to arrange.
- The plastered wall must be rubbed with a special trowel and puttied before painting or other finishing.
Advantages and disadvantages of wall insulation with penoplex
The positive side of using this heat insulator is associated with saving energy costs. The effectiveness of using this material lies in the fact that it differs from mineral wool or other insulation materials in that it is not affected by high humidity. Penoplex, used as insulation, has a special advantage over other types of heat insulators:
- the use of insulation technology does not require the installation of vapor and waterproofing;
- purchasing a heat insulator does not involve large expenses due to the low price of the material;
- has low thermal conductivity;
- the material is light in weight and easy to transport;
- increases the service life of the building due to strength and durability;
- the insulation is environmentally friendly and safe to use;
- The heat insulator has a high density and resistance to loads.
The material is self-extinguishing in case of fire. Penoplex is very convenient for finishing wooden houses. Carrying out such work will not cause difficulties even for a beginner. The material has virtually no disadvantages, but it should not be exposed to direct sunlight. To professionally insulate the outside of your home with polystyrene foam, you can seek the services of specialists.
The lack of disadvantages of this heat insulator is the main reason for its widespread use in construction. In most cases, its characteristics are similar to those of foam plastic.
Mastic: the basics
Bitumen-polymer mastics are one of the most common materials due to their price and ease of use. This technology has found wide application in insulating the plinths of buildings operating in extremely unfavorable conditions of constant humidity, the presence of reagents, and mechanical stress. They provide quick and reliable installation of penoplex with stable resistance to harmful external factors. Mastics are sold in tubes, ready for use. The tube is installed in the sealant gun.
The composition is applied around the perimeter and pointwise to the center (when laying the second one and then next to it, it is also applied to the grooves). Then the installed insulation is pressed for a short time. The glued insulation can be repositioned within one hour.
Siding installation sequence
Many people are interested in the question of how to attach siding to penoplex and where exactly to start? First, you need to make a sheathing from wooden slats or a special metal profile. It is mounted through the insulation to the wall using dowel nails or long self-tapping screws. You need to make sure that the slats are securely fastened and at the same time do not crush the thermal insulation. During installation, they can be supported on the mushroom caps, which we “lined” in rows for this purpose. Another way is to fix brackets on the wall in advance, while gluing the penoplex, which will then hold the planks. Installation of siding on polystyrene foam must be carried out with a gap of at least 2 cm, which means that the minimum thickness of the sheathing must be the same. Sheathing with foam siding is carried out according to the technology provided for siding installation using starting and finishing strips, corners and other elements.
Let us note this point once again - insulating a house with penoplex under the siding requires accurate calculations of the thermal insulation layer. If you neglect this, the “dew point”—the point of moisture condensation in the wall—may shift. Then dampness will inevitably appear in the house.
Whether or not to use penoplex for insulation is a matter for the owner. Some are inclined towards this option due to the relatively simple installation, while others, on the contrary, believe that penoplex has no place in insulating a house above the foundation. After studying all available materials and asking the opinion of professionals, everyone will make their own choice.
Self-tapping screws: cheap and cheerful
Fastening with self-tapping screws using a screwdriver is permissible when insulating a wooden wall over a previously installed sheathing. In this case, it is recommended to install a washer under the screw head to avoid surface destruction and increase the reliability of fastening.
The most widely used method of fastening is the use of bitumen (adhesive) compounds and disc dowels. [flat_ab >
The resulting insulation layer is airtight, able to withstand large mechanical loads and has an increased insulation coefficient.
After installing the insulation, a reinforcing mesh is installed followed by cladding.
Now you don’t have to think: “How to glue penoplex? How to mount it correctly? The use of materials specifically designed for penoplex to the walls will allow you to avoid unnecessary waste of effort, money, time and get a durable layer of thermal insulation made by yourself.
Hello to all readers!
With you, as always, Sergey Zlobin, the author of this blog. Today I want to consider a small but relevant topic for many: how to attach penoplex to the wall. I think there is no need to explain what penoplex is, what properties it has and what it is used for. By the way, it is also called extruded polystyrene foam, abbreviated as EPS.
Let's get straight to the point: let's talk about all the methods of fastening to various wall surfaces. The most common, of course, are concrete and brick. After all, the technology for installing penoplex involves, first of all, insulating the stone facade of the building. For wooden and plaster walls, such insulation is used much less frequently. So, let's start from the very beginning...
From this article you will learn:
What is penoplex?
Penoplex is a brand of insulating material produced by a company specializing in the production of insulators based on polystyrene foam. Today this name has become a household name. Penoplex is foamed polystyrene boards that are produced using a gas-free method.
- To achieve the effect of porosity of the finished material, the initial raw materials for its production - polystyrene itself and the solid filler that forms gases - are driven through special filters under significant pressure and at high temperatures.
- The resulting foamed substance passes through roller rollers, where it is flattened and divided into strips corresponding to the required thickness.
- The frozen material is cut into fragments of the required size.
Why do you need a detailed acquaintance with the structure of penoplex? The use of this material in facade insulation often causes a flurry of criticism, which is not always justified
When choosing insulation, it is important to rely on facts related to its real nuances and characteristics
This type of thermal insulator is universal, not susceptible to chemicals and has significant strength indicators. Penoplex is successfully used to insulate foundations, plinths, and even to create road surfaces. Many experts are convinced of the high flammability of the material, which is why it is not recommended to use it for thermal insulation of facade planes located above the first floor of a building. In fact, such a limitation is relevant for brands of ordinary EPS, which are really only installed in the ground or under a concrete coating layer.
Expert opinion
Konstantin Alexandrovich
In order to insulate or finish the façade of a house without risks, the manufacturer recommends using only a special converted type of extruded polystyrene foam, produced under the brand name. Thanks to improved production technology, including the addition of fire retardants, the output is an insulating material that almost does not burn, but at the same time retains the valuable properties of low heat conductivity, high strength and moisture absorption.
Technical characteristics of the technoplex
Visually, the material is made in the form of a smooth slab , somewhat similar to foam plastic. In the section you can see many small pores.
Technoplex is distinguished by its thermal insulation properties and durability, which means that the insulation will be of really high quality. Moreover, the material tolerates a huge range of temperatures without losing its qualities.
Technoplex is not subject to rotting and is resistant to various chemicals. Since its structure is represented by tightly pressed cells, the thermal conductivity of the slab will be maintained even at high air humidity.
It is worth noting that the strength indicator of technoplex depends on the thickness, but freezing or thawing does not affect the basic properties. Processing the technoplex before installation will not cause any difficulties. The material can be cut using a construction knife. The installation work itself is carried out in any weather conditions, but only appropriate glue is suitable for securing the material.
Main characteristics of the technoplex:
- increased strength;
- a large assortment;
- resistance to moisture;
- non-flammable;
- excellent thermal insulation properties.
Siding in home decoration
Siding is one of the most durable, inexpensive and easy to use materials. Modern siding is made from three materials:
- Vinyl
- Steel
- Tree
While metal siding is used primarily for garages or outbuildings, wood and vinyl siding will look good on a residential building. The undeniable advantage of this material is its ease of use.
It is easy to use siding to decorate an existing house or a house that is just under construction. In case of damage, specialists can easily replace the damaged piece of siding with a new one and there will be no need to replace the entire siding. Also, this finishing material is resistant to external factors and does not require additional coating.
The main signs of a quality XPS
XPS is produced from polystyrene granules by extrusion. High-quality material is very durable, has a low thermal conductivity coefficient, and does not absorb moisture. Regardless of the area in which the XPS board will protect the object from heat loss, when choosing a material you should pay attention to several key indicators. They are important for any design.
Uniform structure. The edge of the slab should be inspected. The cell size of high-quality material is 0.05–0.08 mm. It is virtually impossible to distinguish such a cell with the naked eye. But if the material is of poor quality, then the cell is easy to notice, and a microscope is not needed for this.
Warming step by step
Dacha owners often undertake to insulate the outside of the house with penoplex foam with their own hands. The technology for installing the slabs is simple, the order of work is as follows:
- Prepare the walls: remove the plaster and paint, then treat the surface with an antiseptic. If there are areas with fungus and mold, a bactericidal composition should be applied.
- Level the walls, filling in any unevenness. Thanks to this procedure, it will be possible to prevent breakage of the slabs during installation.
- Apply plaster. To process the slabs, you need to use a needle roller designed for drywall. An alternative is a wire brush.
You can level uneven areas with plaster yourself
If the sheets are too large, you need to adjust them using a saw with small teeth. If it is not available, you can cut the slabs with a knife. To finish window openings, whole sheets should be used. At the final stage you will need to secure them. The glue will dry in 4 days. After this time, you should begin securing the sheets. While the lower part is drying, you will need to insulate the house from above using scaffolding.