Features of wooden floor:
- Less load on load-bearing structures - in some cases there are restrictions on the maximum load on load-bearing structures and the weight of the floor, and it is not possible to organize a cement-sand screed (its weight is approximately 1400 kg/10 m2). In this case, a wooden floor is the solution to the problem.
- Wood requires better thermal and waterproofing
- Wooden floors have a high fire hazard
- Wooden floors are more susceptible to deterioration and rotting
Therefore, when organizing its heating, a wooden floor is subject to increased demands both on the heating element itself and on the installation technology. One of the most popular heating systems for wooden floors is electric heating.
On a wooden base, the easiest way is to use film or cable (heating mats or sections of universal heated floors that do not require laying in a screed).
Film heated floor Teplotex-0.5
- Specific power: 220 W/m2
- Purpose: floor heating
- Country of origin: South Korea
- Heating type: basic / comfortable
- Max. temperature (operating): 45 °C
- Cutting pitch: 25 cm
285 rub. / m
Heating mat Gulfstream MGS2 (0.5 m²)
- Total system power: 75 W
- Linear power: 14 W/m.p.
- Purpose: floor heating
- Country of origin: South Korea
- Heating type: comfortable
- Screen: aluminum foil
RUB 15,500 / PC
Warm floor Oasis (0.5 m²-0.9 m², 100 W)
- Total system power: 100 W
- Linear power: 14 W/m.p.
- Purpose: greenhouse heating / floor heating
- Country of origin: South Korea
- Heating type: comfortable / basic
- Screen: aluminum foil + copper wire drain core
1,700 rub. / PC
Advantages of electric heated floors
- Low cost and ease of installation compared to installing water heated floors or a water heating system. The cost of convectors (especially energy-saving ones) is quite high, but if you evaluate the payback period of such a system, the benefits are relative.
- Efficient use of thermal energy, as a warm floor warms the room from bottom to top. This is especially important for large areas, since convectors distribute heat unevenly.
- Located under the floor, it does not take up space (which is important in small rooms) and does not spoil the interior of the room.
- The system is easy to repair or change, since the installation of an electric heated floor does not imply changes to the design of the wooden base.
- Doesn't burn oxygen.
Preparing a wooden base
Builders claim that a warm water floor can also be laid on an old structure. However, this will require careful preliminary surface preparation. First of all, it is necessary to eliminate cracks and gaps of different sizes. Otherwise, the system will not provide the expected operational efficiency.
Brief instructions:
- We sand the old coating.
- We mask cracks and gaps.
- We lay sheets of plywood.
- Having adjusted the fragments, we fix them with self-tapping screws.
The newly formed base must be treated with an antiseptic solution and allowed to dry.
The presence of water floor systems implies the existence of minor differences in height, and for film and rod analogues the base must be level
Experienced craftsmen use functional scraping or a flat covering (plywood, chipboard sheet, etc.) to create a thin but durable base. With the second option, you should carefully ensure that the edges of the canvas fit tightly together.
Infrared film heated floor on a wooden base
In wooden houses, linoleum or laminate is most often used as flooring - the best option in this case would be infrared film heated flooring.
Characteristics of heating film:
| Laying | Under linoleum, laminate, parquet |
| Heating type | Basic, comfortable |
| Power density | 220 W/m |
| Voltage | 220 volt |
| Max. working t | 45°C |
| Max. t exposure | 60°C |
| Cutting step | 25 cm |
| Thickness | 0.34 mm |
| Width | 0.5/0.8/1.0 m |
The properties of the heating film allow you to organize safe, economical heating of a wooden floor. When installing infrared film, a “dry” installation method is used, which fits perfectly with a wooden floor, because on a wooden base, it is impractical to perform work on pouring a screed or a layer of tile adhesive.
Installation time varies depending on the complexity of the object and the professionalism of the installation team from 2 hours to 1 day.
Classification of linoleum
The main task of the floor is to preserve the functional purpose of the room
First of all, let's pay attention to the classification of linoleum according to the tasks it is designed to perform
There are three groups of flooring:
- household - for the operation of residential premises, with a relatively small flow of people and insignificant load;
- semi-commercial - intended for use in commercial premises, where the load level is defined as “medium”;
- commercial - meets the needs of public buildings and has significant thickness and strength.
There are three types of linoleum, and for residential premises, as a rule, household linoleum is used
An important characteristic is the chemical composition and structure of linoleum.
Based on their components, there are five types of linoleum.
| View | Description |
| Natural linoleum | The natural material is made from wood flour, limestone, and cork tree bark. The composition is held together by linseed oil and pine resin. Dyes of natural origin are used in the production of linoleum. Organic components ensure the environmental friendliness of the material and the absence of toxic effects on the human body and pets during operation. Manufacturers note the antibacterial properties of the coating due to the linseed oil included in the composition. Consumers are also attracted by the safety of using a natural product - antistatic properties and high fire resistance. Wear resistance and indifference to chemicals ensure long service life. Disadvantages include fragility during transportation, the requirement for a flat subfloor, relatively low resistance to high humidity, and high cost. Natural material is painted in solid colors. |
| PVC linoleum | PVC linoleum can have a different base structure: fabric, foam, non-woven. Such linoleum can be made without a base. Manufacturers offer materials consisting of 1-5 layers. Disadvantages of the product: it deforms due to temperature changes, emits a strong unpleasant odor, and is not resistant to chemicals. PVC linoleum is not safe from the point of view of fire requirements. When ignited, the material ignites easily and actively supports combustion. Experts do not recommend using such material for installing “warm floors”. At high temperatures it can release toxic substances. |
| Glypthal (alkyd) linoleum | Made from alkyd resins, pigments and fillers. The production process includes the use of natural oils (linseed, cottonseed, sunflower and others). This increases the final cost of products and limits supply on the construction goods market. The product refers to coverings with a fabric base. It has good thermal insulation and creates acoustic comfort. The manufacturing technology of alkyd linoleum makes it possible to obtain materials of different colors and patterns. During operation, it can deform in length and width, develop cracks and breaks. It reacts poorly to temperature changes, which explains its increased fragility during transportation in the cold season. |
| Rubber linoleum | Rubber linoleum is based on rubber. Products are made from recycled materials. The coating consists of two layers and is characterized by plasticity and water resistance. The advantage over other types of linoleum is its anti-slip effect. The properties of the material are used in the decoration of public spaces, sports and even medical buildings. Wide application is possible due to antistatic properties, resistance to low temperatures, and minimal slip. |
| Colloxylin linoleum (nitrolinoleum) | Colloxylin linoleum is single-layer. It is made on the basis of technical nitrocellulose. The small thickness of the material explains the pros and cons of its operation. The thinness of linoleum ensures its plasticity, flexibility, and low weight. However, this also leads to low heat and sound insulation. Installation of such linoleum is possible only on an ideal subfloor and includes the stage of gluing the material to the base. The coating is characterized by increased flammability and sensitivity to acidic environments. |
Consumers note the material’s resistance to sunlight and pleasant shine.
As you can see, each product has a number of important characteristics. The choice must be made after carefully studying the proposals of the construction market.
Features of installing film heated floors on a wooden base
The basic rules for laying a heated film floor are given in its installation instructions (layout, materials, connections, components). This article lists the features of installing infrared film on a wooden base.
Film heated floors are laid on a wooden floor in two ways:
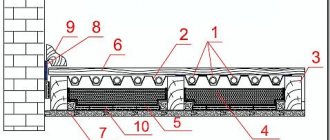
Laying film flooring between joists
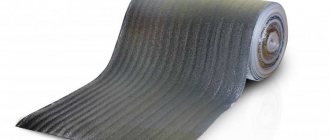
In this case, the film floor is laid on foil thermal insulation placed on the insulating material. In some cases, the film floor is laid directly on the insulation without using a foil backing.
To ensure free passage of air and eliminate mechanical load on the film, the distance between the thermal film and the subfloor must be at least 30mm. All connections are made in compliance with electrical safety standards and regulations.
This installation method increases the electrical and fire safety of the heating system, since the heating element does not come into contact with the upper layers of the floor covering “pie”.
Laying film flooring on a flat base
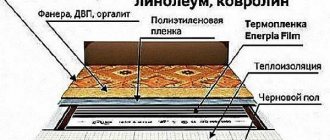
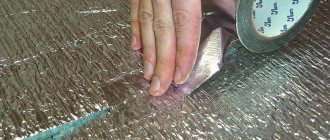
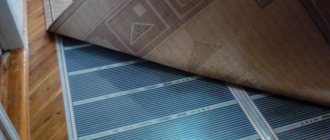
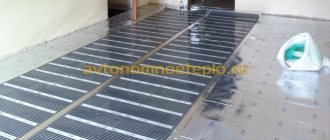
The installation rules coincide with the general requirements for laying infrared film. Foil thermal insulation is laid on the base of the floor (plywood, OSB, GVL), then thermal film is laid and covered with polyethylene. Finally, a decorative floor covering (laminate or parquet board) is installed.
Important! When laying a film heated floor on a wooden surface, it is necessary to exclude any differences in height, that is, the surface must be smooth and clean (without construction debris) both above and below the TP.
Attention! To lay a film floor under linoleum, a sheet of plywood 2-3mm thick is laid between it and the polyethylene film to protect the thermal film from mechanical damage.
pros
It must be taken into account that this method of installation (directly on a flat base of the floor) makes the system more efficient in terms of heat transfer, since in this case the film floor is in direct contact with the surface of the floor covering and there is no need to heat the air gap between the film and the subfloor as in the first installation method. In addition, during repairs and dismantling you will not have to open the base of the floor.
Minuses
Among the disadvantages of this installation method, it should be noted that it is necessary to make recesses in the layer of foil thermal insulation (and in some cases in the rough field) for the terminal connections of the supply wire with thermal film.
To ensure electrical safety of the heating system, it is necessary to strictly follow the installation and operating instructions for film heated floors.
Film heated floor Teplotex-0.5
- Specific power: 220 W/m2
- Purpose: floor heating
- Country of origin: South Korea
- Heating type: basic / comfortable
- Max. temperature (operating): 45 °C
- Cutting pitch: 25 cm
285 rub. / m
Film heated floor Teplotex-0.8
- Specific power: 220 W/m2
- Purpose: floor heating
- Country of origin: South Korea
- Heating type: basic / comfortable
- Max. temperature (operating): 45 °C
- Cutting pitch: 25 cm
395 rub. / m
Film heated floor Teplotex-1.0
- Specific power: 220 W/m2
- Purpose: floor heating
- Country of origin: South Korea
- Heating type: basic / comfortable
- Max. temperature (operating): 45 °C
- Cutting pitch: 25 cm
455 rub. / m
Calculation of IR film and power
Kits of materials required for installing heated floors include all contacts, wires, insulating terminals, temperature sensors and thermostats necessary for installation. But, before you go to the store to buy infrared film, you will need to make simple calculations related to determining the amount of film needed to lay a heated floor, and calculate the power of the heating elements that will be used during operation.
The area of the film must be at least 70% of the area of the room. The irrational use of expensive material can be avoided by the fact that infrared film is available in three widths: 500, 800 and 1000 mm. It can be cut in length by linear meters along specially marked lines.
In addition to roll film, there is another type of IR film of the zebra system. This is also a polymer film 1 mm thick, but consisting of many panels independent of each other, measuring 500x600 mm. There are 50 such panels in one set, which allows you to install a heated floor on an area of 15 m2. The advantage of such a system is that if one heating element fails, the entire system continues to function properly. With a warranty period of 25 years, it is a very economical and reliable means of installing heated floors under laminate or linoleum.
After connecting all the heating elements and reliable sealing of the connecting terminals with bitumen insulators, a temperature sensor is installed, which must be placed in a plastic container, and a wall-mounted thermostat unit, with which you will regulate the heating of the floor.
It should be remembered that if the power of the film heater you installed exceeds 2.2 kW, and the current in the system is more than 10 A, then you cannot connect it directly to the apartment’s electrical network. In this case, a modular contactor is used. But you should not carry out the installation work yourself. It is better to contact a professional electrician.
Precautions when using heated floors in a wooden house
- High-quality electrical wiring
- Electric heated floors are sensitive to local overheating of the surface (locking effect). It is necessary to avoid leaving bulky items on the floor (for example, a mattress, a blanket, etc.), or large objects without legs (drawers, furniture, etc.). Thermoregulation in this area may be impaired and this area of the system may be damaged.
- In order to save energy, it is better to adjust the operating mode of the heated floor according to the time spent in the house. Programmable thermostats allow you to set the days of the week and time of day of operation of the electric heating system.
Checked by: Evgeniy Shchipunov
Chief Engineer of SKO Alfa Project LLC
Laying tiles on plywood. How to lay tiles on plywood
Preparing the base
The plywood needs to be sanded and cleaned. Any surface for tiles must be level. Two layers of primer are applied to a perfectly flat and smooth surface. After you apply a coat of primer, you should wait until it dries for five hours, then do the same for the second coat. If laying tiles is done in the bathroom, then before applying the primer, the plywood must be treated with a special solution for waterproofing.
You should choose an adhesive that is designed for problematic surfaces (plywood, drywall). Before purchasing it, read the instructions to make sure that this mixture is suitable for working with plywood surfaces and your type of tile. In addition to traditional tile adhesives, special two-component polyurethane adhesives can be used.
Laying tiles
Laying tiles should start from the second row, since the first row will be cut to the required size and it will be laid last. It is recommended to install the first tiles on the farthest wall of the room. The horizontality of the laid tiles must be constantly checked by a level.
For some time, until the glue has hardened, the tiles can be adjusted to achieve the desired result. To accurately align the seams, crosses are installed between the tiles. The size of the seams, as a rule, is 2-3 mm, but if the room has high humidity or constant temperature fluctuations, the seams can be increased to a size of 5 mm.
The adhesive mixture dries within 2-4 hours, so it is better to prepare small portions. To stir the glue, use a special mixer to achieve homogeneity of the glue mass. Laying tiles is also done on a small area at a time within 1 sq.m. The glue applied to the surface of plywood and tiles will begin to set within 20 minutes. Therefore, all manipulations for laying and adjusting the tiles must be done during this time.
The final stage is grouting, but in this case it is no different from the usual tile laying procedure.
Recommendations
In order not to make a mistake when buying with the quality of the material and to make a good installation of a concrete floor with linoleum, it is worth taking note of a few tips from experienced craftsmen.
When purchasing, it makes sense to do a small elasticity test: if, when you compress the substrate with your fingers, dents remain on the material, the raw material is not suitable for purchase; It is unacceptable to level concrete with gypsum-based mixtures: in damp rooms they peel off in layers, and this material is not designed for heavy weight loads; If the floor is cold and level, the underlay is necessary for thermal insulation; When preparing the screed method, it is important that it dries completely (on average 28 days); You cannot lay fiberglass in rooms with high traffic; Before laying, the presence of detergent residues, oil stains and dirt on the concrete surface is unacceptable. We recommend watching the following video for tips on choosing a substrate.
We recommend watching the following video for tips on choosing a substrate.
Which glue to buy
How to glue tiles to plywood? This issue deserves detailed consideration, because you will have to glue the tiles to a base made of wood material, which is characterized by its instability.
Therefore, when choosing an adhesive composition, it is necessary to take into account some nuances:
- A sheet of plywood is made up of thin layers of brittle veneer, and if the bond is broken, the plywood will delaminate and will no longer be strong. This feature of the material is a good reason to choose an adhesive that does not penetrate deeply into the structure of the material.
- No matter how strong the base is, it can still bend slightly under load. In this case, the cement-based adhesive will not hold the tile, and it will easily come away from the plywood. Therefore, only elastic adhesive mixtures should be used.
The composition of such mixtures includes highly elastic components:
- microfiber;
- fiberglass;
- silicone;
- silane and other modifying additives.
It is important! When purchasing glue, make sure that the list of listed materials for which it is intended to work includes plywood.
Temperature
It is important to understand that in any case, linoleum cannot be placed on overly powerful systems. Thus, the recommended floor power parameter should not exceed 150-180 W/m2. Only under such conditions will the heating temperature not exceed the permissible 27-28 degrees, which means that the linoleum will not deform and will not begin to release toxic substances into the air.
What kind of linoleum can be laid on an infrared film floor
If you neglect these parameters, there is a risk that:
- linoleum will change color;
- the material is deformed;
- phenol will be released into the air;
- delamination of the coating will occur.
Deformation of linoleum
It is important to understand that at temperatures of 27-28 degrees, floors may seem somewhat cool . But you can’t heat linoleum any higher. If the specified floor temperature does not suit the home owners, then they should abandon the idea of using linoleum as a finishing material and choose some other coating.
Connection
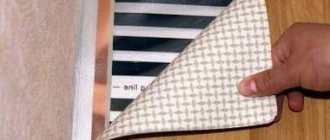
The film must be cut based on the size and configuration of the room. Heating systems are not installed under furniture. The film is supplied in rolls, the width of which is standard and is 50 cm. Manufacturers provide the ability to cut it in the right places to make pieces of the heating film of the required size. Some make a dotted line along which a cut can be made at a distance of 50 cm, others - 10 cm.
Having cut pieces of the appropriate length, you need to connect the power wires to them. There are contacts on both sides of the film. These are silver strips to which metal terminals are connected. The clamps must pierce the contacts to create a proper connection.
When the terminals are connected, a wire is connected to them. Usually all the necessary components are sold as a kit. Many manufacturers supply additional parts separately.

