Water heated floor is a modern heating system. The comfort in the apartment depends on the efficiency of its work.
Our article provides information about the installation of heated floors and existing temperature standards for residential premises. Also, you will learn the operating temperature of water underfloor heating, and how to adjust the temperature level of the coolant.
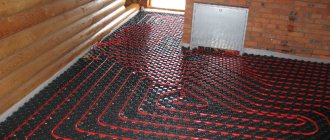
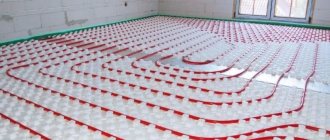
Warm floor in a frame house
Regulating room temperature
Individual temperature control allows you to determine what temperature the heated floor will be at one point or another in the room. For this we use:
- Room automation. In this case, it is mainly not the temperature of the heated floor that is regulated, but the air in the room.
- Zonal automatic systems with a sensor installed at a specific point of the heated floor. These systems make it possible to control the temperature of the floor, and the indicators in the air are regulated depending on it.
Heated floor thermostat connection diagram
Naturally, the owners of residential premises are more interested in the question of what temperature to set on the heated floor than in the general issues of regulating the temperature in the room. There are some nuances here. For example, some homeowners, in order to quickly heat the floor in a particular room, try to bypass the automation and begin to manually adjust the system by opening and closing valves; as a result, the circuits of this heating system become unbalanced, which leads to its failure.
To prevent this from happening, you need to decide once what temperature of the warm water floor you require, and patiently wait for the automation to bring it to the specified level. At the same time, in no case should you upgrade it yourself, since the automation of one manufacturer is not compatible with instruments and devices from another manufacturer. In any case, even if you have “group” climate control in the room, you will have to install thermostats for room-by-room temperature control, since only they are able to maintain it in optimal condition.
The main connection in home floor heating systems is a thermostat and a servomotor. The thermostat controls compliance with optimal temperature values, and the servomotor regulates the flow of coolant into the system. Thermostats are usually mounted on the interior walls of rooms at a height of approximately 0.5 m from the floor. It is prohibited to install such sensors on external walls, behind furniture and curtains, or close to heating appliances.
Local temperature control in the loops is carried out using thermostats
In this case, only one servomotor will work together with such a valve. It is he who, at the command of the thermostat, will regulate the temperature readings in your room.
That’s all for now, read the continuation in the next updates of our online magazine “This is how they lay the floor.” Good luck with your renovation Ladies and Gentlemen!
Causes of malfunctions
When using a heated floor, problems may arise related to its operation. There are two types of malfunctions - complete loss of heating and the inability to control it. For some breakdowns, you will have to remove the finishing coating and dismantle the screed, and for others, you will have to repair the temperature controller.
The reason for the breakdown of the heated floor may be a malfunction of the thermostat or a cable break.
Before you undertake the repair of warm electric floors, you will need to determine the reason that led to the breakdown. For example, this could be construction work that caused a heating wire to be broken, or a flood that flooded the control unit.
If the heating has completely disappeared, then the presence of voltage is checked on the line supplying electricity to it. Sometimes a breakdown occurs due to a circuit breaker tripping or poor contact.
When the input voltage is present, but there is still no heating, you need to find the cause of the malfunction. It may be hidden in the heating wire or thermostat. To understand what caused the breakdown, you need to disconnect the underfloor heating contacts from the regulator and measure their resistance. For this you will need a multimeter. The resulting resistance value should not differ by more than 10% from that specified by the manufacturer.
A significant deviation from the norm indicates damage to the cable under the tie. It can be caused by an insulation breakdown (when the resistance value decreases) or a cable break (the multimeter will show infinity).
If everything is in order with the resistance and there is voltage at the input, then the breakdown is in the thermostat, which is easiest to check by replacing it. Malfunctions in it also lead to incorrect setting of the heating temperature, but in this case the culprit may also be a broken sensor.
Thermostat failure
A common failure in practice is insufficiently tight contact of the wires in the regulator terminal block. Before removing the thermostat, you should try to tighten these contact points.
Before disconnecting the thermostat, try tightening the contacts, this may be the reason
You can understand that it is the thermostat that is to blame by directly connecting the underfloor heating wires to a 220 volt network. If after this the floor becomes warm, the thermostat will have to be replaced. If you have the appropriate skills, you can try to repair it yourself.
The most common radioelements that fail are key transistors, voltage stabilizers, electrolytic capacitors and relays. Often a breakdown of the mains capacitor also occurs.
Cable damage
Repairing the wire under the screed is a very serious task, since it will have to be dismantled. But in order not to tear off the entire coating, special devices are used to help narrow down the location of the breakdown.
Repairing a broken cable requires dismantling the tie
To repair a broken cable, you will need to prepare:
- thermal imager or hidden wiring detector;
- generator;
- connecting sleeve;
- heat shrink;
- press tongs.
Before determining the location of the damage, the wire laid in the floor is disconnected. High voltage is then applied to the cable through a generator or high-frequency transformer. Next, using a thermal imager, a point with a higher temperature is determined.
Once a place is found, the section of screed located above it is dismantled. The ends of the damaged cable are stripped and connected to each other through a copper sleeve, followed by crimping. After this, the cable connection is protected with electrical tape or heat shrink tubing. Before restoring the screed, the system is turned on and checked for functionality.
Sensor repair
If the sensor malfunctions, you will not have to destroy the floor to replace it, since it is installed in a special protective tube.
The sensor cannot be repaired; it must be replaced with a new one.
To dismantle it, you only need to find the exit of this tube and pull it out by the ends of the wires. But in rare cases, the tube may be embedded in the wall.
The sensor itself cannot be repaired; a new one is purchased instead. If necessary, a wire of the required length is soldered to it, which is installed in place of the old one.
Film image floors
They have different heating parameters. The canvases have different sizes. If it is necessary to insulate large rooms, it is recommended to use fabrics with a large width (from about 1 meter).
A device for regulating the heating temperature will have to be purchased separately. Its power should be calculated. Energy consumption for 1 square meter of film is approximately 150 watts. Next, take the area of the floor covering and multiply by 150.
It is required to install an infrared type film by cutting off the edges of the material. They need to be isolated. It is necessary to install a sensor that controls heating. It is placed in a recess located under the film itself.
It is important to record it. We place the electrical cable under the tile
To prevent the coating of the film image from shifting, it must be secured with tape (to the base).
The next step is to install the temperature controller. It should be installed close to electrical wiring. It is installed in a permanent place. It is necessary to lay electrical wires; we connect them in parallel. The wires can be hidden under the baseboards or a plastic decorative cover can be installed.
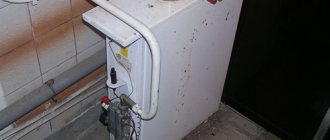
Heating without batteries. 06/28/2015 1500
Water heated floor temperature.
The surface temperature of the heated floor ranges from 25 to 30 degrees. And the human body temperature is 36.6 degrees. That is, a person either does not feel heat at all, or feels it a little, again within the limits of comfort. When you take off your shoes and stand with your feet on the heated floor, it is really warm, but after 15 minutes you get used to it and don’t feel it at all.
According to Russian building codes, the temperature of the floor surface in places where people are constantly occupied should not exceed 26 degrees, and in places where people are not often present (distance near walls, corridors, utility rooms, etc.) - 29 degrees. But the European norm for the same parameters is 29 and 33 degrees. Since the edition of SNiP according to these data has not changed since Soviet times, most developers and owners prefer to focus on European standards.
How does underfloor heating work?
Let's start with heating and supplying water (you can also fill in “anti-freeze” - pipes, fittings and other fittings are designed for this, but you need to check whether the boiler manufacturer allows the use of antifreeze). Water heated by the boiler to 30-40 degrees is supplied to the heating system. A water heated floor is a low-temperature heating system. But you need to take into account that not all boilers can immediately prepare a low temperature coolant, for example, solid fuel or gas (except for condensing boilers), so the temperature will need to be lowered using a pump-mixing unit (autonomous circulation group) mixed with the cold liquid returning from the system.
The heated water then circulates through the pipes laid in the screed. First of all, everything that surrounds us in the room warms up evenly, then the main part of the air warms up. The advantage here is that we feel the heat evenly from all sides, although all objects and walls seem cool to the touch.
Warm floor covering.
The most ideal covering for heated floors is ceramic tiles. It conducts heat well. Other coatings are also used, such as laminate or engineered wood (the same parquet, but it won’t dry out). Cork has low thermal conductivity, just like carpet. You can use them!
Be sure to pay attention to the product labeling; usually manufacturers put a “warm floor” icon on the packaging. These coatings contain the necessary humidity so that the material does not dry out, as well as the absence of harmful fumes when heated
Is water underfloor heating sufficient for a comfortable room temperature? How to understand?
Let's turn a little to physics. One square meter of heated floor heating gives the room 11 watts of energy for every degree of difference in temperature between the floor and the air. If the floor temperature is 28 and the air temperature is 20 degrees, then: (28-20)*11 = 88 W/m2 per hour.
What should we do with these numbers now? This value must correspond to the heat loss of the room, otherwise the floor temperature must be reduced or increased.
The heat loss of a room is calculated depending on the thickness of the walls, their composition, the area and thickness of the windows, as well as the roof and other structures. If you have a very cold house, heating it will be very expensive with any option. But for well-insulated and moderately insulated people, a water heated floor for heating without radiators even in the coldest weather is more than enough. This is evidenced by the large number of finished houses/warehouses/car showrooms/warehouses/shopping centers/swimming pools with the “Water Heated Floor” heating system.
Advantages of underfloor heating.
- Minimal convection. There is no circulation of dust and other substances, as with radiator heating. The best option if there are allergy sufferers in the house.
- Uniform heat. There is no cold or warm place in the room, the entire room is heated evenly.
- Pleasantly warm. Comfortable sensations associated with the direct warm flow affecting a person.
- Warm air does not accumulate near the ceiling. The distribution of heat for human health is the most correct, as they say, “keep your feet warm and your head cold.”
- Designer's space. All heating is hidden, no protruding pipes or heating devices.
Among the shortcomings, one can note only great inertia, i.e. The screed takes a long time to heat up and takes a long time to cool down; it will not be possible to turn off the heating completely for half an hour or an hour. But this also has its advantage. If gas or electricity is turned off during the heating season, the room will not cool down quickly, and in well-insulated houses the temperature will drop by only 1-2 degrees in 10 hours at a temperature of -20 outside (tested on myself), which makes it possible not to install a backup system.
Tips for installing and operating an electric heating system
When installing a heating cable, we focus only on the area that is not occupied by furniture (such a heating system can damage a refrigerator, dishwasher, or washing machine); It is important to calculate the length of the electrical cable very accurately (it cannot be reduced). Therefore, it is better to reduce the figure obtained from the calculations in advance; To check the cable operation it is better to use a resistance
It cannot be turned on until it is laid down. The cement and glue solution must dry; The surface for laying the cable must be cleaned of dust (an industrial vacuum cleaner gives a good result); Do not walk on the heating cable in hard shoes. This can damage it; When placing the temperature indicator (sensor), please note that it must be placed in a corrugated tube (so that the solution does not get on it). Provide for the possibility of replacing it (if it fails); Be sure to measure the resistance before installing the floor. Also take measurements after finishing work. Check the compliance of the received data with the manufacturer; Draw a diagram according to which the flooring operation took place (indicate the exact distances to the wall, window, door). This will be useful when carrying out further repair work; Do not leave pockets of air around the heating cable. You cannot save the solution, because this can lead to overheating. The cable will fail before work begins; You cannot turn on the system immediately after completing installation work. You should wait 2 or 3 weeks for the cement to harden well.
To increase the service life of such a system, you must strictly comply with the requirements for installation and maintenance of “warm floor” elements. Accurate measurements of the required equipment are needed. It is recommended to purchase only high quality materials.
You can install insulated electric floors yourself, but it is better to entrust such work to a competent specialist. Taking into account his experience, he will take measurements with maximum accuracy, which will allow you to purchase materials in the required quantity. Correct and competent installation guarantees a long service life of the entire system.
Installation. Cable laying order
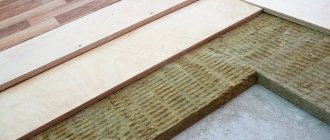
- Concrete base. Thermal insulation is laid on the prepared base.
- Thermal insulation. Thermal insulation is a technical pressed cork 2 mm thick and reflective foil 100 microns thick. In the absence of thermal insulation, the radiated heat from the heating cable will “go” down, which will lead to heat loss and a decrease in the efficiency of the system. Laying order: cork (measured in sq.m.) on top - reflective foil (measured in linear meters, width 1 linear meter - 0.5 m)
- The bottom concrete screed (1-2 cm) is placed on top of the thermal insulation (not required, but recommended)
- The top concrete screed (3-5 cm) is the most important “layer” of the system, because the heating cable is directly immersed into it, must be homogeneous and completely cover the cable and the connecting and end couplings. If conditions do not allow making a screed 3–5 cm high, a groove (recess) is made in the place where the coupling will lie, which allows you to reduce the thickness of the screed.
- Heating cable. It is laid in the form of a sinusoid, taking into account the area and pitch of installation using the “tongues” of the mounting tape. The surface on which the cable is laid should not contain any sharp protrusions that could damage the cable insulation. Attach the mounting tape to raw concrete or reinforcement using nails or screws. The heating cable is laid on a fixed mounting tape in even turns over the surface of the entire floor, bypassing areas intended for placing furniture, bathrooms, washing machines, water pipes, etc. The cable tension during installation should not exceed 5 kg. The heating cable and couplings must be filled with concrete. When the heating cable is pressed into the thermal insulation or air pockets are formed around the cable, the temperature on the surface of the cable may rise above the permissible temperature, which in worst cases can damage the cable. The connection of electrical wires is made in separate junction boxes or a thermostat.
When pouring concrete, you need to be extremely careful not to damage the cable.
Before and after pouring concrete, it is recommended to measure the resistance in the cable and the insulation resistance.
Criteria for choosing a heating system for underfloor heating
- Temperature. Floors using tiles can heat up to 30 degrees. This factor depends on the heat loss of the room;
- Type of room. They are most widely used for installation in rooms with high humidity (kitchen, bathroom, toilet, hallway, corridor). They dry water very well;
- Rooms. Such floors can be used because there is a wide range of colors for tile floors (can be matched to the color of the interior);
- Power. For dry rooms, a power of up to about 130 watts per square meter is sufficient, and for rooms with high humidity up to 180. This difference is due to the fact that with high humidity the floor is always colder. Therefore, more power is needed to maintain the set temperature;
- Material. Floor coverings that use heating elements located under tiles retain heat excellently.
Is there a temperature standard or not?
Regulatory documents have been developed, according to which standard temperature values are established for various rooms.
| Living rooms | 20° — 22 ° | 18° — 24 ° |
| Kitchen, bathroom | 19 ° — 21 ° | 18° — 26 ° |
| Bath | 24 ° — 26 ° | 18° — 26 ° |
| Corridor | 18 ° — 20 ° | 16° — 22 ° |
According to SNIP, the maximum and minimum heating degrees are in the range +26 - 36 °C. The temperature level must be determined based on the type of room.
Best answers
Andrey Fedorov:
As a specialist in the field of electric “Warm Floors,” I can say that systems based on mats (termomat), installed directly into the adhesive layer under the tiles, warm up faster than those installed in the screed, in about 4-8 hours. But the point is different. Warm floors with a thermostat are installed for permanent use in a residential area, i.e., after connecting the thermostat, the temperature required to maintain it is set on the thermostat, according to technical specifications. conditions, the “new floor” must reach the “operating” operating mode within 24 hours and subsequently be constantly turned on in order to maintain the floor temperature you set. The thermostat turns off only with the onset of the warm season or when there are no residents in the house for a long time (like a regular electrical appliance). And the temperature of the floor can only be felt by hand in comparison with the “cold” one, because the temperature of the person. body - 36.6 degrees. , and the floor is heated on the surface, usually up to 24-28 degrees (comfortable heating).
MikLaren:
First switching on: from 6 hours to a couple of days. I forgot to add: heating time also depends on the voltage level in the network.
Valery:
If the floor is turned on for the first time, then it will take 4-6 hours, provided that the work on connecting the thermostat and installing the heated floor sandwich is done correctly, i.e. there is a heat shield, a heat insulator and the thickness of the mortar with tiles does not exceed the calculated values
It is also important to place the temperature sensor in the floor at the required distance from the heating elements. By the way, is the heating indicator on? That is, are the floors definitely included? If you have any questions, write
Unknown:
Tell everyone, tell me I bought a ten 16 valve but the engine takes a long time to warm up, the reason is the thermostat is new
Zhenya Eremenko:
A good article about heated floors -
Elena and Alexey:
Hello everyone, I laid the floor with an electric cable in the screed, connected the thermostat at night, the floor was heated, the cold indicator is on red! Tell me what could this be!?
Optimal temperature values
In principle, the question of what temperature a heated floor should be is regulated by SNiPs. Such regulation is due to the fact that too warm floors can lead to fatigue and overheating of the body. The purpose of this heating system is to increase the level of comfort near the floor, making the indoor microclimate optimal for the human body.
Heated floor temperature sensor
Even if the system installed in your home is capable of heating up above these values, you should not exceed them, since they are specified in the sanitary and hygienic rules.
It is worth focusing on the above indicators when deciding what the maximum temperature of a heated floor is. The physiological characteristics of the human body are such that temperatures above +31°C are no longer perceived by humans as acceptable. In addition, SNiP 41-01-2003, clause 6.5.12 establishes average temperature requirements for various categories of citizens.
Minimum and maximum temperature of underfloor heating
For example, the following information will help you understand what temperature underfloor heating should be in residential and non-residential buildings:
- for rooms with constant occupancy - 26°C;
- for those rooms in which people should not be constantly - 31°C.
In addition, when deciding what temperature to set on a heated floor, it is worth remembering the technical requirements put forward by floor covering manufacturers. For example, at a temperature of +30°C, the varnish coating of a classic parquet may collapse. It may even become deformed due to heat.
Temperatures above +31°C are no longer perceived as acceptable by humans
If we take laminate, then its maximum temperature is +27 – 29°C. In any case, when purchasing parquet boards and laminates for installation on top of a heated floor, you need to check with the sellers about the temperature limit set for this product, as well as the ability to work together with a heated water floor. As for tiles, due to their technical characteristics, they can work at almost any temperature “produced” by a standard heating system, and here the question will be raised about the comfort of a person being on such a hot floor.
Types of heated floors
Today, the three most well-known types of heated floors are:
- warm water floors;
- cable floor heating;
- film infrared heating.
Warm water floors
Water floors are a pipeline system connected to a gas boiler through a manifold block. By supplying hot water, the boiler “forces” the floor coverings to heat up.
Pipes for the water system are used from cross-linked polyethylene, polyurethane, metal-plastic and copper. The most popular pipes are made of cross-linked polyethylene. Polyurethane products require special welding equipment for installation.
Warm water floors are hidden with a cement screed. How long the floor coverings will take to warm up largely depends on the thickness of the cement screed. Pipes for underfloor heating are usually used with a diameter of 16 mm. This size, confirmed by accumulated operating experience, was determined on the basis of thermal engineering calculations.
Through the collector unit, a certain number of heating circuits located in several rooms are heated with hot water.
Heating engineers recommend making the length of the 1st circuit about 70 m with a pipe diameter of 16 mm. The height of the screed is recommended to be no more than 50 mm. In this case, the thickness of the screed over the laid pipes will be about 30 mm.
How long does the heated floor warm up when first turned on under such conditions?
Practice shows that the heating time of a heated floor when first turned on can last from 12 hours to a day and a half.
To do this, the water leaving the boiler is brought to a temperature of 90°C.
After the floor has warmed up, the initial temperature of the coolant is reduced to 70°C.
Cable floor heating
The cable is laid in the form of a spiral and a snake. The spiral shape is used in small areas (up to 20 m2). On larger bases the cable is secured in the shape of a snake.
The electric heating element will quickly heat up and begin to release heat into the body of the floor. A screed thickness of 70 mm or more will significantly increase the inertness of concrete. In this case, the longer it takes for the floor to heat up, the slower it will cool down. At the same time, energy consumption will increase significantly.
How much warm floors warm up when the cable is first turned on largely depends on the power of the wire.
With proper installation of electric heating and compliance with building codes when laying the screed, the time for the first heating of the base of the room can be from 6 to 8 hours.
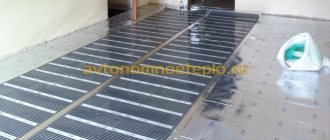
Film infrared heating
Film infrared heated floors are attracting increasing attention from consumers. An electrode grid is soldered into the polymer layer of the film, which, under the influence of electric current, emits heat rays in the infrared range.
Many people are interested in how quickly the floor covering heats up from IR film. This question cannot be answered unambiguously. It all depends on the coverage area, the technical parameters of the IR film, and the method of laying out the connection diagram to the electrical network. But one thing can be stated that where the floor was heated under the IR coating, the first heating time was 2 - 3 hours.
Due to their design features, IR coatings can be easily and quickly installed under any floor covering, except ceramic tiles. An exception is the IR heating device under the tile. For more information about connecting and heating the floor, watch this video:
Advantages of water heated floors
- The room is heated evenly;
- Can be used as part of a completely independent heating system;
- It is possible to connect to the heating plant;
- Mounted only once;
- No maintenance required;
- Economical.
But such a system is difficult to install. Additionally, you will need a water pump. If a breakdown occurs, a comprehensive repair of the entire system will be required. Pipes for such a floor are made of a material called “metal-plastic”, so they are not destroyed by corrosion. A special device inside the pipes prevents the deposition of accumulations, so the diameter of the pipes inside is maintained.
laying water heated floors
Installation of such a floor requires special skills, knowledge, experience and abilities. An expensive installation is cost-effective only for providing heating in large areas. The most successful solution would be to install an insulated electrical system. The most effective solution was to use a cable with two cores.
The floor is not warm enough. Coolant temperature is low
A typical and common problem that owners of city apartments and private houses are forced to face when complaining about the unsatisfactory performance of the heated floor is uneven heating. During normal operation, the water circuit must completely and evenly heat the concrete screed or floor covering, creating the necessary conditions for heating the home.
In this case, the problem is uneven coolant flow through the water circuit. Due to the fact that pipelines can have different lengths, due to the same intensity of coolant supply, the degree of heating of each pipe is different. Usually, before starting, the levels of electric drives are set in the collector cabinet to the required position.
Before starting the system, the optimal parameters calculated for each circuit are initially set. By measuring the temperature of the coolant in each water circuit, the electric drives are set to the appropriate position. Consequently, the heating temperature of the coolant in the system changes, and the degree of heating of the water circuit also changes.
The solution in this situation is as follows. We are looking for a water circuit in which the coolant does not heat the water floor in accordance with the set temperature, then we manually increase the flow of boiler water.
Sources
- https://GuruPola.ru/teplye-poly/skolko-progrevaetsya-pri-pervom-vklyuchenii.html
- https://eurosantehnik.ru/ne-rabotaet-ne-greet-vodyanoj-teplyj-pol.html
- https://stroim42.ru/2018/09/07/%D0%B2%D1%80%D0%B5%D0%BC%D1%8F-%D0%BD%D0%B0%D0%B3%D1% 80%D0%B5%D0%B2%D0%B0-%D1%82%D0%B5%D0%BF%D0%BB%D0%BE%D0%B3%D0%BE-%D0%BF%D0% BE%D0%BB%D0%B0-%D0%BF%D0%BE%D0%B4-%D0%BF%D0%BB%D0%B8%D1%82%D0%BA%D1%83/
- https://teplo-svetlo.ru/%D1%82%D0%B5%D0%BF%D0%BB%D1%8B%D0%B9-%D0%BF%D0%BE%D0%BB-%D0 %BF%D0%BB%D0%BE%D1%85%D0%BE-%D0%B3%D1%80%D0%B5%D0%B5%D1%82-%D0%BF%D1%80%D0 %B8%D1%87%D0%B8%D0%BD%D1%8B-%D0%B8-%D1%80%D0%B5%D1%88%D0%B5%D0%BD%D0%B8%D1 %8F
- https://netholodu.com/teplyj-pol/vodyanoj/neispravnosti.html
- https://ZnatokTepla.ru/teplyj-pol/pochemu-ne-greet-teplyj-pol.html
Average energy consumption
How much does a warm electric floor cost?
Below are the main parameters according to which energy consumption can be calculated:
- if the heating is basic, it will average 200 watts per square meter;
- and if heating is only auxiliary, then this figure will fluctuate between 100 and 160 watts per square meter.
According to studies conducted to determine the functionality of “warm floors,” these systems spend most of their energy exclusively at the initial stage of operation, that is, during preheating.
Note! Upon reaching the target set by the owner, the system’s energy consumption is reduced, and the parameters are subsequently maintained. For this reason, the floor periodically turns on/off
In fact, for every hour the floor works for about 15 minutes, therefore, for 24 hours of work this figure will be only 6 hours. Now - straight to the calculations!
Basics of microclimate regulation
After we have found out what temperature of the heated floor is considered optimal, it makes sense to understand the methods of regulating it. Currently, this process is usually carried out using automatic control systems. Such a system includes a complex of sensors and automatic valves controlled using a remote control.
A big advantage of using automation for heated floors is the fact that once you have set the microclimate values you need in your room, you can not return to them for several days, as they will be maintained automatically. The manual control method involves constant manual adjustment of all necessary parameters, which is inconvenient and time-consuming.
As for the classification of such automatic systems, depending on the location of their installation, the main tasks performed by them, as well as the method of direct control, automatic heating water floors are divided into:
- zonal or individual;
- group;
- complex.
Group control of floor heating indicators refers to the general control of room temperature indicators created by the heating system. Today, there are several ways to set the same temperature in several points of the room:
Thermostat for electric heated floors
- regulating it directly at the heat source using built-in control and monitoring elements;
- regulation at group-type mixing units;
- regulation at individual mixing units;
- application of the “constants” principle using a thermal head equipped with a thermal sensor, which is mounted on the mixer directional valve;
- the use of “climate control”, implemented using programmable heat supply controllers.
From a technical point of view, the temperature here is regulated by setting the desired value on the thermostat. Upon reaching it, the sensors transmit a signal to the control panel and valves with servo drives start or, conversely, remove the coolant from the system, thereby regulating its temperature.
Installing a temperature sensor for a heated floor
Diagnosis of electric floor faults
A malfunction of heated floors can lead to complete failure of the equipment or a decrease in the efficiency of its operation. In the first case, you can begin diagnostics immediately. In the second, you first need to objectively evaluate the operation of the system. The fact is that apartment owners often overestimate the ability of electric heated floors to heat the room . As a result, they feel that the system is not working efficiently enough.
If it doesn't heat at full strength
To objectively evaluate the performance of an electric floor, note the time it takes to heat up and compare it with standard values:
- The comfort of a film floor without a screed and an adhesive layer begins to be felt after 10 minutes of operation of the system;
- Matte floors in the adhesive layer are heated to the temperature set by the thermostat in 6-8 hours;
- Cable heated floors under a thick screed warm up for 24 hours.
If your floors fit within the specified standards, then there are no problems. It may seem that the surface is not warm enough due to the difference in body temperature (36.6 °C) and that set on the thermostat (20-30 °C). The task of the electrical system is to heat the floor and air to a temperature that is comfortable for humans, and its average value is only 21 °C.
If the electric floor takes too long to reach operating temperature or cannot reach it at all, then there is at least one of the reasons:
- The thermal sensor is installed too close to the heating element. When the set temperature is reached, it causes the thermostat to turn off. But since the heat has not yet reached the floor covering, it remains unheated;
- Sensor malfunction. Check the voltage at the heating element terminals and at the power supply without turning off the thermostat. The readings should be the same. Additionally, check the resistance of the sensor, which must match the value specified in the thermostat’s data sheet;
- Low voltage. You can check with a multimeter. The voltage is measured at the terminals marked L and N. Before measuring, you need to remove the thermostat from the socket. If the voltage is less than required. Then the problem has been found;
- Lack of thermal insulation layer. Heat loss can be so great that your floor will never be able to warm up. Remember, when installing the system you used heat-insulating reflective materials. Were the rules for their use followed? This is especially true for owners of apartments on the ground floor;
- Power calculated incorrectly. If the underfloor heating is calculated incorrectly, it will not heat well.
From the list of possible causes of poor floor heating, it is clear that most problems can be avoided at the stage of calculation and installation of the electrical system. Any errors noticed during installation can be more easily corrected before finishing with the finishing coat. And if the screed has already been installed and the tiles have been laid, then repairing the electric heated floor promises to be long and expensive.
If it doesn't heat up at all
If the electric underfloor heating does not heat at all, then you need to carry out diagnostics in the following order:
- Check for voltage. The floor stops heating completely only when it is completely absent. If there is power, then proceed to step 2;
- Check the sensor by measuring its resistance. If it is faulty, it will have to be replaced. Otherwise, go to step 3;
- Check the operation of the temperature controller. Replacing it is the easiest and cheapest way to repair floors. If it is OK, go to step 4
- Check the resistance in the circuits using the same multimeter. If it does not correspond to the values indicated in the passport, then you will have to look for short circuits or cable breaks.
If the sensor and temperature controller are working properly, and there is voltage, but the floor still does not heat, then it will need to be repaired. In order not to dismantle the entire coating, you need a special tool for troubleshooting. This is especially true if the mat or cable is mounted in a screed, the installation of which is a labor-intensive and expensive task.
Lack of power
Heating elements are connected to the thermostat, so this device should display icons so that you can find out the set system parameters. If the indicator does not work, then you need to look for a breakdown with a multimeter, with which you can determine the voltage. If it is detected, you should check whether it reaches the heating cable or film. In addition, low heating is possible when the wires are poorly connected to the terminals.
If, after successfully checking the input voltage, the heated floor does not heat, the cause of the breakdown must be looked for in the area where the system is connected to the regulator. In addition, the functionality of the thermostat can be checked in a simple way: connect the system directly to the power supply. If with this connection method the heated floor operates at full capacity, then it is necessary to replace the mentioned element.
Features of floor heating when first turned on
When the required temperature is reached, heated floors maintain the required minimum heating to maintain it
Why is the emphasis placed on the expression “first turn on”? The answer to this question is simple. When the underfloor heating system has heated up to the required temperature level, the heating of the base of the room is not turned off completely as needed, but is maintained at a minimum heating level.
This is done in order to achieve the maximum level of floor heating at any time in a short period of time.
Turning on the heated floor for the first time requires significantly more energy than during operation. Therefore, this will take a lot of time. Additional energy and time are needed to overcome the inertia of the screed.
It should be noted that for infrared heating there are no problems with overcoming the inertia of the floor structure.
Knowing what temperature of a heated floor is considered optimal is the direct responsibility of the homeowner in whose house such a heating system is installed.
The fact is that only the optimal setting of its automation will create a pleasant microclimate in the premises. In addition, building codes and regulations establish fairly stringent requirements for this indicator, which are not recommended to be violated.
When setting up thermostats directly, you must always take into account various circumstances. For example, when answering the question about what temperature of a warm floor under the tiles will be optimal, it is necessary to take into account the fact that the human foot feels ceramic tiles as a colder material than, for example, laminate. Therefore, when setting temperature readings for a room with such a floor, they need to be slightly overestimated.
Warm floors are the most convenient type of heating, which provides uniform heating of the air.
Possible problems and their manifestations
A malfunction in the water heated floor system manifests itself in a sharp decrease in the level of comfort in the room.
It is felt physically:
- Most often there is no heating , the room becomes cold.
- Less often, users have to deal with excessive heating , when it becomes unbearably hot, and the heating time of a water heated floor is significantly reduced. If such a malfunction is not corrected in time, the floor covering, screed and the pipes themselves may deteriorate.
The question arises, why does a water heated floor heat poorly or is there no heating at all?
Often, such problems can arise immediately after installation of the system during the first start-up. That is why it is important to know the requirements for putting a heated water floor into operation, as well as to be able to correctly adjust the system.
In order not to worry, wondering how long it takes for a water heated floor to warm up, you should adhere to all the requirements of the installation technology when constructing a “warm pie”. One of the possible reasons for the low quality of heat transfer from the system is poor-quality thermal insulation.
Periodic recording of energy consumption and temperature can be invaluable in identifying the problem. By checking them, it is much easier to identify the malfunction in time.
How much does the heated floor heat up when first turned on?
We will not provide formulas for calculating the heating of electric floors below; you can see this in any textbook. The reason is that the calculation formula contains variables that are very difficult to calculate in everyday conditions. So, let's begin.
When turned on for the first time, the electric heated floor will warm up from 15 minutes to 12 hours.
What does this depend on?
- up to 15 minutes
- if you have an infrared heated floor (often called infrared film) and the installation was directly under the floor covering itself (under a carpet, rug or rug). You will immediately feel warm. Of the minuses: it heats up quickly and cools down quickly. - up to 30-60 minutes
- if the infrared electric floor was installed under linoleum or parquet. What is this connected with? The reason for prolonged heating will be the density of the material from which the floor covering is made. - from 60 minutes to 3 hours
- these indicators will be if you put a heated floor under the tiles (directly in the tile adhesive). This can be either a heating mat or a thin heating cable. Why? After the first switching on, the warm floor will first heat the tile adhesive, then the tiles, and only then warm up the air. This time is calculated provided that the cable has a power of at least 150W/m2 (there is a huge selection of manufacturers of these electric floors on the Ukrainian market). There are also high-power electric floors (more than 150W/m2). So how much does the heated floor under the tiles heat up when you first turn it on? Answer: from 1 to 3 hours. - from 3 hours to 12-15 hours
- such indicators are the norm for a cable tie. Why? According to the recommendations of the manufacturers of heated floors, the screed should be poured from 3 to 5 cm. To warm up concrete of this thickness when the heated floor is first turned on, in some cases it takes more than 15 hours. Of the minuses: it heats up slowly and cools down slowly.
Warm-up speed
To know exactly how quickly a warm electric floor heats up, you need to make calculations taking into account its design. For example, if the system was installed without thermal insulation, since there is a heated room under the floor, then its heat loss will be higher, which means it will take longer to heat up.
To assess the heating of such a structure, it is necessary to take into account two layers of screed - above the cable or mat and below it.
Time for 1m2 is calculated by the formula:
t heating = (C/P) • (t initial – t final), where:
- C is the heat capacity;
- P – power of the system itself in W/m2;
- t is the temperature at the beginning of heating, and what it should be.
To calculate the heat capacity of 1 m2 of floor, the formula is used:
- ρ is the density of the screed;
- c is the specific heat capacity of all materials in the system;
- V is the volume of the entire heating system.
For example, with indicators:
- design power is 135 W/m2;
- the thickness of the mortar layer above the cable is 15 mm, the glue is 5 mm and the floor covering is 10 mm, all together = 30 mm;
- initial t - +18, minimum for the system - +27 degrees;
- c (heat capacity of the screed) = 840 J/m2;
- ρ (specific density) = 1600 kg/m3.
Based on these parameters, it turns out that the heat capacity of 1 m2 of the system with the heated thickness of the lower and upper layers of the screed = 30+30 = 60 mm or 0.06 m.
Substituting the numbers into the formula:
- C = ρ x c x V, we get 1600 • 840 • 0.06 = 80,640 J/m2
The time for heating the system will be:
- t = (80640 / 135) • (27 – 18) = approximately 1.5 hours.
It turns out that an electric cable floor without insulation and with screeds above and below it will take about an hour and a half to warm up from +18 to +27 degrees.
If you use a heat insulator when installing a warm electric floor, even if there is a heated room underneath, then the heating rate will be halved.
If the heating time of an electric heated floor significantly exceeds the permissible standards, then the system is failing somewhere and the cause must be identified, otherwise high costs may be incurred in servicing it.