When choosing a heating system for a private home, preference should be given to inexpensive and practical varieties that are characterized by simple and easy maintenance, as well as long-lasting and efficient operation. Almost all of the above parameters correspond to a conventional gas oven. However, such a unit is not without certain disadvantages. There are several varieties of such heating devices. To choose the right model, you need to understand the features of each type.
Location of heating stoves
When installing stove heating yourself, it is necessary to provide the most optimal location for installing the heating unit.
If, for example, you place the structure in the middle of the room, then its heat transfer will be the highest possible, since it will heat the space from all sides, while evenly releasing heat to the air. In the case when the stove is placed near the wall, convection currents of cool air emanating from doors and windows will begin to actively move around the house. As a result, with this arrangement of the heating structure, residents will constantly feel the cold “stretching” up their legs. Before starting to lay the stove device, it is required, according to the installation rules, to provide for the location of the combustion chamber door (read: “Laying a stove with your own hands - how to fold the stove correctly”). This is necessary so that you don’t have to carry armfuls of firewood across the room, spreading dirt and soot. You can avoid such problems if you install the stove in the kitchen or in a space that is rarely visited.
What materials are used
As mentioned earlier, to make a stove for a gas bath with your own hands, it is recommended to use fireclay (fireproof) brick, metal or stone. Stone stoves take much longer to heat up (4-5 hours), but the temperature is maintained 3-4 hours longer than metal stoves. Brick ones are characterized by similar indicators. In turn, metal units heat up faster (rooms up to 50 sq.m. completely warm up in 2.5-3 hours), but also cool faster.
At the same time, metal stoves are lighter than their brick counterparts and are easier to manufacture, and if the outside is lined with fireclay bricks, then there will be no fundamental difference between the 2 units.
How to choose the right gas stove for your cottage
https://youtube.com/watch?v=4KcmGmlW7cw
Choosing a gas stove for a summer house is not an easy task. That is why you must approach it as responsibly as possible.
Performance calculations are carried out taking into account the characteristics of the building. Stoves for summer cottages with gas heating are calculated taking into account the fact that for every 10 m2 of heated area, there is 1 kW of infrared emitter power.
The efficiency of heating largely depends on the correctly placed stoves in the house. If you plan to simultaneously heat several rooms separated by partitions, install your own radiator in each room. In this case, it will not be possible to install one furnace of higher power.
The fact is that infrared heating devices heat not the air, but the surface of objects. Excess temperature is removed by air circulation.
Obstacles in the path of IR rays lead to an immediate decrease in heat transfer. Accordingly, the room where the stove is installed will be warm, and the next room will be cold.
Gas prices are getting higher every year. That is why boiler equipment must be highly efficient in generating heat, which is necessary to heat a country house.
That is why the heat exchanger installed in a gas boiler must have good thermal insulation.
It is thanks to this component of the boiler design that its efficiency increases.
A good gas stove for a summer house cannot be very cheap. Very often, domestic equipment is cheaper than foreign ones. This is due to the fact that domestic manufacturers of gas boilers independently reduce their cost due to the fact that they have worse thermal insulation characteristics.
Consequently, to heat your home using such a boiler you will need more time, and the costs will be significantly higher. That is why it is worth choosing a gas boiler from well-known manufacturers who have had a good reputation for a long time.
Also, if you decide to buy gas heaters for your dacha, reviews from other people will be very useful to you. If a particular model has a negative reputation (even if combined with a low price), then you should refuse to buy it. Otherwise, you may regret your choice in the future.
It is best that the model you choose has positive-neutral reviews that can tell you about the proper quality of the selected model of gas equipment.
It is worth purchasing such a gas stove, which is used both for a country house and for all buildings and areas that are adjacent. For example, you can create the most comfortable atmosphere on the veranda, in the parking area.
In such places, a high-quality modern gas heater can easily take care of the proper temperature level.
Its main advantage is the following - with the help of a gas boiler, the required optimal temperature can be effectively maintained in the room itself and in a fairly open area.
When choosing the heating equipment described, professionals advise paying attention to:
Packaging. It must be intact, without dents or holes
It is on the box that elements such as the logo of the manufacturing company and the name of a specific model should be present.
You need to pay attention to the presence of a receipt and a warranty card. In the latter, you should check the name of the purchased device model, as well as the time period for which the warranty is provided. It is recommended not to forget that purchasing a low-quality heater will lead to strong crackling noise during operation.
It is for this reason that before making such a responsible purchase, it is worth checking the equipment as thoroughly as possible.
Principle of operation
The walls of the fuel cell are heated by combustion of fuel. Air, to support the combustion process, is supplied through the ash pan.
At the top of the heating device there is a chimney (combustion products exit through it), it is connected to the firebox.
Water circuits are rarely connected to gas stoves. The room is heated directly by heated air from the stove. The only difference with a solid fuel stove is that natural gas is used, not wood.
There are options for gas stoves combined with a solid fuel unit or powered by electricity. There are universal burners that run on diesel fuel if the need arises.
Disadvantages of combined models
- Modern manufacturers produce only floor-mounted universal gas-wood boilers. They weigh quite a lot, so transporting and installing them yourself is quite difficult. Under them it is necessary to build a solid foundation, and this is an additional expense.
- For installation of combined installations, you will have to allocate a separate room. And this is not always possible in conditions of cramped, compact housing.
- The more powerful the hardware, the fewer functions it can provide. For example, a high-efficiency boiler does not have a frost protection system. A second circuit for supplying hot water is not installed everywhere.
- “Sophisticated” models are quite expensive. They are difficult not only to buy, but also to maintain later, using service advantages.
- You can obtain the required performance in one single case - by correctly calculating the power of the unit. Experts recommend using the following formula for this: 1 kW of power is spent on heating every 10 square meters. For double-circuit boilers this figure increases by 30%.
Tank location
There are several ways to place the tank in the bathhouse; the container can be:
- Removable;
- Built-in;
- Remote (i.e. placed in a separate room).
In a built-in tank, water heats up much faster, since the tank is installed directly on top of the stove or welded to the side. To install a remote tank, you will need to install a pipe system.
Conversion of the gas unit
You can make wood-burning boilers with your own hands not only from scratch. In the vast expanses of the Internet you can find not only diagrams of homemade boilers. If you still have an old gas boiler, you should not throw it away or recycle it.
To do this, the boiler must be disassembled and all elements that must be connected to the gas system removed from it. Next, it’s worth turning to the diagram of a homemade boiler. There is nothing complicated in such a scheme. The converted gas boiler system is similar to an antique steam locomotive.
This boiler consists of a metal barrel that is filled with water. Pipes are laid inside the barrel and brought out. Through these pipes, heated air enters the heating system. Air circulation is carried out in two ways: natural and forced. The use of forced air circulation in a garage heating system is irrelevant. Such heating schemes are suitable for two-story residential buildings. For a garage, it is quite enough to implement a simple heating system with natural circulation of coolant within the system.
The heating system itself and radiators are mounted to those pipes that extend from the water tank. To heat a regular-sized garage, it is enough to equip the heating system with just two radiators of 4 sections. Considering the fact that this room will be heated periodically, you should not use water as a coolant. The best option for such heating systems is air or antifreeze. Antifreeze is quite expensive, so it is better to opt for an air heating system.
Any solid fuel whose humidity does not exceed 20% can be used as fuel in such boilers. The most common and inexpensive fuel is wood. At enterprises that cut wood, you can purchase scraps of boards or formwork for a low price. Thus, an old gas boiler can be turned into a quite useful tool for heating a garage space.
Fire safety requirements
When installing any sauna stove, it is necessary to strictly comply with fire safety requirements, since the walls of the device heat up to fairly high temperatures during its operation. In order to ensure maximum safety and not have problems with regulatory organizations, it is recommended to install the stove in accordance with the provisions prescribed in SNiP 41-01-2003 (Chapter 6.6).
- The first thing that needs to be done is to equip a reliable foundation for the main structure of the stove, which will be adjacent to the wall dividing the room. The foundation should be covered with heat-resistant material and then with metal sheet. Asbestos sheets were previously used as heat-resistant insulation. Today on sale you can find panels of pressed mineral wool, which is less dangerous from an environmental point of view, sheets of foam glass or EZHKAKH (heat-resistant structural mica plastic).
- It is also necessary to provide a metal flooring in front of the combustion door, which will prevent the wooden floor from catching fire and simplify debris removal. The size of the pre-furnace sheet must be at least 400×800 mm.
- If the partition between the steam room and the dressing room is wooden, then the opening through which the fuel channel will pass must be separated from the wood by brick or stone masonry. The distance between the stove and wooden walls should be 400÷450 mm.
In the version shown, the owner chose to fill the opening with bricks
- Provided that an opening is installed along the end part of the wall through which the combustion channel will pass, a gasket made of heat-insulating material (mineral basalt wool or cement-fiber sheet) with a thickness of 40÷50 mm, the distance between the part of the wall built from combustible material and the outer wall oven can be reduced to 250 mm. If thicker thermal insulation material is installed, the safe distance can be 125 mm.
- The distance between the ceiling of the bathhouse and the surface of the stove should not be less than 1200 mm.
- The distance from the edge of the combustion door to the nearest door must be at least 1250 mm.
- If you purchased a non-factory-made stove, or the device is independently made from sheet metal, then it is best to cover it with brick. Thus, it is possible to protect the structure of the bathhouse from fire, and people taking water procedures from burns. Factory products, as a rule, are made with double walls, between which thermal insulation material is laid or convection channels pass through.
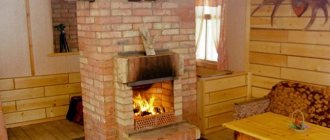
Water-heated stoves
Models that can be used to organize an autonomous heating system are more popular compared to convection analogues
These are the options you should focus on.
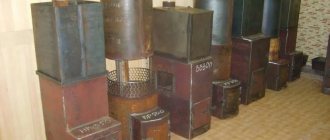
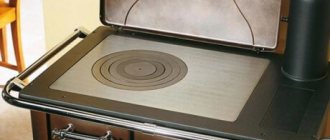
Cast iron stove
Heating stove with water circuit
Compared to other models, cast iron options have some advantages:
- Heat capacity. Although they take longer to heat up, they also retain heat for a longer time. Thanks to this, the temperature in the house remains unchanged even after the fire goes out. This is especially true for those who cannot control the operation of the installation. According to experts, a cast iron part comparable in weight to a metal one accumulates 8% more heat. And this despite the fact that it is significantly smaller in volume.
- Heat resistance. Cast iron walls withstand high temperatures very well. Even coal, which produces a lot of heat, is not capable of burning or deforming the thick partitions of the device.
- Complete with water jackets. They are made from stainless steel and coated with special paint. The models are supplied on adjustable legs, and they are not tied to a stationary heating circuit. Thanks to their mobility, they can be moved around individual rooms or buildings.
- Glass doors. They are made from heat-resistant glass. Transparent material allows you to admire living fire, which, as you know, can fascinate people. Models are often equipped with a pyrolysis chamber in which the emitted gas is burned. This significantly saves firewood and increases the efficiency of the device.
Important! The use of this category of stoves without water in the heating system is strictly prohibited. This may cause destruction of the heat exchanger and the walls of the fuel combustion chamber.
This novelty among systems with a heating circuit was of great interest to consumers. Essentially, these are wood-burning stoves for heating, not designed for any other type of energy source. The Canadian invention served woodcutters for decades before it received the status of a serial model. The workers found a solution so effective that it did not require any engineering improvements.
By design, this equipment option is pyrolysis. It consists of two chambers, one of which is designed to burn gas that is formed as a result of burning wood. The shape of the device is a cylinder with a partition inside. It divides the cavity into two parts. Firewood is placed in the lower one, and the upper one provides additional calories by burning gas.
If we take into account all the heat transfer factors, it is obvious that the Buleryan is the most productive and economical device of all heating equipment that runs on wood. High rates of convection and heat transfer are achieved due to the fact that the firewood in the lower part does not burn, but smolders. All the heat produced is transferred to the room. In addition, frequent downloads are not required. One stack of firewood is enough for 10-12 hours of continuous operation.
The simplicity of the design does not require significant investments in the production of devices, which determines their low cost. The lack of automation requires special attention when organizing smoke exhaust channels
Equally important is ensuring normal air circulation indoors. After all, Buleryan uses oxygen in the house
Models that can be connected to a centralized heating system cannot be called a technical innovation. However, it should be recognized that they appeared relatively recently. The name of such models is usually designated by the prefix “Aqua”. They are practically no different from convection analogues, but require cleaning of chimneys 2 times a year, which is associated with a high load on the devices.
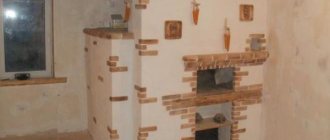
Brick oven
Brick stove heater
To organize a full-fledged water heating system in a house where there is a traditional stone stove, it is enough to install a heat exchanger inside the fuel combustion chamber. The heat supply and return lines are connected to it. Heat can be collected using an ordinary steel tank. The walls of the container are made of sheet metal 3-4 mm thick.
There are no standard sizes or special requirements for its implementation. The geometry is selected according to the shape of the cooking furnace. If possible, it is advisable to make it as large as possible. What is meant is not so much the volume as the heat exchange area. In this case, the greatest efficiency in using the generated thermal energy is ensured.
Gas-wood boiler
For those who cannot imagine visiting a steam room without the unique smell of burning wood and want to save on the operation of the bathhouse, a gas-wood stove may be the ideal solution.
Such a heating device is a modern universal design that allows the use of various types of fuel: natural and liquefied gas, coal and wood. This is possible due to the fact that such stoves have removable elements necessary for working on solid fuel and gas.
Devices designed for gas combustion consist of burners, filters and various valves. At the same time, to operate a solid fuel stove you need a fuel receiver. Such heating devices are not new on the modern market. They were used back in Soviet times. A striking example of this is the OGV (heating gas water heating) boiler.
The equipment necessary for gas combustion is installed in the ash pan of the furnace. If it is dismantled, the boiler will function properly using solid fuel.
Gas-wood stoves are very popular not only due to their versatility. Their cost is at an acceptable level, which is an important factor for bathhouse owners.
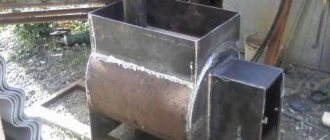
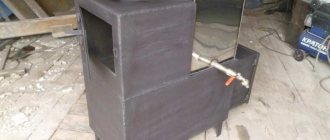
Homemade heater from a gas burner
Independent production of a gas stove from metal or other materials is carried out in accordance with pre-developed schemes. Let's consider one of the possible options for independent step-by-step assembly of a gas stove.
You can purchase the necessary tools and materials at almost any hardware store or construction market. You can simply borrow metal scissors from friends
For assembly you will need the following materials and tools:
- metal scissors and metalworking tools;
- sheet of metal with a thickness of 0.5 mm to 1 mm;
- chain-link mesh, which will be used as a lattice;
- a metal sieve of suitable sizes (can be used, but without significant damage);
- a gas burner with a safety valve, which should be purchased on the construction market;
- gas cylinder of suitable volume;
- fittings, approximately 10 mm thick, with which the structure will be connected to the cylinder.
After collecting all the necessary materials, they begin to directly begin manufacturing the structure.
First, you need to place the sieve on the prepared metal sheet and trace its circumference with a pencil. Then we mark the scan in the form of a rectangle. Its length should be enough to wrap around the sieve and the bottom of the metal stove. The development must be cut carefully and without irregularities.
Next, you need to mark the places where the gas burner is attached, drill holes and fix the burner on the back of the reamer. The parts are connected to each other using rivets and a small flange made in advance.
A drilled plate is attached to the top of the sieve using rivets. You need to attach a chain-link mesh to the plate with metal plates. Next, using a riveter, legs of a suitable length are installed.
It is highly recommended to use a quality gas supply hose. The best option would be to purchase a new hose from the store. Old rubberized hoses may have damage to their structure due to exposure to the sun.
The burner valve is equipped with a hose attached at the other end to the gas cylinder. After releasing the gas, it is necessary to check the tightness of all connections. This is easy to do with a soap solution.
Such an installation can also be connected to a gas pipe that removes combustion products from the apartment. However, in this case, permission and approval from the HOA, residential complex or housing cooperative will be officially required. It will also be necessary to install a ventilation system and install the stove on a separate foundation. You will also need to purchase a gas meter.
When installing a homemade stove, all required distances between various surfaces must be observed. The distance from the stove to the floor or walls made of combustible materials must be the values defined in the standards.
When using a large stove, the owner of the room will need to install an additional chimney. If a gas appliance needs to be installed on a wall, then the wall must be load-bearing. Installation of gas appliances on non-load-bearing walls is prohibited.
The diameter of the chimney must be sufficient for the complete and high-quality removal of combustion products from the heated room. Large homemade units are additionally equipped with a chimney pipe
Before directly starting up the equipment, you must make sure that the ventilation is working properly and that there is no gas in the air in the room. In addition, every time after turning off the equipment, you should close all taps and valves, both on the gas cylinder and on the gas stove.
The reducer installed on the cylinder will protect it from blowback and also makes it possible to regulate the pressure.
Gasification of the bathhouse
To ensure the full functioning of the constructed stove, it is necessary to take care of the gasification of the sauna. To do this, you should either purchase a cylinder unit or supply propane from a centralized system.
It is possible to provide a bathhouse with an uninterrupted supply of fuel for many years by cutting into the main network passing through the site. However, to carry out such a labor-intensive event, permission from the appropriate authority will initially be required. After this, you need to spend time and money on the following procedures:
- preparation of a number of necessary papers;
- acquisition of materials and equipment;
- inviting specialists to install the installation;
- preparation of test and technical documentation and delivery of work to the gas service at the location of the site;
- cutting into the citywide system;
- installation and registration of a gas meter;
- obtaining documents for payment for gas supply services.
Design Features
Such devices are practically no different in design from gas-fired boilers.
The main feature is the method of operation. The gas furnace is not connected to pipelines. This is a convenient heating system for a home or cottage, allowing you to quickly warm up the premises. The coolant liquid will not be able to freeze in it.
The devices operate on mains or bottled gas. The design of the stove has a body, a firebox, a burner, a heating panel, and automation (fuel supply shut-off system).
A device designed to operate with liquefied gas can be used to heat a small house (one- or two-story). Gas-fired stoves are not suitable for heating large areas (more than 60 m2).
Such heating structures can operate in continuous or temporary mode.
Gas-burner
This device is one of the most important elements of such a heating system. Burners used in gas furnaces have different fuel consumption. To heat a small house or cottage, you can use a device that consumes no more than 4 m3/h.
The burner is a replaceable element. It can be purchased and installed separately. A part of the required power is selected and installed in the existing furnace
In this case, you need to pay attention to ensure that the dimensions of the threaded connection of the burner and the fuel supply source to the heating device match. The dimensions of the mounting window for this element are 40-55 cm
Manufacturers
Russian-made gas stoves (Teplodar, Rus, Troika, Termofor) have good reviews. They are of high quality and are presented on the domestic market in a wide range. They have a nice design, a steel firebox, a door made of metal or heat-resistant glass. Such units are distinguished by high performance, simplicity and unpretentiousness in use. Some models are equipped with special valves that allow you to regulate the temperature.
A gas stove for heating a summer house or private home is a profitable and practical option. If you wish, you can assemble it yourself, but if you make a mistake, such a device can lead to a leak of fuel material and an explosion. Therefore, compliance with safety precautions is very important.
Main stages and important features of furnace laying
From the moment the foundation is poured to the start of construction, 3-4 weeks should pass. During this time, the base will gain the necessary strength and will be able to withstand the weight of the brick oven. The work in question requires maximum responsibility and concentration on the part of the performer. Any mistakes can lead to irreparable consequences, so get ready for the work in advance and allocate enough time to complete it.
DIY brick oven
The laying of the furnace is carried out in several stages.
First stage. Lay out the ash pan and the lower part of the first cap from brick. Carry out the laying using the previously discussed sand-clay mortar.
Second phase. Install the ash pan door into the masonry. Use galvanized wire to secure the door.
Install the ash pan door into the masonry
Third stage. Install a grate over the ash pan chamber.
Install a grate over the ash pan chamber
Fourth stage. Mount the firebox. Line the inside of this compartment with fire bricks. Place the bricks “on edge”. At this stage you need to use a special masonry mortar. It is prepared in the same way as the standard one, but instead of simple clay, refractory clay is used, i.e. fireclay. Secure the combustion chamber door using a steel plate and the wire you are already familiar with.
Fifth stage. Continue standard laying until you reach the 12th row. Having reached this row, close the combustion chamber and lay the tiles with burners evenly. This stove must be made of cast iron. Check the evenness of the installation using a building level.
Sixth stage. Lay out the first cap. It is erected at the left edge of the stove. At the same stage, a canal for the summer passage is being built.
Seventh stage. Install the stove and line the walls of the cooking compartment. Lay out the previously mentioned lower cap.
Eighth stage. Install the valve for the mentioned summer passage channel. This valve is located in the inner corner of the cooking compartment.
Ninth stage. Lay the masonry up to the 20th row. When you reach this row, close the brewing compartment and the first hood. Be sure to leave the required number of holes in the solid masonry for the summer passage and lifting channel, as well as the vent for the cooking compartment. Place the bricks on steel corners - this will ensure higher strength and reliability of the stove.
Tenth stage. Close the portal of the brewing compartment with hinged fireplace doors. It is better if the doors have heat-resistant glass inserts. This solution will allow you to monitor the fuel combustion process and admire the flame.
Eleventh stage. Install cleaning doors for easy soot removal. For installation, choose a location that is easiest for you to get to.
Twelfth stage. Lay out the walls of the hood almost to the top edge of the wall opening. Cover the top of the stove with a couple of rows of bricks. Fill the gap between the top of the stove and the jumper with mineral wool. Thanks to this, additional thermal insulation will be provided and heating efficiency will be slightly increased.
Thirteenth stage. Place a decorative band around the upper perimeter of the unit.
Fourteenth stage. Proceed with the installation of the chimney. It is better if the chimney is made of brick. This design will last much longer than the same metal or asbestos pipes.
Heating and cooking stove
Thus, although laying the stove is not a simple task, it can be done with your own hands. It is enough to simply understand the technology and follow the instructions in everything. Remember, the materials for work must be of the highest quality. And stove designs that have been tested over the years will allow you to independently build a unit that will efficiently heat your home for many years without any problems or complaints.
Good luck!
Preparation
When sketching drawings of a gas furnace, it is necessary to indicate the exact parameters of each element.
- At the installation site, prepare a level base and cover it with a fire-resistant layer.
- Lay fireclay bricks on top in two rows.
- Walls located less than one meter from the stove and the ceiling must be protected with non-combustible material.
- Most stoves heated by gas have almost the same design, so their assembly and installation is also identical.
It is not difficult to assemble it yourself; the main thing is to properly prepare the room before doing so, following the recommendations of specialists and observing safety rules.
Furniture items
A few examples of furnishing a kitchen combined with a living room:
- 1. Sofa. It becomes an object that zones space. The sofa is placed with its back facing the place where food is prepared. In small rooms (less than 20 sq m) a corner is placed, which is placed against a wall installed perpendicular or parallel to the kitchen.
- 2. Set. According to designers, minimalist models without elaborate details look modern. The service, vases or glasses are placed on an open shelf. You can buy a fashionable display case for them. Furniture is placed near the wall. If the space is large (20 sq. m, 25 sq. m or 30 sq. m), then in the central part you can install an island, which also has sections for kitchen appliances.
- 3. Furniture set. The style should be combined with the design of both rooms. In small rooms, a compact table and chairs made of transparent material or painted in light colors look good. You can add a table with a round top to your living room interior. In spacious rooms, the kit is installed near the wall or in the central part. An elongated rectangular dining table would look good here.
Gas heaters using natural gas for home
Summer cottage heaters powered by natural gas are equipped with a special nozzle, but remain compatible with household liquefied gas cylinders. For this versatility, such models are in high demand among tourists, summer residents, and builders.
Hyundai H-HG3-25-UI777
pros
- trouble-free operation
- price
- weight 1 kg
- gas consumption 0.22 kg/h
Minuses
- no reducer to stabilize gas pressure
- does not connect to tourist gas cans
From 1,124 RUR
Folding legs and a grill grate immediately brought Hyundai ceramic gas heaters for the dacha to the level of super popular devices with an affordable price. But not everything is so sweet. For example, they fit well with large 50L cylinders, but are not compatible with backpacking cylinders. Therefore, camping falls out of scope, but suitability remains in the garage, warehouse, etc.
Pathfinder Dixon 2.3 kW
pros
- weight 1 kg
- power 2.3 kW
- built-in grille
- infrared heating
Minuses
propane only
From 641 ₽
A mobile energy-saving heater with a grill grate costs very little, and took second place only because it works only with propane. Economical (consumption 0.068 m3/h) and lightweight, Pathfinder Dixon does not take up much space among luggage and quickly warms up even a tent or a room.