A shower enclosure is a shower stall without back walls and a roof, in other words, an “open type shower.” An excellent alternative to closed shower boxes, which, for the most part, are made in China and have very questionable quality, although a very attractive and low price. Our online store offers a large selection of shower enclosures from European manufacturers, which over the years have become a “must-have” solution for customers who value the right balance between price and product quality.
Today we will talk about how to install a shower enclosure with your own hands, with and without using a tray. Let's divide the installation guide into stages:
- What will you need?
- Floor or pallet mounting?
- Installation of a shower tray
- Installation of shower enclosure partitions (curtains)
- Video: “How to install a shower corner correctly?”
Pros of choosing a shower enclosure
It's not just the prostate in the assembly that attracts the corner. In addition, there are a number of positive aspects of the shower enclosure for those who choose to install it:
- The design takes up little space. There is more space left to equip the room with a washing machine. Compactness is an important plus in favor of its choice.
- The price is lower than that of a shower cabin. We purchase plumbing fixtures for those who like to shower.
- Easy to assemble allows you to install the device in a few hours. Even without the skills of a plumber, it is possible to install it yourself.
Assembly steps common to all cabin types
The shower enclosure is delivered from the retail outlet in disassembled and packaged condition. The multitude of packages with parts can be confusing at first due to their diversity. All components are sorted, grouped and arranged in packages in such a way as to suggest how to properly assemble the shower cabin in order to consistently complete all the steps for assembling the kit.
Some box models are designed to allow for self-assembly from the inside. This is convenient when installing a shower enclosure in cramped conditions of a small room.
Installation of the corner requires compliance with a certain sequence. Assembling a shower cabin with your own hands can be done alone within a few hours. This provides the user with some advantages when minor repairs are required.
The owner of a modern device, who has completed the installation himself, will not be at a loss when faced with the question: how to disassemble the shower stall. At any time, he can partially disassemble, carry out minor repairs, and reassemble the structure again, without resorting to paid cabin repair services.
Corner models
Despite the simplicity of its design, the corner is selected according to the material from which the pallet and cabin are made, and according to its shape. Selected according to installation angle. You can purchase the two components of the model (tray and cabin) not as a set, but separately. The assortment of construction stores allows you to make a choice so that they are later combined into a single structure. The main thing is to choose them exactly in size.
Pallets are made from various materials:
- of steel;
- made of cast iron;
- made of ceramics;
- from marble;
- made of acrylic.
Acrylic models remain in demand. They are not heavy, if treated with care they will last for many years, and are affordable to the average buyer. Manufacturers produce them in the shape of a rectangle, square, semicircle.
Accurate measurements of the installation location will allow you to choose a cabin so that the doors do not hit the walls of the room when you open them. The doors are made of glass with frosted or transparent texture. There are colored booths. All this makes the shower enclosure a decoration of the bathroom. The fittings of the design add style to the design of the corner.
Types of cabins and equipment
It is worth immediately noting that all types of shower cabins differ in shape, materials of manufacture and method of installation relative to the bathroom space. Let's look at each type in more detail:
Open cabins
In this case, the wall will be the wall of the room itself. The complete set of this type of shower stall includes only a door, a tray on which a person stands, and a shower head. The option is quite simple and does not have any additional features. Mostly such models are installed in the corner of the bathroom.
Of course, their main advantage is cost. This cabin is the most budget-friendly among all those on the market. It is also possible to construct a cabin of any size that will be necessary for comfortable use.
Their main drawback is the difficult repair of sewer and water supply units. Open models do not have an upper base, that is, a roof. Thus, a “tropical shower” is not possible in this case. A regular shower head is used, which is connected to the mixer.
This type of shower stall is intended only for just washing, but not relaxing under warm water.
Pallets are needed to collect water and also drain it into the sewer. According to their shape, pallets are divided into corner and rectangular.
When choosing it, first of all pay attention to the depth, which is divided into:
- Deep or high pallets. Very similar to a small bathtub, in which you can sit and draw water.
- Medium size pallets. They are considered the most universal and are used much more often than other types.
- Low pallets. They are quite compact. They are often called flat. This is due to the fact that they are practically invisible. Such pallets require special techniques for installing water drainage. Otherwise, problems may arise and the water will not go down the drain.
The most common pallets are made of acrylic.
You can also find products made from other materials:
- cast iron;
- steel;
- earthenware;
- from artificial marble;
- natural stone.
As a rule, the most popular and frequently used is the acrylic tray. It is durable, easy to maintain and inexpensive.
The most expensive is a pallet made of natural stone. Its main advantage is fast heating. As a rule, the tray retains heat for a long time, which makes your stay in the shower more comfortable.
Walls are essential components of a shower room. Their main function is to protect against the ingress of water, which can extend far beyond the cabin.
The raw materials for the production of doors are plastic, glass or aluminum. Glass doors are the most popular. They are presented on the market in two versions: frosted and tinted glass.
The standard equipment of the shower stall includes the following elements:
- pallet;
- back panel;
- roof;
- racks.
Closed models
They are the most common option. Every second person who prefers showers can find this type. It is characterized by closed walls and is a separate small room. An enclosed shower cabin also has a door, a tray, a roof and a shower head.
Additional functions are built inside that are necessary for a comfortable shower. If desired, you can install a water heater and even a radio. The main disadvantage of this type of shower cabin is the cost, which is higher than the market average.
Much depends on the manufacturer, as well as the material from which the booth is made. One of the main advantages of such models is good sound insulation. Advantages also include additional features, variety of models on the market and quick installation.
Technological requirements for pallet installation
One of the important stages in installing a corner shower stall is installing its tray.
In terms of ease of installation, acrylic, ceramic, and steel models come first. Already installing a concrete bottom lined with ceramic tiles will require skills in construction and repair. To install a marble or cast iron bottom, it is better to invite craftsmen. Problems with proper installation arise due to their heavy weight.
Functionality check
Upon completion of installation, it is recommended to check the shower enclosure yourself for operation of the following functions:
- Guided by the instructions on how to assemble the shower cabin and the rules of use, alternately pressing the buttons on the control panel, make sure that they are working.
- Be sure to make sure that the pallet is in a stable position. If swaying is detected, it is eliminated by turning the adjustable heels of the legs.
- The drain should be inspected especially carefully. Its reliability will protect against leaks, which lead, at a minimum, to unpleasant explanations with the neighbors below. Reliable drainage is ensured by special gaskets on the threaded connections of the siphon. To obtain the best result, use silicone sealant.
Choosing a base for a pallet
Installation of the bottom of the shower enclosure is carried out:
- on a brick base;
- on plastic supports;
- on a metal frame.
The base is selected depending on the completeness of the model itself, its material and related technological characteristics.
Proper arrangement of the foundation is the key to the correct operation of the drainage system: the drainage hole must be higher than the level of the sewer system line. Only under this condition does waste water leave without delay. The angle of inclination of the bottom to the inlet to the sewer is maintained at 3 degrees. If the pan does not rise on a pedestal, or the entrance to the sewer does not lower, then only a pump for pumping out water will be able to establish the operation of the drainage system.
Many deep pallets are sold complete with a metal profile frame. But if the model has thin walls, then it is better to install it on a flat floor without a foundation. This is how ceramic bottoms are installed. But the question remains about the correct organization of the height of the drain hole. The hole must be higher than the outlet so that the water goes into the sewer. The bottom sits on the floor using glue or a cement tile mixture.
Bottoms made of cast iron and stone are mounted on the floor. Their height does not interfere with the drainage of liquid into the sewer. But there is a difficulty in arranging the siphon. It is mounted directly on the floor surface or a flexible unit is installed, which is carried into a wall niche.
Depending on the type of foundation, the algorithm for performing the work is different.
Summing up communications
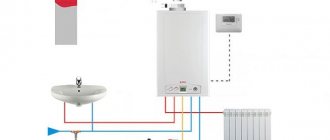
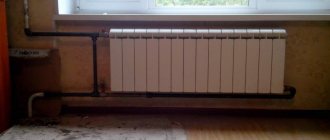
The routing of pipes in a bathroom with a shower depends on where the drain is located in the pan. If the vertical riser is located far from the planned installation location of the shower, it is necessary to lay the sewer pipes in advance at a slope of 2-3°. The flexible siphon must be selected with a small margin of length to facilitate connection with the drain pipe. It is necessary to take care of the cleanliness of the sewer drain before starting work and close the sewer pipe with a plug.
Water supply
Pipes are brought to the pallet through holes in the wall or, when laid on a surface, hidden behind plasterboard sheathing. It is important to pressure test the pipes before tiling your shower. To do this, install a mixer or a plug with an air bleeder on the thread. The test is carried out within 20 minutes after the air is released. During this event, it is important to check all areas with joints and threads for leaks and repair if found.
Electricity supply
If you plan to have lighting in the shower, you need to drill channels for the cable in advance. If communications are hidden inside a plasterboard box, then the wiring is attached to plastic clips. To illuminate shower rooms, use a copper flexible cable with double insulation and a minimum cross-section of 2.5 square meters. The connection is made directly from the panel with the installation of a residual current device. For installation in the shower, only moisture-proof recessed luminaires with a minimum degree of protection of 65 IP are used.
Frame for pallet made of plastic or metal
It doesn’t take much time to make a frame for a base made of metal and plastic. Installation of the structure is carried out in three stages:
- using a building level, the correct installation of the legs of the structure is checked;
- installation of the shower tray itself;
- arrangement of a drain hole and connection to the sewerage system.
An extruded polystyrene plate is placed under the bottom as a thermal insulation material. Can be replaced with polyurethane foam. For a steel bottom this is also noise absorption.
To make the structure stronger, additional brick supports (brick columns) are made.
Preliminary stage
Cabin assembly begins with checking all components. It is necessary to fully check the integrity of all elements, especially glass. They are made using special technology, are shockproof and hardened, so if damaged they break into many elements without sharp edges.
Simply shake the packaging to determine the integrity of the glass by sound. Defects, geometric errors, or damage are unacceptable on the remaining parts of the shower stall.
Cabin elements include:
- pallet (has various shapes, most often comes with a reinforced frame);
- doors (most often have rollers for movement and fastening elements);
- glass for doors (usually transparent, less often frosted);
- walls, side panels (water supply and other functions are provided);
- roof of the shower stall (depending on the manufacturer and type, may be missing);
- factory fasteners and installation elements.
The assembly of a Chinese shower cabin, like any other, begins only after a thorough check and creation of a workplace. If the size of the bathroom is not large enough, it is better to assemble it in another place in several stages, transferring the finished parts.
For high-quality installation, you must have on hand the tools and additional materials from the list below.
Required tools:
- adjustable wrench (or gas);
- flat and Phillips screwdrivers;
- metal drills of small diameter (3-6 mm);
- level (for leveling installed parts);
- a screwdriver, or a drill as a replacement;
- gun for squeezing out silicone;
- sharp knife.
Additional materials that may be needed:
- sealant (silicone) transparent, antibacterial;
- waterproofing tape;
- hoses for supplying hot and cold water;
- transition to sewer 32/50;
- paint, gloves, brush for correcting defects.
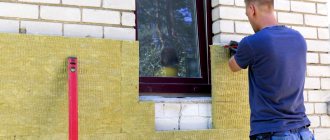
It is necessary to check the location for the shower stall being installed. It must be level, have waterproofing, and it is also desirable to have ventilation to remove steam if the cabin does not have a roof.
Flooring
Without carrying out preliminary work on arranging the floor and walls, you cannot begin installing the corner.
- In the bathroom, attention is focused on the electrical wiring. A moisture-resistant cable is laid in the wall along the grooves. This is a copper wire with three cores, cross-section 2.5 mm, double insulating layer. It is operated independently from the main panel in the house with a separate automatic machine.
- Waterproofing of walls and floors is carried out.
- Make sure it is possible to connect to the water supply and sewerage system. Free access to sewer outlets is provided.
Sealing
All work on installing the frame, fillings and doors is performed using sealing elements. If there is no confidence in sealing, the joints are additionally coated with acrylic or silicone.
The paint sticks to acrylic, so the joints can be touched up. Decorative compounds roll up on silicone, so they are used to process thin and inconspicuous joints.
Gaskets made of paronite, rubber, and polymers are used.
The first material is composite, it is obtained by vulcanization and rolling; it contains rubber, fillers (powders) and asbestos. Rubber belongs to the standard category, consisting of raw rubber, which is vulcanized during manufacture. The color is always black or dark grey. Polymers made from modified PVC are elastic, return to shape when deformed, and are springy.
Installation of a ceramic tray or cast stone bottom
Heavy structures that are installed without legs, without stands, directly on the floor, include trays made of cast stone or ceramics. Their design has a niche for a siphon. If the structure is monolithic, then there is only a drain hole. A flexible drainage system is used for the monolith. Sometimes it is placed on a pedestal:
- The floor is covered with waterproofing.
- A cement screed is laid on top.
- Taking into account the height of the drainage system, bricks are laid around the perimeter of the pallet.
- A siphon is connected to the pan, its outlet pipe is connected to the outlet pipe.
- Installation of the bottom is carried out with an already installed drain system. Therefore, it is installed on cement so that the outlet pipe and siphon each fall into their own niche, created specifically for them.
The front side of the pedestal is covered with ceramic tiles or mosaics. All joints of the shower enclosure are treated with sealant.
How to collect drain?
Screws are used to secure the drain to the frame. You need to take profile A1, which is equipped with special grooves for connecting to the roller system. Be sure to follow the arcs, one of them is lower, the other is upper. We need a small number of screws, which we will screw into a horizontal type arc with a vertical element. We place the profiles correctly, each groove should be exactly opposite the grooves for the glass.
Important! Initially, the instructions may seem complicated, but in fact, here you just need to thoroughly understand the whole process.
Recommendations from experts
- When choosing a fence, consider the needs of all family members. Perhaps the youngest and oldest representatives will be comfortable not with glass doors, but with thick curtains.
- To avoid damaging finishing materials, drill holes for fasteners between the tiles. For greater accuracy, you can change the diameter of the drills, starting with the minimum.
- When installing glass railings, the screws should not be tightened to the maximum - if the pressure is high, the glass may become deformed and cracks may appear.
- Tempered glass is resistant to accidental hand impacts, but often does not withstand a blow from the end to a concrete floor. There is a high risk of microcracks forming, which will eventually destroy the glass.
- Study the fencing passport to determine the top and bottom of the product. Otherwise, the doors may not adhere to each other and the tightness will be compromised.
- Don't skimp on joint sealant when installing glass shower enclosures. High-quality material will not develop mold or peeling.
Aquarium sealants have won the trust of consumers for their good properties when working with glass surfaces.
vote
Article rating
Examples of modern user-friendly designs
Thanks to the unique design features of shower partitions, their use in modern interior designs is limited only by the designer’s imagination. The main thing when installing them is that the room is conveniently divided into separate functional areas, without loss of usable space.
To give the room a stylish and original appearance, you should pay attention to non-standard shower partitions with a rounded shape. It is also worth considering the type of door opening. They can be: hinged or sliding. In any case, well-chosen glass partitions will create a special atmosphere of comfort in the bathroom , allowing you to shower comfortably, separating it from the rest of the room.
To emphasize the individuality of the bathroom, you should carefully consider the choice of glass, which is processed using various technological methods:
| Glass processing method | Result |
| Sandblasting | Allows you to create matte surfaces with various patterns. |
| Application of water-repellent coating | Helps prevent moisture from accumulating on the surface and the glass does not fog up. |
| Full color printing | Allows you to create high-quality and clear drawings, ranging from simple ornaments to black and white photographs. |
| Stained glass | They are distinguished by a real work of art, and consist of multi-colored pieces of glass. |
| Engraving | Allows you to create unusual patterns applied with special equipment. |
To summarize, it is worth noting that installing shower partitions with your own hands is quite easy. The main thing is to familiarize yourself in advance with the sequence of all the work being carried out, prepare the necessary materials and tools, and stock up on free time. As a result, the bathroom will become more stylish, practical and easy to use and maintain.
Price
So, what types of glass shower enclosures are there, and what to look for when choosing them, we figured out. Finally, I will give prices for some products from well-known manufacturers:
| Model | Price in rubles |
| Alex Baitler 90x90 cm | 18500 |
| Sturm BURG 100 x 195 cm | 140500 |
| Edelform 900x900 mm (corner fencing) | 30000 |
| METAKAM 800x800 mm (corner fencing, plastic) | 4500 |
| GLASS 90 x 185 cm | 23000 |
DIY repair
In some cases, it is not profitable to buy a new shower stall due to a minor malfunction. Here's what you can do with your own hands...
Pallet
Most pallets are made of plastic. How to make repairs? Acrylic can be welded perfectly using standard means. Therefore, it is possible to repair the pallet using standard methods. But how much will it cost? For a small piece of acrylic rod in the store they charge many thousands of rubles. Cooking without an additive is not an option. In this case, knowledge from chemistry will help. Let us remember that mainly thermoplastics are used for pallets.
This is the same (but not in chemical composition, in physical properties) from which polyethylene and polypropylene pipes are made. Therefore, it is enough to take out a piece of the ABS plastic window frame to solve the problem. Moreover, most plastics have excellent mutual adhesion. Before starting leak welding, try the method on an area of the pallet that is not visible from the outside.
Corner
Most often, the rollers holding the door break. Carry out repairs by replacing damaged ones with purchased ones. To reduce the likelihood of breakage, use silicone lubricant. It can be bought in most stores. Repairs can be reduced if you use even ordinary waterproof Litol. Lubrication not only reduces friction, but also protects the surfaces of parts from corrosion.
The corner often starts to leak. Repair comes down to treating all cracks with sealant. If necessary, plumbing corners are used around the perimeter of the pallet and fence, in areas adjacent to the wall, and at joints. Additionally, a review about sealing the shower stall.
If the glass breaks. Replace the sheet with cellular polycarbonate, or look for a new one. However, the repair can be done with your own hands by cutting out glass of suitable size. A lot depends on skill here. And most importantly, the master is afraid of repairs!
Some nuances
In some cases, it is advisable to perform preliminary assembly to familiarize yourself with how to assemble a shower stall. This is useful to do in order to understand the installation principles, mark the holes, and, if necessary, purchase missing fittings.
The installed drain must be equipped with additional outlets for connecting other plumbing fixtures. We should not forget about including an audit in the sewerage system.
The process of operating plumbing fixtures involves periodic inspections and ongoing repairs. Loose fastenings, depressurized joints, replacement of doors or rain showers necessitate complete or partial dismantling.
If the assembly was carried out independently, the question of how to disassemble the shower stall does not cause confusion. When disassembling, follow the reverse order of installation. Assembling the cabin yourself saves money and increases confidence in the correct use of this convenient plumbing equipment.
Shower assembly video:
More detailed video:
Video description
Assembling the cabin frame in this video:
Panel installation
The prefabricated panel is a distinctive feature for hydroboxes. It should cover the wall and allow you to control all functions. All holes on which the panel will be installed must be treated with sealant to eliminate possible leaks.
Particular attention should be paid to the injectors. Hose sections are used to connect the injectors to each other. To avoid leaks, clamps are used to tighten the tubes. For additional protection against moisture, a sealant is used to coat all connecting elements.
Working with sealant Source e-stroy.pro
Design
If a lightweight design is preferred, then choose a frameless shower enclosure, which is completely glass and has hinges that align the profiles (they are used to secure the glass to the wall).
There is a so-called “semi-framed” type, which does not have vertical guides, but thanks to the doors (they are sliding) you can save space.
The frame design of the shower stall is more popular among consumers, since due to the fact that the glass is inserted into the frame, the strength of the device increases.
The corners come in different shapes, for example: oval, square or rectangular. And the sizes range from 0.75 X 0.75 m to 0.9 X 1.2 m, and sometimes 1.0 X 2.0 m. When sold together with an acrylic tray, the kit includes a shower channel or mini-bath.
The corner may have doors that fold, rotate, slide apart, or operate using a lift-and-turn design.
The first type saves space and prevents water from spreading.
When the door opens, all the liquid flows into the pan.
If the door rotates, then its mechanism does not require special maintenance, and when opened, part of it opens inward.
Although the folding door is small in size, its entrance width is large.
For the vertical movement of doors, a lift-and-turn design is used, which ensures that the doors move vertically, that is, when they open, they rise automatically and, when closed, they completely adhere to the floor (or pallet).