For more than 50 years, Kuznetsov stoves have occupied a high position among heating structures for the home, and this is not surprising, since the stoves have many advantages and are strikingly different from duct stoves not only in appearance, but also in their characteristics. Kuznetsov was the first person who dared to test the most practical and convenient stove system.
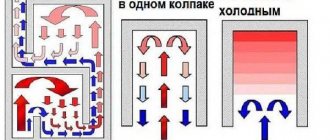
In all ovens, hot air moves through channels, and as it passes through them, the walls of the oven heat up, but the air itself quickly cools down. Such air movement can only occur if there is optimal draft, that is, forced, but in this case the furnace body heats up unevenly, which leads to cracking of bricks and the appearance of unwanted cracks. Thanks to Kuznetsov, an independent principle of air movement in the furnace arose. The stoves have a second name - dome, which they acquired due to their unique design.
Kinds
According to their purpose and design features, blacksmiths can be divided into several types:
- Heating. The devices are designed for efficient and safe heating of premises.
- Cooking. Used for cooking. This includes ovens for baking bread and bakery products.
- Bathhouses. The Kuznetsov bathhouse stove is designed for simultaneous heating of the main bathhouse premises. Such devices have high heat transfer with minimal fuel consumption.
- Street. A stove complex consisting of a grill or barbecue for outdoor cooking.
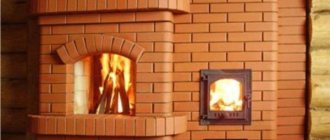
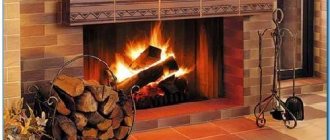
- Fireplace. The equipment is used as a decorative element of the interior or as an additional heating option. Some fireplace stoves are equipped with special loungers for a pleasant leisure time.
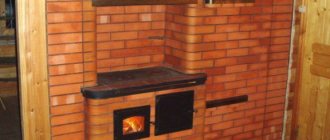
The most popular are complex devices that are distinguished by their multitasking. A striking example is the Kuznetsov heating and cooking stove, which is intended both for heating residential premises and for preparing food.
Despite their functional features, all stoves operate on the same principle - effective distribution of heated gases in the bell into separate streams.
It is noteworthy that stove hoods can be equipped with additional equipment - electric heaters, hot water tanks, steam generators, oven and stove.
A competently designed and constructed Kuznetsov sauna stove will provide reliable heating in all functional rooms: steam room, washing room, dressing room, rest room. In addition, it will allow you to quickly heat water, accumulate hot steam and purify the air.
Varieties for different purposes
Igor Kuznetsov and his team have created a large number of universal and specialized models. Some are intended only for heating rooms, others are supplemented with elements for cooking or heating water. Fireplaces are a separate area.
Drawings of options tested in practice are collected on the inventor's website. For convenience, the structures are assigned alphanumeric designations.
Heating
Kuznetsov's heating stove for a two-story house allows you to save on fuel.
Various dome layout options make it possible to construct designs for heating one- and two-story houses.
Heating models are abbreviated as OIK (heating models by I. Kuznetsov). You can find options with a firebox located inside the room or in the utility room.
For variety and to give the desired qualities, there are stoves supplemented with warm beds (OIK -6 bed. AND OIK 19 bed.) and seats (OIK-7s).
Some products have built-in ovens. In this case, the letter D is added to the code designation, for example, OIK-5D.
Heating stoves also include stoves with a built-in fireplace.
Models RTIC (Russian heated heater by I. Kuznetsov) are needed for heating large rooms. They are massive and need a strong foundation.
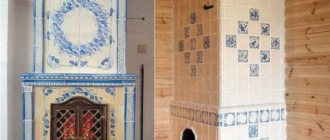
Options with fireplace
Model with a fireplace
Fireplaces, in addition to their heating function, serve as interior decoration. In this case, the firebox is open, the fire can be observed visually. The stoves are equipped with a firebox for conventional heating, which can be located on the facade, on the right, left side, or behind.
For construction, they choose an option in which it is convenient to service the stove from a utility room or hallway - you do not have to carry firewood into the living room. Working with waste (ash) also does not imply inevitable dirt in the room when cleaning the ash pan and the vent from the hallway.
Options for OIK-K have been developed with couches, built-in ovens and a corner fireplace.
Boilers
To organize a water heating circuit, options have been developed with the designation KIK (I. Kuznetsov boiler). A steel heat exchanger is built into the second dome. Water circulates through the system due to an electric pump.
Models are designed for power of 16, 17, 34 and 64 kW. The first option (16 kW) is equipped with a hob.
Heating and cooking
A heating and cooking model is a structure that completely exhausts the fuel resource.
Universal heating and cooking stoves are designed for homes with year-round occupancy. The model has built-in hobs and ovens, shelves for heating food and water.
The firebox can be located on the front or side, which allows you to choose an option for any interior design.
Installation of a bed is available as an option. For large rooms, elongated fireboxes are made, which allows the use of large-caliber firewood. They burn longer and you will have to add fuel less often.
The size of the hob depends on the composition of the family. For 2–3 people, choose a reduced surface, which saves fuel.
For the bath
I. Kuznetsov singled out sauna stoves as a separate area. There are three varieties: BIC, BIC BC and BIC PC. The abbreviation BIC corresponds to the purpose, and additional symbols indicate that the structure is equipped with a fireplace.
For different layouts, models are chosen that differ in the location of the firebox and fireplace - in the steam room, relaxation room or in the dressing room.
Tools and materials used
To carry out the work, you will need a grinder with discs for cutting bricks, a hammer drill or a drill equipped with a mixing attachment for mixing the mortar.
The following materials must be delivered to the construction site:
- Two types of bricks - fireclay (with fire-resistant qualities) and ordinary clay, grade M150.
- Brick volumes are determined by a specialist according to the drawing.
- High-quality clay - about a hundredweight.
- Sifted sand, in an amount twice as much as clay.
The two above components can be replaced with an already prepared mixture, which can be purchased at a hardware store. This option is more convenient and requires less time and effort to prepare the solution.
You will also need various metal products:
- firebox and ash doors;
- valve;
- fire pit;
- steel wire;
- corners.
How to do it yourself
Most often, heating and cooking stoves OVIK 5 are used in homes; we’ll look at just such a stove as an example.
To make a Kuznetsov stove with your own hands, you will need the following:
Material
- Two types of bricks: solid red (M150) and heat-resistant fireclay (ShB-8)
- Sand and cement (3:1), but you can also take a ready-made factory mixture
- Furnace components: cast iron doors, ash chamber, doors for cleaning holes, valves, grate and views
- Wire with a diameter of 3 mm and a length of 10 m. Bricks will be tied with it
- Steel corners (2 pcs.)
- Reinforcing mesh for the foundation
Tools
- Master OK
- Hammer
- Trowel
- Joining
- Basin or bathtub to mix the solution
- Roulette
- Plumb
- Level
- Drill with mixer attachment
- Bulgarian
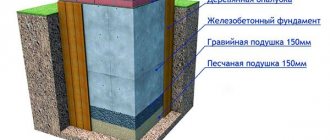
Foundation
Before building a stove, it is necessary to prepare the foundation. When laying it, you should be careful and do everything exactly according to the instructions, otherwise, under the weight of the stove, the foundation will settle, and the stove may crack, which will subsequently lead to collapse.
The foundation must be greater than the furnace parameters. Only in this case will it meet all regulatory requirements.
To make a foundation for a Kuznetsov stove with your own hands, you will need to do the following:
- First of all, we dig a pit at least 1 m deep; it is at this depth that the soil freezes in winter. The edges and walls of the pit must be made as smooth as possible, which will allow you to spend less cement mortar.
- Next, we make a so-called “pillow” of sand. It is advisable to add sifted sand so that it compacts more tightly. The height of the pillow should be about 20 cm. Then we leave the pillow for a couple of days to shrink.
- Next you need to make the formwork. The best option for formwork would be boards, although other material can be used. The upper part of the formwork must coincide with the floor level in the house.
- Next we move on to the installation of fittings. A mesh with cells from 50 mm and a rod thickness from 6 mm is suitable as reinforcement. The mesh must be positioned so that it is either in the middle of the foundation or before the concrete emerges from the soil. The last option is the most optimal.
- The final stage of the foundation is pouring concrete. In addition to concrete, you can add heavy mineral impurities or gravel to the composition, and the best addition would be a water repellent, which will not allow moisture to be absorbed into the foundation and will extend its service life. After the concrete is poured, its surface must be leveled with a spatula and all defects on the surface must be immediately removed.
After completing the above work, the foundation should be left to dry for some time. Ideally, for at least 30 days, depending on weather conditions, but it will harden within a week, so you can begin further construction of the furnace.
Let's move on to construction. Since the bell furnace is considered the most common design, this is what we will do. Before laying, you need to pay attention to important points:
- Before the first laying, it is necessary to lay a waterproofing layer on the foundation, which can be roofing felt or foil-coated isothermal film. If foil is placed, it should be placed with the shiny side up so that it reflects thermal energy.
- You should not make changes in the order, as this may affect the operation of the stove and its service life. An exception can be made only in rows of continuous flooring and their appearance can be changed.
- To make the front side look solid, you need to take good quality bricks, smooth and without cracks.
- If you need to cut a brick, you need to do it with a grinder; the edges and planes must have an even shape.
The following is the procedure for HVAC 5 and additional recommendations for it.
- The first two levels need to be laid with fireclay bricks using oven bonding mortar. The refractory layer will not allow thermal energy to escape into the foundation. From the second row you need to start preparing the ash pan and the blower. Bricks must be laid in a checkerboard pattern and only on clay mortar. It is also necessary to observe the thickness of the seam, which must be at least 5 mm.
- In the third row we begin preparing the trajectory of the smoke channels.
- To make the stove easy to service, you need to make four standard size cleaning doors in the chimneys.
- The grate for the grate must be placed on the fifth level; also at this level the partitions between the blower, hood and firebox are laid.
- From the 5th to the rows the combustion chamber is laid out from fireclay bricks. It is important not to forget about a very important factor: there must be a compensation gap between the fireclay and red bricks of the masonry. It is needed so that the furnace is not damaged by thermal expansion of the material.
- The doors of the firebox and vent must be installed using asbestos sealant.
- In the 17th and 18th rows, the hood overlap has a continuous plane, without holes for the chimney.
- As you can see in the order, in row 21 there are two passages left, which are located along the inner walls.
- In rows 28, 29 and 30, you can make slight deviations from the order if you want to change the shape of the oven. In the case of a low ceiling, fireproof cuts should be made.
- As you lay out, you should line the inner surface of the brickwork. It is necessary to smooth the joints with a solution, adding heat-resistant material to it.
- The overlap must be carried out using cast iron supporting corners, the length of the shoulder of which must be at least 45 mm, however, the exact size should be chosen taking into account the load.
Basics
Most of the advantages of Kuznetsov furnaces come from the principle of free passage of gases. Let us explain again with an example.
Let's imagine a stove with a complex system of smoke ducts: an ethermark, a four-five-turn Dutch oven. In this cramped labyrinth, strong turbulence will inevitably arise. Have you heard the furnace humming? This is only a minor manifestation of the vortex energy raging within her. And there’s nowhere to get it from except from the fuel stash. If the channels are long and narrow enough, then at first glance there is nothing terrible here: the vortices, by the time they reach the pipe, will dissipate, cooling, and will still give their energy to the body of the furnace, and it to the room. But in reality, nuances appear, which will be discussed later in the text. Because of them, the efficiency of a channel furnace over 60% is an exceptional rarity.
In a channel stove, while it is being heated, a huge flow of energy rushes about, and only a small part of it can be used for heating or heating water without disturbing its operation. Such a furnace is somewhat similar to a nuclear reactor. Don’t be alarmed, just because of the synergy, i.e. along the paths of energy circulation in it. A nuclear reactor has to be loaded with tens of times more fuel than is necessary to ensure the design energy output. Otherwise, the neutrons will simply fly out without having time to meet the uranium atoms ready to receive them. In a channel furnace, hot vortices, without having time to cool, will fly out into the chimney or, conversely, will cool down immediately, producing smoke and soot.
But the Kuznetsovkas (details below) are closer in synergy to the thermonuclear reactors of the future. “Thermonylus” sounds scary, but this is only due to its association with the hydrogen bomb. In fact, fusion reactors are quite safe.
Why? Because they generate exactly as much energy as the consumer needs, and the technological power reserve required for rarefied plasma is scanty. If suddenly the chamber of a tokamak or stellarator suddenly completely collapses, the plasma will be completely emitted (there are no heavy atoms in it) and will cool down before it reaches the walls of the room. The repairmen will curse - maybe the duty department is sharpening their laces - but after 5 minutes. will be able to blunt to elimination without protective equipment.
So what do Kuznetsov furnaces have in common with thermonuclear reactors? The fact that the energy of the flue gases, thanks to the principle of free passage, does not rotate many times in the flow until it is pushed into the body of the furnace, but saturates it immediately. And now she has nowhere to go from there except into the room and/or the water heating register.
What kind of building is this?
Kuznetsov’s devices were created more than 50 years ago and to date, more than 150 variants of various projects have been developed, each with its own characteristics and purpose. Main varieties:
- Cooking. This type of device is used for cooking. Mostly cast iron stoves are installed in such ovens, on which the entire cooking process is carried out.
- Bread room with oven. Cooking types of buildings are often combined with a bread machine.
- Heating. A two-bell stove for a home using the Kuznetsov system is an excellent alternative to gas or electric heating. Provided that it is properly installed and fired, it can heat a room even in severe frosts.
- Bathhouses. Kuznetsov stoves for baths are the most popular among other types. Most of these buildings, which can be found in almost every country house or dacha, are built according to Kuznetsov’s designs.
- Fireplaces with water circuit. Useful devices for everyday life. People who want to equip their home with hot water by firing a stove will certainly build a structure with a water boiler. The Kuznetsov bell stove with a water heating boiler is widely used in villages.
- Russian two-story. Wood-burning fireplaces with a stove bench have not lost their relevance, so they are actively used in everyday life.
Furnace designs for private low-rise construction
About 150 bell furnace designs have already been created and brought to life. All of them have stood the test of time and are working successfully. Kuznetsov’s team of like-minded people continues to develop new options, improving existing ones. His website contains complete information with detailed descriptions and recommendations for making stoves.
Models are indexed and written with abbreviations. For example, OVIK stands for “heating and cooking stove by Igor Kuznetsov.” OIK is simply “heating”, etc. Each project is accompanied by step-by-step instructions and visual ordering, made in the AutoCAD program.
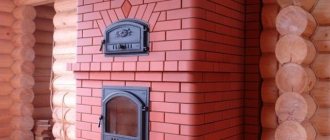
Combined model of a stove with a fireplace: the location of the fireplace on the stove is selected based on the layout of the room - a side fireplace, a back fireplace and a side fireplace with a stove bench
There is no need to do calculations and calculations: the site provides accurate measurements and descriptions of finished projects. If necessary, you can contact Kuznetsov and discuss the design conditions with the formulation of a specific task.
Vertically located hoods allow you to build a narrow stove if the room is very small.
The stove can be installed in any home: a new building or an already built one. But construction in a finished house will cost more, since the roof will have to be partially dismantled to remove the chimney. It is better to schedule work for warm weather. To choose the right place to install the stove, you should remember that the closer it is located to the center of the room, the more uniform the heating will be. At the same time, the stove is located closer to the front door - it is more convenient to bring in fuel.
Video: construction of a Kuznetsov furnace with a water boiler
A round-shaped dome stove operates with the greatest heat output. But if we are talking about a small room and the radius of the furnace circumference is less than 2 m, complications arise with the installation of furnace castings - firebox doors, cleaning pockets, etc. Metal parts designed for flat surfaces are not placed in semicircular shapes: gaps and cracks will appear, which is unacceptable.
A schematic representation of the functioning of the furnace with horizontal cuts and orders helps to better understand the specifics of laying bricks
An experienced craftsman with an assistant lays out a bell-type stove in 2–3 weeks (depending on the complexity of the model). The process is unhurried and requires great care; the fitting of all parts must be careful, with measurements. A beginner will need more time, and you need to be prepared for this before starting work.
Characteristics
Kuznetsov's bell-type stoves have a number of distinctive characteristics and advantages that set them apart from the main competitors in the market of heating equipment for home and bathhouses.
The operating principle of such a device is quite simple: the lower level (tier) and the firebox are a single structure - a cap, which is designed to effectively move gases formed during fuel combustion. In this case, the accumulation of light gases occurs at the top of the bell, and heavy gases at the bottom. Gases with an average heating temperature are concentrated in the middle.
“Kuznetsovka” made of brick provides for long-term retention of heated air inside the hood for effective accumulation of heat indoors, and then the rapid removal of combustion waste through the chimney.
A special feature of the furnace is maintaining the maximum combustion temperature. In addition, the Kuznetsov stove has a high efficiency, which is several times higher than that of a classic Russian stove.
The specific advantages of such furnaces are as follows:
- High efficiency – up to 94%.
- High temperature combustion of fuel material.
- Fast accumulation and long-term heat retention.
- Low level of soot deposition.
- Easy to care for and unpretentious.
- Low material consumption with high thermal output.
- Possibility of additional installation of a circuit for hot water supply.
- Increased draft with small chimney sizes.
- Attractive design and a wide choice of structural forms. An improved option is the Kuznetsov two-bell stove, which can be designed for any type of room.
- Fast distribution of thrust between channels in automatic mode.
Design and working documentation "HVAC"
Explanatory note. The text part contains background information about the meteorological and climatic conditions of the area. Based on these data, the parameters of the outside air and the required characteristics of the coolants are calculated. The rationale for fundamental decisions on HVAC systems is given, the characteristics of heat supply sources are considered, and the choice of communications laying scheme is justified.
The subsection of the description of constructive and technical solutions includes the choice of materials, calculation of the diameters of pipes of heating mains and air ducts, and the choice of a method of thermal insulation of communications. Reliable insulation of the pipeline is required when pipelines are operated under conditions of increased risk of spontaneous combustion. When designing thermal insulation structures, we follow the requirements of SNiP 2.04.14 “Thermal insulation of equipment and pipelines”.
The text part of the project contains information about thermal loads on communications and equipment. Based on the calculated data, the rationale for the choice of types, modifications and layout of heating equipment is provided. When developing a design for a manufacturing enterprise, the factor of air pollution during operation of technological equipment is taken into account. In such cases, a selection of devices is made to purify the air from gases and dust.
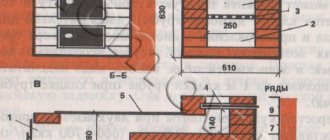
Orders of Kuznetsov furnaces
The construction of a Kuznetsov furnace does not require special knowledge and skills. If your hands are sharpened for the simplest tool, it is enough to follow the order and a few simple rules to successfully build the structure. The order is simply a system of drawings and instructions that describe the process of laying out the stove step by step, down to each row of bricks individually. Why such precision? The fact is that Kuznetsov spent decades trying to ensure that the design worked perfectly, and if you miss any little detail, the stove will not work correctly. Here is a sample order:
This is interesting: Cast iron heating radiators (batteries) - overview of technical characteristics
Advantages and disadvantages of “Kuznetsovka”
Bell furnaces differ from other types of furnaces in a large number of advantages:
Bell furnace
- The main advantage of bell-type furnaces is their high efficiency. About 80-85%. This is much higher than other types of ovens.
- Fuel combustion occurs at very high temperatures, without third-party technologies.
- Any fuel is suitable for bell-type furnaces. During combustion, an extremely small amount of soot remains.
- Due to minimal soot formation, these ovens do not require constant cleaning.
- Possibility of combining a bell-type stove and water heating at home. At the same time, the technical characteristics of the furnace do not change.
- Short chimney. Thanks to this type of design, there are savings on building materials. However, the traction force does not decrease.
- This stove is suitable for any room, regardless of the size of the room and its purpose.
- The design of “Kuznetsovka” can be customized to suit many customer ideas.
- In bell-type furnaces, there is no need to actively use a viewer. The air is self-distributed.
- Durability. Thanks to uniform heating and cooling, the oven is less susceptible to deformation.
- Easy to assemble. Even a person without experience, following the necessary instructions, can assemble Kuznetsov stoves. However, this is not always the case.
The disadvantages of such furnaces are much less than the advantages. The disadvantages include:
- The need for the help of a master in the construction of several domes. Such services cost money.
- Massive size. However, standard Russian stoves are not small in size.
- It is not always possible to obtain 80% efficiency from a bell-type furnace. Typically this figure is 55-60%.
A correctly selected type of bell-type stove can provide not only heating for living spaces, but also help with cooking food or heating water
Rating (No ratings yet) Did you like the article? Share with friends:You may also be interested in How to choose the right gas burner for a sauna stove? A burner for a sauna stove allows you to convert, at minimal cost, an existing wood-burning heating boiler into a mesh stove for a sauna: how to build it yourself? Stones in a steam room, laid in a wire mesh, significantly increase steam output and overall efficiency Paint for stoves and fireplaces: types of materials In order for the heating devices in the house to fit well into the overall design, they are coated with special coatings. We understand how to properly chop wood. Every homeowner has to chop wood. , if he chooses wood for kindling. Let's look at how to professionally make homemade sawdust briquettes. Sawdust briquettes are very popular in Europe because of their environmental friendliness and availability. How to light wet wood? Damp firewood is quite suitable for kindling if done correctly. However, heating the stove with damp
Add a comment Cancel reply
Name *
Email *
A comment
Search:
- Contacts
- Site Map
textarea>textarea>header>header>header>header>header>header>
Recommendations for masonry
For laying the shield, only medium-fat clay with admixtures of sand is used
To fold a brick panel for a metal stove in a bathhouse or house, you need to follow the recommendations:
- The solution should only be clay-based. Cement cannot be used.
- During laying, you must immediately remove any remaining mixture from the inside of the structure.
- Construction must begin with the installation of the foundation. It must be separate, not connected to the foundation of the house. First, the brick is laid dry to check the horizontal position. After checking all the parameters, the foundation is secured with mortar.
- To limit the draft of smoke, you need to install a gate valve at the top of the structure.
The first two rows are laid out blank, there are no smoke channels in them. This is necessary in accordance with fire safety requirements.
Order
Doors should be installed on the brick panel for cleaning the channels from soot
The order of the bell-type heating shield is as follows:
- Rows from the first to the third are laid out in the standard way. In the third row, it is necessary to leave an empty space in which the fire door will be installed.
- On the fourth and fifth rows, a vent and a door for cleaning are mounted, and two plugs are installed here.
- In the sixth row, they begin to gradually reduce the number of channels, and a heating tank is installed.
- The seventh row is intended for mounting the grille. In order for it to be securely fixed, you need to cut off all the bricks that may interfere. The channel is closed to allow two further branches to be made.
- The eighth row is designed for installing two doors.
- On the ninth and tenth, a steel strip tab is placed.
- The next stage is the execution of door overlaps. On top they should be lubricated with a clay solution.
- A cast iron stove is installed on the twelfth row.
- On the sixteenth tier, you need to cut off the bricks in the area of the right corner, and on the nineteenth, a valve is installed.
- The twenty-second row is reserved for mounting the shield and samovar.
- To expand on the thirty-first row, the bricks are cut together, and at the next stage a ventilation grill is installed.
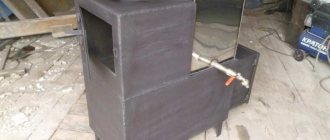
Furnace I.V. Kuznetsov OVIK ZK 19 - completion.
It was not possible to make a full-fledged hood over the cooking chamber due to the fact that the stove had to be raised 3 rows higher and the height of the cooking chamber, at the request of the owner, was increased to 50 cm.
The result is a horizontal channel that goes around the chimney.
In this photo, you can see the direct stroke damper at the bottom right, and the fireplace and stove dampers at the top. The next row will overlap the top of the oven.
In this photo the stove is already ready, a chimney with a cross section of 260x260 is visible.
In order to meet the amount allocated for the stove, it was decided to make the chimney near the stove “five”, although I.V. Kuznetsov recommended “six”.
The owner was warned that with such a cross-section of the chimney it is not advisable to light the fireplace and stove at the same time, as it may cause smoke to enter the room.
On the second floor and attic the chimney is made of Ulan-Ude brick. In the future it will be covered with tiles.
To lay the chimney, I hired a stove-maker friend to help. In the photo he is cutting a hole for a pipe in the roof.
In this photo you can see the hooks attached to the ridge of the roof and the platform from which we will continue laying the pipe.
And two more photos of the site.
Here is a view of the pipe from the platform.
This is a shop cap for a pipe. It is also called a smoke vent, a spark arrestor, a deflector.
The chimney was finished at dusk. I took the photo from the ground, and the flash did not illuminate it, so the quality of the photo is rather poor.
This is a shelf for matches.
And here is the test fireplace insert.
The next day, the fireplace and stove were lit at the same time. The traction is good. I tried to photograph the smoke from the chimney on the street, but it was not visible due to the fact that the wood was dry.
Video of simultaneous firing of a fireplace and stove:
Comments:
Types of structures
The hoods inside the stove can be positioned in different ways, so there are many types of stoves. You can build a stove with your own hands for two-story houses, and both floors will be heated equally. You can even make a building with a bench (this type of heating is convection) or you can put a heat exchanger inside. This type of design is called a boiler and is marked KIK.
There is a type of building in the shape of a fireplace; they are usually built in houses outside the city. Heating gas stoves are designated IOK, and if they have a stove bench, the letter “L” is added. If such designs also have an oven, then the letter “D” is indicated.
Real Russian Kuznetsov bell-type stoves are marked RTIC, there are about 10 models, two of them have stove benches. Such stoves are most often built in baths. But it’s difficult to install a massive brick stove there, so many people choose a metal structure for baths. Sauna stoves are marked BIK; Kuznetsov designed them so that they were small-sized, looked presentable and took up a small area.
Heating a polycarbonate greenhouse with an infrared heater
Techniques for safe operation of a water boiler
The proper operation of the heating installation and long service life directly depend on the handling of the stove from the first days after its creation.
Do not attempt to heat the house if the water has been drained from the heat exchanger. The resulting damage cannot be repaired.
Also, you cannot pour liquid into the pipes if the furnace is already heating up, and the owner later remembered this, since the circuit will begin to crack from the temperature difference.
It is possible to pump moisture without using a circulation pump, but then the speed of water movement will be significantly reduced. This will result in reduced heat transfer from the heating system.
If a break in heating work is planned during cold times, it is possible to prevent freezing of pipes by pouring specialized antifreeze inside the pipes.
It is not allowed to cut off the water flow while the stove is burning, since without complete cooling there is a risk of rupture of the overheated heat exchanger.
The heating stove designed by Kuznetsov has great potential benefits for everyday life, especially in cold climates. But the complexity of execution, the presence of multiple nuances of masonry, will require mandatory consultation with an experienced stove master.
The step-by-step process of assembling the Kuznetsov stove is shown in the following video:
VKontakteFacebookTwitterGoogle+Average rating of ratings more than 0 Share link Comments There are no comments yet, but you could be the first... Similar articles Creating a brick stove with a water circuit for heating a house with your own hands 168 0 Laying a Kuznetsov stove for a bathhouse with your own hands, subtleties of masonry and ordering 289 0 V the convenience of a garage stove with a water circuit, how to make a potbelly stove with your own hands, the advantages of using 382 0 How to build a rough stove with your own hands: 12 photos with examples and stages of work 579 1
Operating principle of Kuznetsov bell furnaces: ordering
The operating principle of Kuznetsov furnaces is not complicated. When building a furnace, it is necessary to carry out all work according to drawings, diagrams and, of course, use procedures.
All Kuznetsov bell furnaces operate on the principle of separating combustion products. This principle lies in the fact that the gas generated as a result of fuel combustion is divided into two streams: cold and hot. The movement of gases inside the furnace design is very well thought out. Hot air is retained in the oven and retains heat for a long time. Cold air quickly flies into the chimney through a specially made recess. A furnace operating on this principle is called a bell-type (dome) furnace. Inside such a furnace, the hearth is combined with its lower part and forms something like a hood. It then acts as a gas separator into two streams. The flow of hot air rises and is retained in the hood, thus concentrating heat.
Advantages of Kuznetsov stoves:
- Cost-effective;
- Long-term heat retention;
- Slight soot formation;
- No need for frequent cleaning;
- A choice of different shapes and designs is possible.
The high efficiency rate (95%) of Kuznetsov furnaces is the result of a fundamentally new development and design features. For comparison, a traditional Russian stove has an efficiency of 25-40%. If Kuznetsov stoves have disadvantages, then they are few, and they are lost against the background of their advantages.
Russian Tepushka (RTIK)
A characteristic feature and its advantage are its compact dimensions. A small stove will fit perfectly into any interior and will not take up much space, which is undoubtedly important. At the same time, this advantage is also a disadvantage of the Kuznetsov furnace “Russian Tepushka (RTIK)”, since due to its small size, the thermal power is also small.
Heats can be:
- with a bed;
- with fireplace;
- with a two-tier cap.
The operating principle of the Kuznetsov furnace is based on the secondary combustion of pyrolysis gases. Therefore, they are also called pyrolysis ovens. It is the presence of several domes that allows you to squeeze maximum energy out of the fuel and thereby increase the efficiency of the design to 80%.
Preparatory work
First of all, you need to choose a place to build a furnace. The easiest way to do this is before building a house - then both the stove and the building are designed together so that three or at least two rooms are heated. With a ready-made house, the situation is more complicated. In this case, they tend to build the stove into an interior partition, since installing it into a load-bearing wall requires complex calculations and dangerous, time-consuming work (part of the wall will have to be dismantled, keeping the load from being blocked by a system of lintels and columns).
You can, of course, limit yourself to a simple wall-mounted arrangement, but then only one room will be heated.
A reinforced concrete foundation must be built at the selected location. Its dimensions must exceed the dimensions of the oven by at least 100 mm on each side. It is not allowed to combine the foundation of the furnace with the foundation of the building - both structures give different settlements and one of the foundations will pull the other along with it, causing it to skew.
A reinforced concrete foundation must be installed under the furnace.
The depth of the foundation depends on the bearing capacity of the soil, the depth of its freezing, and the method of operation of the building (periodically/continuously). Typically, in buildings with year-round habitation of people located on stable ground, the foundation is deepened by 400–600 mm. Crushed stone should be poured onto the bottom of the excavation as a reinforcing layer, and a sand cushion should be placed on top of it.
Then everything is done using traditional technology - they install the formwork, fix the reinforcement frame and fill it with concrete. You should proceed to the construction of the furnace only after the concrete has fully matured and gained sufficient strength - this usually takes about a month.
Calculation of dome heating devices
Without going into complex thermodynamic calculations, we will present the simplest method for calculating a bell-type furnace, which is used not by theorists, but by real stove makers with extensive experience and dozens of successfully operating heating appliances to their credit.
If you plan to take one of the existing structures as a basis, then you will need to calculate the heat loss of the room. To do this, determine its volume based on the dimensions of the external surfaces of the walls and ceilings. To make your task easier, you can measure the internal dimensions and add to them twice the wall thickness. Having obtained the cubic capacity of the room, multiply its value by 21 - the average value of heat losses for 1 cubic meter of total volume. The furnace power should be 15–20% more than the obtained values.
Dome stove designed for heating a two-story house
Now as for the case when, for some reason, none of the found projects suits you. There is only one way out - to create a heating device yourself, based on the general principles of constructing bell-type furnaces and methods for determining their internal dimensions using the method of proportions. All that is required for this is to correctly determine the external dimensions of the heating unit. The calculation method in this case is also not complicated. First of all, the resulting heat loss value must be divided by 300 - the thermal power that can be removed from 1 square meter. m of the outer walls of the furnace. In this case, only active surfaces are taken into account, that is, those that are directly involved in heat exchange. In this way, the area of the walls located above the grate is obtained. By adding the quadrature of the remaining parts of the furnace to them, the total area of the solid fuel heat generator is obtained. Its height and width are determined according to the relationships of the design taken as an example.
Sometimes situations arise when the resulting unit is too bulky. It doesn’t matter - it can be easily reduced by 25–30%, if we assume that the stove will be heated in the morning and evening.
When making a stove more compact, you should know that a double firebox will never provide double heat transfer. The maximum that can be achieved is an increase in thermal energy by 40–50%. So aesthetes and perfectionists will have to come to terms with the loss in efficiency of the heating device.
As for the dry seam, it is made with a width of 2–3 cm, and the lower value is taken during the construction of units that are used daily, and the upper value is taken during the construction of “weekend stoves,” that is, installed in dachas, hunting lodges, etc. .
Types of Kuznetsov furnaces
The design gained enormous value due to its amazing versatility. The Kuznetsov stove, drawings of which are presented in more than 150 options, can be used in any room as efficiently as possible. Each of the drawings takes into account the characteristics of the room for a specific purpose, which is why the stove operates with such high efficiency for a certain type of building.
There is no point in listing all Kuznetsov furnaces, here are just some of the options that are most in demand:
- bread ovens for cooking, combined with cooking surfaces;
- sauna stoves;
- outdoor stoves;
- fireplace stoves;
- heating stoves.
This is not a complete list of specialized Kuznetsov furnaces. It is possible to create combined types, which is very convenient if you use them in everyday life in small areas.
What can such a strange chimney provide?
- Stratification of smoke gases by temperature directly after the combustion chamber.
- In the path of gases, you can install not one, but two or three caps at once. As a result, the smoke will give off more heat, and the structure itself will consist of several zones with a permanent temperature.
- The hood is located next to the firebox and smoky gases that have not yet given up their heat enter it. As a result, ash, carbon monoxide and volatile hydrocarbons, which in a conventional stove are carried away by the chimney, burn out under the hood in this design. This leads to increased heat transfer and minimizes the amount of soot in the chimney.
- Thanks to natural convection, combustion products are physically unable to leave the stove before they give up all the heat.
- The heat exchanger in the Kuznetsov furnace, unlike other types of construction, is located in the hood, that is, outside the combustion chamber. It cannot in any way affect the temperature of the fire and, as a result, does not reduce efficiency.
Now - directly to the construction process.
Design and principle of operation
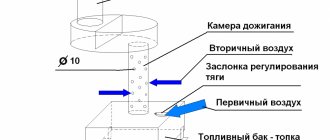
The expression “Everything ingenious is simple!” fully concerns the design of the dome furnace, which allows you to realize the advantages of the free movement of gases. The simplest two-bell unit, shown in the figure on the left, works as follows. The air necessary for burning firewood enters through the ash pan 1. The firebox 2 is made in the form of a tapering nozzle, thanks to which it is possible not to allow outside air to pass through excessively. Otherwise, it will immediately go into the second bell, carrying heated gases with it. The so-called gas view, which forms under the dome, also prevents the entry of heavy cold air. By the way, due to the simple design, the atmosphere established inside the furnace is often unstable - it is disrupted by the draft from the outer hood. That is why two-bell stoves, known long before Kuznetsov’s birth, were not popular.
Operating principle of a two-bell furnace
During active combustion of wood, flammable gases that have not had time to be oxidized by atmospheric oxygen rise under the dome 4 of the inner bell 3. There they ignite under the influence of an open flame and high temperature. We can say that a zone appears under the hood, similar to the one that forms in the afterburning chamber of a conventional pyrolysis furnace. It is also important that the process of pyrolytic combustion regulates itself - with a very intense flame, the outflow of combustion products becomes difficult, and, accordingly, the draft decreases. If the pyrolysis gases burn out, the process is restored. At the same time, no less important processes occur under the arch of the second hood. In this zone, nitrogen oxides and carbon monoxides (carbon monoxide) react, which, as a result of reactions, decompose into harmless components. When the dome unit operates correctly, predominantly water vapor and carbon dioxide escape into the chimney.
When wood burning comes to an end, the hoods act as storage tanks, holding heated air masses under their arches. Unlike channel furnaces, where the residual combustion products simply “fly out into the chimney,” in “smiths” they give up all their energy to the brick walls.
The ideal option for a two-bell furnace would be a round-shaped unit. In this case, the body of the heating device could serve as an upper dome. Unfortunately, in practice, it is difficult to build such a heat generator not so much because of its spherical shape, but because of the difficulties in arranging cleanouts and hatches for their maintenance. Because of this, the hoods are connected to each other by a wide channel that runs in the back of the oven. This feature is reflected in the diagram on the right.
If it is necessary to integrate a water heating circuit into the furnace, it is installed under the arch of the second hood. This method does not affect the thermal equilibrium of the system and does not have a negative impact on the fuel combustion mode.
The efficiency of furnaces of this type can be further increased by installing several cascades, each of which consists of two hoods, however, due to the complexity of installation and increased requirements for the heat resistance of the lining, such designs are not popular among amateur stove makers.
We strengthen the structure with wire
https://youtube.com/watch?v=vXFx1VcDXKQ
Every third row should be laid with metal wire; this is a small but necessary detail that will make the structure reliable. Iron components must be inserted into the masonry with a gap of 0.5 cm, and the resulting void must be filled with fire-resistant wool.
To make a Kuznetsov sauna stove with your own hands, it is not necessary to have masonry skills. If you have a diagram and drawings, if you work carefully, everything will definitely work out. To find the scheme, just go to Kuznetsov’s website, there is information available to everyone that anyone can use.
If you have experience with masonry, then there will be no problems, the main thing is to follow the instructions.
Furnace foundation
As with every brick structure, it is necessary to prepare the foundation for the furnace in advance. If this is not done when building a house, the process can be labor-intensive. But you can’t get around it, because the structure turns out to be quite heavy and neither the cement screed nor the floor joists can withstand it. So, to prevent the furnace structure from cracking in the future, the construction of the foundation must follow the following rules:
Fig.1. Scheme of the furnace arrangement.
- The base of the furnace should not be connected to the common foundation, otherwise it will cause deformation of the structure and lead to cracks or even complete rupture.
- If the furnace structure is planned to be located near a wall, then the furnace foundation being built should not touch the main one and should be located at a distance of no more than 5 cm. The resulting gap after the concrete has hardened is filled with sand.
- It is necessary to maintain correspondence between the climatic zone of soil freezing and the depth of the excavated pit.
- It is necessary to isolate the foundation from moisture with a sand cushion placed at the bottom of the pit, and after hardening, wrap it with roofing felt or other waterproofing material.
- It is necessary to reinforce the concrete part of the foundation with a metal frame made of reinforcing bars.
After completing this stage, the process of constructing the furnace begins. For anyone who has at least once encountered such work, it will not be difficult to master the technology of bricklaying using the example of the Kuznetsov fireplace, modern models of which are very diverse and fit perfectly into the interior.
What will be needed for construction
Let us immediately note that it is better not to use used bricks to build a furnace. Constant temperature changes are not the most suitable conditions for its operation, and if you take a material with fatigue stresses, it is possible that after a couple of years the walls of the furnace will simply begin to crumble into dust. So, what will you need to prepare to implement our project:
- solid red clay brick M 150 in the amount of 754 pcs. – for laying the body of the heating device and chimney;
- sand, 150 kg;
- fine clay, 130 kg;
- refractory brick - 63 pcs., which will be needed to equip the core of the furnace; Fireclay bricks of the Sh-5 and ShB-8 brands are most often found on sale. In our case, it is better to take the latter, since its dimensions fully correspond to the dimensions of the red brick.
- blower door, 1 pc.;
- combustion door, 1 piece;
- doors for cleaning channels, 6 pcs.;
- grate, 1 piece (minimum size 250x375 mm, which can be assembled from separate grates);
- steel wire for tying rows;
- metal corner;
- chimney damper, 1 piece;
- asbestos cord or basalt sealant - for sealing the installation sites of cast iron castings.
If you have ever done brickwork, you should know what you will need:
- trowel (trowel);
- container for preparing the solution;
- building level;
- plumb line and cord;
- bushhammer;
- mixer for mixing the mixture (you can use an attachment for an electric drill or prepare the solution manually);
- roulette;
- pencil.
If during the construction process it is necessary to trim bricks for the front side of the stove, then this work is best done using a grinder with an installed cutting disc for stone and concrete.
Basic rules for creating a heating stove
- To make Kuznetsov stoves, the ordering (masonry diagrams) should be printed in advance.
- The refractory shell located inside the furnace must be free on all sides, since the brick expands during the heating process.
- Internal refractory masonry when using fireclay bricks is always done on edge. If the bricks are made of clay, on the inner walls and on the posts, they are laid at the discretion of the stove-maker.
- To strengthen the bond, a wire is laid every two brick rows.
- When a Kuznetsov stove is created, the ordering of brick stoves for a home provides that various elements (for example, doors) are installed in such a way that there is room for expansion. A special gasket is placed between the brick and the metal element.
- After completing the construction of a brick structure, it should be treated with a fire-resistant compound.
- The first kindling begins at a minimum temperature and is then gradually increased.
Safety
The main requirement for any type of oven is its safety. In addition to the fact that the use of a constant open fire in the house always sharply increases the risk of fire, the combustion of any type of fuel produces carbon dioxide, which is extremely dangerous for humans, which, if the design is defective or improperly used, leads to carbon dioxide poisoning.
Therefore, if the owner of the house does not have stove construction skills, the construction of the stove should be entrusted to a master, despite the high cost of this work. Only a specialist will be able to lay bricks in the stove correctly with minimal gaps and correctly install the chimney and pipe, taking into account all possible nuances of its operation, including the prevailing wind direction.
What is needed to build Kuznetsov stoves
To lay it according to all the rules, it is important to strictly follow the diagram. Experts advise first to do a “rehearsal” of this process by laying out the structure “dry”, without using cement mortar.
When calculating the main parameters, it should be taken into account that the concrete base must be 10 centimeters larger than the dimensions of the furnace on all sides. The pit is dug to a depth of approximately 40 to 60 centimeters.
Today, more than 150 diagrams – drawings with designs of Kuznetsov furnaces – are available for public viewing on the Internet. To build any of these models, you need to stock up on the necessary materials and tools. For example, to build an OVIK-9 oven, which has a cooking chamber with a 2-burner stove and steel doors, and is also equipped with a separate exhaust duct, the following materials are needed in a certain quantity.
- Red brick – approximately 450 pieces.
- Fire-resistant brick of the SHA-8 brand for the firebox – 22 pieces.
- Doors: for a DT-3 firebox with a size of 210*250mm and for a blower (WPC) with a size of 140*250mm.
- Grate, size 250*252 mm.
- Cooktop (stove) with 2 burners measuring 586*336 mm.
- Doors for the cooking furnace size 510*340 mm – 2 pieces.
- Valves: for the firebox – 130*130 mm, for the chimney pipe – 130*250 mm, “summer” valve – size 130*130 mm.
- Metal corner 36*36*4*600 mm and metal strip 40*4*600 mm.
- Metal sheet 600*550*3 mm.
- Pre-ceiling metal sheet 500*700*3 mm. You can also use ceramic tiles or other material with fire-resistant properties instead.
As for the tools, for the work process you will need a trowel, a plumb line, a building level, a container for mortar, spatulas, a construction angle, a hammer drill, an angle grinder and a mixer attachment.
Ovik stove 15 l how many bricks are needed
First of all, we determine the composition of the soil: sandy, clayey, loam, etc. The composition determines how it will behave in winter frosts. When frozen, clayey and loamy soils exhibit heaving, that is, they expand when frozen due to the moisture present in it. And freezing and expansion can be uneven, which causes movement of the foundation, its bulging and, as a result, distortions. From double impact (the weight of the stove presses from above, the protruding force from below) the foundation may even crack, and after it the stove.
How to make a reliable foundation for a stove
To avoid such impacts and keep the oven intact, use the following steps.
Firstly, a larger area slab is made under the foundation to reduce the load. The slab is well reinforced to avoid cracks and fractures.
Secondly, an enlarged sand and gravel cushion is made under the slab, compensating for the pressure from below in case of heaving of the freezing soil.
Thirdly, to reduce heaving, the space under the house is drained as much as possible, and drainage is installed around the house. This reduces the moisture content of the soil itself.
Fourthly, the foundation is made solid and insulated (if the foundation is piled, it is sewn up and insulated), reducing the likelihood of freezing. The house must also be reliably insulated, including the floor of the first floor. Then the structure of the house itself works like a thermos, retaining soil heat and preventing the soil from freezing.
The combination of these conditions will make it possible to create a strong and reliable foundation.
Let's now look at a specific example. The foundation for our stove will be located on moderately heaving soil in a seasonal house.
Foundation slab
Slab dimensions (in cm): 200x150x20
(0.6 m3)
We make a sand cushion under the slab, 5 cm thick (volume of sand: 200x150x5=0.15m3)
Cement mortar for slab 1:3 (cement/sand)
We must reinforce the slab with a metal rod, 1 cm in diameter, the rods are laid out crosswise in increments of 10 cm and the knots are tied with knitting wire (not welded, so as not to weaken the rod itself).
Foundation - foundation
If we make the foundation for our brick kiln concrete, we will need: cement, sand, crushed stone (or gravel, or rubble stone, or broken brick). It is convenient to make such a foundation if its height is low (within 0.5 m).
If it is higher, it is easier to lay out the foundation box from concrete blocks or bricks (can be silicate or ordinary red masonry). And fill the internal space with concrete mixed with brick and stone filler: crushed stone, pebbles, rubble stone, broken brick. Just don’t use bricks that have been stored outdoors for a long time; they lose their strength when they get wet and freeze and can crumble.
The masonry mortar is also made at a ratio of 1:3. For backfilling (internal filling, the proportion of the mortar is 1:4. The volume of the filler (in relation to the mortar is no more than ½), that is, the stone is no more in volume than the mortar, so as not to lose the binding properties of the mortar mixture.
An example of an estimate for a foundation
oven OVIC -15 with oven 4.5x3 bricks. (117x78 cm)
Slab : concrete, reinforced met. rod (diameter 8-10 mm), with a cell of 10 cm. Slab dimensions (in cm): 200x150x20 (0.6 m3)
The slab is poured into earthen formwork 25 cm deep, onto a sand cushion 5 cm thick, previously well compacted. Lay the metal rods in increments of 10-12 cm and tie the knots with wire. The depth of occurrence in the slab is closer to the middle. Prepare cement mortar at the rate of 1:3 (cement/sand).
The base consists of:
brick box 130x90 (5x3.5 bricks = 15 pieces in a row)
backfilling - filling (concrete-stone-brick mixture)
Size of sand-lime brick: 250x120x88 mm.
The brick box is laid out on a pre-cured slab (soaked for 5-7 days) along plumb lines. The height of the masonry is up to the level of the lower edge of the floor joists - 12 rows.
Prepare cement mortar for masonry at a ratio of 1:3 (cement/sand)
Cement mortar for backfilling 1:4 (cement/sand).
For backfilling, use broken bricks and stones no more than ½ the volume of the cavity to be filled.
Materials:
silicate brick (250x120x88) 15 pcs x 12 row = 180 pcs.
If a brick has been lying outside in the open air during the winter, it cannot be used.
brickwork (V=0.65 m3): cement - 60 kg (130 l solution)
backfill (1.107 m3): cement (at the rate of 1:2 solution volume = 0.55 m3) = 182 kg
Total:
silicate brick = 180 pcs.
cement = 502 kg (the quantity in bags is determined based on the weight of the packaging)
Usually these numbers are increased by 10% so as not to miss by a smaller margin.
Metal
metal rod (diameter 10-12 mm) 2 m x 15 pcs., 1.5 m x 20 pcs. = 60 m
knitting wire (1-1.5 mm) = 10 m
It is necessary to lay waterproofing (roofing felt in 2 layers) between the slab and the base of the foundation in order to cut off the rise of moisture (capillary effect) to the sand-lime brick, which loses strength when regularly moistened. The finished foundation needs to stand for at least 2 weeks for the concrete to gain the required strength.
Stove with bench
The stove with a stove bench is especially popular among our people. This design is also possible for bell-type furnaces. They heat themselves with wood. Such models are used mainly in dachas or country houses. All stoves with benches consist of the following elements:
- heating oven;
- bed;
- hob;
- oven;
- ash pan;
- woodcutter;
- place for kitchen utensils.
As with any stove structure, such models require a separate foundation. First, the base of the furnace is built. It consists of several brick rows aligned horizontally. They must have right angles. You should also maintain a distance from the rows of the base to the wall of the room of approximately 15 cm (more is possible). Then a vent and air vents are installed, thanks to which the air heated in the firebox rises up, is evenly distributed throughout the entire structure of the stove and optimally heats the stove bench.
At the level of 8–9 rows, overlaps should be laid on the bench and firebox. After this, you need to continue laying brick rows for the oven and hob according to the order. It is mandatory to lay a row separating the latter from the wall of the room.
The next stage: laying out the jumpers. In the oven area, you need to use regular or figured masonry in the shape of an arch or wedge for this purpose, and it is advisable to install metal corners and a decorative shelf above the stove casing. Subsequent brick rows connect all the chimneys together. Windows are made on the walls, and a summer house is placed near the oven (it can be used in the summer season). Those located higher will warm the room in winter.
The pipes are mounted higher and have a square cross-section. It is recommended to lay 2.5 bricks. Those floors that are laid in the area where the chimney is located should be insulated in several layers with basalt slabs.
It is advisable to cover the outer surface of the chimney with silicate brick, since it is characterized by resistance to temperature fluctuations and climatic precipitation. After its erection, all available fittings are installed on the stove.
For example, you can not limit yourself to simple brickwork (although it looks quite solid), but paint the structure with heat-resistant paint and decorate it with ornaments and designs. This model will look beautiful in any interior. In financial terms, the finishing will be more expensive, the higher the quality of the tiles used for it. And tiles serve not only an aesthetic function - they retain heat well. And these elements are unpretentious in care. If you can’t do the finishing yourself, professional craftsmen can come to the rescue.
DIY bell furnace construction
We will begin the construction of the furnace from the foundation, since it is its foundation and one of the main elements in ensuring the strength characteristics of the structure.
- We dig a rectangular hole, about 1 meter deep (dimensions: width 1 m, length 1.5 meters).
- Pour about 15 cm of sand onto the bottom and leave it for several days to shrink.
- We make formwork from boards or other unnecessary wooden products.
- We put a thin metal rod to reinforce the concrete.
- Slowly pour the concrete, periodically removing air bubbles from it using a regular shovel or a small concrete vibrator. As a result, we should get an even, smooth slab. The foundation of 2 bricks should not reach the floor level.
Construction of the foundation for the furnace
We leave the concrete to harden for several weeks, since the longer the foundation stands, the stronger and more reliable it will be.
Step-by-step instructions for laying a Kuznetsov stove with your own hands - ordering (photo)
- Lay out the first row of bricks. It must be perfectly even, as it is a solid basis for future order. We make the thickness of the seams about 5 mm. Checking the correct angles. We will need 20 bricks for this masonry.
Laying out the first row of bricks for the stove - We begin to create the blower chamber and the lower cap.
In order to be able to clean its base after finishing the masonry, we place two halves of brick protruding from the main row and do not sit them on the mortar. We install the ash door and temporarily support it with bricks. We lay the second row of the stove - Place the 3rd row according to the drawing.
During the laying period, we secure the ash door tightly. Laying the third row - We partially lay out the 4th row of fireclay bricks. From it we create the side walls of the combustion chamber and the end wall. We cover the blower door with 2 ordinary bricks, let them out a little above it and cut them at an angle. We also place 2 hewn bricks at the end of the vent. We leave a five-millimeter gap between the two types of bricks. To do this, we put a simple five-millimeter corrugated cardboard between them. In the future, it will simply burn out and the thermal hole we need will remain. We will have to make such gaps in other rows where two types of bricks will be joined.
- We continue laying 4 rows.
After we lay the bricks on the side above the blower door, we cover the middle of the door with fireproof and ordinary bricks, hewn on both sides from the side. We will need to take 1 regular and 1 fireclay brick. Laying the fourth row - From the fifth row we create a fuel chamber.
We cut the brick at an angle and place the front wall of the fireplace. The internal space of the firebox between the masonry should be similar to the size of the grate so that it easily fits into the brick rectangle and onto the bricks of the previous row protruding by 10 -15 mm. We make a five-millimeter gap between the walls and the grille. Behind the firebox, where the first hood is located, we create a channel of ½ brick to connect the two hoods. We will need 12 and ½ red and 4 fire bricks. Here we place a grate on the protruding bricks of the previous row (do not fix it with mortar). We fill the holes with sand. Laying the fifth row - On the sixth row we install the combustion chamber door.
We fill the holes between the bricks and the door with asbestos. Laying the sixth row - Place the next row.
When laying the end wall of the firebox on the left side, we make a gap of 2–3 cm, which will serve as a dry seam. We use 12 regular and 3 fire bricks. Laying the seventh row - We lay the eighth row according to the drawing, using 12 ceramic and 3 refractory bricks.
Laying the eighth row - In the 9th row we make the walls of the hearth, and between it and the hood below we create a passage where the combustion products will go. We make the side walls ten millimeters lower than the rest of the masonry. We move the bricks that we place above the firebox a little to cover a small part of its frame. Before this, we cut the bricks obliquely and thus create a “recess” into which we will lay the main central brick. We use 12 regular and 2 and a half fire bricks.
- Here, between the façade side bricks, which are located above the chamber door, we place a centering brick covering the rim of the door.
Before doing this, we cut it obliquely. We cover the side of the chamber on the left with a 10 mm asbestos strip. It will line the entire 9th row. Laying the ninth row - On the bricks of the tenth row, which are covered with fire-resistant asbestos, we place ordinary bricks on a “dry” surface. In the masonry that frames the firebox, we make a small ten-millimeter cutout on which the hob will lie. We leave a 5 mm gap between the slab and the brick on all sides to heat the metal. We cut the fireclay brick, which we lay in front and to the right of the firebox, at an angle. We make a small ten-millimeter gap between the slab and the masonry.
- After we have laid out the 10th row, we place asbestos twine, which is soaked in a clay mixture, on the openings in the masonry.
We put the panel on top. We fill all the holes between it and the bricks with sand. Laying the tenth row - On the 11th row we begin to create the walls of the cooking chamber and install a frame with doors.
We make a 5 mm gap between the steel frame and the masonry. To form the frame, we wrap it with fireproof rope. Laying the eleventh row - We lay out the 12th row according to the drawing from 11 ceramic bricks.
Laying the twelfth row - On the 13th row we continue to form the chamber and side channels.
Laying row 13 - We lay out the 14th row strictly according to the drawing.
Laying row 14 - We put the 15th row in two approaches.
First, we raise the walls of the chamber and channels to the level of the steel door frame, and then create a jumper for it. We place a metal sheet 600x550 mm on this row and make a cutout in it for the hood. For strength, we place 4 iron corners and 1 strip on top of the sheet. Laying row 15 - We place regular brick on the corners of the 16th row and the strip as indicated in the drawing. Leave the channel openings open. On the bricks that frame the nearest channel and for exhaust, before laying, we make holes for the chimney valves. We make a 5 mm gap in the masonry.
- Here, on the platform with the openings, we install 2 valves.
Laying row 16 - On the next row, we cover the cooking hearth and valves with ceramic bricks so that the drainage channels are open.
Laying row 17 - Next we form the second cap.
To do this, we install two halves of bricks without mortar, which we raise above the main masonry. This is necessary so that you can then clean the base of the stove hood. After finishing the masonry, we fix these bricks with mortar. Place row 18 - We lay the 19th row according to the drawing from 12 and a half red bricks.
Place row 19 - We lay out the 20th row according to the drawing from 13 and a half red bricks.
Place row 20 - We lay out 21 rows according to the drawing of 14 bricks.
We put 21 rows - Next, we lay a large section of the furnace according to the specified drawing with alternating rows.
So we lay out rows 22, 24 and 26 of 14 bricks each. Lay out row 26 - We lay out rows 23 and 25 in the same way.
Lay out row 25 - For the 27th row we will need 14 bricks, but their placement on the masonry is slightly different from the previous ones.
Here we prepare the basis for the following almost continuous surfaces. We put the 27th row - On the 28th row in the masonry that frames the chimney duct, we make 10 mm cutouts for installing the main chimney damper.
When making openings, we regularly apply a latch so that it is located 5 mm from the walls of the oven and fits freely into the gap we have made. Place row 28 - Here we also install the valve itself into the opening onto the solution.
- For the 29th row we take 19 ordinary bricks and almost completely cover the surface of the structure.
We leave only the chimney opening with the valve intact. Place row 29 - On row 30 we also almost completely cover the surface of the oven according to the pattern.
Place row 30 - On the 31st row we lay the base of the pipe in 1 brick.
Its size must correspond to the cross-section of the chimney. The masonry is made of 5 bricks. We put 31 rows - Then we create the chimney pipe.
For each row we need 5 ceramic bricks. The furnace has been built. Now it should stand until the solution dries completely. Lay out the chimney pipe at the required height