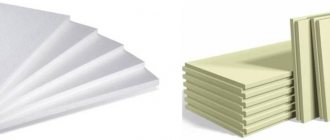
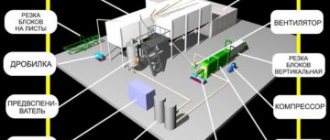
Expanded polystyrene is a modern insulation material created using heat treatment with the addition of polymer granules to a foaming component in an extruder. “Extrusion” is a technological process in which a component is pressed into a foam mass at high temperature to give it the desired properties.
As a result of this process, the new material compares favorably with conventional foam in a number of parameters:
- high strength, water resistance, low vapor permeability, durability, environmental friendliness, fire safety.
High thermal insulation qualities and durability have made expanded polystyrene almost indispensable for insulating buildings. More than 75% of the territory of our country is in harsh climatic conditions.
There are several ways to use polystyrene.
Laying foam plastic inside hollow walls. This method is applicable directly during construction. The method of insulating walls with polystyrene from the outside has become widely used. This is the most commonly used method, which is used both in the construction and reconstruction of various objects, and insulation of already constructed buildings.
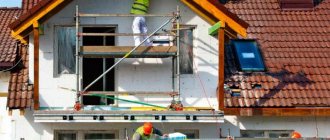
The use of expanded polystyrene in the construction and reconstruction of buildings
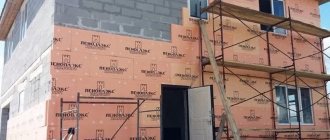
External wall insulation with polystyrene foam has received the most widespread use in the use of this material. The thickness of the sheets in this case is from 50 mm to 100 mm.
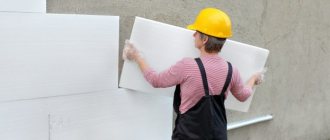
Before starting this work, wall preparation is important. The foam is attached to the walls using special glue and plastic mushroom-shaped dowels. According to the work technology, reinforcement with dowels is carried out only three days after gluing.
For corners use a special corner profile.
All this prevents the material from slipping while the glue dries during work. After all, the amount of slipping of even a light sheet can reach 10 cm. After gluing the foam sheets, a reinforcing mesh is used to create a more rigid layer under the plaster. This will make it easier in the future to finish the building’s exterior, plastering and painting. External thermal insulation work can only be carried out on days without rain.
Application of mastic under the mesh, leveling mastic, or primer should be done only after the previous layer has dried. The air temperature must be at least 5 C°. High environmental characteristics and fire safety made it possible to use this material for insulation from the inside of the house. Such work is carried out if external installation is impossible or inconvenient.
Table: Useful data on thickness, number of slabs and packaging of Penoplex
| Material | 20 mm | 30 mm | 40 mm | 50 mm | 60 mm | 80 mm | 100 mm | 120 mm | 150 mm |
| Comfort 1185x585 | 20 pcs; | 13 pcs; | 9 pcs; | 7 pcs; | — | — | 4 things; | — | — |
| 13.86 m2 | 9.01 m2 | 6.23 m2 | 4.85 m2 | — | — | 2,772 m2 | |||
| Wall 1185x585 | — | — | — | 8 pcs; 5,545 m2 | — | — | — | — | — |
| Base 1185x585 | 20 pcs; | 13 pcs; | 10 pieces; | 8 pcs; | 5 pieces; | 5 pieces; | 4 things; | 3 pcs; | — |
| 13.86 m2 | 9.01 m2 | 6.93 m2 | 5,545 m2 | 2,772 m2 | 3.47 m2 | 2,772 m2 | 2,079 m2 | — | |
| Facade 1185x585 | 20 pcs; | 13 pcs; | 10 pieces; | 8 pcs; | 5 pieces; | 5 pieces; | 4 things; | 3 pcs; | 2 pcs; |
| 13.86 m2 | 9.01 m2 | 6.93 m2 | 5,545 m2 | 2,772 m2 | 3.47 m2 | 2,772 m2 | 2,079 m2 | 1.38 m2 |
Have questions? Call the number
8
Head of Sales Department
Features of the work on insulation with polystyrene foam from inside the house
Insulating walls with foam plastic from the inside of a house has its advantages and disadvantages. The work on fastening to the wall is not affected by external weather factors; the area of the insulated surface is relatively small, which eliminates unwanted sliding of the sheets. As a disadvantage, one can note the reduction in the internal volume of the building.
The additional thickness of the insulating structure further reduces the area of the rooms. For internal installation of insulation, the thickness of the foam sheets can be no more than 40 mm, and fastening can only be done with glue. The use of profiles for laying foam plastic and additional fastening with dowels can be abandoned.
It is quite possible to do this work yourself. How to attach polystyrene foam to the wall. There are two ways to attach foam to the wall - using glue and mechanical fastening with dowels “fungi”. Mechanical fastening is usually used as additional fixation of glued foam. To fasten using this method, it is necessary to profile the wall with thin wooden blocks or special profiles.
They are aligned in a plane; this determines how evenly the polystyrene sheets can be strengthened. Holes are drilled in the profile according to the diameter of the dowels used, usually 8 mm. Using dowels and these holes, the material is attached to the bars. We will not consider fastening with drilling directly into the wall as extremely inconvenient.
The optimal way to attach insulation to the wall from inside the house
The most convenient and less expensive method of fastening is fastening with glue. The possibility of abandoning the mechanical method was discussed above - small areas and the absence of unfavorable climatic factors.
This work can be carried out in several steps over two days:
Preparing the wall surface. The quality of the entire work depends on the basis on which the insulating material rests. The quality of surface preparation determines how firmly the foam will stick to the wall and how much glue will be needed to attach the sheets.
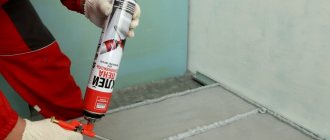
The wall must be carefully leveled and primed. The surface of the foam, on the contrary, should be rough for better adhesion to the glue. Selection of the optimal glue for attaching sheets of foam to the wall. Dry glue mixture or polyurethane foam glue?
It all depends on the skills at work. It takes much more time to properly prepare glue from a dry mixture, and the quality and consistency of the glue must be constantly monitored. Laying insulation sheets using polyurethane foam is faster and the adhesion is better.
But the complexity of preparing glue and the long duration of the work itself are compensated by the absence of errors with little experience in this field. Foam dries faster and requires experience and skill from the master. An important factor is that polyurethane glue in cylinders is much more expensive, and the quality of adhesion for glue made from a dry mixture is not much lower.
The glue is applied to the foam sheet using a notched trowel evenly over the entire surface in a layer of about 1 cm.
The sheets are glued to the wall starting from the bottom to avoid slipping while the glue dries. It is advisable to arrange the foam sheets in a checkerboard pattern, as when laying bricks. This way the whole structure will be more stable.
Gaps should be minimal. If foam is used, glue is applied around the perimeter of the sheet at a short distance from the edge and in the center. After gluing, the gaps between the sheets are filled with the same glue and puttied.
After the glue has dried, mastic is applied to the insulation and a reinforcing mesh is laid on it. The mesh should be recessed in a layer of mastic, this will give greater stability to the entire structure and will facilitate further work on the wall. The use of mastic and reinforcing mesh further strengthens the entire structure on the wall.
Plastering does not relate to the process of attaching polystyrene foam to the wall, but this is the logical completeness of the entire process. For all the work you will need: The polystyrene foam sheets themselves of the required area. A dry adhesive mixture at the rate of 3 kg per 1 m2 of wall area. 1 bag contains 25 kg of dry mixture. If you decide to use foam, 1 bottle replaces one bag of dry glue. Reinforcing mesh, mastic (consumption of the finished mixture is 2-3 kg per 1 m2). Spatula, trowel, level and a classic set of home craftsman tools (hammer, screwdriver, knife, ruler , compass, masking tape). An electric drill, if you are planning to fasten with dowels. The use of polystyrene foam for home insulation has its supporters and opponents.
Modern developments of this material make it possible to use it for residential premises without fear of adverse effects on health. Lightness, environmental friendliness and fire safety in addition to ease of installation make this material very competitive in construction and repair. Ivan Publitorov Insulating a house is an important issue for its owner. One of the most popular materials used for insulation and additional sound insulation is polystyrene foam. It is reliable and effective, does not put additional load on the walls. If the decision is made to use it, then the home owner is faced with the question of how to attach the foam to the wall, what kind of fastening to use in order to get a reliable, strong structure.
Foam plastic and penoplex are the most popular materials for insulation and sound insulation of house walls, because... they are practical and inexpensive.
Preparatory work
Before attaching the foam, you need to prepare the surface.
There should be nothing on the wall that could interfere with the work. All structures must be removed. Clean the surface from dust.
If there are cracks, chips, unevenness or other damage on the wall, then they must be eliminated before attaching the insulation. Irregularities on the wall of more than 1 cm can cause insulation failure. If the walls are damp, they need to be dried.
The next important step in preparation is treating surfaces with special compounds that will prevent the formation of mold and mildew. The next stage of work can be started only after they have completely dried.
Scheme of insulating walls from the outside with polystyrene foam.
After the preparation is completed, you can begin drawing up a diagram of the location of the foam sheets on the wall.
Such a scheme will help to minimize losses from cutting sheets. On the wall they should be arranged in a checkerboard pattern. If the foam needs to be cut, then it is better to use a mounting knife.
The foam can be attached in several ways: with glue or mechanical fasteners.
To fasten foam plastic to the wall, use special dowels, which are also called umbrellas or mushrooms. You can use any of these methods, but, as practice shows, it is most rational to simultaneously glue and nail the foam. During facade work, this technology is most justified, especially if heavy facing materials will be used later.
It is better to fasten the insulation only with glue during interior work; this will be quite enough. Dowels do not need to be used as fastenings for foam plastic, since heavy facing materials are not used during interior work
Return to contents
The easiest way to attach foam to the wall is to use glue. Work begins from the bottom with the installation of a starting bar.
The plank will become a reliable support for the bottom row and will not allow it to move. This method will allow you to do the job correctly and with better quality. If you do not use the limiting strip, then until the adhesive mixture dries, the foam can drop up to 10 cm.
Scheme of external insulation from foam blocks.
The thickness of the starting strip should be equal to the thickness of the insulation sheet. In addition to the strip, to attach the insulation, you will need:
- Tile adhesive. Construction mixer. Electric drill. Large and small spatulas. Container for glue.
When preparing the adhesive mixture, you must strictly adhere to the instructions. Using a construction mixer attached to an electric drill, prepare the solution, strictly observing the proportions of water and dry mixture.
Return to contents
Two spatulas are needed to make it more convenient to work. The small one is used as a spatula to spread the mixture onto the large one.
On a perfectly flat wall, you can work with a spatula-comb with special teeth. If the surface has differences of more than 1 cm, then the mixture is applied to it with a spatula in separate “islands”. Due to this, all differences are leveled out as much as possible, that is, a larger amount of glue is placed on the unevenness, and less on the protrusions.
Graph of thermal insulation properties of insulation materials.
The adhesive mixture can also be placed on foam plastic. Manufacturers recommend applying it evenly over the entire surface.
But here you may encounter the following problem: if the wall is uneven, then half of the sheet may not stick. In addition, the sheet will become 3-5 kg heavier and will be inconvenient to work with: hold, fasten, level. Therefore, for convenience and reliability, it is better to apply glue to the wall.
The adhesive mixture is applied in “islands” along the perimeter of the foam sheet. "Islands" can be of various sizes. The main task is to level the insulated surface as much as possible if there are depressions on it.
All existing protrusions should be knocked down, if possible. Alternatively, you can scrape off the insulation sheet a little in the place where the protrusion hits. In addition, the glue must be applied to the wall along the perimeter of the sheet in a broken thick line.
For this it is better to use a small spatula. This technique will allow some of the glue to get under the adjacent sheets. Thanks to this, the joints will be more durable.
Attach the sheet to the prepared surface and press lightly. To avoid making dents, fasten carefully. The sheets are stacked in a checkerboard pattern.
Return to contents
One of the types of fastenings for foam plastic are special dowels - mushrooms, which consist of a plastic circle (hat and plastic sleeve) and a “leg”. A plastic or metal nail is driven into the sleeve. It is better to fasten with plastic nails.
For work, in addition to the dowels themselves, you will need:
- Perforator.Drill.Hammer.
The depth of the hole for fastening should be 20 mm greater than the length of the fungus. To decide how long to prepare the fungi, you need to add 1 cm to the thickness of the insulation as the thickness of the other layers on the wall and add another 3-4 cm to the recess.
For example, with a foam thickness of 50 mm, you will need mushrooms with a length of 50 + 10 + 40 = 100 mm. In this case, the depth of the hole will be 100+20=120 mm. You need to prepare a drill for the hammer drill of the same length.
Fasten the sheet with at least 5-6 dowels, placing one in the center, the rest at the joints of the sheets.
Thanks to this, the joints are better pressed. If necessary, you can attach more material. Dowels are considered the best and most reliable among foam fasteners.
First prepare the holes for the fasteners. Then insert the fungi into them, without nails for now.
Hammer it with a hammer so that the cap is level with the surface of the insulation. When all the fungi are installed, you can start driving nails inside. A correctly hammered mushroom is immersed in the insulation by 1-2 mm.
It is very important to take into account that the insulation can be nailed no earlier than 3 days after gluing is completed. During this time, the adhesive mixture will dry and the foam will not move away from the wall.
To insulate buildings during modern renovations, materials derived from polystyrene foam are often used: polystyrene foam, penoplex. Their composition is more than 90% air. This determines their high thermal insulation properties.
Before attaching polystyrene foam to the wall outside or inside the premises, you should prepare the working surfaces and decide on the installation method. Not only the service life of this material, but also the durability of the decorative finish will depend on the quality of fastening of the sheets.
Preparatory activities
You can insulate a house with polystyrene foam in 2 ways: with glue or with special dowels
Insulation allows you to save on heating the room. You can attach the foam to the wall after preliminary preparation of the surface.
The process consists of performing a series of actions to level and strengthen the base. It all boils down to this:
- unnecessary structural elements are dismantled from the working surface; falling sections of the finishing coating are removed to a solid base, after which they are plastered again; the walls are checked for unevenness with a level; if necessary, the entire surface is leveled and puttied; after drying, the dust formed on the installation surface should be washed off with water (you can wipe with a damp cloth); when the moisture has evaporated, apply sequentially: a primer layer, a solution against mold and fungi (with a brush or spray); before attaching polystyrene foam, you should take measurements of the wall (to order consumables in the required quantity, in a convenient format).
Preparatory operations also include the selection of tools. To carry out the work, depending on the chosen fastening method, you will need the following set:
- spatulas of different sizes; construction knife, stapler; level, tape measure, pencil; hammer drill (impact drill); mixer or attachment for stirring the adhesive solution; sandpaper (grater); hammer; containers for glue, primer, plaster mixtures.
It is customary to pay great attention to preliminary preparation. Leveled walls without defects speed up further installation work, avoiding possible troubles (for example, panels falling off along with the plaster). It is recommended to use foam plastic 3 cm thick inside the rooms, and at least 5 cm thick outside.
Mounting methods
Fastening with fungi Installation on plaster mixture is not the most reliable
Polystyrene foam is installed on the prepared base in many ways. A description of the most common of them is given in the table. The classification criterion lies in the materials used for fastening.
No. Method Procedure, features 1 use of plaster mixtures; a solution of the required consistency is prepared according to the instructions on the packaging; in this case, the volume should be mixed for approximately 3 hours of work (after which the mixture begins to lose its properties); the solution is applied with a spatula along the perimeter of the sheet in a continuous layer (thickness from 10 to 30 mm), then several contact points are established on the remaining surface (on average 5-6 are enough); the fragment is applied to the wall; gluing is carried out from the bottom up (it is advisable to do the work in a checkerboard pattern); the sheets are pressed tightly against each other to minimize the size of the gaps; if the distance between the joints exceeds 2 mm, then the area is sealed with polyurethane foam; the disadvantage is weak fixation, it is advisable to use mixtures together with the following two methods: 2 fastening with fungi, holes are drilled in the wall through polystyrene foam (with a diameter of 0.8 cm, depending on the thickness of the plastic part of the fungus); the dowel is inserted and hammered in so that it fits at least flush with the surface; the use of fungi allows both attaching and dismantling fragments without consequences; There are 2 common options for the location of dowel nails: 4 pieces in the corners, 1 in the center for one sheet; inserted along the joints, securing several fragments at once 3 with the help of adhesives; the scheme of work is similar to the use of plaster mixtures; It is easier to apply the glue with a gun. Attaching polystyrene foam or polystyrene foam to a brick wall, as well as a wooden, concrete, or stone wall can be done using any of the described methods.
Extruded polystyrene foam is gaining increasing popularity as insulation. In terms of its characteristics, it is superior to ordinary polystyrene foam, but is more expensive in price. To install it, you don’t need to invent anything - just use the methods outlined.
The use of the considered installation options allows you to securely fasten polystyrene foam for a long time (if all work is carried out correctly and sequentially). To achieve a high-quality result and some savings, the foundation should be insulated with polystyrene foam, and the rest of the facade with ordinary polystyrene foam. The best effect will be from the combined use of dowels with glue.
Technological data
This type of fastening of extruded polystyrene foam to the wall is intended mainly for masonry; a sheet 5 cm thick is taken, with a density of 25 kg/m3. Such parameters will be sufficient for effective protection from cold and frost, since its properties are similar to two brick layers.
Expanded polystyrene has excellent vapor permeability and this guarantees good ventilation inside the material, absence of condensation and moisture. It will not rot, become damp or deteriorate quickly.
Special cases at work
For gluing to a metal base, use liquid nails
Fastening polystyrene foam to a concrete, brick, or wooden wall are the most common cases. In practice, there are situations when it is necessary to fasten sheets of material to a metal surface. Then the work is done as follows:
- indoors and when high strength of the coating is not required, PVA glue is used: the intermediate material - burlap - is impregnated with it; after which it is fixed on the working surface; then slabs lubricated with the same adhesive are glued onto it; for exterior finishing it is better to use special polyurethane adhesives together with liquid nails (so that the attached slabs do not slide); you can attach the foam with polyurethane foam, applying it at 5 points on the sheet in a small amount.
The use of liquid nails separately does not provide this level of strength. Joint application will increase the speed of installation. To learn how to quickly glue polystyrene foam to walls, watch this video:
Insulation of balconies and loggias can be done without gluing sheets, spreading them out in the sheathing.
After installation, the entire surface is puttied according to the level. Sheathed either with plastic, or MDF, or gypsum board. From the outside, the foam is held, securely fixed, by the outer wall.
There are nuances when working. You can't provide for everyone. Knowledge of how to secure material and practical skills will allow you to cope with any obstacles.
To work in multi-storey buildings, professional high-altitude workers will be required
Insulating a house using polystyrene foam methods is easy to do yourself. They can be combined with each other.
The decision on how to attach depends on the operating conditions and financial capabilities. Only facade work may require the involvement of professional high-altitude workers. Well-attached sheets of foam plastic will allow you to insulate your home for decades while preserving the exterior finish.
09.10.2017
In order not to heat the air outside the house, owners try to install thermal insulation. For this, a wide variety of materials are used, ranging from mineral wool to polystyrene foam.
The most popular due to its technical characteristics and affordable price is polystyrene foam. To reduce the cost of work, the owners do all the work themselves. That’s why questions are often asked: how to attach polystyrene foam to the wall?
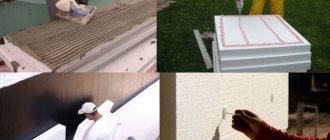
Painting ceiling tiles
Grayish colored tiles can be repainted. It is recommended to paint ceiling tiles immediately after they are attached. Also, painting is an option for restoring a foam ceiling when the cladding loses its appearance, gets dirty, is not cleaned, needs to restore its waterproof properties and the ability to even out the overall appearance of the ceiling when replacing old slabs with new ones. More often this applies to kitchens and bathrooms: refresh, extend service life, enhance fire safety, water resistance, thermal properties, resistance to fungi, and fading of ceiling panels.
Primary painting of foam boards does not affect adhesion, but secondary painting can significantly worsen it. There will be stains, stains, and unpainted areas if you paint mirrored, laminated and plastic boards. Painting will never help hide cracks and creases in panels. But the cost of restoring the appearance of ceiling tiles by painting consists of the cost of materials (tools, primer, paint), and this is significantly more economical than work (dismantling - installation) with a new coating.
Direction for layer-by-layer painting of a ceiling made of foam tiles with a paint roller Source postroi-sam.info
Types of paint for painting polystyrene foam ceiling tiles
Expanded polystyrene ceiling tiles are painted. You should use the instructions for using foam boards and the following paints:
Water-based - quickly becomes dirty, loses freshness, is not used in a humid environment, but dries quickly, is fireproof, environmentally friendly and easy to apply with a regular brush or roller. The layer is applied evenly when using a spray gun. Painting is carried out on a cleaned and dried ceiling surface, preferably in several layers with drying.
Acrylic - dries quickly, without a pungent odor, hypoallergenic, with a long service life. Combines with acrylic primer. Suitable for painting foam panels in the bathroom. But there is a possibility of paint swelling.
Latex - does not peel off when applied to a dry or wet surface. Dries quickly, is resistant to exposure to the sun, temperature changes, and is suitable for use in different rooms.
It is recommended: close the room until the paint is completely dry, follow the instructions for using paints, and safety precautions when working.
To paint foam tiles in children's rooms and bedrooms, it is necessary to select highly environmentally friendly dyes Source nashaotdelka.ru
Mounting methods
In order for the insulation to fulfill its intended purpose, it must be properly secured to the base. Professional craftsmen use several methods to attach foam:
For the adhesive composition.
This option is suitable if the insulation will not be used as a basis for heavy finishing material. Using fasteners. A more reliable method, but also suitable for spruce on foam plastic, it is planned to install heavy decorative trim. A combination of the first and second options. The use of glue and dowels allows for the most reliable fixation.
But before you start installing polystyrene foam, you must prepare the base and all the necessary materials.
Preparatory stage
First you need to buy all the necessary materials and tools that may be useful during the installation process:
Insulation.
The required quantity is calculated in advance and must be purchased with a reserve. During transportation and even during fastening, the slabs may be damaged, so a few sheets in stock will not harm. Starting profile. Adhesive composition suitable for external work. You also need to pay attention to whether it is suitable for fastening foam plastic. Fasteners (fungus dowel) if this method was chosen for fixation. Deep penetration primer. Roller or wide paint brush (for applying primer). Sealant. Perforator.
After all the equipment and materials have been purchased, you can begin preparing the foundation. To do this you need:
- Remove old decorative trim.
If there are areas that are crumbling, then they are eliminated. All facade elements that interfere with the installation of insulation are removed. All cracks and recesses whose depth exceeds 5 mm are sealed. For polystyrene foam, it is not important that the base be perfectly level.
But if there are large depressions, then mechanical stress may cause cracks to appear both on the insulation itself and on the decorative finish. And this reduces the effectiveness of thermal insulation. Clean stains and traces of fungus or mold. The last stage of preparing the base will be the use of deep penetration soil. Particular care is taken in areas of constant exposure to moisture (basement, foundation).
Only after the soil has dried can you begin installing the foam using the chosen method. Now let's take a closer look at each method.
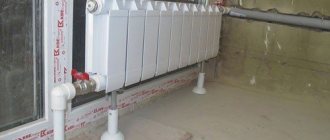
Preparing walls before insulation with penoplex
Before fixing the insulation sheets, it is necessary to clean the surface from dust, oil and mastic contaminants, as well as poorly retained old mortar or a layer of paint. Only those coatings that cannot bear the load should be removed.
The old paint layer must be removed to a solid base mechanically or using special compounds. If fungus, mold or other negative microorganisms are present on the surface, then to eliminate them you should use appropriate mixtures with bactericidal properties.
Next, you need to thoroughly check the evenness of the walls, using a building level 2.5-3 m long. If recesses, holes, cracks or irregularities larger than 2 cm are found, then in order to avoid breaking the penoplex during the installation process, you should first plaster the surfaces with cement-sand mortar. After complete hardening, the walls need to be opened with a primer in 2 layers.
For adhesive composition
For reliable fixation, you need to choose an adhesive that is suitable for outdoor use.
Be sure to pay attention to the frost resistance of the composition, because it will be exposed to such effects more than once. And be sure to keep in mind that not all adhesive solutions are suitable for working with foam plastic. When purchasing, read the label; manufacturers indicate what materials the product is suitable for.
Important! You don’t need to feed pharmacies so that hemorrhoids go away once and for all, use a very effective cream...
Read more >>>
For those who are wondering how to properly attach polystyrene foam with glue, we will now look at step-by-step instructions.
Setting up a starting profile.
It is fixed around the perimeter of the entire building. It is on this that the entire insulation structure will rest, so its width corresponds to the thickness of the foam board. It is imperative to ensure that the profile is installed clearly horizontally.
To do this, use a building level. The profile is attached using dowels and nails. Preparation of the adhesive solution. Everything must be done strictly according to the instructions indicated on the package. Applying glue. The solution is applied to the entire surface of the insulation up to 1 cm thick.
In this case, you should not save, because the reliability of fixing the slab will depend on the amount of glue. Installation of the slab. The first sheet of foam plastic is laid in the starting profile from the corner of the building. You need to put a little pressure on it so that the element is securely fixed. The next sheet is laid, 5 mm away from the previous one. Fastening the next rows.
The top slabs should be staggered so that the seams do not overlap. And you also need to leave a small gap between the rows. After all the slabs are laid, the gaps are filled with sealant. You should not use polyurethane foam.
The final stage will be decorative finishing. This can only be done after the glue has completely dried.
Basic principles of installation
Insulation boards are mounted on the starting profile. A kind of profile strapping should run along the entire perimeter at the same level. You should carefully monitor this using a construction level.
Regardless of the installation method, the plates are arranged in a checkerboard pattern. That is, the seam joining the sheets of the top row should run through the center of the bottom slab.
Installation is carried out with a connecting seam 1.5-2 mm thick, and it is not permissible for glue material to get into the seam.
The slabs are laid without taking into account the openings, and a window or door is sawn from the entire wall. In this case, the material can be cut in advance, but the laying order must correspond to whole sheets.
When laying the material on a corner, you should leave the tail of one of the sheets, and then fit the adjacent slab to it. After which the tail is carefully trimmed, and the corner insulation is of high quality.
Lay the material in the direction from bottom to top.
On fasteners
To attach foam plastic in this way, you need to purchase special dowels with a wide head.
They are called "fungi" or "umbrellas". To calculate the required number of fasteners, you should multiply the number of whole sheets of insulation by 5. Since the slabs are fastened with 5 dowels each.
The first step is to install the starting profile in the same way as in the previous version. Next, you need to secure the first sheet of foam. It is placed in the starting profile and using a hammer drill or electric drill, make holes with a depth corresponding to the length of the dowel plus 1–3 mm.
In order not to overdo it on the drill, you can install a limiter or make a mark with a marker. First, the dowel is installed, and then the core is driven into it. The head of the fastener should “sink” into the insulation by 1–2 mm. The fasteners are installed in the corners of the insulation sheet and one in the center. If the head is very wide, then one dowel can hold 2-3 slabs. A gap is left between the elements, which is then sealed with sealant. The place where the dowel is located must be covered with plaster.
The renovation of the façade is completed by installing decorative finishing.
Glue or dowels
For high-quality installation, both materials are used at once. In this case, the glue should not be applied to the entire surface, but only to 50% of the sheet area.
For gluing, it is better to use the ready-made mixture, diluting it with water in the proportions indicated on the package. When preparing the solution, mix the mixture thoroughly, let stand for 10 - 15 minutes and stir again. It is necessary to use glue within 2, less often 3 hours. The shelf life is indicated on the packaging.
When gluing the boards, press the material firmly against the wall using light wave-like or circular movements.
In order to improve the adhesion of the slabs to the wall, you should lightly sand the slabs on one side before applying the glue.
Additionally, the slab is fixed with 5 dowels - umbrellas: in the corners and in the center. This strengthening is done after the glue has completely set. The dowels go about 10 cm deep into the wall.