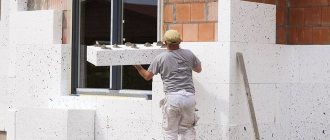
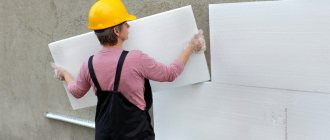
Insulating the external walls of a house with polystyrene foam or extruded polystyrene foam is a classic method in construction that creates additional insulation and reduces heating costs.
But, despite the advantages, not everyone is happy with external wall insulation with polystyrene foam. Which is not surprising, because progress does not stand still; new, more advanced materials are appearing.
To make a choice, let's find out how extruded polystyrene foam differs from regular polystyrene foam and which one is of better quality.
Why foam?
Polystyrene foam, also known as expanded polystyrene, is by far the most economical of insulation materials. It does an excellent job of keeping the room warm. When insulating with foam plastic from the inside, there are no requirements for load-bearing capacity and impact resistance of the material; its best qualities come out ahead -
- low thermal conductivity;
- low water absorption;
- excellent soundproofing qualities;
- ease of cutting.
Previously, polystyrene foam caused complaints from consumers due to the release of hazardous substances during combustion and the fact that mice nested in it. Nowadays, special additives are used in the production of the material - fire retardants, fungicides and antiseptics. Due to their use, polystyrene foam has a reduced fire hazard and increased resistance to rotting and damage by rodents.
Unfortunately, insulating walls from the inside with foam plastic causes inconvenience that cannot be avoided:
- Loss of part of the living space.
- Temporary removal of furniture from the room for the period of work.
- The need to install forced ventilation in an insulated room.
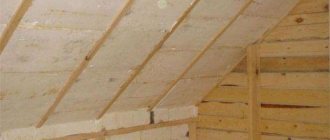
Insulating walls from the inside with polystyrene foam requires solving the main problem - preventing the formation of condensation inside the insulation, which will lead to gradual wetting and loss of its heat-insulating properties. To prevent this from happening, vapor barrier films are used in the insulation system.
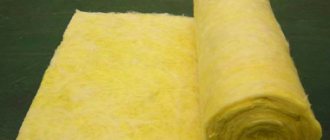
So, why polystyrene foam and not other materials? Mineral wool insulation has greater moisture absorption and thermal conductivity, therefore, the service life of such insulation will be shorter and the layer thickness will be greater.
For foam insulation, a spatial frame will be required, which will affect the cost of the work. The cost of penoplex, the closest material in terms of properties, exceeds the cost of polystyrene foam several times.
Is it possible to insulate a house with foam plastic from the inside? It is possible if there is no other way out and you are ready to solve problems.
Types of foam plastic for carrying out insulation measures
All types of foam plastic offered by manufacturers are manufactured in different ways; the finished product differs not only in name, but also in such indicators as appearance and physical and mechanical characteristics.
When determining which foam plastic is better for insulation, it is necessary to consider all the proposed options and focus on the operational parameters of the materials; the most popular among builders are:
- polystyrene foam. It can be pressed or unpressed, outwardly representing a collection of small balls that are tightly fastened together;
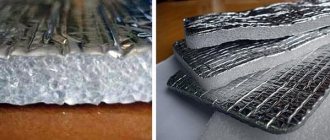
- extrusion material. A denser structure provides the possibility of optimal moisture insulation and does not allow wet or dry air to pass into the insulating layers;
- polyurethane foam. It is more often used in the manufacture of furniture and is similar in appearance to ordinary foam rubber, inferior in quality to the first two types of insulation.
Modern types of insulation include a special type of material using which insulation is carried out with liquid foam, which has its advantages compared to sheet building materials.
The purchased polystyrene foam must comply with generally accepted quality standards, confirmed by special certification documentation, which indicates the specification and labeling of properties, and be sure to comply with the necessary storage conditions.
Preparation for work
To carry out work on insulating polystyrene foam from the inside, you will need a set of tools, including:
- Dowel – nails or dowel screws with a metal core and a thermally insulated head.
- Smooth and serrated spatula.
- Carpenter's knife and hacksaw with fine teeth.
- A screwdriver or drill with an attachment for stirring glue.
PLEASE NOTE: thermally insulated dowel heads are needed to ensure that the metal core does not serve as a cold bridge.
A set of materials for insulating foam from the inside:
- Primer that increases adhesion;
- Reinforcing fiberglass mesh.
- Adhesive composition from dry construction mixtures or foam glue.
- Wooden beam with a thickness of 40 mm and a width corresponding to the thickness of the thermal insulation boards (according to calculations).
- Expanded polystyrene.
- Vapor barrier film.
- Finishing materials.
IMPORTANT: When purchasing materials, consider the area of the slopes of windows and external doors.
Before performing foam insulation indoors, it is necessary to prepare the base: the walls must be cleaned of paint, paint, oil stains, solvent stains, and peeling plaster. The adhesion strength of the plaster to the wall is determined by tapping it with a mallet.
Treat the peeled areas with a primer that increases adhesion and plaster again. We check the evenness of the surface with a plumb line and a building level. After the plaster has dried (as recommended by the manufacturer), apply another layer of primer with an antifungal component, and you can begin insulating the wall with foam plastic.
Selection of consumables based on its physical and mechanical parameters
When choosing polystyrene foam, it is important to pay attention to its condition and especially the granules of the material, which must be the same size, evenly distributed throughout the structure, the sizes of the sheets cannot be different or differ significantly.
When selecting, you can focus on general characteristics and visually determine quality parameters by comparing several sheets that must be taken into account when purchasing in order to avoid unnecessary expenses and expenses:
- absolute coincidence of thickness;
- same density and structure;
- smooth cutting of all sides and corners;
- identity of color or shade.
Good polystyrene foam, which has excellent performance parameters, does not lose its physical and mechanical properties during long-term use and increases the efficiency of insulation procedures, keeping the house warm and comfortable.
During its storage, before the upcoming installation work, it is important to maintain a certain temperature regime in the utility or household premises and periodically ventilate it.
Installation of insulation boards
After fixing the frame, they begin to insulate the walls with polystyrene foam with their own hands: coat each slab with adhesive around the perimeter, retreating 1.5–2 cm from the edge and applying dot glue markers on the back side of the slab in an amount of at least 5 pieces on the back side of the slab.
The slab is placed into a cell of the frame and tapped with a mallet or the handle of a spatula. Work continues after the glue has completely dried, about 2–3 days.
PLEASE NOTE: Using foam adhesive will save you two days as it dries in 2-3 hours.
The seams between the plates and the cracks must be carefully sealed with scraps of insulation, glue foam or polyurethane foam. It is impossible to use an adhesive composition for this purpose, as cold bridges will form.
Polystyrene foam or extruded polystyrene foam
The main difference between two seemingly identical materials is the manufacturing technique.
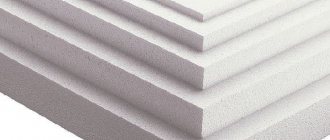
Polystyrene foam (foamed polystyrene) is made from white polymer slabs with a granular structure by foaming. The reaction is produced by steam under the influence of high temperature: the molecules swell and join together.
Each hollow grain in the slab is filled with carbon dioxide, which provides excellent thermal insulation not only for walls and roofs, but also for household appliances (refrigerators, freezers).
The advantages of polystyrene are resistance to moisture, the ability to regulate cold and heat like a thermos, low cost, and installation of polystyrene foam is much simpler.
The material is very light, does not allow fungi and bacteria to develop, is durable, can last more than 50 years, can withstand cold down to -40-50°C, and heat up to +70-75°C.
Density depends on the brand of material.
Extruded polystyrene foam
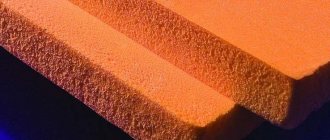
The slabs are distinguished by a bluish or pink color, have closed pores and perform the same protective function as polystyrene foam - they provide thermal insulation for roofs, foundations, walls, and maintain a water barrier.
Raw materials are loaded into a machine to soften the materials and give them uniform shapes through pressing. Inside the machine, the material heats up and loses its connection with the polystyrene molecules.
The result is a homogeneous liquid without grains or cavities, which passes through a special hole and takes on the shape specified by the program.
The main differences are higher density and strength (at low density the material is looser and crumbles), the presence of recesses for adjusting sheets, crumbles less when cutting, and is more waterproof.
The extruded polystyrene shell helps regulate humidity and reduces air leakage through the walls, which not only improves the home's energy efficiency, but also overall comfort.
The quality of insulation depends on proper installation and taping of seams. As for the joints, extruded foam has much fewer of them, which means that the cold does not penetrate inside (there are no cracks).
What to look for when choosing a material
The main thing is the composition: carbon dioxide must be non-flammable.
The disadvantages of the two materials are that if installed incorrectly, mold may appear on the walls; the sheets become discolored or turn yellow if the surface is left uncoated for at least one season. When the material is heated, toxic substances are released.
The cost of extruded polystyrene foam is much higher (about 2 times) and it is more difficult to manufacture.
Pros: the thermal conductivity of extruded foam is higher, it almost does not shrink when heated, and due to its monolithic structure, it does not absorb moisture at all. Conventional foam plastic is significantly inferior in these indicators.
As for flammability, both materials contain a fire retardant, which is responsible for self-extinguishing (in the event of a fire, the fire goes out in 3-4 seconds).
The choice is obvious, but if it is not possible to purchase extruded polystyrene foam, then polystyrene foam will be an excellent replacement. However, it is more common to insulate the outside of houses with polystyrene foam, so it does not lose popularity.
Doweling
After the glue has dried, the insulation boards are additionally secured with dowels, at least 5–6 per standard 600x1200 mm slab.
Then a vapor barrier film is laid out over the surface and secured to the frame with a stapler.
IMPORTANT: Polyethylene film has a short service life, about 5 years, and therefore is not suitable for use as a vapor barrier.
Expanded polystyrene installation technology
Foam insulation begins with gluing each slab to the facade and its subsequent fastening with disc-shaped dowels. For this purpose, it is better to use special glue designed for polystyrene foam and polystyrene foam. The adhesive base is applied in an even layer using a spatula on the wall itself or directly on the slab; the sheets can be glued in several accessible ways.
Laying begins with window or door slopes, then proceeds to installing the first row, the position of which is fixed with a plinth profile. The slabs are mounted in a checkerboard pattern, while paying attention to how tightly they will be fixed. Expanded polystyrene sheets are secured with dowels, just like polystyrene foam. When fastening dowels, the following rules must be observed:
- the glue must dry completely, the structure is left for a day before proceeding to the next stage;
- dowels are hammered into each corner at the junction of several plates; to fix three sheets, one piece will be enough;
- The first dowel is driven into the central part of the sheet, the rest in the corners.
When using polystyrene foam or expanded polystyrene as wall insulation, you need to take into account the service life of the slabs and follow safety precautions. In this case, the insulation will retain its properties throughout the entire period of operation.
Finishing
After the glue has dried, the wall is primed again, puttyed and painted with acrylic paint or a decorative finish is applied.
To quickly complete the work, you can use another type of finishing - plasterboard cladding: in this case, reinforcing mesh is not used.
After securing the vapor barrier film with a stapler, beams with a cross section of 25x40 mm are attached to the main frame, and plasterboard is attached to them. The drywall seams are protected with construction mesh, the surface is puttied and finished as desired.
By using plasterboard cladding, you reduce the area of the room, but gain time savings since you do not use a long-drying adhesive.
Reinforcement and plastering of foam plastic
The most difficult part of the work is done, all that remains is to put a protective mesh on the walls and cover the entire surface of the sheets with plaster.
You can leave the façade for the winter without final finishing with brick or paint, but only after you have applied a leveling layer to the sheets. If this is not done, the sheets will turn yellow and may collapse (in the spring you may find broken pieces of slabs on the ground or cracks along the entire perimeter of the building).
Then you will have to re-attach the foam to the facade.
Making the adhesive mixture
Extruded polystyrene foam cannot be left for the winter without plaster; it even needs to be stored in unopened bags.
Polystyrene foam as insulation in this case is not so capricious.
How to properly apply a leveling layer
To plaster sheets, you need to make the solution not thick, but slightly liquid. The liquid solution smoothes out more easily, and if the first layer was applied correctly and evenly, then very little mixture will be needed.
Treatment of window slopes
Installing mesh on the corners of windows
After application, wait until the mixture dries and walk over the surface with sandpaper (it is better if it is not new, then there will be no streaks).
Preparation for reinforcement
The first step is preparing the adhesive solution. It is better to use a mortar composition designed specifically for reinforcement, rather than a regular dry mixture.
Dilute the powder according to the instructions indicated on the bag of dry mixture, but it is better to make it a little liquid, so it will stick better.
Add water in parts, break up all the lumps with a mixer with an attachment (run the drill only at low speeds).
Gluing blanks around the perimeter of windows
Installing fiberglass mesh at corners
Apply the prepared solution in a thin layer to the foam on the inside of the window and level the mixture.
Installation of facade profile with mesh
Then place the façade reinforcing mesh on top (it will protect against shedding and cracking). The principle of operation is the same as when insulating window and door openings. The mesh should “sink” in the adhesive solution.
Place another layer of mixture on the mesh (at least 3 mm thick), level the glue. The reinforcing mesh will improve the “adhesion” to the blocks.
Install metal profiles.
Additional mesh reinforcement at corners
Make a “kerchief” over the corners of windows and doors: coat the sheets at a 45° angle with the adhesive mixture (should be in the shape of a rectangle), apply strips of glue along the frame or doorway. Press the reinforcing mesh onto the mortar on all sides.
Installation of window sill profile
Processing the slopes of the remaining windows
The mesh should be placed both on the inside of the corners and on the outside of the frames or door frame. Cover the reinforcing mesh with another layer of the mixture, remove the excess.
The next step is to apply the mixture to the lower part of the house (around the perimeter).
Processing of internal slope angles
Installation of cable profile
Installation of a profile with a dropper
On top of the protective layer on the bottom of the house, install a corner profile with a drip edge. Feature of the profile: a facade mesh with a protrusion along the entire length is glued to the plastic corner, which does not allow water to flow onto the plaster and reduces the appearance of rust to a minimum.
The drip tray performs many functions:
- Protects the building from cracks and damage.
- Suitable for decorative protruding elements.
- Makes the corners of the house nice and even.
- Replaces the base profile if it is not possible to purchase it.
- Suitable for façade restoration.
Installing profiles on external corners
Installation of armored fiberglass mesh
Having installed a profile with a drip around the perimeter, pull out the mesh and press it to the glue strip. Place another protective layer on the mesh and cover it completely. Remove excess mortar with a flat spatula. Wait for it to dry a little (but not completely). If you remove residue from a damp wall, the solution will simply spread across the surface.
Using the same method, lubricate the remaining corners of the insulation and tighten the reinforcement.
Only after all corners of the building have been reinforced can you proceed to covering the foam sheets in the middle. Don't forget to indicate where the mesh will be stretched.
Applying the adhesive mixture
Leveling with a toothed trowel
First, apply the solution to the wall, level it, then stretch the mesh and press it into the mixture. Be sure to overlap the mesh. The overlap of the mesh should not exceed 10 cm.
Apply another layer. Do not leave any voids when leveling the glue.
Installation of facade fiberglass mesh
Overlap of facade fiberglass mesh
Before completing the work, check the level to see if there are any differences left.
If you don’t have a dropper, you can use a regular mesh; just cut it into strips to size (it will be cheaper, but it’s easier to work with ready-made corners).
Irrigation with water
Additional alignment of window slopes
How to install blocks in two layers
Foam plastic for facade insulation can sometimes differ in thickness.
If you decide to insulate the house not with one, but with two blocks of polystyrene foam (if the thickness of one layer does not reach the required standard, it needs to be supplemented), then first you need to glue the first row, and then the second.
It is important that the joints of the second row of blocks do not coincide with the joints of the first.
Correction of irregularities
When installing the second row, apply a thin layer of adhesive directly to the square of foam, not to the wall.
There is no need to cut off excess polyurethane foam or grind down the unevenness of the first row - the blocks will still be covered with new layers, and the defects will not be noticeable.
Note: if there is nowhere to rush, wait until the first row has dried; if there is no time, then immediately proceed to install the second (to avoid displacement, install the sheet no higher than 2 m in height).
Foam insulation of external walls is often made from one layer of blocks.
Solid alignment
Myth - Insulating a façade is expensive
If you decide that it is absolutely necessary to insulate the facade and there is no return to your decision, the time will come to purchase materials. In order to cover the entire house, you will need relatively large amounts of money.
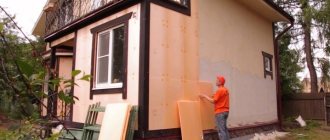
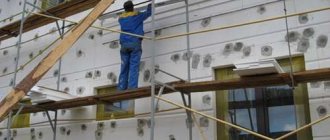
To reduce heating costs, many owners of houses and apartments are thinking about insulation. One of the possible options is insulating the facade with polystyrene foam (PPS or EPS). The work is not the easiest, but you can do it with your own hands. It is important to know the technology. We will talk about it in detail further.
Proper insulation of the facade with polystyrene foam will give good results
Pros and cons of insulation from the inside
Before doing the work yourself, you need to study all the nuances. Thermal insulation of indoor walls is not the right solution from the point of view of such a science as heating engineering. This method becomes only acceptable if it is impossible to use another. The disadvantages of insulating the walls of a house from the inside are as follows:
- reduction of usable area of internal premises;
- the measures taken do not prevent the walls from freezing, and therefore do not protect them from destruction;
- the point of dew (condensation) appears inside the load-bearing wall of the house (there is a high probability of moisture accumulation).
The dew point is at the junction of the wall and the foam, so to avoid condensation it is extremely important to apply a vapor barrier
Insulation with foam plastic from the inside can only be done if there is a serious need for it. Most often, DIY work should be done in the following cases:
- Thermal insulation of premises in a multi-storey building. To insulate an apartment with polystyrene foam from the outside, you will need to hire industrial climbers. Such services are expensive, so an alternative option is to use protection from the inside.
- Insulation of house walls with new cladding. When doing work with your own hands in a private house, it is necessary to take into account the condition of the facade finishing. If the external work was completed relatively recently, dismantling the cladding is not practical from an economic point of view. In this case, it is also possible to fix the thermal insulation from the inside of the walls.
Styrofoam harbors mice
And one more fact that needs to be pointed out when assessing the pros and cons of foam insulation is that mice breed in the material.
Expanded polystyrene is an ideal habitat for them, because it is warm and soft. Therefore, when insulating with polystyrene foam, block the access of mice. To do this, you can finish the places where rodents can enter with mineral wool, which mice do not like.
Therefore, although polystyrene foam has a number of positive qualities, we should not forget about its disadvantages. Therefore, it should be used thoughtfully and in accordance with all the technological features of the material.
How to properly insulate a house with foam plastic from the outside, how to avoid mistakes?
Insulating walls with expanded polystyrene (a type of polystyrene foam) is not a very difficult task, but you must follow certain rules.
Mistakes made when performing insulation can result in it being less effective and, in some cases, can lead to serious damage to the façade. To properly insulate walls, it is important to follow certain rules and avoid common mistakes. Below are 11 of the most common rules and mistakes when insulating a building with polystyrene foam.
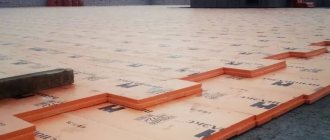
The surface on which the polystyrene boards will be placed must be properly reinforced, stable, level and dry. It should be free of contaminants that reduce adhesion, such as:
The base must be level - small inequalities (up to 2 cm) are leveled using a leveling solution. In case of large unevenness (more than 2 cm), you must use different thicknesses of polystyrene foam boards so that they form one plane.
Underlay-related errors include:
The glue must be applied both along the edge of the slab and on its surface. If you apply glue only along the edge, or only at one point, the plate will bend, and the edges of the plates will be visible on the finished facade.
Proper use of foam glue:
a) along the periphery and points - in this case, the glue should be applied in the form of strips along the edges of the slabs with a width of 4-6 cm. On the remaining surface, the glue is applied pointwise, there will be from 3 to 8 points. The total area of the glue should cover 40% of the white panels and 60% graphite plates.
b) the comb method, which is used only in the case of smooth, plastered surfaces. The adhesive is applied using a notched trowel to the entire surface of the slab.
Note: The adhesive solution is applied to the surface of the polystyrene plate, and never applied to the substrate.
The adhesive on each sheet should be placed around the edge and on the surface.
A poor choice of adhesive or mortar of unsatisfactory quality can lead to the tearing off of the foam plates, along with other layers of the facade. As a rule, it is recommended to use a complete insulation system from the manufacturer - such a system contains all the necessary elements, guaranteed quality, and good coordination of the elements with each other.
It is important that the foam plates are offset by half their length in the direction from bottom to top, starting from the corner of the wall.
It is also important to position the slabs correctly in the corners. If this is done incorrectly, then thermal bridges appear at the connection of the plates, through which heat loss occurs.
In addition, polystyrene panels must also be laid neatly and tightly side by side. Connections should not form straight lines.
The gaps between polystyrene foam boards should not be filled with adhesive solution (this creates thermal bridges). To fill gaps up to 4mm wide, use polyurethane foam.
Dowels that are not deep enough will cause problems. If they are installed too deep, they will destroy the structure of the insulation board. If they are installed too shallowly, they can create a bulge that will be visible on the wall surface.
If starter baseboard and mesh are not used, the insulation will be exposed to the weather and rodents such as mice, which, seeking shelter for the winter, often bite into the bottom layer of insulation and cause it to become damaged.
The surface of the slabs after their placement must be flat.
If there are uneven surfaces, the surface must be sanded to remove the unevenness. Otherwise, they will also appear on the facade. Unfortunately, sanding polystyrene is a labor-intensive and time-consuming process, so it is often forgotten.
There should be no seams between slabs in the corners of window and door openings. Additionally, you should use additional diagonal mesh strips in these areas.
Layout diagram in the corners of window and door openings
The corners of window and door openings should fall into the central part of the polystyrene plate.
Often installers do not take weather conditions into account during repairs. It is important that insulation work is carried out in appropriate weather - the temperature is not lower than 5 ° C and not higher than 25 ° C.
Of course, there should be no precipitation at the time of insulation. This is important, not for comfortable work, but for the properties of materials that retain their qualities only under certain conditions. For example, at a higher temperature, the adhesive will dry quickly before it can properly bond the foam to the backing.
The use of solar shading is especially important when installing gray foam. When exposed to the sun, it heats up quickly, and the result can be the formation of gaps between the plates and their peeling from the substrate.
Do-it-yourself insulation of a house with polystyrene foam
A lot depends on how well the house is insulated: the microclimate and indoor air temperature in winter and summer, saving money during the heating season. That is why close attention is paid to wall insulation during the construction and restoration of a building.
You can insulate walls inside and outside with different materials: mineral wool, isolon, glass wool, polystyrene foam. The last option is the most profitable and technically accessible.
Is it possible to use polystyrene foam on concrete walls?
Another important characteristic of any insulation is vapor permeability.
Polystyrene almost does not allow vapor to pass from the room to the street, but for insulating concrete walls this does not matter, since the materials are similar in performance. If the premises of a brick or expanded clay concrete house are humid, properly arranged ventilation solves the problem.
It is not advisable to insulate concrete walls from the inside for permanent housing. In cold weather, the dew point (freezing point) will move closer to the inside, the walls will freeze to their entire thickness.
Internal insulation is beneficial for dachas that are not constantly heated. In this case, the building will warm up faster, since the house will become warm before the brick (stone, expanded clay concrete) walls warm up - the heat from the heating devices, like in a thermos, will be retained by the foam plastic.
Advantages of the material
Despite its cheapness, polystyrene foam is a high-quality and safe material. Information about toxicity is just a myth. The main property due to which it is actively used in house cladding is its high thermal insulation qualities.
The material also has many more advantages:
- High noise insulation properties.
- Light weight, which reduces the load on the foundation and walls.
- The material is water-resistant and does not deform in high humidity.
- Does not ignite.
- Durable and does not lose its properties for about 50 years.
- Prevalence and accessibility. You can buy polystyrene foam at any hardware store.
But all these advantages apply only to high-quality material and with proper installation. How to properly cover a house with polystyrene foam?
How long will it last
Foam plastic is resistant to moisture and aggressive substances of organic origin, so the service life before replacement is, according to manufacturers, 700 freeze-defrost cycles.
This is significantly longer than the service life of the plaster layer, in which, in addition to the composition itself, the polymer mesh is destroyed. Based on the recommended operating parameters, you can expect the service life of external foam insulation to be from 20 to 40 years. It all depends on the quality of the building materials and the careful work carried out.
Insulating the walls of a house with polystyrene foam is one of the available ways to save heat in winter and coolness in summer. A simple installation process that anyone can master makes insulation with foamed polystyrene a popular method that allows significant savings on the purchase of materials and wages for builders.