Tile is a material with high thermal conductivity. This means that its surface for the most part remains, if not cold, then cool. In winter and in the off-season, when the temperature outside is low, walking on such a floor is not very comfortable.
The problem of cold floors is more relevant for residents of the first floors. The best option would be to insulate directly from the basement side, covering the concrete floor with sheets of foam plastic.
Therefore, when installing such a covering, it is recommended to insulate the floor under the tiles.
Choice of insulation
If you are planning to make a storage room here that will not be particularly warm, you can get by with formal insulation, but if you are planning to install additional heating and need to keep it warm in the winter, you will have to look for a solution with maximum efficiency. There are several materials that can help you cope with the task:
- Foam plastic or penoplex are practically “brothers” and differ in their characteristics in terms of service life, resistance to moisture and sunlight. They are used when you need to seriously insulate.
- Mineral or stone wool has excellent heat-saving properties and is easy to work with. However, it will be necessary to create insulation from water. The cost will be higher than other options.
- Izolon is an all-foam polyethylene, usually having one foil side. This is the same case of “formal” insulation.
Other materials, like expanded clay, cannot be used here - the layer needed is too thick. The effective work of expanded clay for heat conservation will begin from a backfill thickness of twenty centimeters.
Installation of electric heated floors under tiles
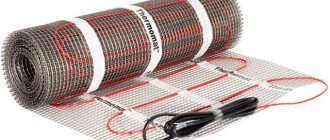
Of the several options for electric heated floors (cable, film or heating mats) under tiles, the most acceptable would be a heated floor, where heating mats act as a coolant.
The mats are produced in the form of a fiberglass mesh with shielded heating sections attached to it. Sections are obtained by connecting the cold and hot parts using a coupling-free method. This determines their reliability.
The first step is to draw up a detailed layout of the heating mats. It is worth noting that heating elements should not be placed in places where furniture will subsequently be placed; they can quickly fail.
Consecutive installation of heating mats
All debris and dust must be removed from the floor surface. If necessary, the floors are leveled. Additional thermal insulation materials are laid out on the surface to prevent possible heat loss. In the future, such a measure will significantly increase the feeling of comfort.
An important stage is the creation of a high-quality cement screed. It will become a reliable basis for the subsequent installation of ceramic tiles. Read how to do this in this article.
The screed should be as even as possible.
Heating mats are laid exactly according to the diagram drawn up in advance. Once this is done, the system is connected to the electrical network. Having completed the connection, we install the temperature regulator.
You will also need to install a special temperature sensor and an emergency shutdown device.
It is necessary to check the functionality of the system. To do this, electrical wires are connected to the network. If any problems arise, their elimination should occur at this stage. Otherwise, you will have to dismantle the floor.
Ceramic (if chosen) tiles should be laid directly on the mats using the usual laying method using standard tile adhesive.
In this case, the thickness of the adhesive layer should not exceed 7 millimeters. The floor can only be turned on after three weeks, when the glue is completely dry.
Application of foam plastic
Polystyrene foam is relatively inexpensive and at the same time a fairly good way to insulate a bathroom floor. Unlike mineral wool, it practically does not absorb moisture and can be laid on any floor surface, be it wood, concrete or old ceramic tiles. The leveling screed can be placed directly on top of the foam, having previously covered it with a special reinforcing mesh.
Types of insulation and necessary tools
The advantages of an insulated floor are quite obvious. First of all, your feet will always be warm, which will not lead to a runny nose. Uniform distribution of warm air throughout the room will avoid drafts. You can approach the floor heating process in different ways.
These include:
- electric floor heating;
- heating with water;
- insulation using insulating materials (mineral wool, glass, basalt fiber, etc.).
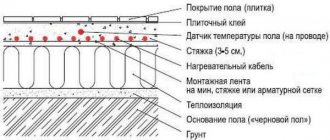
Scheme of methods for laying underfloor heating pipes.
In order to begin the process of repairing floors, you need to prepare for this matter. To do this you will need the following tools and materials:
- a hammer drill, which will be needed to remove old tiles and prepare the coating;
- a mixer or stirrer with an attachment for a hammer drill cartridge for preparing a solution for the screed;
- building level to determine the floor horizon;
- a voltmeter or tester, which will be needed to check electrical connections;
- polypropylene pipe with scissors, soldering iron and necessary accessories for preparing water heating;
- reinforcement mesh for screed preparation.
Carrying out masonry
The glue dries quite quickly, so you should not rush to mix the entire volume of the solution at once. The mixture is laid in an even layer on the surface. After this, you can lay the first tile. You need to start from the corner where the whole product will be located. Ceramics are mounted with some pressure on its surface. In order not to deform the tile, it is necessary to tap the corners and central part with a plastic hammer.
Pipe placement rules
When placing the pipes of the underfloor heating system, you must ensure that they do not twist or break, otherwise the system will leak and will have to be dismantled.
You can put a moisture-resistant floor USB on top of the penoplex. Apply a centimeter layer of tile adhesive to it, partially remove it using a comb spatula and immediately begin laying the tiles. If there is no balcony or loggia below, then you should think about building a frame from wooden blocks, in the cells of which mineral wool or other insulation is placed. It is covered with foil material for thermal insulation, reinforced, and a rough screed is poured.
Now spread the substrate and lay the system tubes. A screed no more than three centimeters thick is again poured over these tubes, and tiles are already laid on it. It is worth checking the operation of the structure that provides heating on the balcony before pouring the top layer of screed.
“Warm” plaster (video)
This type of insulation appeared on the market relatively recently, but immediately gained quite wide popularity among consumers. When insulating walls with “warm” plaster, there is no need for preliminary leveling of the walls, as well as their finishing putty (the only exception is when the walls are planned to be painted). This makes the use of “warm” plaster not only a less labor-intensive process, but also cost-effective.
Essentially, “warm” plaster is a cement-based mixture, to which special components with low thermal conductivity are added instead of sand. Such components can be sawdust and cellulose, polystyrene foam granules or vermiculite capsules, a mineral with low thermal conductivity and low specific gravity.
The procedure for applying “warm” plaster to the walls is as follows:
- The surface of the walls is cleaned of dirt and dust;
- Two layers of primer are applied;
- The plaster solution is mixed. When making it, it is recommended to follow the manufacturer's instructions.
- Important! Mix the solution in an amount that you can produce in a maximum of two hours.
- Using a wide spatula, apply the plaster from the floor to the ceiling.
Please note that one layer of plaster should not be thicker than two centimeters. Otherwise, it will slide off the wall under its own weight.
- After the applied layer has dried (at least 4 hours), you can begin applying the next one. It is recommended to apply “warm” plaster in at least 3-4 layers.
- When the last layer has completely dried, you can begin to putty the surface. If you plan to decorate the walls with tiles, you can skip this step.
Detailed technology for applying “warm plaster” is shown in the following video:
As you can see, insulating the walls in the bathroom is not difficult and does not entail excessive financial costs. So it’s worth spending a little effort and money on this process, thereby providing yourself with warmth and comfort. Good luck with your renovation!
What type of modern heated floor should you choose?
The underfloor heating system on a balcony or in any other room is a structure made of heating elements.
Their role can be played by metal-plastic pipes through which the coolant passes, or by electric heating elements.
That is, the warm floor on the balcony can be:
- water;
- electric (film, cable or heating mats).
Water heated floors on the balcony are able to heat the floor as evenly as possible over the entire area.
Water floors are excellent space savers, and operating costs will be lower than electric floors, since water as a coolant is significantly cheaper.
But water heated floors also have their drawbacks, for example, difficulty in adjusting the temperature regime, and a possible periodic decrease in pressure inside the riser.
If there is a leak, it will be difficult to find and even more difficult to eliminate. We must not forget about the complexity of installation and the fairly high cost of the structure.
As for electric heated floors on the balcony, they have almost the same advantages as water ones. But in terms of the totality of all operational characteristics, the electric heated floor is far ahead of its competitor.
In addition, electric underfloor heating ensures uniform heating of the entire area.
Finding a fault and eliminating it is much easier than in the case of a water floor. Installation is very convenient to carry out in the limited space of a balcony of a typical apartment in a multi-storey building without special equipment. And the cost of such floors is significantly lower. Among the shortcomings, there is only one - bills for electricity consumption.
With an electric floor you can easily regulate the temperature.
Weighing all the pros and cons, it is easy to make a choice in favor of an electric heated floor for installation on the balcony.
Use of polyurethane foam
This method of floor insulation is quite popular primarily because of its cost-effectiveness. Polyurethane foam is applied by spraying, which eliminates the consumption of excess material and the appearance of “residues”. In addition, polyurethane foam is an excellent vapor and water insulator. Its only drawback is that to work with it you will need special equipment, which does not make sense to purchase for the insulation of one bathroom, so it is almost impossible to carry out insulation with polyurethane foam yourself.
Instructions for insulating the floor on the balcony
Insulation of balcony floors using thermal insulation material
Insulating the balcony floor with your own hands using insulation can be done as follows:
- Thoroughly clean the floor surface from old finishes (if any) and debris using a regular broom or vacuum cleaner.
- Next, waterproof the floor. laying a special film, but better penofol, which also serves as the first layer of insulation. It is laid over the entire surface, if necessary, cutting the material with a knife to give the desired shape. When laying, it is better to use whole pieces of penofol to avoid a large number of joints.
- Having finished laying the penofol, the balcony is treated with polyurethane foam along the perimeter of the floor. blowing out the joints and seams of the material.
If you want to visualize how to properly insulate the floor on a balcony, you should find a thematic one on the Internet.
Thermal insulation of the floor on the balcony
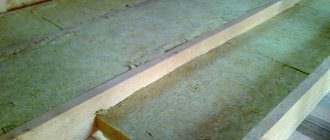
- Next, wooden beams with a cross section of 50*50 mm are laid and secured on top of the foam foam layer. The beams are laid transversely in increments of approximately 50 cm. The outer beams are mounted with an indentation of 5-10 cm relative to the walls. Before insulating the floor on the balcony, the beams are fastened using several self-tapping screws (at least 4).
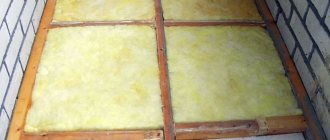
- Then the openings between the beams are filled with 50 mm thick foam boards. When laying, the slabs must be flush with the upper surface of the beams. The insulation is inserted as tightly as possible into the openings between the beams, thereby reducing the number and size of cracks. If you cannot avoid gaps, you should fill the voids with polyurethane foam.
- Next, a tongue-and-groove board or chipboard and waterproofing are laid on the floor. if you plan to lay ceramic tiles.
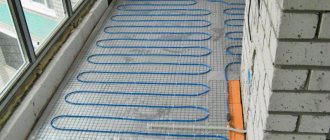
Insulation of a balcony floor using a heated floor system
Now let’s look step by step at how to insulate a balcony floor with a heated floor system:
- Styrodur insulating boards 20-40 mm thick are attached to the concrete base of the balcony using special glue.
- A thin layer of the same glue is applied on top of the insulation and a special welded metal mesh is placed on it.
- Laying of underfloor heating cables is carried out using a metal mounting tape, ensuring that a constant cable pitch is maintained. The step should be 10 cm.
- The tape is laid out on top of the mesh and attached to the base with self-tapping screws. The distance between the two tapes should be at least half a meter.
Insulation of the floor on the balcony must be carried out in strict accordance with the instructions supplied by one or another manufacturer of cable heating structures.
Diagram of an electric heated floor on a balcony
- A temperature sensor enclosed in a corrugation is placed in the gap between the cable branches. The ends of the cable are connected to the thermostat, and the temperature sensor is also connected there.
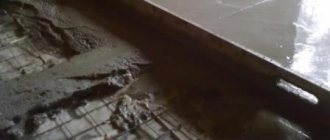
- A screed 4-5 cm thick is poured over the cable system.
Operation of the cable can only begin after the screed has completely hardened. If the screed solution was made from a dry mixture, the hardening time should probably be indicated on its packaging.
In addition, when choosing a facing material for a balcony floor, it is recommended to give preference to materials (including tile adhesive) suitable for installation on a heated floor system according to the instructions for them.
A good solution for insulating the floor on a balcony can also be to use the so-called thin heated floor. It is very simple to lay such a warm floor under the tiles on the balcony: the thin mats of this system have a self-adhesive base, which greatly facilitates installation.
Also, a thin heated floor does not require a screed and can be installed, for example, in a layer of tile adhesive.
As you can see, insulating the floor on a balcony is not as difficult as it might seem at first glance. You just need to be diligent about the task at hand and strictly follow the instructions.
More information on the topic: https://obalkonah.ru
Material requirements
Insulation is a necessary part of the “pie” of any floor on the first floor of a private house. Especially if there is no heated basement below. In high-rise apartments, additional thermal insulation will also not be superfluous, performing not only a direct function, but also a noise-proofing function. It is also mandatory when installing heated floors, so that the system does not work in vain.
Of the many types of insulation, only a few are suitable for installation under a concrete screed. They must meet the following characteristics:
- High moisture resistance . When wet, the insulation may lose its insulating properties. Therefore, only water-resistant materials are used for pouring liquid concrete.
- Resistance to temperature changes . Floors on the ground or above an unheated basement in winter freeze on one side and are warmed up by heating devices or a “warm floor” system on the other. It is important that the material does not deform, causing cracking of the overlying layers.
- Light weight . The concrete screed itself is massive and its installation on existing floors, especially in high-rise buildings of the Stalinist and Khrushchev type, is the ultimate load. Light, but high-quality insulation will allow you to reduce the thickness of the top layer to a minimum and reduce the overall weight of the “pie”, without losing its insulating properties.
- Ecological cleanliness . Despite the fact that the owners of a house or apartment do not directly come into contact with the material, the influence of toxic substances, if any, cannot be completely excluded. It is better that every component of the floor is safe for health.
- Easy to install . This parameter is especially important for home craftsmen who fill the floor with their own hands.
- Compressive strength, elasticity, resistance to uneven loads. Insulation materials have the ability to compress under pressure. But if they start to “play,” for example, under point loads from cabinet furniture, this will lead to cracking of the concrete, as well as problems with the top coating, primarily with ceramic tiles.
- Biostability. Mold and fungus should not develop in the coating, which significantly accelerates its destruction.
- Acceptable price. Sometimes it is this factor that turns out to be decisive when choosing a heat insulator. But it is advisable to take into account the long-term perspective, because some materials can last for decades, helping to significantly save on repairs.
Features of insulation work and advantages
There are several options for constructing the frame:
- from wooden logs,
- from backfilling with dry heat-insulating compounds and concreting,
- made of concreting with insulation.
But to ensure the rigidity of the floor and eliminate subsidence and dips in the thermal insulation composition over the entire distance of the floor, it is advisable to use an additional timber frame, set according to the level and to a certain height, taking into account subsequent decoration.
The frame not only provides a level, but also makes it easy to place insulating materials between the joists.
To install wooden logs, use either a wide board, with a small thickness of insulating material, or a wooden beam with mounting supports made of metal, pieces of timber.
A wooden frame made of timber laid at a distance of half a meter will serve as a beacon level. The supports must be securely fastened to the floor of the balcony slab and to the beam frame.
After checking the level and reliability of the frame, you can insulate the loggia with materials and externally finish the floor.
conclusions
There is no universal method of insulation - materials and installation method are selected based on the following indicators:
- Loggia or balcony;
- Are they glazed;
- Passive or active insulation is required (expanded clay lining or “warm floor”).
The low cost of materials, their variety on the modern market and a large selection of tools will allow you not to resort to qualified help, but to do everything yourself.
How to insulate a balcony floor
The first thing you need to do is figure out how to insulate the floor on the balcony.
This can be done using two means:
- by laying insulating material (passive insulation);
- by installing a “warm floor” system on the balcony (active insulation).
Let's consider the features of each of the presented insulation methods.
How to choose the optimal insulation
Floor insulation on a balcony is usually carried out using the following types of insulation:
Penofol. This thermal insulation material is made of foamed polyethylene and aluminum foil. It has proven itself well both as a high-quality insulation material and as a means for sound and waterproofing. Penofol is produced with foil on one and both sides in rolls. The thickness of the material can be 3, 5 and 10 mm. Penofol insulation involves the joint use of the material with penoplex.
This is what a roll of foam foam looks like
- Foam plastic has been used in construction for insulating balconies for a long time due to its combination of insulating qualities and low cost. Foam plastic is produced in sheets from 2 to 10 cm thick. Insulation of floors on a balcony with polystyrene foam is usually carried out in the form of laying it between wooden logs, followed by laying the covering on a wooden base.
- Foamed polystyrene foam or penoplex has very high thermal insulation properties. Among other advantages, Penoplex has low vapor permeability, chemical inertness, ease of installation, but is somewhat more expensive than alternative options. Penoplex sheets are available in a thickness of 2-5 cm. Penoplex is a good option for insulating balconies.
- Mineral wool. It is also a very common construction insulation, produced on the basis of basalt or fiberglass and reminiscent in structure of ordinary medical cotton wool. Such insulation for the floor on a balcony will perfectly retain heat and can be laid even in small cracks. Mineral wool is produced in sheets and rolls of various thicknesses.
Insulation with underfloor heating system
Another more than relevant solution is to lay heated floors on the balcony. The system can be a structure made of electric heating cables or metal-plastic pipes with water heating.
For a balcony, in most cases, it is rational to use the first type of construction, since a water heated floor is difficult to install and is beneficial only when insulating large areas.
Water heated floor for a balcony
Before insulating the floors on the balcony, you will need to select a suitable electrical system. When choosing a heated floor system for a balcony, you need to start from its power, which should be about 150 W/sq.m.
Penoplex trimming
If you need to lay insulation in non-standard rooms, or cut communication holes in sheets, use several methods of cutting the material.
Use any sharp knife. This trimming ensures relatively even edges of the sheet.
Trimming using a jigsaw. The cutting edge is very uneven; construction foam is used to tie sheets cut in this way.
Using hot wire. In this way, you can quickly cut a thick slab; for cutting, a nichrome string is heated with electric current and communication holes are easily cut out.
Being a universal insulation material, the material can also be used as thermal protection on wooden floors and on joists. The technology of laying sheets on a wooden base technically has few differences from covering a concrete base.
As an additional insulation element, mineral wool (as an additional thermal layer), construction foam (to fill possible gaps and for sealing), and mounting nails are used.