Vapor barrier for the walls of the house is the most important element that will ensure warmth and dryness from the inside. Walls with wind vapor barrier will serve for a long time and will not become covered with mold, because when heating a house, vapors are formed that need to escape outside so that they do not settle on the very surface of the walls. Paraisolation and how to properly lay it on the walls will be discussed below.
For what premises?
Premises requiring vapor barrier
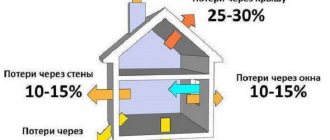
In the cold season, the temperature indoors is much higher than outside, and accordingly the humidity there is much higher; accumulating vapors try to escape from the house. Even with high-quality thermal insulation, protection from moisture in the form of a vapor barrier material is required. Its function is to prevent moisture from penetrating into the structure through existing cracks, gaps and holes. The waterproofing material protects the insulation from interaction with moisture from the outside of the house, and the vapor barrier protects from the inside.
Vapor barrier materials are divided depending on vapor permeability into limited and complete.
Where is vapor barrier required?
Vapor barrier is required:
- in multi-layer fencing structures;
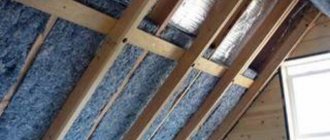
- in the presence of a pitched or flat roof, for the insulation of which bulk or fibrous materials were used;
- in rooms with high humidity;
- in structures insulated from the inside;
- in seasonal buildings.
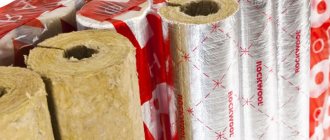
Foil vapor barrier
Vapor barrier protection is used not only in the construction of residential buildings and other structures, but also in addition to materials that absorb moisture, as well as for insulating communication lines.
In order for the procedure to have the expected result, the vapor permeability of the multilayer structure must increase from a warm surface to a cold one. For this reason, the vapor barrier is installed from the inside of the roof, walls and ceilings.
Sectional diagram of walls.
Sequence of layers for wall insulation:
- roofing layer;
- diffusion membrane;
- insulation material;
- vapor barrier, with an overlap glued with tape;
- tightly glued vapor barrier to the surface of the walls.
Criteria for choosing a vapor barrier material
When choosing a material, you should pay attention to several important criteria, including the following:
- Vapor permeability, the ability to absorb moisture and let air pass through is one of the most important factors; it is measured in g/m2 per day;
- Life time. Cheap materials can tear very quickly; membranes made of non-woven artificial fibers show the best indicator of this criterion;
- Difficult to install. When choosing, you should find out how the material is attached (what kind of overlap is made, and what tapes are needed); it must be attached tightly to the insulation, or leave a gap;
- Price. Products for this purpose are sold in rolls. In a store, they usually pay attention only to the price, but do not take into account that rolls come in different sizes; in order to sensibly assess the cost, you need to compare these two factors and calculate the real price.
The ability to absorb moisture and allow air to pass through is one of the most important factors.
Nuances
Foil fabric
Construction stores offer a huge selection of materials for vapor barriers, and depending on the manufacturer, they all have their own characteristics. During production, ease of installation, humidity and climatic operating conditions, and the functional purpose of the room are taken into account. Today, many manufacturers produce material that prevents fire, steam penetration, and helps remove excess moisture.
Vapor barrier in wooden houses
Wood is a material that requires mandatory vapor protection due to the passage of air and the absorption of excess moisture, which causes its swelling.
Since logs shrink during the first 5 years, when installing a vapor barrier, you must adhere to the following rules:
- Before using laminated veneer lumber, it must be dried as best as possible;
- There should be grooves on the timber so that over time, during drying, the material becomes compacted to minimize the formation of steam.
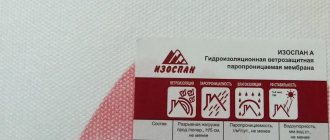
If shrinkage has occurred for less than 5 years, then membranes of the type “Izospan B”, “Izospan FB”, “Izospan FS” are used.
Vapor barrier installation on the outside of a wooden house
The sequence is:
- The vapor barrier layer is laid directly on the wall;
- A sheathing made of beams or metal profiles is installed;
- Thermal insulation material is placed in the cells of the sheathing;
- Finishing in the form of siding and other types of materials.
This method is suitable for rectangular timber.
Vapor barrier device inside a wooden house
The method of installing a vapor barrier from the inside of a room is suitable for preserving the appearance of a wooden house. Produced in the following sequence:
- Insulation is laid between the wooden beams;
- The vapor barrier film is attached to the sheathing using a special stapler;
- After fastening, seal the membrane joints with mounting tape;
- The interior decoration of the room is installed on the vapor barrier layer.
This technology is used when using cylindrical timber.
General rules for installing a vapor barrier film for a wooden house:
The film is stretched tightly without sagging, overlapping by about 10 cm. To connect them together, adhesive tapes are used.
Installation features
Often, installation is carried out by trained specialists. Based on the opinion of professionals, several rules can be drawn:
- For effective vapor barrier, it is necessary to have supply and exhaust ventilation inside the building.
- Protecting the insulating material from interaction with moisture, both inside and outside.
- Laying the vapor barrier exclusively on the warm side of the insulation.
- Mandatory fixation of the material at joints and in places of contact with surfaces using special tape and glue.
In any case, the installation must be completely sealed. In the event of a technology violation, you will have to redo everything all over again, which will entail large financial losses.
To carry out high-quality insulation, you need to have many special tools on hand, many of which are determined by the characteristics of the material.
How is vapor barrier attached?
Fixation is done in several ways:
- Nails with wide heads;
- Construction stapler;
- A lathing of wooden sticks at a certain distance.
On the floor
Vapor barrier, as a rule, is laid in a cake, which consists of the following layers:
- Rough floor.
- Waterproofing.
- Insulation.
- Vapor barrier.
- Finishing material.
But in some cases, a vapor barrier is laid on both sides of the thermal insulation. It is much easier to complete the work in a new building. If you are making repairs, then first of all you will need to completely remove the old coating, right down to the subfloor.
Even if you plan to install a heated floor system, it is recommended to lay a vapor barrier and insulation between the water floor heating pipes.
Vapor barrier with an air gap
Let's consider an example of laying rolled material:
- The film must be completely stretched over the floor surface.
- It is recommended to leave a ventilation gap of 7 to 15 cm between the insulation and the vapor barrier. If a diffuse membrane is used, then such gaps are not needed.
- The direction in which you lay the material does not really matter.
- But the installation side of the vapor barrier plays an important role. As a rule, brand inscriptions should be on top. If the film does not have an inscription, then the metallized side is laid upward, and the rough side is placed on the insulation. If you use simple polyethylene film, then there is no difference.
- Regardless of the material chosen, the canvas is overlapped up to 20 cm. They are fastened together with tape.
- If the base is wooden, then you can additionally stuff slats on top in increments of 50 cm or secure the vapor barrier with a stapler.
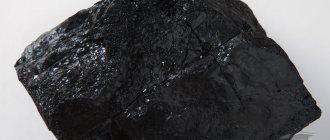
Another vapor barrier option is to use liquid rubber. To use it, there is no need to prepare the floor surface in any special way. The rubber is spread over the surface with a roller or spatula manually. The only thing you need is to remove all debris from the surface before starting work. In this case, it is best to vacuum the floor.
Thermal insulation of the floor on the balcony
As a result, the rubber will completely prevent the penetration of moisture under the floor covering. The air in the room will be light, and you can forget about the smell of dampness and mold forever.
The technology for applying liquid rubber is especially relevant when working with wooden floors.
How to mount
Vapor barrier ensures the reliability and durability of the entire house structure. You need to understand which side to attach the vapor barrier, if it is not double-sided, and how to do it correctly. If you abandon this layer, then all the materials used on the roof will gradually begin to deteriorate and, over time, problems with the house will appear.
Installation of roof vapor barrier Source applesakhalin.ru
See also: Catalog of companies that specialize in engineering systems
This layer has its advantages:
- UV protection;
- high level of strength;
- resistance to temperature changes;
- multifunctionality.
Laying this layer has its own rules and requirements that must be taken into account. It is important to take into account the design features of the material. Different films are used on different sides of the insulating layer, carrying the opposite tasks discussed above. Materials may differ in installation method; there are single-sided or double-sided options. In the first case, the film is attached to a specific side, and in the second, both sides of the vapor barrier membranes are the same - this is a more practical option.
To find the required side, you must carefully study the manufacturer's instructions. But if nothing is indicated there, then you can determine the required plane yourself based on a number of factors. Izospan with the light side is mounted to the insulation. The fleecy side is the outer side, and the inner side is always smooth. Some manufacturers roll the rolls with the inside facing up, so when unwinding it is directed towards the floor.
Durable film option Source dekoriko.ru
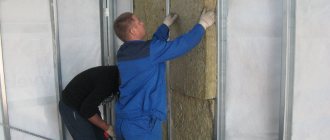
On the walls
Different materials can be used to vapor barrier walls. So, if roll material is used, then installation is carried out in a horizontal position. Laying starts from floor to ceiling. In this case, each subsequent strip is mounted with an overlap. The joint is glued with tape or other special compound. It is important here that the connection is completely sealed.
The principle of operation of vapor barrier in general
The main task is to create an obstacle to the permeability of vapors. Thanks to this property, the walls are protected from destruction from accumulated moisture (condensation). But the very definition of “vapor barrier” does not mean that the film creates a barrier and completely interferes with the circulation of steam. Modern materials are aimed at providing a slight air flow to eliminate the greenhouse effect in the house itself.
To the ceiling
As for the vapor barrier of the ceiling, it is overlapped with the vapor barrier of the walls up to 20 cm. The presence of a vapor barrier on the ceiling will allow the finishing material to be preserved for a long time. As a rule, vapor barrier can be installed both from the bottom of the ceiling and from above from the attic. In this case, you will get the following pie:
- Vapor barrier.
- Thermal insulation.
- Vapor barrier.
This work must be done even with concrete ceilings. When there is a temperature difference, the accumulated condensation can, after a while, provoke the appearance of mold and mildew, which is not so easy to fight.
Ceiling vapor barrier The
installation process begins with preparatory work:
- The surface is cleaned of construction debris and old finishing material.
- All existing cracks and imperfections in the base are covered.
- The ceiling is primed and dried.
The vapor barrier process looks like this:
- As mentioned above, the vapor barrier is laid overlapping with the wall one. It is attached to the ceiling with a stapler.
- It’s good if it is possible to treat the vapor barrier joint with slats.
- The joint is first covered with waterproof tape.
- On the ceiling it is enough to overlap up to 10 cm.
- There is no need to stretch the material too much. But you should not allow sagging. Otherwise, condensation will accumulate on the film and the polyethylene may break through.
Remember that the vapor barrier on the ceiling cannot be pierced. Therefore, the ideal option is to lay the film on a wooden frame.
Membrane films
The base of the vapor barrier membrane is polypropylene, with fiberglass mesh. The rough surface of the film creates a barrier that does not allow moisture to pass into both the wall and the insulation.
Due to the fact that the membrane is multi-layered, it stops not only the permeability of moisture, but also allows a small amount of air to pass inside.
Advantages:
- Can be used for wooden and frame houses;
- No need to create an air gap;
- Easy installation;
- Strength;
- Resistance to an increase in the number of mold microorganisms on the surface of the walls;
- Resistance to putrefactive processes;
- The material is harmless to humans;
- Extended service life - the film retains the original properties declared by the manufacturers for 50 years;
- Large temperature coverage during operation (from -60 to +80 °C);
- The presence of types of membranes reinforced with a layer of foil, which will reflect the heat coming from the house.
Photo
In the photographs you can take a closer look at individual details of the vapor barrier process:
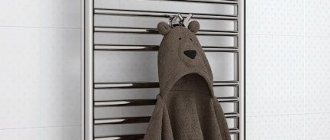
Fastening the vapor barrier with a stapler
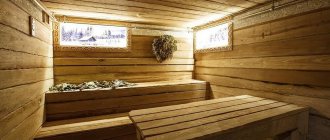
Bath vapor barrier
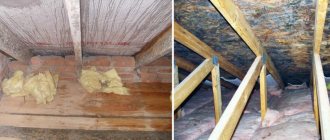
Laying in the attic
Laying insulating material
Vapor barrier for attic floors
Installation of vapor barrier
Overlap laying
Fixed vapor barrier
Briefly about the main thing
For proper vapor barrier of a building, the choice of material plays an important role. Before purchasing it, you need to know exactly where it will be used. Based on this, you need to choose the right film characteristics. And if a concrete wall can be treated with a special mastic, then the walls of a frame house require the use of high-quality membrane film.
The second significant factor in protecting both the wooden wall itself and the insulation on it is the correct installation of vapor barrier. Only a small part of the budget material has the same coverage on both sides. All membrane or diffuse films must be applied to the insulation with the correct side. If you make a mistake during installation, the protection simply will not work.
Scheme
The provided diagrams will help you understand the principle of performing the work:
Laying technique
Isolation diagram
How does ventilation occur?
Roofing device
Vapor barrier of walls
Roof vapor barrier diagram
Layout
Did the article help you?