Insulating a floor by laying insulation on a concrete floor slab, followed by pouring a cement composition is a rather complicated process. In order to carry it out with guaranteed quality of the final result, you must first decide on the choice of the heat-insulating material itself. There are a considerable number of types of floor insulation for concrete under screed, and each has its own pros and cons. Let's look into them thoroughly.
Rough screed using beacons
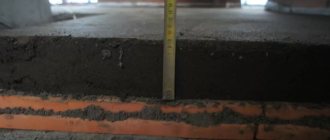
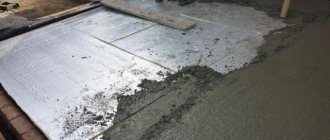
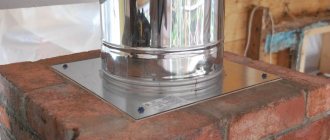
If the screed is made with a cement-sand mortar, then metal beacons are required, which are shown, and their installation in the room is shown.
The beacons are installed along a horizontal line previously drawn for the subfloor. To level them horizontally, use a ruler-level and place the same solution under them as for the screed. The distance between the beacons determines the length of the rule with which the solution will be distributed between the beacons. However, in the absence of experience, this distance should not be greater than 1.5 m. Composition of the solution: 1 part M300 cement, 3 parts sand, 1/10 part lime paste. Water must be added in such an amount that the solution is thick and does not spontaneously spread over the surface. No more than 2 hours should pass from preparing the solution to its use.
The ready-made mixture for screed can be purchased at a retail chain; it is prepared according to the attached instructions.
https://kuhnyamoya.ru/youtu.be/Jtw7-0XAyQo
Lay the mortar with a shovel, starting from the wall. Liquid cement is first applied to the surface. The solution should rise slightly above the beacons and occupy an area of approximately 1 m2. Distribute the solution, removing the top layer, using the rule rack shown. The lath near the wall is removed, the place is filled with mortar, smoothing it with a trowel. The areas of the beacons to be removed are also filled with solution.
The hardening time of the screed is approximately 1.5 days. After that, you can walk on it, but you can lay the insulation on the rough screed in a week.
If in a newly built house the concrete floor of the room does not require leveling, then the subfloor is not made. It is enough to properly seal the cracks, remove debris from the floor and wipe with a damp cloth to remove dust.
If insulation is done during the construction process, then there is no need for all the operations described above. Polyethylene film is laid overlapping on the concrete slab, sealing its joints with tape. Then the foam is laid and waterproofing is placed on top of it again.
Next, a reinforced cement screed is made. The dimensions of the reinforcing mesh are 100×100 mm or 150×150 mm. If the thickness of the screed is no more than 5 cm, then the mesh must be raised so that it does not touch the waterproofing.
https://kuhnyamoya.ru/youtu.be/RRaZfW17rNw
Thus, if insulation is done during the construction of a house, then it is not difficult to complete this work yourself. It is much more difficult to insulate the floor in an already built house, especially if it was built a long time ago and has shrinked a lot.
How to lay insulation on the concrete floor of the first floor?
First of all, the base under the insulation is thoroughly cleaned. Sometimes, depending on the type of flooring, thermal insulation material is placed between the ribs of a metal or wooden frame. When the installation is completed, a cement-sand screed is made on the insulating material.
When insulating a concrete floor in a private house, you need to choose the right insulation and strictly follow the technology for its installation. Expanded polystyrene is much easier to use than mineral wool, and the protection against it is no worse. During the construction phase, there will be large expenses, which will more than pay for themselves during operation - you will save on heating and repairs.
Expanded clay as insulation
This insulation is filled in and porous. It has been used for a long time. This material is easy to install. Expanded clay chips are placed on the prepared surface. The thickness of the embankment is 150-300 mm. Beacons are installed at a distance of a maximum of 80 mm from each other - this is necessary for precise insulation of the floor at the desired level.
In order to simultaneously carry out waterproofing, a polyethylene film is applied near the wall. You can install an insulated floor using a more progressive method - using a screed. Then the film is not used, because the layer is made only from a binder solution and water. This makes it possible to protect the structure from moisture.
Isolon as a method of arranging thermal insulation
This material can easily be used to insulate the bottom of a concrete floor in a private wooden house, and in this case roll materials are not required. Izlon is a foil material. It is laid on a concrete surface, directly on the insulation or on the attic wooden floor. The waterproofing seal is glued to the main structure.
It is moisture-proof, but a small gap is left before the coating for ventilation purposes, which will prevent the material from shrinking. To form such a cavity, the bars must be laid at a distance of 0.5 m from each other. The material is glued, after which the remaining layers containing foil and logs are mounted. To ensure that the floor always remains warm, a heating system is laid on the surface along the izlon.
Floor insulation with foam
The method eliminates the use of other insulation materials, since only foam insulation allows for maximum leveling of the floor surface. The foam will not shrink even after several years, since during its installation the beacons are first built by assembling guide profiles. Then foam is applied and the remaining layers of the floor covering are laid, thus thoroughly insulating the floor.
If you need to install thermal insulation for an already completed floor covering, then the production time and the amount of work are reduced. The structure is disassembled, foam is sprayed, and the top layer is installed on it as it swells. For partial repairs, without disassembling the structure, two or three boards are lifted and foam is poured under the floor.
Safe material – ecowool
A special dispenser allows for uniform application of ecowool when sprayed. This is a significant reason for specialists to recommend this material. It can also be laid manually if the amount of work is small. In this option, material consumption increases by as much as 50%.
After unpacking the material, it is placed in some container to be fluffed with a special apparatus. We must not forget that ecowool increases in volume. Then it is laid on the floor surface. It is worth noting that during the application process it is necessary to pause before laying the last layer of flooring - wait for a crust to form.
Floor insulation with polyurethane foam
This material is used if it is undesirable to allow the formation of thick seams or if it is necessary to cover the attic. Polyurethane foam perfectly stops the formation of condensation and prevents moisture from seeping through. In a short time it is possible to cover the entire floor at once, because all the ingredients are supplied only in liquid form.
To insulate a concrete floor in a house with high-quality polyurethane foam, it is necessary to calculate the loads acting on the base. The material is laid according to the rules for maximum longevity. Polyurethane foam does not have the ability to evaporate, therefore it is absolutely harmless to humans. It does not rot, does not mold.
To insulate the floor in a private house yourself, it is worth foreseeing in advance the loads that affect the design of the coating. The type and thickness of the insulation material is determined in accordance with the methodology - only in this way can the desired results be achieved when insulating the floor in a private house.
Advantages of polystyrene foam as floor insulation
It is popular to use polystyrene foam for heated floors because it has the following advantages:
- Excellent heat insulation and frost protection
. The thermal conductivity of the material is low due to its porous structure. In this regard, polystyrene foam perfectly retains heat in the room. - Good sound insulation
. The material absorbs both sound waves coming from the room and those coming from outside the building or its lower levels. The insulation layer reduces the level of vibration of the ceiling. - Fire resistance
. Polystyrene foam does not burn when exposed to direct fire, and to be more precise, it instantly extinguishes. It is worth noting that even during the shortest period of combustion, harmful volatile substances are released that pose a danger to the human body. It is not recommended to use such insulation in industrial facilities with an increased risk of fire. - Resistant to exposure and moisture penetration
. The resistance of polystyrene foam to moisture is very high, since the material does not absorb water. When using it, you can refuse to install waterproofing. - Long service life
. Foam sheets do not deform and are resistant to subsidence and rotting during operation.
Based on the foregoing, we can conclude that polystyrene foam is a universal material and can be used in the construction of a wide variety of buildings. Floors treated with foam plastic are reliably protected from the effects of cold air masses.
When using such insulation, floors do not lose their strength and reliability, which means that the presentability of the selected finishing coating is not affected. The owner will be pleased to present his home in a photo and personally show it to guests, who will be surprised not only by the appearance, but also by the warmth of the floors.
Styrofoam
Very often polystyrene foam is used for insulation. Its main advantages are:
- low cost;
- good thermal insulation characteristics;
- light weight;
- long service life;
- the material is easily cut using a regular stationery knife;
- resistance to combustion (if the heat-insulating layer is covered with a screed plate);
- moisture resistance and moisture resistance.
Among the disadvantages of foam plastic under floor screed is its toxicity. However, it all depends on the type of foam. Suitable for residential premises:
- PVC foam plastic. Polyvinyl chloride material is considered less harmful, since it contains a minimum of toxic substances.
- Polyurethane foam under the screed is foam rubber with good flexibility. This material is widely used in the production of furniture, so it is also safe for health. Thanks to the pores, polyurethane “breathes”, but it is flammable.
- Polyethylene foam for flooring under screed is completely non-toxic. This material is well known to everyone, since it is in it that various products are most often packaged.
In order for a floor screed with foam to have all the necessary parameters, it is necessary to select a material of a certain density. Therefore, when buying polystyrene foam, look at its markings - after the letters PPT there should be a number no lower than 25; such sheets are best suited for the heat-insulating layer of the screed. It is also worth paying attention to the PSB marking.
Another disadvantage that this material has is the complexity of its installation. In order for the foam floor screed to be durable, it is necessary to create the most even surface possible. To do this, quartz sand is first poured onto the rough screed, and only after that the insulation sheets are laid.
Healthy! For even cutting of insulation sheets, it is best to use a special construction cutter with a hot wire.
Foam sheets must be laid very carefully. If cracks or gaps have formed between the plates, they must be eliminated using polyurethane foam. Otherwise, the thermal insulation properties of the material will noticeably decrease.
If the foam screed will be located close to the foundation (first floor), then you should choose a material with a thickness of at least 10 cm, and for the upper floors slabs 5 cm thick will be sufficient.
Insulation process
To secure the thermal insulation material, it is best to use glue, especially for floating floors. When using glue, the risk of damage to the material is minimized. The glue should not be ordinary, but special, made specifically for the material used. The insulation must be laid as evenly as possible, and after applying the glue, press it carefully and wait a certain amount of time so that they have time to set.
Preparing the adhesive mass will not be difficult - just follow the instructions supplied with the product. To dilute the solution you will need a construction mixer. You can also use an ordinary drill, only in this case you will need to install a “mixer” attachment on it.
The process of insulating the floor under the screed begins not with the placement of slabs of material, but with the formation of sides along all four walls. They are made from the same material with which you will insulate the floor.
After this, it is necessary to accurately determine the height of the screed, taking into account the thickness of the insulating material. The sides mentioned above are installed precisely at this height.
If you use material in the form of slabs to insulate the floor under the screed, then they must be cut to the required size. These pieces are laid over the entire surface of the floor. At the same time, carefully ensure that the material is in good contact with the sides in the corners.
Thus, anyone can insulate the floor under the screed with their own hands. The main thing in this matter is to follow the sequence of actions and existing rules. Then you will be completely satisfied with the result, and your home will always be warm and cozy.
Thermal insulation technology
Let's look at two main methods of how to insulate floors in a private house under a screed.
Insulation on the ground
This method is used at the construction stage of a house if a basement is not provided. The order of work should be as follows:
- The bottom of the pit must be leveled. Then the first layer is crushed stone, gravel or slag. This layer should be 20–25 cm.
- Then a layer of sand (10–15 cm) is poured, it must be thoroughly compacted.
- A layer of reliable waterproofing is the most important component when insulating any floors. Thick polyethylene film laid in several layers is excellent. The seams need to be taped.
- Now you can directly fill in the insulation – expanded clay. The thickness of this layer may vary depending on the climate of the region. The minimum thickness of the thermal insulation pad must be at least 15 cm. In order for the insulation to fit more tightly, it also needs to be compacted.
- Next, the reinforcing mesh is laid on the floor. The cross-section of the squares should not be too large; the optimal size is 5×5 cm.
- Now you need to prepare the cement mortar and make a screed. As already noted, foam granules can be added to the solution and additional insulation of the floor can be made. The only thing worth noting is that it is better to fill the top layer (1–2 cm) with a clean solution. It will be easier to level, rub and control the horizontal position.
Advice! The horizontal plane and uniformity of the layers of the insulation cake should be controlled from the very first stage - backfilling the base. This will avoid uneven heating of the floors in the future.
Insulation on a concrete base
This method is used in already built private houses and in city apartments. This method is less labor intensive and faster, but still requires a carefully thought out approach. Let's figure out the sequence in which floor insulation is carried out using this method:
- First of all, you need to dismantle the old flooring (if any). In city apartments, it is also recommended to remove the old cement screed.
- Then you need to inspect the base and, if necessary, make repairs: seal cracks and crevices.
- Now the waterproofing is installed - thick polyethylene. Installation is carried out with an overlap, the seams must be sealed with tape.
- Insulation can be laid on the waterproofing layer. You can use any insulation: filling with fine-grained expanded clay or laying sheets of extruded polystyrene foam.
Advice! There is a small nuance here: if the concrete base is uneven, then in order to save materials and time on leveling, it is better to use expanded clay while simultaneously leveling the floor. Expanded polystyrene boards are best used for insulating pre-leveled floors.
- The top of the polystyrene foam must be covered with another layer of waterproofing to prevent moisture from the cement mortar from getting into it. It is recommended to pour expanded clay with cement laitance: this will increase the strength of the top layer.
- After installing the reinforcing mesh, you can directly screed the floor.
After the screed has completely dried (usually this takes from two weeks to one month), you can begin installing the finished floor covering. Any material is suitable for this: laminate, linoleum or ceramic tile.
If you have some skill and follow the given technology, it will not be difficult to insulate floors in a private house or city apartment. When doing such work with your own hands, you need to follow the sequence and technology of the installation process, and then the result will not disappoint you.
Extruded polystyrene foam for screed
Compared to polystyrene foam, polystyrene foam has high strength and greater density. The closed structural cells of the material give expanded polystyrene foam almost complete protection from moisture. The material is difficult to burn, which makes it possible to use it when insulating wood floors.
A layer of crushed stone is poured and compacted. Sand bedding is made and compacted. The base should be as level as possible on a horizontal plane. Sheets of material are laid out on the prepared base at intervals. The joints are sealed with tape. A layer of waterproofing is required. A reinforcing mesh made of metal or plastic reinforcement is laid over it. The floor base prepared in this way is poured with concrete mortar.
Types of thermal insulation for floors
The modern market of finishing and building materials provides a wide selection of insulation for floor screed. Each variety has its own characteristics, which are expressed in a combination of quality characteristics and installation technology.
Expanded clay
This material is quite popular for screeding in private homes on a pre-prepared soil base.
This option has a number of advantages:
- Non-flammability. The material does not burn, does not support combustion and does not emit toxic substances when exposed to temperature.
- The created layer of thermal insulation does not contribute to the appearance of mold and mildew. No rotting occurs when exposed to water.
- Excellent soundproofing effect.
- Ability to withstand large temperature changes without changing characteristics.
- Reasonable price making it affordable.
Expanded clay is clay that has boiled at a high temperature; therefore, the material is absolutely harmless.
The material is laid according to the following scheme:
- The base is being prepared. If the work is carried out on a foundation made of soil, then a foundation pit is built with a layer of sand, everything is carefully compacted.
- Depending on the necessary requirements for thermal insulation, a layer of expanded clay is poured.
- Additionally, a reinforcing layer is made.
- The prepared solution is poured over the structure.
Thus, the screed is created quite quickly, and the result is of high quality.
Bulk insulation materials are more suitable for arranging a dry screed; in the wet version, expanded clay is better used as a mortar filler (expanded clay concrete)
Styrofoam
Foam plastic under floor screed is used for installing flooring in apartment buildings or private cottages, on the second or first floor if there is a basement.
- The porous structure of the material provides a high level of thermal insulation, which makes it possible to retain heat inside the object.
- Excellent sound insulation. Foam plastic is able to neutralize vibration, which significantly reduces noise flows coming from the outside and inside.
- Resistant to fire. Although the material is subject to combustion, it has a self-extinguishing effect. Due to the fact that this process is accompanied by the release of harmful substances, it is necessary to exclude the use of the product in places with an increased fire hazard.
- There is no need to create an additional layer of waterproofing, since the products are moisture resistant.
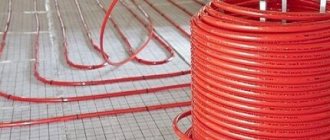
Nuances of arranging a “warm floor” system
The water system is more complex to arrange. It requires not only the installation of pipes under the screed, but also the installation of special equipment designed to heat and ensure forced circulation of water.
Nuances of arranging a “warm floor” system
The heating system is installed directly on top of the thermal insulation material
It is important that the insulation has a foil coating, due to which more heat will be reflected into the room. If there is no foil barrier, it is recommended to lay it manually
The system is installed according to the instructions provided by the manufacturer. After checking its performance, you can lay a reinforcing mesh to strengthen the structure and begin arranging the screed. When using a “warm floor” system, the solution can be prepared without crushed stone, expanded clay and other fillers.
Installation features
Before you start insulating the floor with foam plastic under a screed with your own hands, you should familiarize yourself with some useful information that will help you do everything correctly (more details: “Insulating a floor with foam plastic under a screed - installation instructions”).
If you plan to make a screed from cement-sand mortar, then a waterproofing material must be laid on top of the insulation. This is done to protect the material from exposure to moisture from the solution. The waterproofing must be laid overlapping, the joints must be secured with tape.
If a “floating floor” is being made, then even before screeding, it is recommended to lay strips of wooden slabs, which should be equal in height to the thickness of the future screed.
A small gap of approximately 1-3 mm should be left between the screed and the wall. This will help avoid the formation of “sound bridges”.
Conclusion
After studying all the information about thermal insulation materials for screed, you can choose the most suitable one for yourself. You should also remember about consistency and compliance with the rules when performing floor insulation, otherwise you may get a completely different result than you would like.
Using Penoplex
The name Penoplex itself is a brand. And the material itself is a high-density polystyrene board. For screed floors this is the best option.
- It has low thermal conductivity - 0.031 W/m K.
- It has a high density - 45 kg/m³, which affects the compressive strength. And for genders this is one of the important indicators.
- Does not absorb moisture.
- Does not allow steam to pass through.
- Chemically inert.
- Absolutely environmentally friendly.
- Easy to process.
Today, manufacturers produce foam boards with a tongue-and-groove connecting lock, which makes it possible to assemble a seamless coating on the floor base.
The process of insulation with penoplex is simple. It is necessary to lay the slabs over the entire surface of the concrete floor, connecting them together with a lock, then stretch the reinforcing synthetic mesh over the top, and only then you can pour the solution.
Estimation of the cost of screed with insulation
The only thing that will affect the cost of a poured floor screed with insulation is the price of the latter. Here are the prices for insulation materials that are used for thermal insulation of floor bases.
| Thermal insulation material | Characteristics | price, rub. |
| Mineral wool, m² | Thickness 50 mm | 75 |
| Expanded clay, m³ | Fraction 0-5 mm | 2400 |
| Penoplex, sheet | Thickness 50 mm. Dimensions 1200x600 mm. Density 30 kg/m³ | 170 |
| Penofol, m² | Thickness 10 mm. | 190-200 |
Extruded polystyrene foam
Expanded polystyrene foam is perfect for floor screeding, as this material meets all the requirements for high-quality insulation. Compared to polystyrene foam, it has better performance.
If we talk about choosing the right component composition of EPS, then you should be guided by the following indicators of various brands of expanded polystyrene.
| Name of insulation | Density, kg/m3 | Coefficient of thermal conductivity | Tensile strength, MPa | Hygroscopicity |
| Penoplex 35 | 28 – 38 | 0.030 W/m x C | 0,4 – 0,7 | 0,4% |
| Penoplex 45 | 40,1 — 47 | 0.030 W/m x C | 0,5 | 0,2% |
| Penoplex Foundation | 29 – 33 | 0.030 W/m x C | 0,27 | 0,4% |
| Penoplex Comfort | 25 – 35 | 0.030 W/m x C | 0,18 | 0,5% |
It is not recommended to choose polystyrene foam whose density is below 20 kg/m3, since such a base will not withstand the load from furniture. Based on this, the thickness of the sheets should be at least 30 mm for standard Penoplex boards and at least 7 mm for thin sheets (for example, Pufatherm).
There is also foil-coated polystyrene foam, which, thanks to the additional layer of foil, is the best option for insulating screeds for wooden floors and when installing heating systems. Foil can not only retain heat, but also reflect it. However, this material must be laid on the screed, and not under it.
Expanded clay
Expanded clay is best suited as insulation for concrete floors. Porous granules of baked clay have the same thermal insulation properties as polystyrene foam and polystyrene foam. However, unlike them, expanded clay is an environmentally friendly material that has the following characteristics.
In addition, if you are planning to install a screed for a country house, then it is recommended to lay expanded clay on the ground as insulation.
This material can be laid as an “independent” heat-insulating layer or expanded clay concrete can be made from it. In the second case, insulation granules are added to the cement-sand mortar, so you get a light but durable screed composition. If you use dry expanded clay, then chipboard sheets are usually laid on top of it, rather than concrete flooring.
When choosing and laying expanded clay, pay attention to the following recommendations:
- The clay granules must be intact, since the strength of the screed will depend on this. Most often, bulk material crumbles during transportation, so there may be many damaged particles in the bag. It is better to order expanded clay with a reserve or buy it not in bags, but directly from the production line.
- To increase the strength of the screed with expanded clay, it is recommended to pour it with cement laitance.
- To increase the thermal insulation properties of expanded clay, mix it with foam chips.
Rating of floor insulation
The formation of the TOP by the Vyborexperta.ru team was carried out by excluding from the list of nominees, which included 30 items, the least safe, convenient, durable and cheap heat insulators.
The rating was based on the following characteristics:
- Type of floor – wooden, concrete, warm;
- Type of material – polymer, mineral, wood chip;
- Type of insulation - cotton wool, polystyrene foam, etc.;
- Release form - sheets or rolls;
- Thickness and dimensions of the heat insulator;
- Density of sheets or rolls;
- Degree of heat and sound insulation;
- Water absorption level;
- Covered area;
- Vapor permeability;
- Insulation structure;
- Operating temperature;
- Flammability and fire safety group;
- Resistant to rodents and rot;
- Composition and absence of hazardous substances in it;
- Amount in a package.
The results of the analysis are presented taking into account the relationship between the cost and quality of thermal insulators and their prevalence in stores.
The best floor paints
The best insulation for wooden floors
Insulation of wooden floors is carried out from below, under the main boards, which are subsequently finished with the main coating. This reduces the risk of swelling of the top layer. For such surfaces, penoplex, stone wool, etc. are used. Before understanding which insulation is best for the floor of a wooden house, 10 nominees were analyzed taking into account their safety, ease of installation and durability.
Penoplex Comfort 118.5 x 58.5 cm 50 mm
A new generation of heat-insulating material used for finishing not only floors, but also walls, roofs, and foundations. Extruded polystyrene foam is suitable for both external and internal work. It comes in the form of slabs measuring 118.5 x 58.5 cm, which makes the installation process convenient and quick. The model can be used without consequences in a wide temperature range – from -50 to +75°C.
Penoplex has a good density - 25 kg/m³, so it reliably retains heat and at the same time has some soundproofing properties. In this regard, it is also relevant for finishing interfloor ceilings in a house. Due to water absorption at the level of 0.4%, the accumulation of liquid inside and the appearance of unpleasant odors is eliminated, but the vapor barrier should not be completely ignored. The insulation is durable in compression and can withstand high mechanical loads.
Advantages:
- The area covered by one sheet is 0.7 m²;
- Good waterproofing;
- Ease of installation;
- Long service life (up to 40 years);
- Low thermal conductivity – 0.033 W/(m⋅K).
Flaws:
- Sometimes attacked by rodents.
Sheets are produced with a thickness of 5 cm and a density of 25 kg/m³, which is sufficient for a wooden (frame or log) house, including an attic. At the same time, they do not take up space and are relevant for low ceiling heights.
TechnoNIKOL Rocklight 1200 x 600 x 50 mm
When trying to decide what kind of insulation to put on the floor, it should be noted that stone wool is supplied in slabs, which makes it easier to install. This material does not burn and can withstand temperatures up to 870ºC. It has, along with heat-insulating, sound-absorbing properties due to its dense structure - 35 kg/m³. This option is suitable for installation between joists under laminate, parquet, linoleum, and solid boards.
TechnoNIKOL Rocklight has low heat losses - 0.041 W/(m⋅K), which reduces home heating costs. The insulation is resistant to compression, allowing it to be used in areas with high traffic. It practically does not absorb moisture - its absorption coefficient does not exceed 2%. Thanks to this, the material can be used when arranging floors on lower floors, including above the basement.
Advantages:
- Resistance to rotting;
- Not affected by mold;
- The optimal sheet area is 0.72 m²;
- 8 sheets per pack.
Flaws:
- Weighs 10.28 kg.
Stone wool does not lose its performance characteristics over a wide temperature range: from -180 to +700 degrees. Due to this, it can be used for thermal insulation in rooms with high fire safety requirements.
Isolon 500 3020 AV/AH 1m 20 mm
A universal material used in construction for steam, sound and heat insulation. The insulation is produced in the form of a slab 1 m wide. It covers an area of 2 square meters. m, which allows for quick installation. Its density of 33 kg/m³ makes it possible to thermally insulate a room with a concrete floor, including under a screed. Izolon is also relevant for finishing above the basement.
Isolon 500 3020 AV/AH has a low thermal conductivity coefficient of 0.036 W/(m⋅K), which reduces the need for additional heating. The use of a slab significantly reduces the thickness of the interfloor “pie” and eliminates excessive pressure on the load-bearing parts of the building. This is a fireproof material that does not support combustion. Good steam and moisture protection make it possible to install the material in Finnish saunas, rooms with a swimming pool, and baths.
Advantages:
- Eliminates leakage through the floor;
- Reflects heat;
- Protected from UV rays;
- 15 sheets per pack;
- Suitable for outdoor use.
Flaws:
- Not detected.
Laying heated floors on Penoplex
There are differences, but they only concern the laying of pipes or heating cables/mats. Preparation of the base, the first layers, including the waterproofing layer on Penoplex, were described above. A steel mesh is laid on the waterproofing film. It is needed to fix the cable or pipes in a given position. When using heating mats, they can be placed in a layer of tile adhesive - this is simpler and more effective, so this type of heating elements for the floor is rarely used at this stage (although no one prohibits it).
Which mesh should I use? Depends on the step at which you need to lay the pipe or cable. Can be laid 50*50 mm, 100*100 mm or 150*150 mm
It is important that the chosen scheme can be implemented. What is the thickness of the wire in the mesh? Not less than 3 mm
In the case of a cable, perhaps 2 mm is possible. And before pouring the screed, the pipes will be filled with coolant and need to be held in place, so a mesh made of 3-4 mm wire is needed.
You can use Penoplex under a warm water floor without any problems
To prevent the mesh with coolant from moving when filled, it must be attached to the Penoplex. There are several options:
- Plastic clips that are driven into the insulation. But the thickness of the mesh rods is at least 4 mm.
- The metal tie is aimed at the insulation on both sides of the mesh cell.
- Special harpoon clamps.
- Special tires, but they are expensive.
- A mat with bosses is laid on top of the Penoplex. Then the grid is not needed. But these mats are also expensive.
After the mesh is secured, we attach the pipes or cable. The easiest way is with plastic ties, or knitting wire. But the wire can theoretically fray a pipe or cable as it increases or decreases in size (from heating and cooling) during operation. Therefore, if knitted with wire, it is in a plastic sheath. Manufacturers of pipes for heated floors have it.
Actually, that's all. Then they pour the screed, level it, and wait until the concrete gains strength.
https://youtube.com/watch?v=sZfkUVlJ93M
↑ Characteristics of thermal insulation materials
The thermal conductivity coefficient determines the ability of a material to transmit heat. It is equal to the amount of heat that passes through a material 1 m thick, with an area of 1 m 2 per hour, provided that the temperature difference on the two sides of the material is 10 ° C.
Porosity is a very important indicator; it is determined by the ratio of the number of pores to the total volume of the material. Affects all other characteristics of insulation.
The vapor permeability of a material determines its ability to “breathe”.
Water absorption affects the ability of the material to be used in conditions of high humidity. The lower this figure, the better.
The strength of the material is important for its use in structural elements where there are compressive loads.
Biostability means whether the material is able to withstand the action of pathogenic flora.
Fire resistance determines the ability of a material to withstand high temperatures for a certain period of time without breaking down.
Heat capacity is the ability of a material to retain heat under conditions of frequent temperature changes.
There are several other important characteristics:
Insulating the floor with penoplex under a screed with your own hands - how to insulate the floor with penoplex
Floor insulation is the most important element of repair work. After all, heat loss through this surface is 15%.
There are several ways to retain heat; one of the best is considered to be insulating the floor with penoplex under a screed with your own hands.
This is a very effective and simple method and does not require much effort or skill. The technology is unchanged and does not depend on the type of surface.
Features of penoplex
Penoplex is insulation made from extruded polystyrene foam. There are several options that suit the specific building conditions
This is why it is very important to make the right choice. For floor insulation, only penoplex with a density of 35 and 45 kg/m3 is suitable
"Penoplex 35" is suitable for thermal insulation of external walls, floors and foundations. This material has good characteristics:
- Average density 28 – 38 kg/m3;
- Low thermal conductivity;
- Low hygroscopicity;
- Low flammability index G1. The material can be considered absolutely fireproof thanks to the heat-resistant concrete screed, which will be laid on the insulation;
- The noise absorption rate reaches 41 dB;
- Operating temperature – -50º +75º C.
This material is perfect for a concrete floor under a screed. Additionally, you can install a “warm floor” system.
"Penoplex 45" has the highest density and is ideal for insulating floors on the ground. This material is even used for runways. Its characteristics are superior to Penoplex 35:
- High density. In the range from 40 to 47 kg/m3;
- Minimal hygroscopicity;
- Strength is 0.4-0.7 MPa;
- Fire resistance is G4.
Required tools and materials
To insulate the floor you will need the following materials:
- Penoplex;
- Polyethylene film;
- Cement;
- Sand;
- Glue;
- Primer;
- Sealant;
- Ribbon;
- Repair solution;
- Guide profiles for beacons.
In addition to the necessary materials, it is recommended to have the following tools available:
- Putty knife;
- Rule;
- Roller;
- Construction mixer;
- Container for mixing the solution;
- Level;
- Roulette;
- Knife.
Installation of insulated concrete floor
To carry out high-quality floor insulation, preliminary preparation is necessary:
- The floor surface is thoroughly cleaned of dirt and dust;
- All cracks and chips are eliminated;
- The floor is leveled if there is an urgent need for it;
- The primer is being prepared.
Penoplex is laid under the floor screed in several stages. After the base of the floor has completely dried, you can begin laying plastic film. It is better to cover the floor with film overlapping by 10 cm, and carefully glue the joints for additional vapor barrier.
The damper tape is cut and laid around the entire perimeter of the room. For better fixation, glue is applied to the tape pointwise, and the tape itself is pressed firmly to the floor. It is better to prime the area between the wall and the floor.
Damper tape plays a huge role in the operation of the floor.
In addition to enhancing thermal insulation, the tape, due to its elasticity, prevents the formation of cracks in the screed during its expansion due to changes in temperature and humidity.
There are usually no difficulties in laying penoplex itself.
It is important that the sheets lie flat and neat, and it is recommended to treat the joints with sealant. Even tape will work for this.
After that, a layer of film for vapor barrier is laid on the penoplex, a metal mesh is placed on top and secured with concrete mortar. It is better to pour the solution in parts.
Screed concrete is prepared from cement and sand in a ratio of 1:3. The most convenient and optimal option for work looks like this: half a liter of water, 1 kg of cement, 3 kg of sand. It is better to use containers larger than 20 liters.
If you use ready-made dry mixtures, then first add water, then add the dry mixture.
Then everything is thoroughly mixed. Afterwards, the resulting homogeneous mass is mixed with a construction mixer for another five minutes.
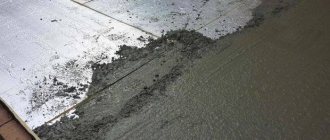
The finished solution can be safely poured starting from the far corner opposite the floor. The mass is thrown up to the level of the guide beacons, distributed with a trowel, the excess is removed by the rule, leveling the surface. After filling the first strip, you can start the next one.
At the stage when you can already walk on the screed (usually on the second day), the guides are carefully removed, and the resulting empty spaces are sealed with concrete mortar.
The final drying of the screed will not occur earlier than after three weeks. And only then can you place furniture.
Installation features: on the floor, on the wall, under the screed
Let's take a closer look at the sequence of actions when working on different surfaces. Penoplex is a multi-profile insulation, so you need to look at all the installation features.
Under a concrete screed on the ground
Here, the base will be a pillow of gravel with sand, 30 and 10 cm respectively. Penoplex sheets are placed directly on top, and if the thickness is insufficient, a second layer is built up. We make sure that the seams of different planes do not coincide, this worsens the waterproofing properties of the insulation.
The second row, for greater solidity of the structure, can be glued together at the ends. At the top, the seams are closed with tape. Then comes the covering film, laid on the wall with an allowance, and the reinforcing mesh. Now the installation of penoplex on the floor under the screed is almost complete, all that remains is to fill the resulting cake with a solution at least 5 cm thick. A cement-sand mixture is also used to create a heated floor, in this case, the size of the concrete layer depends on the location of the components of the heating system.
On the wall
Laying penoplex on the wall is not always recommended indoors, but it is ideal for loggias and outdoor installation. The installation process is much easier compared to floor insulation. Sequentially it looks like this:
This is interesting: Men's hairstyles for medium hair 2022
- Cleaning the wall from oil stains, crumbling plaster, paint;
- Prime the base with a compound containing an antiseptic;
- Prepare holes for fastening dowels;
- After drying, start gluing the insulation from the bottom corner. Place the sheet with the adhesive mixture against the wall, move it slightly to distribute the solution, press firmly in the desired position;
- Treat the ends of the workpiece with sealant and glue the next layer;
- Having assembled the bottom row, proceed to install the remaining plates, which you do in a checkerboard pattern;
- Final fixation with disc dowels in previously prepared holes. This is carried out only after the glue has hardened.
Next comes the finishing of the penoplex insulation with plaster with mesh reinforcement. We can assume that the work on laying the material is completed. Independent work with insulation will not be difficult.
The manufacturing technology of extruded polystyrene foam is one of the new, but widely used. It's all about the ease of installation and the variety of uses of insulation.
Filling the screed
The screed is made at above-zero temperatures. The entire area is poured at once. To prevent air voids from forming, it is necessary to pierce the surface in several places with a thin metal object, since the air itself cannot escape from under the heavy cement layer.
If the room area is large, after laying the heated floor, special beacons are installed, they are levels for pouring an even layer of mortar. Beacons are placed 0.5 meters from the wall, and from each other at a distance less than the size of the rule.
Concreting is done from the far corner to the door. The solution is poured between the beacons, evenly distributed and leveled, its level should not be higher than the beacons.
In order for the screed to come out of high quality, it requires care. To do this, 2-3 times a day for a week, its surface is moistened with water, since the solution must harden and not dry out. The heated floor system should be turned on after the laid screed has completely dried.
In general, the filling procedure is simple. If you follow the instructions and technology for making the solution, anyone can do everything with their own hands.
Choice
Concrete screed is far from the only way to insulate and level floors, especially in a private home. Instead, wooden logs are often used, which are easier to install, do not require long exposure, allow you to create a mini-underfloor (technical space for laying communications and storage), and, importantly, are lightweight.
Almost any insulation is suitable for such structures - from traditional mineral wool to ultra-modern sprayed polyurethane foam. Since the space between the joists is filled with a heat insulator, and the top is covered with OSB or plywood, it does not bear any load. The method of laying all components of the floor is dry. Consequently, neither high strength nor moisture resistance is required from the insulating material. And the consumer has much wider choice.
Only two options are recommended for concrete screed: expanded polystyrene and expanded clay. Both work well in bending and compression, and have not only heat but also sound insulating properties. The materials are absolutely safe for health and are not affected by fungus. To make a specific choice, you need to become more familiar with each of them.
Expanded polystyrene
This type of insulation can be called improved polystyrene foam. Today it is recognized as a favorite in the construction industry. 98% of polystyrene foam consists of air enclosed in a thin polymer shell. Available in two versions: pressless (PSB) and extruded (EPS). There is also a loose variety, which is foam granules, but it is used extremely rarely.
PSB has a lower price, however, its water resistance and strength are also low. Builders prefer its analogue, which is produced at high pressure and therefore has improved characteristics. Extruded polystyrene foam is even used for runways and highways. Its compressive strength is considered the highest among existing thermal insulators.
EPPS is also characterized by:
Domestic products are popular on the Russian market. Therefore, extruded polystyrene foam is known to many under the name of this brand. EPPS is produced in slabs with dimensions of 1200x600 mm, thickness from 20 to 150 mm. They can be foil-coated on one or both sides, which enhances the heat-insulating and moisture-proof properties. The one-sided covering is placed “facing” the living space.
The disadvantages of polystyrene foam of all types include flammability. Manufacturers are working to improve the fire safety of the material, experimenting with various fire retardants, but so far no effective impregnations have been found. That is why it is recommended to “hide” polystyrene foam under concrete, which reliably protects it from open fire.
A screed with an EPS layer is called a floating screed. It is permissible to install heated floors in it - this is one of the most effective solutions. In order for the structural “pie” to last as long as possible, it is necessary to take into account all the subtleties of its arrangement; there are no “extra” actions here. There are two types of installation - for floors on the ground and on the ceiling.
Insulation on a reinforced concrete slab
The “pie” is made as follows:
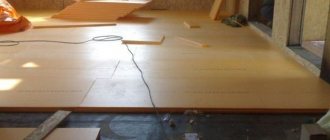
If you plan to lay linoleum or laminate, it is better to make another layer under them - a self-leveling layer.
In multi-storey buildings of the old housing stock, where the floor is not monolithic, but prefabricated, there are often differences between the slabs that do not allow the polystyrene foam to be laid evenly. In this case, a rough concrete floor screed is first made. It is recommended to lay any waterproofing material under it - polyethylene or rolled bitumen, placing it on the walls. This will protect the lower floors from leakage.
It should be remembered that additional layers of flooring “eat up” the living space and it becomes uncomfortable to be in it. Therefore, they choose insulation with a thickness of no more than 50 mm, and the screed is made 30 - 50 mm high.
If there is an unheated basement below, waterproofing must be done under the insulation. It is even better to use a hydro-vapor barrier membrane, such as ONDUTIS, which protects against condensation. To reduce the humidity of the basement in winter, install small ventilation holes - vents, which are constantly kept open until the frost subsides. A plastic film is laid on the earthen floor or a layer of lean concrete about 50 mm high is poured. The load-bearing walls of the first floor in the lower part are insulated.
Ground installation
In private houses on a strip foundation without a basement, the floors should be insulated more thoroughly than usual. After all, there is no additional protection between the ground that freezes in winter and the living spaces on the first floor. To enhance the strength characteristics of the floor, it is recommended to make a rough screed. Its location varies depending on the groundwater level. But it is important that the finished floor is level with the threshold of the building.
The classic “pie” diagram looks like this (from bottom to top):
If groundwater lies below 2 m, the concrete base can be poured directly over the ground, removing the fertile soil layer and making a small sand and crushed stone backfill.
Expanded clay
The material is obtained by firing clay shales, which foam and form granules that are hollow inside. Expanded clay is the most environmentally friendly, lightest and cheapest type of insulation. It has noise-proof and anti-vibration properties, is easy to install, does not mold or be corroded by fungus. In addition, unlike expanded polystyrene, expanded clay does not burn.
But the ceramic granules themselves are fragile and absorb water well. If they are used as dry filler, falling asleep between the joists, no problems arise. But under the concrete, expanded clay must be poured with a liquid cement-sand mortar. It is better to buy a ready-made mixture that contains all the necessary proportions. And only after it has dried, make a clean concrete floor screed with reinforcement.
Expanded clay has a low heat capacity. Therefore, to ensure the proper level of insulation, it is poured in a thick layer. But this apparent minus turns into a plus in houses of old construction, when builders replace the wooden floor along the joists with a more modern and comfortable concrete screed. A high layer of expanded clay ideally compensates for the difference in height, without gaining critical mass with heavy concrete.
For floors on the ground, clay insulation is also considered a good option, more economical and functional than polystyrene foam. Another advantage is that it does not require a flat base.
Standard “pie” made of expanded clay:
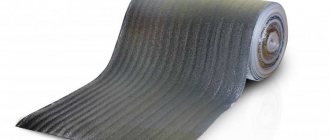
Penofol
Foamed polyethylene, covered with foil on one or both sides, is a new word in the market of thermal insulation materials. Penofol is non-toxic, moisture resistant, does not allow sound, vibration and heat to pass through. It has a small thickness, which allows you to maintain the useful height of the premises and is produced in rolls - a significant advantage that facilitates installation. The only obstacle may be the cost of penofol. But its durability compensates for this “shortcoming”.
Most often, a new generation of heat insulator is used when installing water-heated floors:
It is highly undesirable to use penofol for electric heated floors, and the intra-apartment wiring system under the floor must be reliably insulated. Insulation is a conductive material.
Source
Penoplex insulated ground screed
The soil base is fundamentally different from concrete and requires a different technology when insulating it with penoplex. Most often, this method of flooring is used for strip foundations in private homes. There are several conditions that allow you to use penoplex for screeding on the ground:
- No serious loads on the floor.
- The location of groundwater is below 5 meters.
- Presence of heating in the room.
Option for installing a floor on the ground
In addition to penoplex with an L-shaped edge to prevent the formation of cold bridges, you will need to purchase other materials for preparing the base and pouring the screed in the form of:
- Clean sand.
- Rubble.
- Waterproofing material (roll and mastic).
- Cement.
- Self-leveling mixture.
- Damper tape.
- Reinforcing mesh.
Insulation schemes
Before you begin installing the floor, you must choose one of three flooring schemes for laying the floor on the ground with polystyrene foam.
Scheme 1
The first scheme involves laying insulation directly on compacted sand located on the surface of a durable crushed stone cushion.
Scheme 2
The second scheme involves the installation of two screeds - rough and finishing, between which insulation with a waterproofing layer is laid on both sides. A “warm floor” system can be installed in the final screed.
Scheme 3
The third option differs from the second in the absence of a rough screed and the laying of penoplex directly on the sand cushion. This scheme differs from the first option only by the presence of waterproofing.
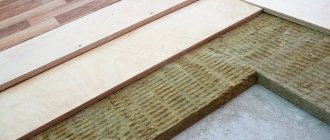
Mineral wool
It should be noted that of all the insulation offered under the screed, this is the most inconvenient. The thing is that mineral wool is a hygroscopic material. It quickly absorbs moisture, becoming practically unnecessary. Therefore, it must be covered on both sides: on the side of the concrete floor with a vapor barrier film, on the side of the screed with a waterproofing membrane. Therefore, the pouring process itself begins with the installation and laying of the lower protection.
- Typically, the film is laid in strips with edges overlapping within 10-15 cm, which must be secured with construction tape along the joint. Be sure to lay it over the walls, taking into account the thickness of the entire insulated pie plus the screed.
- Next, the thermal insulation material itself is laid out. It is better to use mats for the floor. They should be laid tightly to each other so that there are no gaps left, which can later become cold bridges.
- The top film is laid, like the bottom one, in strips with overlap and installation of tape.
- A reinforcing frame in the form of a metal or synthetic mesh must be applied to such a heat-insulating cake.
Please note that if mineral wool is laid in two layers, then the mats should be offset by half the panel. The seams between the thermal insulation elements must not coincide vertically.
Floor insulation with polystyrene foam: instructions
- Level and compact the soil as much as possible.
- Place a layer of fine crushed stone about 10 centimeters thick on top. It will also need to be compacted thoroughly.
- Fill this layer with sand on top and compact it again. The sand filling will hide the sharp edges of the crushed stone and compact the cushion made of it.
- Expanded polystyrene is laid on this soil base. If necessary, the material must be cut into pieces of the required size. The insulation should be laid as tightly as possible, without gaps or cracks. Most modern brands of this material now have special protrusions and cutouts that allow it to be laid in an even layer.
- The next layer is always a vapor barrier. The waterproofing film should overlap slightly, and to prevent the material from moving out, it should be fixed with mounting tape.
- For the strength of the concrete screed and uniform distribution of the load on the insulation, the next step is laying a mesh of reinforcement. It increases the strength of concrete and makes the floor durable.
- The concrete screed is made in the usual way. The sand-cement mixture is poured onto the reinforcement and leveled. The concrete layer should be no thinner than 5 centimeters so that it can withstand any load.
- After the concrete has hardened, it is leveled again and the final covering is installed on top - tiles, laminate, parquet, etc.
Please note that for thermal expansion of materials, it is necessary to leave a centimeter gap between the walls and the floor, which we talked about earlier. It needs to be sealed with foam. For reinforcement, you can use wooden logs rather than metal mesh or rods
They are placed below, and not on top of the layer of material. In this case, a wooden base is first mounted on a bed of crushed stone and sand, and then polystyrene foam is laid between its parts
For reinforcement, you can use wooden logs rather than metal mesh or rods. They are placed below, and not on top of the layer of material. In this case, a wooden base is first mounted on a cushion of crushed stone and sand, and then polystyrene foam is laid between its parts.
If you are not carrying out work in a private house without a basement, then the construction technology does not change significantly. The concrete or wooden base is covered with insulating material, and the remaining layers are installed on top of it.
Insulation of concrete floor
In most cases, the floors in apartments in city high-rise buildings are reinforced concrete slabs. The concrete floor itself is very cold, but if you add to this the gaps between the slabs and insufficiently tight joints between the walls and the floor, then it becomes truly icy. Therefore, insulation of concrete surfaces is a top priority for residents of multi-storey buildings who seek to increase comfort in their apartments.
Each master involved in insulation develops his own formula for the ideal insulation “pie” on concrete slabs. Let's look at the most popular possible options.
Option No. 1 - insulation + screed
The thermal insulation properties of a concrete floor can be significantly improved by laying insulation between the floor slab and the cement leveling screed. In this case, floor insulation in the apartment is performed as follows. The first step is to remove the old floor covering and remove the screed. The surface of the slab is cleaned of debris, dust, and unevenness from cement screed residues is eliminated.
Insulating the floor in an apartment using thermal insulation material and reinforced screed
Then a vapor barrier is performed. A polyethylene or polypropylene film is laid on the concrete base, laying the strips overlapping by 15-20 cm and extending 3-5 cm onto the walls. The overlap joints are insulated with special tape. Foam plastic with a minimum thickness of 50 mm and a density of 25 mm is laid on the vapor barrier film. Instead of polystyrene foam, you can use polystyrene foam, mineral wool, etc. The insulation sheets are laid as closely as possible to each other so that cold bridges do not form in the seams. After this, another layer of vapor barrier is laid. If polystyrene foam or expanded polystyrene were used as insulation, then this step can be skipped.
Now lay a metal mesh with square cells (cell side – 50-100 mm). The mesh will act as a frame for the cement screed, making it more durable. A cement screed with a minimum thickness of 50 mm is poured over the mesh. A thinner screed will be unreliable - after a while it will begin to crack and crumble. The cement screed must dry, this will take about two weeks. After which, to strengthen the top layer, it is necessary to cover it with a primer. After all this, any decorative covering is laid on the screed.
Option No. 2 - insulation along joists, without the use of wet processes
This option is similar to insulating a wooden floor. The difference is that the thickness of the wooden floor initially contains logs, between which it is convenient to lay any type of insulation. In the case of concrete floors, these logs will have to be constructed independently.
Insulation of the concrete floor along the joists eliminates wet processes and does not burden the ceiling
Technology for insulating concrete floors using joists:
1. First of all, clean the concrete slab from old screed, debris and dust.
2. Arrange waterproofing. It is convenient to use ready-made waterproofing polymer-bitumen solutions, which are applied to the concrete surface with a roller or brush. Another option is to use a vapor barrier film for these purposes, which is laid out overlapping on the floor, extending onto the adjacent walls. If you want to save money, then the most suitable material for hydro- and vapor barrier would be ordinary polyethylene film.
3. Install the logs at a distance of no more than 0.9 m from each other; if you take a step larger, the floors will sag. Instead of logs, if you plan to use bulk material for insulation, metal beacons are attached to the floor.
Installation of wooden joists on a concrete floor
4. Lay the selected insulation. Both mineral wool and polystyrene foam, and any type of bulk thermal insulation materials are suitable. Insulation in the form of sheets or rolls is laid out tightly, without gaps between the joists. Bulk material (for example, expanded clay) is poured between the beacons and leveled to one level using a metal rule.
Insulation is placed in the space between the joists
5. Lay the floor. To do this, you can use sheets of plywood, gypsum fiber board, OSB, chipboard with a thickness of 10-15 mm. It is safer to lay them in two layers so that the seams of the lower sheets overlap the panels of the upper sheets. Thus, the floor covering will be seamless, which will eliminate the possibility of cold bridges. After laying, the layers of sheets are connected to each other and to the joists (beacons) using self-tapping screws.
Laying sheets of dense material (plywood, gypsum fiber board, etc.) on joists
6. Suitable for any finishing floor covering.
Laying laminate flooring on an insulated floor
This short video will clearly demonstrate the process of insulation using joists:
The use of lightweight heat-insulating screeds
Providing good thermal conductivity is achieved by using a similar material such as perlite sand in concrete screeds. Lightweight concrete with perlite sand is environmentally friendly, durable, and retains heat remarkably well.
The downside is that the perlite screed must be protected with moisture-repellent compounds. Perlite sand is a very hygroscopic material.
Selecting a heat insulator for a floor is a very complex process. The variety of materials and their characteristics require a careful selection approach. The price issue is also very important. Choose the optimal middle ground between purchasing qualities and cost.
Penoplex insulation
Penoplex is a polymer insulation, the structure of the material is closed cells. It is thanks to the penoplex structure that the insulation has high moisture-repellent properties and has high compressive strength. In addition, the material is fireproof, which allows the use of a heat insulator for insulating wooden floors.
Penoplex floor insulation technology
Linoleum, tiles, laminate and other finishing materials can be used as flooring.
Before laying the insulation, it is necessary to thoroughly compact the soil, pour a layer of crushed stone and make a sand cushion. Penoplex sheets are laid on the base prepared in this way. The insulation must be laid in a checkerboard pattern, and all joints between the insulating boards must be taped. A waterproofing film is mounted on top of the heat-insulating layer and a reinforcing mesh is installed, which ensures the resistance of the floor to dynamic and static loads. A layer of leveling screed is applied on top of the structure, the thickness of which should be 4 centimeters. After the screed has dried, the floor covering is laid. Linoleum, tiles, laminate and other finishing materials can be used as flooring.
Before pouring the screed, a temperature gap should be created. It is necessary to lay a buffer tape along the entire perimeter of the room, and the gap between the screed and the wall should be about 1 centimeter.
Options for floor pie with screed
Insulation of the floor under the screed is carried out in several cases:
- on the floor slab - reducing heat loss in the basement or attic floor;
Thermal insulation on the floor slab.
- floor on the ground – reduction of heat loss into the ground;
Thermal insulation of the floor on the ground.
In addition, insulation is laid under the contours of a heated floor on any floor if a decision is made not to use a massive ceiling as a heat accumulator. Therefore, all options will be considered in detail.
There are three types of screeds, which also affects the choice of insulation. For example, in dry screeds, expanded clay sand is used, which has both heat-insulating and sound-proofing properties. For wet and semi-dry screeds, the same insulation materials and principles of hydro-, sound- and vapor barrier are used.
Insulation with expanded clay
Expanded clay is a highly environmentally friendly, fire-resistant material.
Expanded clay is a highly environmentally friendly, fire-resistant material. Polystyrene foam granules are highly porous, which increases the water absorption of the material; in addition, expanded clay is a fragile insulation material, so backfilling of the expanded clay thermal insulation layer should be done carefully.
In order for the floor to withstand significant loads, the thickness of the expanded clay layer must be at least 15 centimeters. This thickness entails an increase in the floor level, so expanded clay is not used for insulating rooms with low ceiling heights.
The expanded clay thermal insulation layer should be carefully insulated from moisture penetration, and before applying the concrete screed, the structure must be additionally reinforced.
What should it be: requirements
According to building codes and regulations (SNiP), the minimum thickness of the floor screed is 20 mm. In everyday life, such a minimum is rarely installed. It increases significantly if you need to hide equipment located on the subfloor. Thus, the thickness of the screed when installing a warm water floor should be determined taking into account the basic parameters of the pipes.
It is well known that the layer of mortar above the heating system should not exceed 40 mm. With a greater thickness, the installation of a heated floor is ineffective, since the bulk of the heat received simply will not reach the consumer. The internal layers of the screed will heat up, and the floor covering will receive virtually no thermal energy. The simplest calculations show that the thickness of the screed for a pipe diameter of 25 mm should be in the range of 50-70 mm. A standard screed consists of several components or layers.
The order of installation from bottom to top is as follows:
- waterproofing;
- thermal insulation;
- fittings;
- warm floor;
- screed
Different heated floor designs require different screed layers.
In some cases, the subfloor is first leveled with a thin screed; sometimes the solution is laid directly on the insulation. Its thickness should not be less than 2 cm. The layer is given 1 month to dry, and only after it has completely dried can you begin installing the heated floor, subsequently covering the installed communications with another screed.
An electric heated floor requires a low screed, especially if film heating was chosen. Infrared film is ideal for installation under laminate, carpet and linoleum.
If you plan to cover the floor with tiles, you should use a heating cable. In this case, you will need a less thick screed than when creating a water floor.
How to choose floor insulation: a comparative review of 10 different options
The question “Which insulation is better for the floor?”
are asked by everyone who loves comfort. It's always nice to walk barefoot without fear that your limbs will freeze. And this is especially true in the off-season, when central heating (if any) is not yet turned on, and in winter, when the temperature outside is sub-zero. It is then that people often turn their attention to floor insulation. We will tell you how to choose the material and how to lay it correctly. After all, a well-insulated floor is one of the components of heat preservation in a living space. When choosing insulation materials, it is important to take into account the climate zone (how cold it can be in winter), the characteristics of the room and its purpose, the type of existing or planned floor covering. For example, floor insulation in an apartment and in a wooden house will differ significantly.
Features and types of foam
Externally, the foam is a white slab made from compressed polystyrene granules.
Expanded polystyrene or polystyrene foam
The dimensions of the slabs are usually 0.5x1.0 m, but can be 1.0x1.0 m.
Advantages of expanded polystyrene:
- affordable price - this is practically the cheapest insulation for floors or walls;
- has good thermal insulation ability, 15-20% better than mineral wool;
- not afraid of moisture;
- has good elasticity, although it largely depends on its density (grade);
- has very low weight;
- it is simple to install and easy to cut; if necessary, adjust the size of the slab in the desired location of the floor base.
Flaws:
- Flammability - ordinary polystyrene foam burns with the release of very harmful substances. But there is a variety of it that practically does not burn - this is the so-called self-extinguishing foam. On its marking there is an additional letter C (for example, PSB-S). Although when using polystyrene foam under a screed, especially on a concrete base or soil, its flammability is not a big drawback.
- Contacts with gasoline or some other organic solvents, releasing harmful substances. Therefore, when working with polystyrene foam, it is necessary to ensure that it does not come into contact with solvents of this type. And they can be, for example, in coating waterproofing solutions.
- May be damaged by rodents.
- Decomposes when exposed to ultraviolet radiation. Although for the insulation under the screed this factor does not play a special role, since it is closed from sunlight.
Foam boards differ in density or grade. Most often, you can find polystyrene foam with a density from 15 to 50 on sale. The higher its density, the greater its elasticity and ability to withstand mechanical loads.
And this quality for floor insulation, which is laid under a screed, is quite important, since it will subsequently be subject to the load from the weight of the screed itself, the floor covering, as well as furniture, objects and people. Therefore, to insulate the floor under the screed, it is best to use foam with a maximum density, but not less than 35. Of course, another type of polystyrene foam would be best suited for this purpose - extruded (penoplex or extruded), but its cost is 2-2.5 higher, that's why many people choose the regular one
We have already talked about insulating the base of the floor with penoplex (extruded polystyrene foam) in another article in this section, but here we will talk about ordinary polystyrene foam or polystyrene foam and its use when insulating the floor under the screed
Of course, another type of polystyrene foam would be best suited for this purpose - extruded (penoplex or extruded), but its cost is 2-2.5 times higher, which is why many choose regular one. We have already talked about insulating the base of the floor with penoplex (extruded polystyrene foam) in another article in this section, but here we will talk about ordinary polystyrene foam or polystyrene foam and its use when insulating the floor under the screed.
Requirements for insulation
The specifics of the work carried out determine the requirements for insulation.
Due to the fact that insulation under floor screed is used in different climatic zones, they must have the following properties:
- water-repellent;
- high strength properties (to prevent the appearance of deflections and subsequent deformation of the floor covering);
- meet fire safety requirements;
- have a low thermal conductivity coefficient.
Manufacturers and prices
It is not difficult to insulate a concrete floor today, since the range of thermal insulation materials is very large. But you can only trust the following manufacturers in terms of choosing quality:
- Ekomix (extruded polystyrene foam) - price 1300 rubles per package.
- Isolon (foil insulation) - price 1200 rubles per roll.
- Paroc (mineral wool) – price 800-850 rubles.
- Rockwool (mineral wool) – price 1000 rubles.
- Neman (glass wool) – price 1200 rubles.
Insulation is one of the important processes in the field of construction, with which you can make any home warm and cozy
When choosing a material for thermal insulation of a concrete floor, you need to pay attention to the composition of the material, its thermal conductivity, moisture permeability and service life
Floor insulation: popular methods and common mistakes
Just as it is clean not where they clean, but where there is no litter, so it is warm not where the boiler is more powerful and the temperature in the system is higher, but where there is less heat loss. And although warm air tends upward, and the lion's share of the outflow falls on the attic floor and roof, the cold floor also makes its contribution. The absence of a thermal insulation layer in the floor pie, its insufficient thickness, or errors made during installation are the reason that the house loses heat through the floor, and you can only walk on such a base in slippers. Insulation can correct this situation and can be done both at the construction stage and after its completion, and even in a residential building if necessary.
Content
Do-it-yourself concrete floor thermal insulation technology
The process of installing insulation under a concrete screed comes down to three steps. This includes preparing the work site, laying insulating materials and finishing leveling with a water-soluble mixture.
Preparing the base
To insulate the floor, you first need to vacate the room, dismantle all the old finishing, eliminate weak areas and fillers, and get rid of debris. Then an overview opens to identify voids, cracks, and irregularities.
The gaps are filled with polyurethane foam and the excess is trimmed. Seams and splits are opened, dusted and covered with cement or polymer mortar. If differences in plane are observed, the floor level must be leveled.
Important! Smooth and repaired concrete must then be freed from dust. To do this, use a vacuum cleaner or carry out wet cleaning. After this, it is necessary to saturate the base with soil. The choice of composition depends on the purpose: to strengthen the base, reduce moisture absorption, protect against biological damage, or increase moisture resistance or adhesion.
Finally, a damper tape is installed around the perimeter of the entire room. This is necessary in order not to flood the neighbors below. And also, between the thermal insulation under the screed, the leveling layer and the walls, an installation gap must be maintained. Thanks to this void (up to 10 mm), during thermal expansion, the coating will retain its original shape without cracks or sagging.
Installation features depending on the insulation
It is necessary to insulate floors with penofol and expanded polystyrene according to the same rules. They are tightly laid at the joint and then fixed with a special glue. It is applied using a flat or notched trowel in an even layer over the entire surface of the floor. The seams between the sheets and slabs are sealed with metallized tape.
Important! If laying in 2-3 layers is planned, then it is carried out in a checkerboard pattern to cover all joints.
Finally, the insulated cover is protected with waterproofing with an overlap on the walls up to 20 cm high. This can be a membrane or technical film (from 100 microns). The edges are overlapped by 15 cm with additional gluing with sealing tape.
In the case of expanded clay, waterproofing is laid or applied directly to the concrete base of the floor. A guideline for leveling the embankment is outlined on the walls. To do this, you need to identify the highest point on the base and count 10 cm or more from it. after which lines are drawn, maintaining a horizontal level. If the room is large, then temporary or permanent beacons can be attached.
Screed device
The cement mortar must be used within 1.5 - 2 hours to avoid premature setting. It is poured onto a platform with installed beacons, which are pre-attached to a similar composition in advance. The mass is distributed using a rule or a rack supported by the beacon profile. If it is galvanized, then dismantling is not necessary. Without a protective coating, the planks must be removed before the screed has completely hardened. And the voids at the end are filled with the same composition.
Common Mistakes
A common mistake is to use impermeable membranes to protect the insulation from moisture coming from below. Despite the fact that a vapor barrier is also laid on top of the insulation, it is unable to completely prevent moisture condensation in the insulating layer. And when there is nowhere for condensation to fall, it soaks the insulation, worsening its properties, and falls on the film. And if for the insulation moisture is fraught only with increased thermal conductivity, then over time the logs in a wet environment will simply become covered with mold and rot much ahead of schedule. The waterproofing membrane must be diffusional so that moisture does not accumulate under the thermal insulation, but is released outside in the form of steam.
The pitch between the lags is selected in such a way that the thermal insulation slabs are laid spaced apart - quite tightly, but without compression. When the insulation is compressed, its thermal conductivity increases. If there are gaps between the insulation and the joists, there is no need to talk about the effectiveness of the insulation at all.
Foil insulation based on polyethylene foam, although characterized by minimal thermal conductivity and the ability to reflect heat into the room, does not work as independent thermal insulation. No matter how much you would like to save on insulation, you should not do this. One of the participants of our portal decided to additionally insulate the concrete floor along the ground. Despite the presence of a 100 mm thick EPS layer in the cake, the temperature of the concrete screed in a warm house did not rise above +15⁰С. And, although the heat does not go into the ground, the floor is cold. In the bathroom, boa2011 installed a heated floor system under the tiles, and in the rest of the house he decided to raise the temperature of the base by covering the heat-intensive concrete with foamed polyethylene with a reflective layer.
In general, what is the result of the rigmarole called “Insulation of a concrete floor” - I report. I laid it out as I wrote earlier:
It has become warmer, BUT! This method doesn't work. The insulation is soft, the floor is springy underfoot, the boards are simple edged, so they have a thickness variation of 3-4 mm and the floor is uneven. The plywood is thin and begins to bend at the edges, lifting the boards screwed to it. In general - nonsense. Now, in order to somehow bring it into divine form, I sew the entire pie with long dowel nails to the concrete. At the same time, I understand that over time the runway will wear out even more and the dowels will stick out. For those who will think about how to insulate floors, my advice from experience is: EPS with an L-edge and two layers of plywood. More expensive, but much more decent.
The runway has a too soft structure, and the thicker the layer, the more springy the finished floor will be. To avoid this, it is necessary to lay a timber sheathing on top of the insulation. And then on it there is either a slab base for type-setting coverings, or a finished floor made of tongue-and-groove boards (solid wood, engineered boards).
You can insulate a floor in different ways and with different materials; the best option is selected for specific conditions. If wet processes are undesirable, dry technologies are sufficient.
Read more about fill-in insulation in the material about expanded clay and perlite. To prevent the base from being cold, it is worth pouring a screed made of polystyrene concrete or foam concrete. The video is about floor insulation with extruded polystyrene foam.
Source
Materials for screed insulation
Insulation of floor screed with polystyrene foam
To properly organize insulation, it is necessary to select the appropriate raw material option.
You can create the optimal level of thermal insulation at home using polystyrene foam or expanded polystyrene. These materials have a relatively elastic structure. They are laid in slabs, having previously selected the desired thickness. This raw material contains 96% air, so it is considered natural. Thanks to this material, it is possible to minimize the heat transfer rates under the concrete screed in the house and apartment. The main advantage of the canvas is its versatility.
Expanded clay
Expanded clay is a bulk insulation for floors under coarse screed. Its basis is foamed baked clay. The material is poured into specially prepared niches and evenly distributed over the surface. Initially, only this raw material was used to insulate floor screeds. The main condition when using expanded clay is the installation of waterproofing on top, since when the screed is poured, all the thermal insulation turns into expanded clay concrete.
The foil fabric consists of two layers. The first one plays the role of a base and substrate, the second one is a reflector. The basis for such insulation is usually foamed polyethylene under the screed or polystyrene. It comes in white or blue. It is laid under concrete and has good reflective properties. The product with foil retains heat well and also prevents the penetration of moisture.
Mineral wool is inconvenient for insulation under screed, as it is difficult to lay it correctly and isolate it from moisture
This screed insulation is considered inconvenient for installation on concrete floors. It is quite difficult to lay it correctly and isolate it from moisture. Raw materials require special surface preparation, in particular, laying a vapor barrier film. A special waterproofing material is also laid on top of the insulation before pouring concrete. If this is not done, the internal floor equipment will not perform its function.
They are a kind of foam plastic. You can attach the insulation to the floor under the screed using special glue or cement mortar. It is also possible to make a floating insulating pillow. This material has good resistance to deformation and excellent moisture resistance.
We invite you to familiarize yourself with Filling a site with crushed stone - the right technology from the company Krasivy-uchastok.rf
Foam granules
When using this method of floor insulation, there is no need to lay a base surface under the material. This insulator is considered the lightest and is also able to avoid surface unevenness, so it is indispensable when screeding uneven floors.
We invite you to familiarize yourself with the Mini cattle farm for 10 heads
Basically, foam granules (polytherm) are used as an additive to a solution also consisting of water, coarse sand, cement, fiber fiber and plasticizers.
The lightness of the material is due to the low density of the granules. This type of screed is ideal for insulating attics, roofs, basements and floors of the first floors of houses. In this case, the foam plastic should have a thickness of about 50 cm, and if it is used as interfloor sound insulation, then first a layer approximately 60 cm thick is poured, and then a semi-dry screed is laid on top.
After filling the screed with the solution, it is leveled, dried, and then sanded.
Polytherm ideally accommodates household communications, water-heated floors, as well as electrical wiring placed inside the corrugation.