Residents of private houses often get very cold in winter. After all, heat escapes through windows and doorways, cracks in the floor, as well as walls. To solve this problem, mineral wool for insulating the ceiling helps a lot.
Below in the article a video of do-it-yourself ceiling insulation with mineral wool is published, as well as the main nuances of installing this building material.
About mineral wool
Insulation with mineral wool in the Russian Federation is breaking all popularity records: the material is inexpensive and easy to work with.
This is explained primarily by large reserves of easily accessible raw materials and production technology that has been developed over many decades. The disposal of blast furnace slag in the USSR had to be taken care of even during the industrial leap of the first five-year plans, and for a breakthrough into space, thermal protection for return capsules was developed based on fibers from melted heat-resistant rocks. So “modern” methods of producing slag wool and stone (especially basalt) wool are actually not that new. Professionals especially like mineral wool: it does not require expensive special equipment, but there is a wide range of special fasteners and accessories for it on sale. As a result, the ceiling area is up to 20-25 square meters. m can be insulated in less than 1 work shift, or even in 2-3 hours, it depends on who knows how. How it looks technologically can be seen in the video below.
Video: example of ceiling insulation with mineral wool
https://youtube.com/watch?v=_rdfDyEej6w
After reading what follows, you may have a question: where is the membrane between the insulation and the ceiling? It is quite possible that in this case it is not needed if the attic and roof are already insulated; Why do the owners have to shell out too much?
More attention should be paid to the following precautions when working with mineral wool:
- The standard electrical wiring is rolled into a coil and hangs on the wall.
- Judging by the fact that a temporary light bulb is used for working lighting, the room is completely de-energized, and its wiring is disconnected at the nearest junction box or at the input panel - this is absolutely correct and absolutely necessary.
- The master puts on a full set of personal protective equipment (PPE): special overalls, gloves, goggles, and a respirator. For an amateur master, this is an important point, because... Quite expensive PPE will have to be used once.
It is already clear here that mineral wool is not without its drawbacks: it is a group 3 allergen and carcinogen, i.e. Suitable for residential premises, but it is necessary to work with it using PPE. In addition, which all manufacturers and sellers without exception are wisely silent about, under the influence of even insignificant amounts of moisture vapor and its own weight, mineral wool shrinks irreversibly, as a result of which its thermal conductivity drops by 50% in 3 years: air gaps in the insulation are the same thermal bridges , like metal jumpers, only based on microconvection. Gaps between slabs in 5% of the insulated surface area increase heat loss by 30-35%
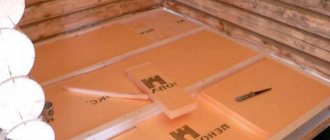
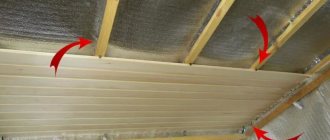
This leads to another unpleasant circumstance: the simplicity of working with mineral wool is apparent. When cutting slabs/rolls to size, you need to give an overlap (usually 20-40 mm) so that the slabs fit tightly into the openings without sticking out, as on the right in the figure, but also so that further cracks do not appear due to shrinkage. Perhaps this is only based on experience, because... the properties of the material vary significantly from batch to batch.
Correct and incorrect installation of thermal insulation
Finally, the thermal conductivity of brand new mineral wool significantly depends on its humidity - in the direction of deterioration. An increase in air humidity in a room insulated with mineral wool from 60% to 85% leads to an increase in heat loss by 10-12%. Therefore, in further presentation, we, still focusing on mineral wool as the most popular insulation, will give, where possible, recommendations for replacing it with something better.
Note: Also take a closer look at the mounting jig (circled in green on the left in the figure). If you use a propylene linen cord instead of a fishing line, the conductor can be left permanent. Then there will be no need for special fasteners and, when installed on the ceiling and surfaces with a negative slope, sagging in the middle and corners of the slabs will be eliminated.
What is the best way to secure insulation to the ceiling and wall?
The issue of improving the energy efficiency of housing remains relevant today. To a large extent, its solution depends on additional insulation of ceilings and walls, because it is through them that the building loses more than 2/3 of its heat. Residents of houses insufficiently protected from temperature changes are forced to heat them with greater intensity, which also negatively affects the family budget. Laying insulation on the ceiling and walls will help not only retain heat in the winter, but also maintain a comfortable room temperature in the summer. It is better if the thermal insulation of a home is carried out comprehensively, that is, not only its ceiling is insulated, but also its walls. The results of this approach to improving the energy efficiency of the building will be noticeable immediately after completion of the work.
Ceiling insulation scheme.
How and what is the best way to insulate ceilings and walls?
It should be noted that the easiest way to insulate individual housing. Its owners have greater opportunities to choose insulation methods compared to residents of multi-apartment buildings. For example, in a private house you can attach insulation to both sides of the walls, top and bottom of the ceiling. In most cases, apartment dwellers have access to thermal insulation only indoors, however, this (albeit partial) solution to the problem of heat preservation leads to positive results. Nevertheless, recommendations on how to fix insulation to a ceiling or wall will be useful to everyone. The technologies for laying thermal insulation both inside and outside are described below. All you have to do is choose the most suitable option for your conditions.
The most popular materials for insulating buildings currently are expanded polystyrene (foam plastic) and mineral wool.
Both insulators are effective, but for interior work it is still better to use mineral wool, because the debate about whether polystyrene foam is harmful or not harmful to health has not subsided to this day. From this we can conclude that the slightest doubt about the environmental friendliness of the material should put an end to its use indoors. Nevertheless, expanded polystyrene has a number of advantages over mineral wool in facade finishing. Wall insulation made from extruded polystyrene foam is an unsurpassed material for thermal insulation of external walls.
Return to contents
Ceiling insulation with mineral wool
Tools needed when working on room insulation.
The question arises: isn’t it difficult to install insulation on the ceiling in an apartment if you can only use mineral wool? However, it is produced not only in rolls or sheets, but also in slabs. The latter has increased characteristics of moisture resistance, density and fire safety. Its fastening is done in almost the same way as installing foam insulation. But laying roll insulation is not as complicated as it might seem at first glance.
Before laying soft mineral wool under the ceiling, it is necessary to create a sheathing hemmed to the ceiling. But first you need to clean the insulated surface from whitewash or water-based paint, treat the ceiling with waterproofing impregnations and primer. This will improve the adhesion of the insulation to it.
Return to contents
How to make a sheathing?
To attach the sheathing to the ceiling, you need to build its plane. For this you will need:
- level,
- roulette,
- painting cord,
- chalk,
- synthetic threads,
- self-tapping screws
Scheme of ceiling insulation with mineral wool.
At a certain distance from the ceiling, corresponding to the thickness of the insulator, a point is placed on the wall. Using a level, marks are made on the remaining walls. Horizontal lines are drawn between adjacent points on each wall using a cord, rubbed chalk or plaster. Self-tapping screws are screwed into the walls along them, between which threads are stretched, forming the plane of the new ceiling. The profile or bars are hemmed to the concrete ceiling using corners and dowel-nails. The step between fasteners should not exceed 60 cm. The distance between adjacent bars should be slightly smaller than the width of the roll or sheet of mineral wool. This will allow the insulation to be tightly inserted between the slats.
Return to contents
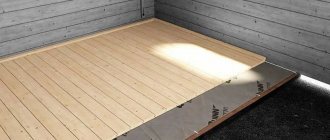
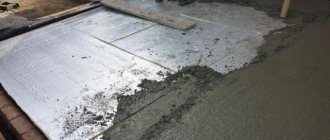
Laying the insulator
The ceiling between the guide rails is coated with glue, after which insulation is laid. After laying, a vapor barrier membrane is attached to the sheathing with a stapler. Additional adhesion of the insulation to the ceiling is provided by disc-shaped dowels, the length of which must be at least 50 mm greater than the thickness of the insulation. For every square meter of mineral wool laying there should be at least 5 dowels. After completion of the work, the sheathing is sheathed with a finishing coating.
Scheme of insulation of walls indoors.
Mineral wool in slabs (basalt slabs) can be mounted under the ceiling without lathing. Before installation, the ceiling is cleaned of old coating, dust, grease stains, etc. The surface is impregnated with waterproofing agents and primer. After this, glue is applied to the ceiling. You should not apply it to the entire floor at once unless you are sure that you will finish the work before the prepared mixture dries.
The glue is also applied to the slab. After that, she presses herself against the ceiling for a few seconds. The remaining panels are glued in the same way. They are located close to each other. Insulation of the ceiling with fragments of tiles is carried out only after laying whole slabs. The panels are fixed with disc dowels (5 pieces for each slab). After this, glue is applied to the mineral wool, to which the synthetic mesh is pressed. The glue is evenly distributed with a spatula over the surface. After two days, the ceiling can be puttied with regular putty and finished with finishing coatings.
Return to contents
Insulation of walls from the inside
Insulation of walls from the inside is carried out in exactly the same way as insulation of the ceiling. Laying basalt slabs and rolled mineral wool does not require reinforced fastening of insulating materials to the wall, since there will obviously be no wind load in the room. You can lay mineral wool between the sheathing guides for installing drywall.
The metal profile or bars are installed along a plane built with the help of sags. Sags are 2 threads that are stretched vertically from the ceiling to the floor on opposite sides of the wall. They are attached using long self-tapping screws screwed in at the top and bottom. The distance from the wall to each thread should correspond to the thickness of the insulation. Another thread is pulled between the slacks on free loops. Sheathing slats are installed along it. They are attached to the wall using U-shaped hangers, which can be used to adjust the gap between the profile and the wall. The step between the hangers is no more than 60 cm.
The mineral wool is placed tightly between the slats on a primed and glue-coated surface. The installation frequency of disc dowels can be reduced to 1-2 pieces per square meter or slab. After laying the insulator, the profile is sheathed with plasterboard. The slabs are also installed along the sag and placed on an adhesive base. The process of working with them completely repeats the insulation of the ceiling.
Return to contents
Insulating the ceiling from the outside
Now we need to move on to a description of the insulation of the ceiling from the outside. This is the advantage that owners of individual housing have over residents of high-rise buildings. Any material can be used as insulation, but the most popular of them are expanded clay, mineral wool and polystyrene foam.
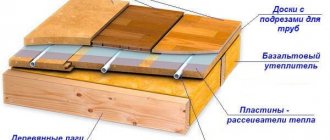
Expanded clay can simply be poured onto the ceiling if the attic is not used in any way. However, in most cases, the attic space is intensively used, so expanded clay is poured between the joists, onto which the flooring is subsequently attached. Insulation of the ceiling from the outside must be accompanied by its waterproofing, which is laid on the ceiling. The vapor barrier membrane must allow steam escaping from the room to pass through and prevent moisture from penetrating inside. The film strips are overlapped. The edges of adjacent sheets should overlap each other by 10-15 cm.
The beams are attached to the concrete ceiling with anchor bolts. The length of the fasteners is selected in accordance with the dimensions of the bars. The fastening step is 1 m. The beams are installed according to the level. If necessary, plywood or wood pads are placed under the joists. The height of the sheathing does not have to be equal to the thickness of the insulation. Its level may be below the upper edges of the lag. After filling the expanded clay, the insulation is covered with waterproofing and boards or flooring slabs, screwed to the joists with self-tapping screws.
Laying expanded polystyrene and mineral wool can be carried out without attaching insulation to the ceiling. The main thing is to lay the insulation more tightly. Insulators are laid on a vapor-permeable membrane between the beams of the sheathing. After this, the thermal insulation is covered with another film and floor boards.
Dried sawdust can also be used as external ceiling insulation. However, they will not improve the level of fire protection at home at all.
Features of the technology for insulating wooden ceilings with mineral wool
Insulating the ceiling in a wooden house with mineral wool can be done in two ways:
- Wet option. Glue the slabs to the base base, cover with waterproofing and sheathing. Application for internal and external works. The thickness of the laying layer depends on the height, strength of supporting supports, etc.
- Dry method. Installation is carried out in the gap between the supporting structure and the casing. To equip the slabs, the owner makes a frame, but it is permissible to install products without a frame, then press them with a waterproofing film or sheathing.
Scheme of ceiling arrangement with mineral wool insulation
Depending on the characteristics of the room, you should choose one of the layout options:
- Internal insulation. Used in houses with high ceilings. The thickness of the layer depends on the climate and the owner’s requirements. On average, the structure takes up to 45 cm in height.
- External insulation option. Most often in this case, mineral wool is laid out from the attic side and covers utility lines.
- Combined method. This is the application of internal and external techniques. Suitable for houses with cracks in walls and ceilings. It is used in buildings where preset temperature parameters are maintained for a long time - baths, saunas.
Layout layer thickness
Before starting work, you must read the instructions from the manufacturer - they indicate the dimensions of the products.
The thickness of mineral wool for ceiling insulation is selected taking into account the following nuances:
- number of layers;
- climatic conditions of the region;
- indicator of the temperature in the room.
On average, a material width of 15 cm is enough to insulate residential buildings. In houses with flat roofs, the thickness of the products is from 3 cm; pitched roofs require insulation up to 20 cm thick.
Step-by-step technique for insulating the ceiling from the outside
Insulation of the ceiling from the outside with mineral wool is carried out in the following order:
- Clean the attic floor and cover it with a vapor barrier membrane. The layout is overlapped, the joints are taped.
- Lay sheets of mineral wool on top of the membrane, tightly adjacent to the beams. The space must be completely covered with insulation. If you need to crumple the sheets, don’t worry, after 15 minutes the cotton wool will straighten out and close the cracks.
- Whether to cover the materials or not is the owner’s choice. To eliminate the threat of getting wet and reduce heat loss, it is recommended to cover the insulation with a waterproofing film or lay a rough plank floor.
Waterproofing becomes mandatory if there are leaks in the roof. If the sheets are laid in several layers, the seams between the elements are shifted by half the length of the sheet - a brick lining is used.
Insulation from inside the house
It is most convenient to insulate the ceiling in a house from the inside with mineral wool using slab modules.
Stages of work:
- clean the base; to prevent damage, treat wooden ceilings with an antiseptic and dry;
- lay a waterproofing membrane, film or glassine on the ceiling, fixing it with tape (temporary);
- form a frame made of metal or treated wooden dies on top of the waterproofing;
- assemble the frame taking into account the dimensions of the slab - the slab must be placed in the cells so as to fit tightly to the sheathing profile;
- fixing the frame to the base with dowels, thus pressing the waterproofing;
- Place mineral wool slabs in the cells.
If the boards are glued, they stick better. The dry layout option is only available if the slabs are securely fixed in the cells and then covered with the ceiling.
Waterproofing must be laid over the slabs, secured with tape to the frame or with a construction stapler. Then cover the trim with sheet materials and prepare for finishing cladding.
Tools and materials for work
In addition to a certain type of insulation, you will need:
- glue (for wet laying);
- bar or metal profile;
- metal scissors;
- dowels, hardware;
- staples and stapler;
- scotch;
- film and membrane for waterproofing.
Types of fasteners and technology for fastening mineral wool indoors
Installation of insulation indoors is usually carried out in an apartment. Fastening of mineral wool is carried out in several stages:
Construction of the frame. To do this, you need to install a metal sheathing for the suspended ceiling. The profile of the metal sheathing has standard parameters.
For a wooden frame, boards of 30×100 mm or 40×200 mm are used, based on the weight of the slabs. That is, the heavier they are, the more massive the sheathing will be. The slats need to be fixed with dowels with hangers, in increments of 55-60 cm.
This distance is optimal when laying mineral wool in slabs. Installation of waterproofing material. The film is cut into strips of 65-70 cm, i.e.
slightly more than the width of the intervals between the slats. Nails are used for fastening to a wooden frame, and self-tapping screws for a metal frame. The insulation is laid using two methods - using a construction stapler or using a specialized paste. In parallel, a vapor barrier is installed as the top layer.
The result of high-quality work is a consistently strong “pie” of three layers without gaps between the mineral plates. Drywall is placed on the lower profile, which covers the thermal insulation. After this, you can install lighting fixtures and decorate according to the project.
Cottage: insulating the attic
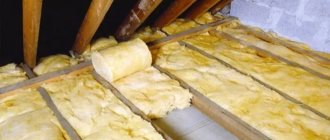
Given: above our heads we have rafters and a roof laid on them. How to properly insulate a ceiling under a cold roof?
Let's see what the attic insulation will look like.
Waterproofing
A layer of waterproofing must be present directly under the roof. The reason is that in winter moisture will condense on the cold inner surface of the roof. The waterproofing layer in this case will create a barrier that will prevent water from getting onto wooden structures and causing them to rot.
Mineral wool itself does not rot; however, the thermal insulation qualities of wet wool are much worse.
It is highly advisable to leave a gap of 2 - 3 centimeters between the waterproofing and the roof itself for ventilation. The condensation will need to drain and evaporate; For this you need at least some air movement.
There are now many materials available for waterproofing; the most reliable and durable of them is ordinary polyethylene film. It is absolutely impermeable to moisture and has a service life of at least 50 years.
The waterproofing strips are attached with an overlap, with an overlap of 10 centimeters. The lower strips are attached first, the upper ones overlap them so that water cannot flow under the material (see Insulation for the ceiling - types of insulation, methods of attaching to the ceiling).
Laying wool
On sale you can find mineral wool packaged in two main ways:
Mineral wool with a thickness of 50 millimeters or less is sold in rolls. They are unwound, the wool is cut in place with an ordinary knife and attached between the rafters.
The method of fastening depends on the density of the wool and the distance between the rafters: it can simply be placed apart; can be fixed to the rafters with a stapler; as an option, a sheathing of slats can be assembled from below, under a layer of cotton wool, or a mesh of nylon rope can simply be stretched.
Mineral wool 10 centimeters or more thick is sold in mats and placed spaced between the rafters. At the same time, sufficient rigidity is ensured in order to retain the thermal insulation until the filing (see Insulating the ceiling from the inside: choosing a material and the main stages of work).
The ideal option is when the distance between the beams is equal to the width of the thermal insulation mat.
Vapor barrier
A vapor barrier layer is needed to ensure that the inevitable indoor humidity does not affect the thermal insulation properties of mineral wool.
Ideally, a vapor barrier should have two contradictory properties:
- Retain water vapor;
- Let air through, providing ventilation of the heat-insulating layer.
A popular and cheap vapor barrier material is glassine; It is usually attached to the rafter system with a conventional stapler. It is advisable to additionally glue the strips of material with double-sided tape to ensure maximum tightness of the layer.
There are now a lot of materials for vapor barrier. A film with a foil layer will further reduce heat loss due to radiation.
Useful video
Below we will watch a video on how to properly insulate a ceiling with mineral wool in a private house:
(
2 ratings, average: 5.00 out of 5) Loading...
Insulation of premises
10.05.2017
3.2 thousand
2.2 thousand
5 minutes.
Thermal insulation of the ceiling surface with mineral wool makes the home warmer and also reduces the risk of fungus and mold appearing on the ceiling.
The comfort of any home depends on how cozy, dry and warm the home is. A properly installed roof prevents cold air from entering the room.
In some cases, it is necessary to additionally insulate the ceiling. This is especially important for private housing construction with a cold attic. Thermal insulation of ceiling surfaces in such dwellings has long been carried out using mineral wool. This material is characterized by the following advantages:
- 1. Resistance to aggressive environments, exposure to fungi and microorganisms.2. High efficiency of thermal protection (high-quality insulation of the ceiling with mineral wool is achieved with a relatively small thickness of the material).3. Sufficient strength of the heat insulator.4. Invariance of the shape of mineral wool with temperature fluctuations.5. Excellent noise insulation potential.6. Fire safety, fire resistance.
Mineral wool has high thermal protection efficiency
The disadvantages of mineral wool usually include its tendency to absorb moisture, which reduces the heat-shielding properties of the material, and a certain complexity of installation due to the large mass of the insulation.
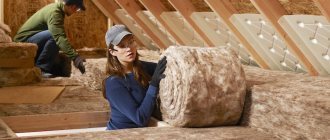
The greatest difficulty is caused by the installation of mineral wool from the side of the living room. In such cases, securing the material can be quite difficult. But from the side of the cold attic, cotton wool is installed without any serious difficulties.
Important point! The described heat insulator must be laid taking into account the characteristics of its structure. Mineral wool is made from small fibers.
They can come off a piece of material and land on a person’s body, as well as penetrate into their respiratory system. This should be avoided by performing all installation work in overalls, a mask and gloves. It is prohibited to lay the material of interest to us without using the specified protective equipment.
The described insulation is manufactured in different forms. It is sold in the form of semi-rigid or rigid slabs, easy-to-use mats and special cylinders. Plate products are characterized by high strength indicators.
For this reason, they are often used for floor insulation. The mats are less durable, but their installation causes minimal problems for a self-taught master. Products in cylinders are designed for thermal protection of pipelines.
Also, when planning to insulate the ceiling with mineral wool, you should take into account the type of heat insulator used. Cotton wool is made from various raw materials. Based on this feature, it is divided into:
- glass; basalt; slag.
Slag wool is used quite rarely in everyday life. It is made from open-hearth, blast furnace and other slags, which determines its low environmental friendliness. But basalt and glass products are widespread.
The former are usually produced in the form of slabs with a high rigidity index. Glass wool is made in the form of mats. You can also find it in the form of semi-rigid slabs.
Ceiling insulation can be internal, external, or combined.
We will talk about this in more detail below, describing each thermal insulation method. But before that, we will give one piece of advice.
Using basalt rigid products, it is best to insulate the ceiling from the attic side (that is, from above). And mats are most often used inside the house. They have less weight, due to which the process of their installation and fastening is simplified.
This technique is recommended for private housing construction with a cold attic. Insulating the ceiling of a private house with mineral wool from the attic side is done as follows:
1. Place glassine (an inexpensive and effective vapor barrier) on the attic floor.
The material must cover the entire available area. In this case, gaps between individual glassine strips are unacceptable. The vapor barrier sections should be laid overlapping (8–10 cm), gluing the joints with construction tape or regular adhesive tape.2. Place the sheathing on the ceiling.
This design is made from boards with a cross section of 3–4x10–20 cm. The width of the products is determined by what layer of insulation is planned to be laid. Important! For external thermal insulation, in most cases, mineral wool is installed in a layer of 10–20 cm.
Keep the distance between the boards within 0.5–0.6 m. Fix the sheathing elements with self-tapping screws or nails of suitable length.3. Place the insulation between the boards of the constructed frame. Here you need to ensure that there are no gaps between the mineral wool and the sheathing beams.
It is easier to install insulation from the attic side
If you use regular mineral wool, you need to cover it on top with a layer of waterproofing (roofing felt, any other material). The products are laid with an overlap, glued with tape, and additionally secured with thin wooden slats. If you purchased mineral wool that has a foil layer on the outside, additional waterproofing of the insulation is not required.
The last step is to install the plank flooring with mineral wool and waterproofing.
This structure can be made from OSB boards, particle boards, and ordinary wooden boards. Some experts advise laying a five-centimeter layer of polystyrene foam before installing mineral wool. In this case, you can achieve maximum protection of the ceiling from steam.
Laying insulation from inside the room onto the ceiling is recommended for apartments in high-rise buildings and for private housing construction with 2–3 floors. The technology for installing mineral wool will be approximately the same as in the case of external thermal insulation, but with some features.
First, make lathing on the ceiling surface from boards of the previously specified section. Instead of wooden slats, you can mount a metal profile. They are fixed to the ceiling with self-tapping screws.
Then cut out strips 0.6–0.7 m wide from the mats, place them between the frame parts and attach the insulation to the ceiling surface previously coated with glue. It is allowed to fix mineral wool with staples using a construction stapler. Choose the option that is more convenient for you.
The installed thermal insulation requires vapor protection. It is usually made from the already mentioned glassine. The vapor barrier is fixed to the mineral wool with a stapler.
To lay mineral wool on the ceiling from the inside, you also need to install a lath
The final fastening of the heat-vapor barrier structure should be done with self-tapping screws if a metal profile was mounted, or with counterbattens when the sheathing was made of boards. This completes the internal insulation operation. You can do the final finishing of the surface, install a suspended ceiling, plastic panels, sheets of plasterboard or other types of cladding.
The combined scheme for insulating the ceiling surface involves laying mineral wool both from the attic and inside the room. This technique is rarely used in residential buildings. It is necessary for buildings where there is a need to maintain high air temperatures for a long time (saunas, baths).
To insulate the ceiling surface with mineral wool as efficiently and competently as possible, take into account several useful recommendations:
1. Fastening the lathing from metal profiles must be done with self-tapping screws made of hardened steel.
They guarantee reliable fixation of thermal insulation.2. Do not press or tamp the mineral wool during installation. Such actions significantly reduce the heat-protective capabilities of the material.3. If the width of the sheathing made is less than the thickness of the insulating material, add additional wooden blocks to the main boards.4. After installing the metal profile and attaching the mineral wool, be sure to blow foam into all corners of the ceiling surface. This will eliminate the risk of cold air currents penetrating through the ceiling.
Let your home always be warm and comfortable!
Mineral wool for ceiling insulation is a reliable and affordable material that allows you to create a comfortable microclimate in your home. Installing mineral wool helps prevent the formation of fungus and condensation due to temperature differences. You can do the installation of mineral wool yourself; the only requirement is compliance with technical regulations.
Insulation procedure
If you plan to install mineral wool in the attic, then before starting work you need to decide on its type (glass wool, mineral wool, basalt slabs), the density of the material (varies in the range from 30 to 200 kg/m3) and the required quantity.
All this must meet the requirements for attic insulation.
Nuances for work
The floor in the attic is also the ceiling of the house, through which heat is lost from the room. Moisture from the warm air below constantly penetrates into the attic and has a negative effect on the fiber insulation.
When wet, it loses its thermal insulation properties, and with prolonged exposure to moisture it quickly collapses. The negative impact of moisture is also noted on the structural elements of the roof. Condensed water on the inside surface of the roof flows onto the rafters and beams. This leads to the destruction of supporting structures.
To protect mineral wool and the internal surfaces of the roof from water vapor, a vapor barrier made of moisture-proof material is used. It is laid between the ceiling and the insulation
It is important that the integrity of the waterproofing is not compromised
To avoid further formation and accumulation of moisture in the attic, you need to properly organize ventilation. It is arranged through vents placed on the ridges and cornices, as well as through slatted and dormer windows. Ventilation will be quite intense if the ratio of the sum of the areas of the ventilation openings is from 0.2 to 0.5% of the attic area.
Isolation process
Working with insulating wool requires compliance with safety rules and the use of special PPE. If the attic space will not be used as a living room, then it must be made ventilated. Before you start insulating with mineral wool, you need to install ventilation gutters. They are attached under the roof with brackets to the roof frame.
If insulation is carried out using rolled material, then laying a vapor barrier is not necessary, since the wool is in a polyethylene cover. The mineral wool strips should be laid tightly and the edges taped.
You need to start insulating with cotton wool from the point farthest from the door, gradually moving towards the exit. If obstacles arise, the canvas or sheet must be cut, and in the next part of the insulation a cutout should be made in the shape of the obstacle. It cuts perfectly with a utility knife. If gaps appear, they need to be insulated with leftover material and scraps. Try not to be overzealous when compacting and bending the mineral wool, as this will negatively affect its heat-insulating ability.
If lighting fixtures are installed in the attic floors, they must be covered with special caps. Although the cotton wool does not burn, the device heats up during operation, and conditions may be created for the wooden floor to catch fire. Next, all that remains is to cover the thermal insulation by installing the floor in the attic. It can be plywood, plasterboard, chipboard or OSB board.
Stages of external thermal insulation
For external insulation, the presence of an attic non-residential space is required. The process of laying mineral wool is simpler than during interior work and takes less time, because the mineral wool is attached not to the ceiling, but to the floor.
We follow the following procedure:
We cover the entire area of the attic floor with a layer of glassine, laying the sheets overlapping (10-15 cm is enough). We glue the joints or reinforce them with tape.
The effectiveness of the vapor barrier layer will increase several times if it is reinforced with sheets of 5-centimeter polystyrene foam. We lay rolled mineral wool of the standard 150-200 mm. We make sure that there are no gaps between the plates. If the rolls are covered with foil on one side, the insulation process ends here.
The sheets must be positioned so that the foil is on top. We fix the material with slats; it is not recommended to pierce the thermal insulation directly with nails. We stretch a thick film over simple mineral wool (without foil) (you can use greenhouse film) and fix it with slats. We glue all joints and joints with double-sided or regular tape.
External insulation with mineral wool - laying slabs on the attic floor
A floor made of any available material is laid on top: chipboards, plywood, boards. Sometimes the roof also requires additional insulation. Thermal insulation is carried out according to the same principle as the option for apartments, but with one caveat - instead of a powerful frame, a light sheathing of counter-battens is sufficient.
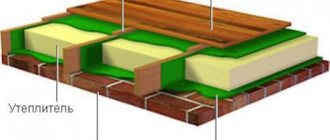
Ceiling insulation on wooden beams
Earlier, we looked at the step-by-step method of insulating from the inside, which is most suitable for apartments and houses where there is no possibility of insulating from the outside. One of the obstacles can be low ceilings. We should not forget about the advantages of insulating the outside - the process is quite simple and does not require violating the integrity of the ceiling inside the room.
Ceiling insulation with mineral wool on beams
The thermal insulation process is divided into several stages:
- clean the attic floor from dust, debris and unnecessary things;
- check surfaces for leaks (seal all cracks and joints with tape or blow with foam);
- Lay a vapor barrier material between the wooden beams, taking into account the overlap between the gluing of its joints;
- lay the mineral wool in such a way as to avoid gaps and gaps between it;
- cover the mineral wool with boards or pressed panels.
Ceiling insulation in a frame house
Brief overview of manufacturers
Nowadays it is easy to purchase products for any construction purpose, and mineral wool for the ceiling is no exception. Most likely, the supermarket will offer you several options that differ little from each other.
Brands known for excellent product quality and leaders in the thermal insulation products market:
- Knauf (Knauf - an international company); Isover (Isover - an international group); TechnoNIKOL (Russian corporation); Ursa (Ursa - a subsidiary of the Spanish group Uralita); Rockwool (an international group of companies headquartered in Denmark).
For insulating ceilings, both stone wool, produced on the basis of basalt rocks, and glass wool, which is produced after processing quartz sand and glass production waste, are suitable.
Diagram of one of the options for insulating the attic floor
Insulation of the ceiling from the inside with mineral wool in a private house using the accordion method
The ideal way to place mineral insulation on the side of the room is by installing a suspended ceiling.
Roof insulation scheme.
It is based on a strong metal frame made of profiles with a pitch of 30 cm. It must be carefully attached to prevent the ceiling from cracking or collapsing. All kinds of supports and hangers are attached to each profile.
Since the width of mineral wool is 50-120 cm, and the distance between the profiles is 40 cm, the wool is installed using the “accordion” method. The cotton wool is slipped under the profiles like this: one strip after another without gaps. If necessary, the cotton wool is stratified. It should be remembered that the material cannot be compressed in order to maintain the insulation effect due to the peculiarities of the mineral wool structure and its air layer.
A waterproofing film is stretched over the frame filled with mineral wool, which also performs a protective function. Drywall is mounted on top.
If mineral wool sheets with dimensions equal to the area of the spaces between the profiles are used, the insulation is attached to the ceiling with tile adhesive.
Installation of sheathing
An important process in thermal insulation is considered to be the reduction of thermal conductivity of ceilings. This stage is not skipped and is performed when the roof has not yet been assembled. Stages:
- The vapor barrier film is attached to the ceiling beams.
- Then the boards are nailed onto a film 2.5 cm thick, divided into 0.5 m squares.
- Thermal insulation is fixed on the resulting canvas. Mineral wool should be laid across the entire width of the ceiling.
On a note!
If you do not use the attic, then there is no need to install the film. In this case, you can attach the material directly to the sheathing.
If it is not possible to insulate the ceiling from above, above the beams, then you need to perform internal thermal insulation. To do this, simply attach the material to the ceiling. Afterwards it is sheathed with film and plywood.
Properties and application features of the material
The main property that determines the effectiveness of a particular insulation is the thermal conductivity coefficient.
It characterizes the heat loss occurring through a layer of material 1 m thick in an area of 1 m2 for 1 hour with a temperature difference on opposite surfaces of 10 ° C.
For various forms of mineral wool, this figure is 0.03 – 0.045 W/(m*K).
A distinctive feature of fiber insulation is the dependence of their thermal insulation properties on moisture content.
When wet, droplets of water envelop the fibers and gradually penetrate into the volumetric structure, gradually displacing air from there.
An increase in the amount of water inside, between the fibers, leads to a sharp drop in thermal insulation characteristics. The situation is further aggravated by the fact that water that gets inside is extremely difficult to remove outside.
The insulation can absorb up to 70% of its mass in water. Naturally, under these conditions, the efficiency of its work will tend to zero.
Despite the criticality of getting wet, the scope of application of mineral wool is extremely wide. When building a house, its use is possible almost everywhere where direct contact with water is excluded:
- Hollow walls (frame and brick, made using well masonry technology);
- External surface of wooden or brick walls;
- Internal partitions;
- Floors;
- Interfloor ceilings;
- Roof.
Advantages and disadvantages
The leadership of mineral wool in the environment of floor thermal insulation in the house is determined by the following points:
- high class of non-flammability. An insulator of this category is a barrier to the spread of fires. Varieties of the product are characterized as means of additional fire protection of structures for various purposes. The material is relevant, including when arranging fire-hazardous structures. For example, the operating temperature range of stone wool varies up to +1000°C;
- low thermal conductivity coefficient. The fibrous structure provides an air layer that prevents the transfer of thermal energy. If the installation technology is followed, this type of insulation helps maintain a comfortable microclimate in the room;
- high noise absorption rates. The composition is able to actively resist the propagation of sound waves. Due to its decent sound insulation characteristics, this insulating agent is applicable in various structures, including roofing pie, construction of interfloor ceilings or engineering infrastructures in the house;
- frost resistance. The material is not exposed to negative temperatures and is able to provide maximum protection against heat loss, regardless of the climatic conditions of the area;
- vapor permeability. The composition compares favorably with other insulators by its ability to “breathe”;
- inertness to chemical and biological threats. Insulation based on mineral fibers does not react to the effects of active chemical compounds and pathogens;
- ease of installation. It is convenient to fill any volume of space with mineral wool, since the composition is lightweight and of sufficient thickness;
- efficiency. The material is sold in an affordable segment, which is due to the simplicity of the manufacturing process.
It is convenient to fill any volume of space with mineral wool, since it is light in weight and of sufficient thickness.
When planning thermal insulation of the floor with mineral wool, you should be aware of the disadvantages of the resource:
- impressive volume in height. The thickness of the insulating product is of considerable importance when organizing a frame made of wooden logs; this argument negatively affects the overall height of the floor structure;
- exposure to moisture. Not all varieties of mineral wool have moisture-resistant properties. For example, glass wool and slag wool lose their functionality when exposed to a humid environment. Compositions made from volcanic rocks - basalt - are highly resistant to moisture;
- certain difficulties in installation. To work with glass wool and slag wool, you must use special clothing and accessories. It is necessary to avoid direct contact with the composition of small particles with sharp ends that can damage the skin, respiratory tract and eyes.
A big disadvantage is the unsafety of certain types of mineral wool due to the presence of chemical components in the composition. When exposed to high temperatures, compounds are released that are harmful to health and the environment. At the same time, the basalt variety of mineral insulation is quite safe and is used when arranging floors and other structures in the house.
Resources based on mountain volcanic rocks are characterized as effective heat and sound insulation agents. In addition, stone insulator provides high fire resistance, resistance to mechanical loads and moisture. The only disadvantage of basalt insulation is its relative high cost compared to slag and fiberglass.
Ecowool insulation
The name of this insulation contains the prefix “eco”, meaning that it is an environmentally friendly material. 80% of ecowool for the ceiling consists of natural cellulose, and the remaining 20% consists of various additives. For example, lingin imparts stickiness to the structure of the heat insulator, and antiseptics and boric acid protect against rodents, fungus and rot.
Ecowool contains fire retardants that prevent the material from burning; it only smolders under the influence of flame and high temperature. The thermal conductivity of this insulation is 0.038 W/(mK).
There are two ways to insulate the ceiling with ecowool - dry and wet. The first option involves laying the material in pre-prepared cells on the ceiling surface, but in this case its thermal insulation qualities do not exceed 60-70% of the possibilities.
When using the second method, special equipment is used - it moistens the ecowool and then sprays it under high pressure. As a result of contact with water, the insulation becomes sticky, as a result of which it adheres tightly to the ceiling surface. For wet application, special equipment and the services of craftsmen will be required.
Step-by-step instructions on how to insulate a glass wool ceiling externally:
The ceiling surface is protected and leveled in order to rid it of debris and dirt. A sheathing similar to that intended for installing mineral wool is assembled from a wooden beam. This step can be skipped, but in this case it will be impossible to use the attic. Lay the vapor barrier film in one layer
If necessary, it is used to protect the sheathing elements. Using a blowing machine, the space between the slats is filled with material, paying special attention to hard-to-reach places and crevices. The minimum thermal insulation layer of ecowool is 25 centimeters, but in regions with very low temperatures in winter it should be from 40 to 50 centimeters. A waterproofing film is overlapped over the insulation, securing the seams with special tape.
We insulate wood with mineral wool: simply, quickly and inexpensively
- Mineral wool is considered the optimal budget functional insulation. She solves several problems at once. Saves money because it is characterized by a high price-quality ratio.
- Simplifies installation, which is accessible even to non-professionals.
- Acts as additional sound insulation.
- Compliance with the technology of insulating wooden walls from the inside with mineral wool requires the use of personal protective equipment (PPE). This will help avoid negative aspects associated with exposure to carcinogenic substances that are hazardous to health: on the skin, respiratory organs, mucous membranes of the eyes, etc.
Necessary tools
For work you will need:
- level (construction level);
- brush;
- roulette;
- marker;
- knife or saw (for cutting insulation);
- PPE: gloves, cap, respirator.
Installation of mineral wool: a wooden wall is taken as an example
- You need to start insulating with a thorough examination of the walls. Clean them from dirt and dust. Remove electrical wiring. Caulk the gaps between boards and logs using jute fiber and a thin chisel: the tool tightly fills the gaps, and in the case of large gaps, use tape tow formed into a roller. Elimination of cracks will be inevitable, because during operation the house dries out, shrinks, etc.
- Protect wood from damage by insects and organic formations.
- Next, insulating wooden walls from the inside with mineral wool involves creating a vapor barrier layer from film. This is necessary in order to protect the walls from moisture penetrating into the room. The rolled material is laid overlapping with the rough side facing the wall surface. The strips are fixed together with a stapler.
- The sheathing for the insulation is made either from wooden blocks or from a metal profile (if you plan to insulate the walls from the inside with mineral wool plus plasterboard).
- To ensure that the corners do not lose their shape when facing, corner posts are additionally designed that resemble the letter “G”. Two beams of the same length, equal to the height of the room, but with different sections (50×50 mm and 50×100 m) are formed using self-tapping screws into a given structure. To do this, a beam of smaller cross-section is joined to the edge of the second beam and secured. The resulting “G” racks are placed in each corner of the room. To avoid deviations from the vertical, constantly check the level.
- Wooden sheathing requires pre-treatment of its guides and posts with an antiseptic, protection from possible rotting and bug damage. Vertical elements with a cross section of 50x50mm are installed at intervals of 0.5 m.
- The installation of insulation can be either tiled or rolled, with preliminary cutting of pieces of the required length. It is equal to the height of the room with an increase of another 10-15 cm. The pieces or strips are located between the bars, close to the film and each other. Fastened with anchors with large diameter caps. The presence of voids between the wall and the wool leads to the deposition of steam on the enclosing surface and the formation of condensation in this place. The moisture from the wet wall then drips onto the floor and can seep into the room.
- The laid insulating material on top is again covered with a hydro- and vapor barrier film, which is then attached to the beam with a stapler or double-sided tape. The protective membrane prevents pieces of mineral wool from entering the air in the living area. In this case, ordinary rolled cellophane can play the role of protection.
You can do the job differently. Make a frame. One side of it will be sheathed with LGK. The opposite is to pack with sheets of mineral wool. They are all pushed one by one into the cavity under the gratings, without making any gaps. Any leakage in the joint is fraught with the formation of “cold bridges”. If the thickness of the insulation “does not fit” into the gap, it is peeled off, removing the excess thickness. The frame filled with insulation is covered with plasterboard sheets.
How to choose mineral wool
The most commonly used universal stone mineral wool is for ceiling insulation. But glass wool is sometimes chosen for thermal insulation of wooden houses. Its disadvantage is that if the material is not carefully isolated, its sharp particles can get on the skin and respiratory tract, which leads to irritation. There is also slag wool, but it is used rarely and exclusively for production facilities.
Density
Mineral wool density table
To choose mineral wool for ceiling insulation, you need to take into account its brand depending on the density. This is indicated in the labeling in numerical value in kg per cubic meter
m:
- P-75. It is used for thermal protection of horizontal surfaces that do not experience serious loads, insulation of oil, gas and central heating pipelines.
- P-125. It is used for thermal insulation of bulkheads, ceilings, floors and walls indoors, as well as for protection against extraneous sounds.
- PZh-175. Dense material, which has a fairly high rigidity, is used as insulation for floors and walls that are made of metal profiled sheets or reinforced concrete.
- PPZh-200. It also has increased rigidity. The difference is that PPZh-200 is as fireproof as possible.
Thickness
Table for calculating the average thickness of the insulation layer for different cities of Russia
The thickness of mineral wool varies from 2 to 20 cm. The main thing you need to decide is the number of layers of insulation and the climate of the area. You can calculate the required amount of mineral wool based on SNiP 02/23/2003. In a warm region, a layer of 10 cm will be sufficient. In a cold locality, you will need to increase this parameter by 1.5–2 times.
It is also necessary to take into account the material that was used to construct the building. If there are concrete floors, it is better not to use mineral wool less than 10 cm thick.
The thickness of the insulation installed on a flat horizontal roof can be significantly less than for a pitched roof. For those buildings that have a heated attic, an 8-centimeter layer is sufficient.
Advantages and choice of slab thickness
Mineral wool has the following advantages:
- light weight; elasticity; fire resistance; low price; long service life.
The thickness of mineral wool is an important parameter when choosing a material. This indicator depends on the ceiling covering. It also takes into account which method will be chosen to insulate the ceiling with mineral wool.
So, for concrete floors, choose wool with a thickness of at least 10 cm. If there is a heated attic space, insulation with a thickness of 8 cm is used. A pitched type of roof requires the installation of mineral wool 30 cm thick.
Polyethylene foam and polyplex
In addition to attaching mineral wool to the ceiling, thermal insulation of the ceiling can be done using other materials:
- Foil polyethylene foam. This insulation is made of polyethylene foam in a special way and then glued to aluminum foil. It is sold in rolls, the width of which is standard and reaches one meter, and the thickness varies from one to 20 centimeters. The material is used both independently and together with mineral wool to improve the thermal barrier.
- Polyplex is produced by extruding polystyrene foam. It is sold in the form of sheets measuring 60x120 centimeters, the thickness of which varies from one to 20 centimeters. Among the advantages, it should be noted the increased density, due to which polyplex is used as insulation and a rough base for laying putty.
Both types have advantages and work such as gluing insulation to the ceiling can be done with your own hands. Polyethylene foam is fixed using special glue or dowels, widely used in construction. Polyplex is secured with dowels or holders that look like the letter P.
Foam plastic and expanded clay
Polystyrene foam in appearance resembles foamed plastic material with a cellular structure. It is usually produced in size meter by meter and is used not only as internal, but also external insulation. Its thickness can vary from twenty to one hundred centimeters.
This depends on the type of finishing required. Can be used as a base for ceiling putty. Another feature is its ability to level surfaces.
Polystyrene foam is not only convenient to use, it also has a number of advantages, such as:
- Has proven itself as a universal remedy. Quite low cost. Based on this factor, this makes it more accessible to the population. Durable in use. Provides a very high level of reliability of room protection. Has good thermal insulation.
The main component of expanded clay is clay, from which it is subsequently made. It looks like balls and is easy to insulate a room with. The principle of working with it is to backfill it in the attic, so it is only relevant in private homes.
When insulating the roof of a house with expanded clay, you can use these useful instructions to help you carry out the installation correctly. These tips include specific actions such as:
- The work process should begin directly with the installation of waterproofing. The choice of means for it is quite large, and all of them are ideal for carrying out this process. It is necessary to cover the rafters and chimney pipe prematurely. For a better vapor barrier effect, a layer of clay should be laid on it. Expanded clay is laid out in layers of at least 15 cm. Thus, thermal insulation is significantly increased .
Expanded clay has a number of advantages, such as:
- It is one of the materials that does not decompose over time. Others can harbor various insects and small rodents. Expanded clay completely eliminates this possibility. It is considered fire-resistant and fireproof. It has good sound insulation. It is waterproof. It has frost resistance, which is very important in winter. It has high heat transfer. It is quite low in cost due to the materials from which it is made. It is used not only for ceilings . It can also be used for foundations and walls.
Ceiling insulation with mineral wool
Why mineral wool? Many experts recommend insulating the ceiling with mineral wool. The product is an environmentally friendly material that retains heat well and is not subject to bacteriological decay. In addition, this material is not afraid of open fire, and the appearance of colonies of rodents and insects is excluded.
The ease of working with mineral wool is also its undeniable advantage. This material is produced in the form of rolls and plates
When choosing insulation, you should pay attention to whether there is a waterproofing material on one side; most often it can be foil. Foil insulation is an excellent screen that reflects warm air currents that, obeying the laws of physics, go upward
If the material was purchased without such a coating, then the foil can be replaced with any other waterproofing material, such as parchment paper, which builders are increasingly using as waterproofing.
Types of mineral wool
In addition to reflective properties, foil or paper will protect the insulation from condensation wetting. Mineral wool is produced in standard sizes of 5 and 10 cm. Usually a 10-centimeter layer is enough for insulation; if the heat continues to escape, the thickness can be increased to 20 cm.
Important! Mineral wool insulation loses about 50% of its properties when wet. It is necessary to create conditions under which the material will not come into contact with moisture. Depending on the type of insulation work performed (, ,), the work will require:
Depending on the type of insulation work performed (, ,), the work will require:
- Screwdriver and screws;
- Plastic fastenings for mineral wool;
- Counterrail;
- Glue;
- Reinforcing tape for foil;
- Profile with hangers;
- Stationery knife;
- Stapler
- Hammer, nails and tape measure;
- Drill and dowels.
Features in creation
There must be reliable insulation of the room from mineral wool so that harmful microfibers do not enter the living space. The role of such an insulator is taken over by vapor barrier, which must be especially careful at the intersections of cables and pipes. It is advisable to use grades of glass wool that do not contain phenolic binders.
Resins are used to stiffen slabs. To insulate the ceiling from the inside, pure glass wool is suitable. The layer of mineral wool (glass wool) must be of sufficient thickness so that the insulation is done in accordance with economic feasibility and ensures comfort inside. The ceiling is the main place of heat leakage from the house; it is known that for a temperate climate the layer of mineral wool should be at least 20 cm thick.
Now all that remains is to implement all this - make a classic suspended ceiling, and fill the space between it and the ceiling with insulation.
How to properly insulate a frame house with mineral wool with your own hands
Everyone dreams of having their own country house in the Moscow region, but not many people think that a private house is far from an apartment and requires much more attention, especially if they do not build it themselves, but buy it ready-made. Heating a private house in the cold season is a difficult and expensive task, but you can significantly reduce costs by insulating the walls of a frame house yourself.
Mineral wool is an excellent popular modern insulation material
There are a lot of options on how to make your home warmer, but most often various types of mineral wool are used as insulation. Using mineral wool, you can carry out all the work yourself.
Insulation of a frame structure house is different in that the insulation is located in the center of the wall between the frame sheathing. This is how the frame structure is insulated during the construction of a newly built house. If you want to perform additional insulation of an existing building, then the insulation should be placed outside the walls of the house or inside.
Additional insulation of a frame house is carried out in two ways:
- Work on the external wall with subsequent finishing, for example, siding.
- Internal insulation.
External thermal insulation under siding
This is the most effective option, since the technology involves not only installing an insulating layer, but also updating the facade with materials that are not afraid of negative environmental factors and can easily withstand low temperatures. The siding is fixed on guides, which are used as a wooden beam or a metal frame.
Considering that modern mineral wool is produced in standard sizes in rolls or slabs, the guides for fastening the siding are filled in increments equal to the width of the mineral wool strip. Depending on the type of mineral wool and the walls of the structure, it is secured by shooting it with an industrial stapler or using special glue. Only mineral wool slabs are attached to glue, since they have a relatively dense structure and backing.
Note! In addition to the insulation itself, it is recommended to apply a steam and moisture-proof membrane to the walls of the house. It is mounted directly on the wall, and the insulation is already attached to it. The last stage of external insulation is the installation of siding, the individual strips of which, with the help of locks, are assembled into a single surface, which has many advantages:
The last stage of external insulation is the installation of siding, the individual strips of which, with the help of locks, are assembled into a single surface, which has many advantages:
- Siding is immune to temperature changes.
- Not afraid of moisture.
- It does not require heavy structures for installation, as it is light in weight.
- Does not fade in the sun.
- It lasts a long time. Manufacturer's warranty for at least 15 years.
Internal thermal insulation
Insulation inside a house is much more difficult compared to outside. Not all materials can be used, as it is necessary to comply with fire safety and environmental standards. Mineral wool is a partially natural and environmentally friendly insulation material that is excellent for interior work.
The installation technology does not differ from the external one, however, the frame is sheathed not with siding, but with plasterboard or OSB panels (approximate strand boards). Thermal insulation of buildings from the inside has its disadvantages, the main of which are:
- Reducing room space.
- If steam and waterproofing are not installed correctly, the walls will begin to become damp, which will lead to the appearance of mold.
- The base of the wall warms up worse, since the heat from inside the house does not reach it, and accordingly a freezing effect appears. Sooner or later this will lead to the destruction of the supporting structure.
- It is possible that a dew point may form inside the insulation layer or directly on the wall due to impaired heat exchange.