The weather conditions of a short summer period and a long frosty winter suggest the use of additional thermal insulation during the construction of houses. The international construction market is saturated with various insulation materials, but experts recommend using mineral wool as an economical and effective material. Thermal insulation for finishing the foundation, walls or ceilings differs in its characteristics, so let’s look at which mineral wool is better for the ceiling and what insulation methods exist.
Characteristics of mineral wool
Thanks to its technical properties and easy-to-install dimensions, mineral wool has gained popularity not only among professional builders, but also among owners of private houses and apartments interested in insulating premises.
To maintain heat in apartments, almost all qualities of the material are important:
- environmental friendliness; fire resistance; water resistance; sound insulation properties; resistance to wear and rot.
Rolled mineral wool is the best option for ceiling insulation
The optimal set of useful properties is provided by the unique structure of mineral wool, which has no analogues among industrial thermal insulation products.
The only negative concerns the high degree of moisture absorption, but with proper installation of the panels it loses its relevance. To protect against condensation, rolls and mats are covered with a layer of waterproofing - thin impermeable foil. In the absence of protective foil, it is compensated for by an additional layer of polyethylene film and glassine, which acts as a vapor barrier.
When using foiled mineral wool, you can save on the purchase of waterproofing
Among the wide range of products, it is difficult to determine which mineral wool to choose for the ceiling in an apartment, and which for thermal insulation of a private house.
In fact, the easiest way to focus is on the type of packaging and layer thickness. Typically, products are produced in the form of mats, rolls (rolled slabs) and cylinders. The latter type is used for insulation of ventilation pipes, mats are used for external thermal insulation of foundations and floors in basements, so rolls are more suitable for housing.
Insulation with a thickness of 50-100 mm is suitable for apartments in multi-storey buildings, but for cottages thicker and denser rolls are needed - 150-200 mm in thickness, since there are most often unheated attic spaces above the living rooms.
Installation of sheathing
Before installing fiber cement siding, it is necessary to create a frame on which the panels will be attached.
Stages of frame production:
- Fixation of the drainage system on the façade – drainage pipe, gutter
- Attaching a waterproofing film to the wall of a building with self-tapping screws
- Installation of sheathing from boards - usually a wooden beam with a cross-section of 5 centimeters is used, installing guide vertical slats with a pitch that will be equal to the size of the slab (if insulation is needed, then a layer of insulation is laid between the beams)
- Fastening the second layer of waterproofing with slats
- Installation of vertical sheathing, which will become the basis for siding: wooden beams with a cross-section of 3 centimeters are attached to the insulation frame
Brief overview of manufacturers
Nowadays it is easy to purchase products for any construction purpose, and mineral wool for the ceiling is no exception. Most likely, the supermarket will offer you several options that differ little from each other.
Brands known for excellent product quality and leaders in the thermal insulation products market:
- Knauf (Knauf - an international company); Isover (Isover - an international group); TechnoNIKOL (Russian corporation); Ursa (Ursa - a subsidiary of the Spanish group Uralita); Rockwool (an international group of companies headquartered in Denmark).
For insulating ceilings, both stone wool, produced on the basis of basalt rocks, and glass wool, which is produced after processing quartz sand and glass production waste, are suitable.
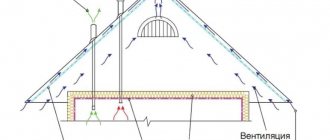
Diagram of one of the options for insulating the attic floor
Concrete base
When working with concrete floors, you will need not only insulation and a minimum amount of tools, but also skills in working with a hammer drill, as well as the hammer drill itself. Work with porous insulation is carried out in the following order:
- The ceiling is treated with a primer and the wiring for the lamps is laid.
- A certain number of holes are drilled in the ceiling, located in such a way that the dowels inserted into them can hold the insulation.
- Using pre-applied marking lines, a frame is assembled on which the outer covering will be held after finishing. He will also create a small niche in which the cotton wool is placed.
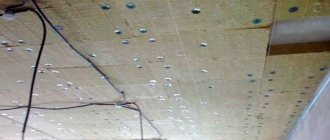
- Cotton wool or basalt slabs are laid. Both types of material must be secured using special plastic dowels, for which holes have already been drilled in the floor slab. If necessary, additionally secure the insulation with a strong cord.
- The entire surface is covered with a special vapor barrier film, which will protect the material from moisture.
- The final finishing of the ceiling is in progress.
How to properly insulate a ceiling
The installation of ceiling tiles should be given special attention, because improper installation of mineral wool on the ceiling will result in the loss of its thermal insulation properties - during the first year the characteristics deteriorate by about 40%.
In addition to insulation, you will need tools and fasteners:
- self-tapping screws, plastic fasteners, nails; a set of counter slats; a metal profile with hangers; a screwdriver; a tape measure, a hammer; a stationery knife with a thin blade; glue for insulation.
The correct calculation of the material will be made right in the store, if you provide data on the working surface area.
Laying insulation on a metal suspended ceiling profile
Conclusion
I hope that this unique instruction will answer all your questions regarding the installation of thermal insulation materials. The video in this article will tell you about some important points in more detail, and if you have questions, ask them in the comments under the review.
Did you like the article? Subscribe to our Yandex.Zen channel
September 6, 2016
Fasteners, hardware, meshes and membranes, Thermal insulation
If you want to express gratitude, add a clarification or objection, or ask the author something, add a comment or say thank you!
Instructions for internal thermal insulation
Internal insulation is most often carried out in city apartments. Pay attention to how to attach mineral wool to the ceiling: a mandatory step is the construction of the frame.
Main stages of work:
Creating metal profile lathing for suspended ceilings or boards. The profile has certain standards, and for a wooden frame, boards with a cross section of 30 x 100 mm or 40 x 200 mm are suitable - the heavier the thermal insulation boards, the more powerful the frame.
The profile slats are attached to the ceiling with dowels on hangers, the distance between them is approximately 55-60 cm (the most convenient for laying slabs). Insulation of the ceiling in a private house on a wooden sheathing. Attaching waterproofing (using simple mineral wool). The thick film is cut into strips slightly wider than the intervals between the slats - 65-70 cm.
For fixing to a wooden base, thin counter-battens and nails are used, and screws are used to a metal profile. Laying insulation. Mineral wool is fixed in two ways: with a construction stapler or using special glue. At the same time, a vapor barrier layer, which is the top one, is also installed.
Glassine is considered a good vapor barrier; mineral wool glue is suitable for fixing it. One of the methods of laying thermal insulation slabs is along beams. Strengthening the thermal insulation with transverse slats. The result of the work should be a stable, durable three-layer “pie” without gaps between the plates.
On the bottom side, sheets of plasterboard are attached to the profile, completely covering the thermal insulation pad. The result is an insulated suspended structure, which is subsequently equipped with lamps and decorated in accordance with the design project.
Sequence of work
As already noted, installation technology will be discussed using mineral wool as an example. However, the process, with minor adjustments, is suitable for other thermal insulation materials. The difference is only in some details; the main stages of work remain unchanged.
Frame installation
This is the main element of the entire structure, determining its durability and aesthetics. You can create a sheathing from wooden blocks or a metal profile. In this case, everything depends on the decorative ceiling. Actually, it is for this that the crate is made. If you intend to install plasterboard as a “finish ceiling”, then it is definitely necessary to use a profile. The fact is that wood becomes greatly deformed when it dries, and there is no fastener that could withstand this. The seams between the sheets crack and the screw heads slip through them.
Lining, MDF and OSB, are more unpretentious in this regard and are attached directly to the wooden sheathing, which is pre-treated with an antiseptic.
In any case, regardless of the material chosen, the work is carried out in the following sequence:
- The ceiling surface is cleared of crumbling plaster in compliance with safety regulations, chandeliers and lamps are dismantled.
- At the same distance from each other, equal to the width of the insulation, wooden blocks or profiles are attached to the ceiling. Here you need to take into account several nuances. The slats can be attached directly to the ceiling, which greatly facilitates the work. In this case, their thickness should be the same as that of the insulation layer. To install profiles, you need special hangers that are fixed to the ceiling, and the profile is screwed to them.
- You will have to install hanging parts often, since plasterboard sheets have a large mass. If the plane is made of concrete, special dowels must be used. You need to leave a gap between the profile and the ceiling so that insulation can be inserted there later. Otherwise, in this place, there will be “poles of cold”.
When all the profiles are installed, the sheathing can be considered complete.
Installation of insulation
Thermal insulation of the ceiling can save up to 10% on heating bills. You just need to choose the right material. The main characteristics of each of them are now known. The owner of the house must decide how best to insulate the ceiling, based on analysis and in accordance with his capabilities.
Stages of external thermal insulation
For external insulation, the presence of an attic non-residential space is required. The process of laying mineral wool is simpler than during interior work and takes less time, because the mineral wool is attached not to the ceiling, but to the floor.
We follow the following procedure:
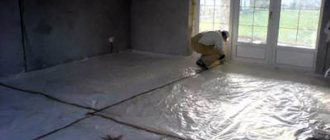
We cover the entire area of the attic floor with a layer of glassine, laying the sheets overlapping (10-15 cm is enough). We glue the joints or reinforce them with tape.
The effectiveness of the vapor barrier layer will increase several times if it is reinforced with sheets of 5-centimeter polystyrene foam. We lay rolled mineral wool of the standard 150-200 mm. We make sure that there are no gaps between the plates. If the rolls are covered with foil on one side, the insulation process ends here.
The sheets must be positioned so that the foil is on top. We fix the material with slats; it is not recommended to pierce the thermal insulation directly with nails. We stretch a thick film over simple mineral wool (without foil) (you can use greenhouse film) and fix it with slats. We glue all joints and joints with double-sided or regular tape.
External insulation with mineral wool - laying slabs on the attic floor
A floor made of any available material is laid on top: chipboards, plywood, boards. Sometimes the roof also requires additional insulation. Thermal insulation is carried out according to the same principle as the option for apartments, but with one caveat - instead of a powerful frame, a light sheathing of counter-battens is sufficient.
Features of installation of mineral wool
Modern types of mineral wool are completely safe and do not emit any harmful substances during operation. But during installation you must follow certain rules.
With any type of mineral wool, microscopic fibers are separated during installation. They can get into a person's eyes and lungs, and penetrate under clothing. Glass wool is especially harmful to health, since the smallest glass needles do not dissolve in the lungs and can provoke the development of complex pulmonary diseases.
Therefore, it is recommended to work with mineral wool in a closed suit, gloves, goggles and a respirator. At the end of the work, you need to take a shower, throw away your clothes or wash them thoroughly.
Combined method of insulation
Thermal insulation of the ceiling on both sides in residential buildings is done extremely rarely; it is usually necessary for equipping rooms in which heat is maintained for a long time: steam rooms, saunas, baths. Sometimes double insulation is important in houses with irregular or stove heating. You already know which thermal insulation to choose or how to fix mineral wool on the ceiling; all that remains is to choose the order of work: you can start with both external and internal insulation.
The results of work on insulating residential premises are immediately noticeable - the house becomes warm, dry and cozy.
The ceiling is one of the most important attributes of a room. Its appearance should not only be attractive, but also have protective functions.
The insulation is attached to the ceiling using various types of means and materials. The main and most used of them is considered to be mineral wool; it is the one that has the most advantages in its use. In the modern world, the ceiling plays not only a decorative role, but also performs a number of mandatory functions, such as:
- Noise. Protective. Thermal insulation.
Expanded polystyrene
When it comes to expanded polystyrene (another name is polystyrene foam), the question of how to attach insulation to the walls of the facade is incredibly relevant. The fact is that, unlike mineral wool, it is not attached to wooden walls, it is simply laid in the lathing.
Thermal insulation of brick or concrete walls with this insulation can be carried out simply using glue. We must not forget about the preparatory stage, which greatly affects the final result. In fact, it is not difficult, because it is enough just to thoroughly clean the walls: there should be no dust or any dirt left on them.
It is worth mentioning the need to correct defects in the walls, which are quite possible; for this, use plaster. As for applying the glue, which is necessary for attaching such insulation, it must be applied directly to the polystyrene foam board, use a special notched trowel for this. Important! Do not you need to feed the pharmacies so that hemorrhoids go away once and for all, use a very effective cream...Read more >>>It is important that the glue is applied to the surface evenly, otherwise attaching the insulation to the wall simply may not give the desired effect, that is, with such fastening, ensure normal thermal insulation will not work. But this rule only applies if it was decided to apply the mixture to the entire surface
An effective method is also fastening with glue, applied pointwise to the inner area and completely around the perimeter.
Mineral wool
Mineral wool is a fiber made from textiles.
It can be purchased in the form of rolls or blocks. The one made in the form of a path has greater thermal insulation. It not only has better performance properties, but it is also much easier to work with.
How to attach insulation to the ceiling using mineral wool? Let's look into this issue.
Thanks to cotton wool, it becomes possible not only to insulate, but also to protect the room from excessive noise, as it has excellent sound insulation properties. The installation itself is carried out using dowels with a wide head. Additional means for more durable fastening can be self-tapping screws and self-adhesive tapes.
Mineral wool on the ceiling
The installation instructions include the following work steps:
Measurements are taken from the ceiling on which installation is planned. Preparation of the slabs. They must correspond to the measurements taken and be completely identical. Holes for dowels are drilled in the ceiling. In this case, it is better to use plastic ones. With their help, metal profiles are installed on the base. Mineral insulation is applied to the profiles. After applying mineral wool, the entire structure is secured with dowels. Sheets are laid on top.
They also need to be secured as best as possible. This can be done using wooden slats and nails that resemble mushrooms in appearance. They received this name because of their wide cap on top. During installation, cracks and openings may remain, which it is advisable to fill with polyurethane foam.
Fastening mineral wool insulation has its advantages, such as:
- This material has high environmental parameters. It is hypoallergenic. Durable in use, thanks to the high quality of the products used. It is not subject to deformation. It is a fireproof material, which expands the range of its use. Application is possible even in bathhouses or saunas. High percentage of vapor permeability.
One of the important aspects in installation is that during installation the material itself must be placed tightly, but in no case be subject to deformation. Otherwise, it may lose its performance properties.
For a longer period of operation, it is advisable to coat the surface with an antifungal agent upon completion of installation work. This will allow further dust collection.
Modern thermal insulation materials
Thermal insulation from the inside of the room and from the attic with polystyrene foam and mineral wool
The choice of insulation depends on average winter temperatures, the material of the building walls and the method of energy-saving cladding.
Let us briefly consider the most popular insulation materials used for thermal insulation of ceilings and attic floors.
Mineral wool is an environmentally friendly, non-flammable insulator. The release form in the form of rolls or solid mats makes it easy to do the cladding yourself. This insulation has low thermal conductivity and high vapor permeability.
Finishing the loggia ceiling with polystyrene slabs
- Penoizol is sprayed polystyrene foam. The price of insulation is affordable, and the foam-like consistency allows you to fill all the voids in the layer of energy-saving finishing, even in complex architectural structures;
- Ecowool - has high thermal insulation properties, is environmentally friendly and inexpensive. The disadvantages include the fact that it is problematic to carry out the installation yourself - you need special construction equipment;
- Expanded clay is an inexpensive insulating material made from sintered clay. It is environmentally friendly, light in weight and does not carry a load on the structure, thermal conductivity is low, and installation of the energy-saving layer, especially in the attic, can be done with your own hands;
- Foam glass is a non-flammable insulation with low thermal conductivity. But the vapor permeability of the material is low, so it is not recommended to use this insulation for rooms with high humidity.
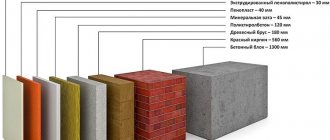
Comparative table of the main technical characteristics of popular energy-saving materials
Polyethylene foam and polyplex
In addition to mineral wool, attaching insulation to the ceiling can be done using other materials, such as:
Foil polyethylene foam.
In appearance, it is polyethylene foamed in a special way and subsequently glued to aluminum foil. You can find a similar look in rolls. Their width is standard and reaches one meter, and the thickness can vary from one to twenty centimeters.
It can be used either independently or used in combination with mineral wool to improve the thermal barrier. Also, this combination makes it possible to protect against various carcinogens that can appear due to the use of cotton wool.
Polyplex is the result of extrusion of polystyrene foam.
It can be purchased in the form of sheets measuring 60*120 centimeters. The thickness can vary: from one to twenty centimeters. Among the advantages, one can highlight the increased density, due to which it has found its use not only in the form of insulation, but also as a rough base for putty.
From the above we can conclude that both types have their advantages and their installation can be done independently. The polyethylene foam is fastened by gluing it with special glue or using dowels, widely used in construction. The polyplex is attached with dowels or holders that look like the letter P.
Best answers
Solntsev's Star:
Fit the sheathing according to the size of the insulation boards to the slab with dowels, lay a layer of insulation of the required thickness and sew up the plasterboard or suspended ceiling
Vitalik Panov:
foam plastic is lighter and better
Alexander L.:
secured with special fasteners, commonly called “fungi”
Airat Sattarov:
I sewed a strip of thickness equal to the thickness of the mineral wool (50mm) at distances 2 cm less than the width of the slab. Rockwell entered tightly and held on due to this, while I pinned him with mushrooms (4 per sheet) - I drilled the slab directly through the insulation. Next on the rail - plastic panels (I’m talking about my loggia)
Victor Victor:
“How to fix insulation on the ceiling in an apartment? “- It will be correct from the roof side, otherwise the dew point will move into the insulation and in winter it will get wet. To protect against heat, I would make a suspended ceiling from plasterboard, for example, using profiles, without insulation.
Foam plastic and expanded clay
Polystyrene foam in appearance resembles foamed plastic material with a cellular structure. It is usually produced in size meter by meter and is used not only as internal, but also external insulation. Its thickness can vary from twenty to one hundred centimeters.
This depends on the type of finishing required. Can be used as a base for ceiling putty. Another feature is its ability to level surfaces.
Polystyrene foam is not only convenient to use, it also has a number of advantages, such as:
- Has proven itself as a universal remedy. Quite low cost. Based on this factor, this makes it more accessible to the population. Durable in use. Provides a very high level of reliability of room protection. Has good thermal insulation.
The main component of expanded clay is clay, from which it is subsequently made. It looks like balls and is easy to insulate a room with. The principle of working with it is to backfill it in the attic, so it is only relevant in private homes.
When insulating the roof of a house with expanded clay, you can use these useful instructions to help you carry out the installation correctly. These tips include specific actions such as:
- The work process should begin directly with the installation of waterproofing. The choice of means for it is quite large, and all of them are ideal for carrying out this process. It is necessary to cover the rafters and chimney pipe prematurely. For a better vapor barrier effect, a layer of clay should be laid on it. Expanded clay is laid out in layers of at least 15 cm. Thus, thermal insulation is significantly increased .
Expanded clay has a number of advantages, such as:
- It is one of the materials that does not decompose over time. Others can harbor various insects and small rodents. Expanded clay completely eliminates this possibility. It is considered fire-resistant and fireproof. It has good sound insulation. It is waterproof. It has frost resistance, which is very important in winter. It has high heat transfer. It is quite low in cost due to the materials from which it is made. It is used not only for ceilings . It can also be used for foundations and walls.
Advantages of foil insulation
An important advantage of such insulation is the foam base. Thanks to it, a layer of air is securely retained, which has minimal thermal conductivity. This is what allows maximum retention of warm air inside the room.
It is not necessary to level the surface before using insulation
Other advantages that insulation has:
- The material is not flammable. This makes it possible to safely use it indoors in any room. Including residential ones.
- High sound insulation rate. Foil insulation is often used as additional protection against noise penetration into the room.
- Lightweight and thin. These characteristics allow the installation of canvases in conditions where other types of insulation cannot be installed.
- The structure of the material allows moisture and steam to pass through. Thanks to these indicators, there is no need to use additional moisture insulation around the insulation.
- Good elasticity. Most types of foil insulation have a similar indicator. This saves time on leveling the surface.
- Environmentally friendly. All types of foil-based insulation are absolutely safe for human life. The fabrics are not able to emit harmful fumes during the entire period of operation.
- Relative ease of installation. To attach material, it is not necessary to have special skills or involve specialists. You can do this kind of work yourself. To carry out installation, it is enough to prepare a minimum set of tools (stapler, scissors, stationery knife, tape measure, pencil).
Finishing foil insulation with wooden clapboard
Like all materials, foil insulation has its drawbacks. One of these is the insufficient rigidity of some types. For this reason, canvases cannot be covered with a finishing layer or plastered. This is especially true for foil polyethylene foam. As for fastening, it is not recommended to fix such material with glue. The best option is nails and staples. That’s why, by the way, polyethylene foam manufacturers invented and launched the production of self-adhesive versions of this insulation.
Insulation from above
Insulation implies various methods of attaching insulation. Today two types are known:
The upper one provides for insulation from the attic of the house, which is quite relevant for private houses. The process includes a sequence of actions such as:
- The first stage is the filing of the beams. Laying of insulation. After which the insulation material itself is directly laid. The final step is the cladding. You can use a board for it. This is done to allow free movement around the perimeter of the attic.
The advantage is that you can use any type of insulation, even in bulk form, such as expanded clay. An important feature that you should pay attention to when laying is that during the process itself it is very important not to leave empty space.
Regardless of the method, for installation you will need tools such as:
- Knife or hacksaw. Nails. Various screws. Hammer. Grinder. Electric drill. Stapler designed specifically for construction work. Polyurethane foam. Profiles. Screwdriver. Self-tapping screws. Dowels.
On glue
As the only method of fastening exclusively with adhesive mass, it is rarely used and only under ventilated facades. For plastering work, additional reinforcement with umbrella dowels is required. However, this method has its own characteristics that need to be considered separately.
Firstly, there are two types of adhesives:
The dry mixture is sold in bags and requires dilution. Adhesive foam is sold in cans and does not require preliminary preparation. The latter is a little more expensive, but the convenience is worth it.
Sets the bottom bar, which will be the starting point of thermal insulation. The dry mixture is applied to the slab itself.
In the case of a dry mixture, you need to apply the glue to the slabs in several pieces and spread it evenly over the entire surface using a comb. After this, the insulation board is fixed to the wall. Typically, the installation of mineral wool or other materials begins from the corner and always from the bottom row.
Foam adhesive is applied around the perimeter of the slab and in several strips in the middle. After application, press the slabs to the plane. The foam hardens in 30 minutes to 2 hours.
During this time, it is possible to slightly adjust the position of the slab using a level. Dry mixes are often used: EK THERMEX; Ceresit CT 190; Ceresit CT180. Popular foam options: Ceresit CT 84; Soudabond EASY; Insta STIK. The cost of one cylinder is from 200 to 500 rubles We discussed the basic principles of how to attach insulation to a wall using adhesive. You can decide what exactly to use after reading a couple of opinions. When we decided to insulate the facade, the master said that he would glue it with foam. We were indignant, saying that polyurethane foam expands, but he said that he would use adhesive foam. I asked which one to buy, good or simple.
We said: “Good.” We didn’t regret it; 30 minutes after gluing it, the sheet couldn’t be torn off. We decided to conduct an experiment and glued signs with the street name and number on it. Everything holds up perfectly. Marina For large differences in the walls, it is recommended to use polyurethane foam, specifically for polystyrene foam.
It is also called “liquid foam.” If the curvature of the wall is one to three centimeters, this is not a problem at all. I bought it at Epicenter a year ago, glued the sheet on just for fun - a year has passed, everything is holding together, the sheet cannot be torn off. Polystyrene foam breaks, but holds on. Sergey
Insulation from below
This type involves the process itself directly from the bottom of the ceiling itself. Materials made in rolls or beams are ideal for it.
This method is considered more difficult and labor-intensive. The process itself includes the following stages of work:
- It is necessary to make the fastening using hemming. If this was not possible, you can build up beams on which the installation will be carried out in the future. If it is done using foam plastic, then the process itself is greatly simplified. It can simply be glued to the ceiling. But after this, to increase reliability, it should be additionally secured with dowels intended for these types of work. After the installation process, the ceiling itself, if its condition requires it, can be decorated by painting or using putty.
Thus, you can carry out the fastening with your own hands. The main criterion is the presence of either a suspended frame or specially made fastenings.
If the ceiling height is low, it is better to opt for foil-coated polyethylene foam. The profiles on which they will subsequently be attached can be made of metal or wood. After insulation is completed, if desired, the ceiling can be decorated in various ways, the main ones being painting or installing a stretch ceiling.
Today there is a huge selection of insulation materials that can not only retain heat in your home, but also provide good sound insulation, which is quite important in multi-story panel or brick houses.
- Date: 02/05/2015 Comments: Rating: 15
Warmth and comfort in the home are one of the first tasks that need to be solved for a comfortable life and preservation of health. In the modern world, where the daily rise in price of energy resources is by no means new, the issue of insulating living quarters is acute.
Scheme of insulation and soundproofing of a wooden ceiling.
To ensure the safety of heat from below, “warm floors” are used; to prevent it from escaping through walls and windows, plastic structures are used.
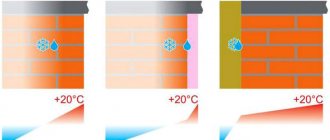
But it is extremely important to pay attention to heat loss through the ceiling. This is due to the fact that more than 30% of all heat is concentrated at the top of the room. If adequate thermal insulation is not maintained, this will inevitably lead to condensation settling, an increase in the amount of moisture and, as a result, the formation of mold.
How to avoid this, you ask? Is it possible to insulate a ceiling with your own hands?
Of course. In addition, it is quite simple to do, without spending a large amount of effort and material investments. You just need to properly understand the question of how to attach the insulation to the ceiling?
Before considering the issue of attaching insulation to the ceiling, you should pay attention to such an important aspect as the types of insulation. What is the material with which you will insulate your ceiling? After all, only after deciding on this issue, you can purchase it and start mounting it.
Answers from experts
Sergey:
In general, insulation is installed on the cold side. If you do not have this opportunity, then increase the thickness of the insulation and install a vapor barrier (such as a universal one - isospan D) from the bottom of the insulation with gluing the seams, and only then finish the ceiling. No moisture or steam should enter the insulation layer.
Stas Shabanov:
I would like to look at the installation diagram of the insulation; it is not advisable to attach it from the inside. Sometimes even the presence of a vapor barrier can be a problem. Or ventilate or remodel more often.
Mikhail Godunov:
Is it 100% foam insulated?
Andrey:
There should be waterproofing on the ceiling under the insulation. Insulates from internal moisture. There should be nothing on the insulation for ventilation.
Alexei:
for timber - moisture insulation (their sea), then - slabs of dense foam (they have different names and looks, but you need one that has grooves for joining and cannot be cut with a knife, thickness up to 4-5 cm, on it a plaster mesh (preferably galvanized), level with sand concrete (m300) and apply tile adhesive - tiles - that's it! (the mesh and slabs can be fastened with façade dowels directly into the timber (those with a large plastic cap and a metal nail in the middle of the plastic body - there will be no heat transfer through them. that's all I did your repair in 3 minutes (wrote), you should do it faster too!)))
Dim-Dim:
If you poop in winter then if not in summer
Valentina M.:
It is necessary to insulate from the outside to prevent the formation of the so-called. a bridge of cold in the walls. Look at what insulation materials are sold in your area, what their thermal conductivity coefficient and resistance to dampness are, then calculate the consumption and price of the issue. Do not strive to save at any cost; heating the atmosphere and replacing rotten logs will cost more. If possible, and you live in cold regions, insulate the inside as well.
INTERCEPTOR:
How thick is the timber? If it’s 150x150, then you can create a ventilated façade on the outside; that is, there must be a gap between the timber and the finishing material of the façade so that the timber can be ventilated. Nail parchment paper to the beam. Inside there is slab insulation, URSA or ROKVOL, whatever you want, but it must be a pressed slab. Then you can shoot a polyethylene film and on top of it the finishing material - PVC panels - MDF, etc.
Lukin Sergey:
It’s better to insulate the outside, there are a lot of materials, both siding and aquapanels, and there is insulation between the siding or aquapanel. The inside can be covered with gypsum fiber (you can glue tiles onto it; it is moisture resistant.
User deleted:
The ceiling can be insulated with glass wool; attic insulation made from dried seaweed is also very fashionable now; it is environmentally friendly and does not rot. Polystyrene foam is extremely effective and durable, but there are environmental problems. Read more here. You can also read the articles How to keep the house warm? How to insulate the floor?
Evgeniy Bebikh:
It is necessary to effectively insulate both walls and ceilings. Outside is by definition.
Zhenya Barannik:
It can be insulated both from the outside and inside; the foam material is available in different thicknesses. then plaster and line the inside with plastic. from the outside there is also foam plastic and then plaster for the facades (bark beetle). It will be warm and nice.
