Coolant is supplied to residential buildings and office buildings during the cold season through special devices or heating systems. During the summer heat, cooling is provided by air conditioners.
According to established standard indicators, comfortable temperature is:
- 22-25 degrees in the warm season;
- 20-22 degrees in winter.
The recommended temperature for work areas is 18 degrees.
Current standards provide for the following temperature readings:
- corridors and hallways – 18;
- kitchens – 15;
- showers and baths – 25;
- stairs and toilets – 16;
- sleeping quarters – from 16 to 18;
- in the children's room the optimal temperature is about 23 degrees.
Installing and configuring the device
According to the classical scheme, the regulator is installed at the radiator inlet in accordance with the diagram of its connection to the heating system.
There is also an alternative installation scheme, in which the regulator is mounted at the radiator outlet. According to many experts, this increases the efficiency of heat transfer and the accuracy of the heating control of the batteries by limiting the outflow of cooled liquid from the heating device.
The alternative scheme can only be used for manual and automatic thermostats, but not for thermostats.
Installing a temperature controller on the battery
The installation process itself is not particularly difficult and is practically no different from installing other types of pipeline fittings. Before doing this, you should carefully study the instructions supplied with the device.
In single-pipe water heating systems, a jumper (bypass) must be installed in front of each radiator between the supply and return lines so as not to disrupt the circulation of the coolant throughout the system.
When installing automatic regulators, the thermostatic head or electronic valve control unit must be located in a horizontal position perpendicular to the plane of the radiator in order to eliminate the thermal effect of the heating device on the temperature sensor.
Manual devices do not require additional settings.
Automatic devices are configured in accordance with the instructions supplied with them and the general rules for operating such devices.
As a general rule, you need to install a thermometer in the room and eliminate as much heat loss in the room as possible through windows and doors, then fully open the regulator valve, turning on the maximum heating mode for the radiator.
When the thermometer reaches the temperature in the room 5-7 degrees higher than the required one, close the regulator completely and wait until the temperature in the room drops to the desired value.
After this, they begin to gradually turn the regulator handle towards opening until the shut-off head of the valve opens, which can be determined by the sudden heating of the regulator body and the appearance of liquid gurgling in the pipes and battery.
The regulator handle is left in this position. The adjustment of the device is considered completed.
Why is non-freezing coolant for heating systems better than ordinary water? Let's look at the pros and cons of antifreeze.
Bimetallic heating radiators: technical characteristics, design features, heat transfer parameters and other important facts https://teplius.ru/radiatory/vidy/bimetallicheskie/tehnicheskie-harakteristiki.html
Basic parameters of the thermal relay
There are several such parameters. Here are the most important of them:
- Operating temperature range;
- set point accuracy;
- hysteresis;
- load power.
The temperature set for the relay to operate is called the setpoint. The setting lies within the operating temperature range with which the temperature relay operates.
Hysteresis is the temperature range of the relay's steady state when the relay maintains the load in the on state. The setpoint can occupy any position in this interval, but belongs to this interval. Hysteresis is not a bad quality of the relay; it is often standardized, even separately regulated and helps to avoid too frequent switching in the heater circuit, which will shorten the service life of the heating elements.
Explanation of set point and hysteresis
In home devices, the set point position is characterized as “plus or minus”. It's easier to count that way. For example, room temperature is comfortable for a person within 18-20 degrees Celsius. If the controller hysteresis is 1 degree, then the setpoint in this case will be 19 degrees. If the accuracy of the thermostat is 0.5 degrees, then the temperature will be maintained within 17.5 ... 20.5 degrees. More precisely, the thermal relay will operate, and the true temperature will be determined by the power of the heater, which works in conjunction with this relay.
The load power is expressed in terms of the current that the relay is capable of switching. It is known that electric heaters consume the most power among other energy consumers. This means that such heaters need sufficient current and the relay must provide this current with its contacts. If the current load is too high for the relay contacts, then an intermediate relay is used: a magnetic starter or an electronic power switch. Otherwise, the relay contacts will quickly burn out and the relay will fail.
Thermal relay with range switching
Types of thermal heads
- With internal thermocouple.
- With remote temperature sensor.
- With external regulator.
- Electronic (programmable).
- Anti-vandal.
A conventional thermostat for heating radiators with an internal sensor is accepted for installation if it is possible to position its axis horizontally so that the room air freely flows around the body of the device, as shown in the figure:
If horizontal installation of the head is not possible, then it is better to purchase an external temperature sensor for it, complete with a capillary tube 2 m long. It is at this distance from the radiator that this device can be placed by attaching it to the wall:
In addition to vertical installation, there are other objective reasons for purchasing a remote sensor:
- heating radiators with temperature controllers are located behind thick curtains;
- in the immediate vicinity of the thermal head there are pipes with hot water or there is another heat source;
- the battery stands under a wide window sill;
- the internal thermoelement enters the draft zone.
In rooms with high demands on the interior, batteries are often hidden under decorative screens made of various materials. In such cases, a thermostat trapped under the casing registers the temperature of the hot air accumulating in the upper zone and can completely shut off the coolant. Moreover, access to the head control is completely blocked. In this situation, the choice should be made in favor of an external regulator combined with a sensor. Options for its placement are shown in the figure:
Electronic thermostats with a display also come in two types: with built-in and removable control unit. The latter differs in that the electronic unit is disconnected from the thermal head, after which it continues to function as usual. The purpose of such devices is to regulate the temperature in the room according to the time of day in accordance with the program. This allows heating power to be reduced during working hours, when no one is home and in other similar cases, which leads to additional energy savings.
Temperature calculation using a thermistor
The circuit of the voltage divider we use is shown in the following figure.
The voltage across the thermistor in this circuit can be determined from the known voltage:
Vout=(Vin*Rt)/(R+Rt).
From this formula we can express the resistance value of the thermistor Rt (R is a known resistance of 10 kOhm):
Rt=R(Vin/Vout)-1.
We will then determine the value of Vout in the program code by reading the value at the ADC output on pin A0 of the Arduino board.
Mathematically, the resistance of a thermistor can be calculated using the well-known Stein-Hart equation.
T = 1/(A + B*ln(Rt) + C*ln(Rt)3).
In this formula, A, B and C are constants, Rt is the resistance of the thermistor, ln is the natural logarithm.
For the project we used a thermistor with the following constants: A = 1.009249522×10⁻³, B = 2.378405444×10⁻⁴, C = 2.019202697×10⁻⁷. These constants can be determined using this calculator by entering the resistance values of the thermistor at three temperature values, or you can directly find them out from the datasheet for your thermistor.
Thus, to determine the temperature value, we will only need the resistance value of the thermistor - after determining it, we simply substitute its value into the Steinhart-Hart equation and use it to calculate the temperature value in Kelvin.
The benefits of heating thermostats
It is known that the temperature in different rooms of the house cannot be the same. It is also not necessary to constantly maintain one or another temperature regime.
For example, in the bedroom at night it is necessary to lower the temperature to 17-18°C. This has a positive effect on sleep and helps get rid of headaches.
The optimal temperature in the kitchen is 19°C. This is due to the fact that there are a lot of heating equipment in the room, which generates additional heat. If the temperature in the bathroom is below 24-26°C, the room will feel damp
Therefore, it is important to ensure high temperature
If the house has a children's room, then its temperature range may vary. For a child under one year old, a temperature of 23-24°C will be required; for older children, 21-22°C will be sufficient. In other rooms, the temperature can vary from 18 to 22°C.
A comfortable temperature background is selected depending on the purpose of the room and partly on the time of day
At night, you can lower the air temperature in all rooms. It is not necessary to maintain a high temperature in the home if the house will be empty for some time, as well as during sunny warm days, when some electrical appliances are operating that generate heat, etc.
In these cases, installing a thermostat has a positive effect on the microclimate - the air does not overheat and does not dry out.
The table shows that in living rooms during the cold season the temperature should be 18-23°C. Low temperatures are acceptable on the landing and in the pantry - 12-19°C
The thermostat solves the following problems:
- allows you to create a certain temperature regime in rooms for different purposes;
- saves boiler life, reduces the amount of consumables for system maintenance (up to 50%);
- It becomes possible to perform an emergency battery shutdown without shutting down the entire riser.
It should be remembered that using a thermostat it is impossible to increase the efficiency of the battery or increase its heat transfer. People with an individual heating system will be able to save on consumables. Residents of apartment buildings can only regulate the temperature in the room using a thermostat.
Let's figure out what types of thermostats exist and how to make the right choice of equipment.
Automatic home heating as part of an overall scheme
A “smart” heating system, designed according to the principles described in the article, can work both on its own and as an integral part of the overall “smart” network of the house, together with other systems.
Such a scheme for organizing smart home systems does not have a central control controller. More information about the various types of organization of control systems is written in the article → “Do-it-yourself smart house in the country.”
I recommend: Requirements for installing gas equipment
At the same time, some of the devices’ capabilities, which are not fully used, can be used in other smart home schemes.
The same GSM module is capable of not only receiving phone calls, but also sending reports about the situation in the house, for example, signaling a flood or a starting fire. But we will talk about this in other articles. Leave your tips and comments below. Subscribe to our newsletter. Good luck to you and good luck to your family!
Wide range and European quality
We offer a wide range of thermal heads for automatic control of thermostatic valves for your choice. Our catalog contains products from such well-known European companies as Danfoss, HEIMEIER, LUXOR, Meibes, RIFAR, STOUT, Watts.
For example, thermostatic elements produced by Danfoss (Denmark) are rightfully considered one of the best in terms of price/quality ratio. They are distinguished by their reliability and sophisticated design.
In our store, the prices for thermostats for radiators are very affordable. We have a wide range of thermal heads: gas, liquid, remote controlled, etc. We will always help you choose the best option for you. Contact us!
Installing a thermostat on a radiator
Radiator thermostats are installed mainly on the supply before entering the heating device. Each of the valves allows coolant to flow in one direction. An arrow on the body shows where the flow should move. The coolant should flow exactly there. If connected incorrectly, the device will not work. Another question is that you can install a thermostat both at the inlet and outlet, but respecting the direction of flow. And in both cases they work the same.
Options for connecting and installing control valves. But to be able to repair the radiator without stopping the system, you need to install a ball valve before the regulator (click on the picture to enlarge its size)
It is worth paying attention to the manufacturer's recommendations regarding installation height. Most models should be at a height of 40-60 cm from the floor
They are calibrated to temperatures at this level. But not everywhere the supply is top. Radiators often have a bottom connection. Then, in addition to the type of system (one-pipe or two-pipe), select the installation height. If such a model is not found, you can set the temperature on the thermal head to a lower temperature. If you install the recommended one, it will be too hot, since the air below, near the floor, is cooler, and the model is configured to maintain the temperature measured at the height of the upper edge of the radiator. The second option is to configure the device yourself. The procedure is usually described in the passport, and the most common sequence of actions is described below. And the third option is to install a thermostat with a remote sensor on the battery. Then it makes absolutely no difference at what height the thermal head is located. The main thing is the location of the sensor. But such models are much more expensive. If this is critical, it is better to adjust the regulator.
Please note that the thermostatic head must be turned horizontally (looking into the room). If it is welded upward, then it is constantly in the flow of hot air that comes from the pipe
Therefore, the substance in the bellows is almost always heated, and the radiator is turned off. The result is that the room is cold.
For the device to work correctly, you need to install it “head” into the room
The situation is a little better if the battery is installed in a niche, covered with a screen or curtain. The thermoelement is also “hot”, but not so much. Here you can go two ways: either set a higher temperature on the regulator, or use a remote sensor. Models with remote thermal controllers, of course, are not cheap, but you can choose the control point at your discretion.
What else you need to remember: when installing in a single-pipe system, a bypass is required. Moreover, it is unregulated. Then, when the supply to the radiator is closed, the riser will not be blocked, and you will not receive “hello” from your neighbors.
Thermal valves also differ in the type of connection: some have union nuts, some have crimp nuts. Accordingly, they are connected to one or another type of pipe. Typically, the specification or description of the product will indicate the type of connection, as well as what pipes it can be used with.
DIN rail relay
Modules assembled on a DIN rail have now finally replaced the old panel mounting of equipment in cabinets, which was very inconvenient for maintenance and repair. It takes seconds to snap onto the rail. The wires are laid in cable trays within the cabinet and clamped with screw terminals at the connection points when they are fully accessible for installation and illuminated.
In this way, electrical equipment for industrial, municipal and domestic use is assembled. Thermal relays are no exception, which are also produced in a housing for mounting on a DIN rail.
Thermal relay in DIN rail housing
When installed in a closet or box, there is no need to spoil the walls and appearance of the premises. The relay sensors are output to the controlled area, and the relays themselves are located with the rest of the equipment in the cabinet.
Most types of thermal relays are available in DIN rail versions. Online stores offer consumers a wide variety of choices. Some models contain an interface for connecting via cable, for example, for a wireless communication device, if there is a need to control the relay remotely from a mobile phone or smartphone.
Temperature sensors for radiators
Common mechanisms of this type include:
- thermostatic head. It is an automatic sensor that monitors the temperature of the coolant in the battery. The principle of its operation is as follows: during the heating process, liquid and gaseous substances expand (for more details: “Which thermal head for a heating radiator is better - selection and installation”). This, as a consequence, leads to the fact that the heated product squeezes out a special rod, thereby blocking the access of the coolant;
- devices called chokes are no less often used. They are special screw-type taps, with which you can manually regulate the flow of coolant. Their cost is more affordable, and in addition, they can be used to control two-pipe heating systems;
- The least expensive and simplest mechanism to help regulate temperature is a traditional valve. Of course, in this case, only modern models should be used, and not outdated screw devices, since in old mechanisms valves very often come off, and there is also a risk of oil seals leaking. The situation is completely different with ball valves: even in a half-open position, they function reliably and efficiently over a long period of time.
Example of heating temperature controllers in the video:
Energy efficient heating system
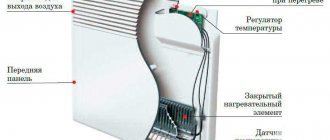
Without delving into the technical jungle, we can say that a thermal head for a radiator is a fairly simple device. The important point is installation. For correct operation and long service life, it is necessary to install the product correctly and strictly follow the instructions in the instructions. So, the thermal head should not be exposed to sunlight, otherwise the sensor will constantly heat up and the heat transfer from the radiator will automatically decrease. As a result, the device will not operate correctly.
The thermal head (thermostat) for the radiator is capable of regulating the temperature in the range - from -6 to +30 °C, with high accuracy (up to 1 °C). Its operating principle is quite simple: inside a sealed cylinder there is a working substance (gas, liquid, solid) with a high response to changes in ambient temperature. Accordingly, if the room temperature drops below a user-specified level, the thermal head (thermostat) increases the volume of hot liquid in the radiator. And vice versa.
Project work
You can power the Arduino board via a USB cable or via a 12 V adapter. The LCD screen will display the temperature in Kelvin, Celsius and Fahrenheit. The voltage drop across the thermistor will be continuously read from analog pin A0 and the temperature value will then be calculated from this.
When the temperature rises above 28 degrees, the Arduino board will turn on the lamp using a relay, and when the temperature drops below 28 degrees, turn it off.
The solutions implemented in this project can be used in automatic fan speed control and automatic air conditioner temperature control.
You can also see other home automation projects on our website:
- home automation using Arduino controlled by a smartphone;
- home automation using Arduino and MATLAB;
- home automation using GSM and Arduino;
- home automation using infrared communication and Arduino;
- home automation using Arduino.
Shut-off and control valves
Varieties
- What shut-off and control valves can be used to regulate the temperature of a heating battery?
For this purpose, the following are routinely used:
- Chokes;
- Thermal heads.
The needle throttle is a screw valve with a conical metal valve. The adjustment is extremely simple: the stem with the valve is screwed in and out, while limiting the flow of coolant through the hole in the seat.
Needle throttle device.
The thermal head is an automatic regulator that allows you to focus not on the permeability of the line, but on the air temperature in the room.
The operating principle of inexpensive thermostatic heads uses the expansion of solids, gases and liquids when heated:
- When the target temperature is reached, the expanding working fluid of the thermal head pushes the valve towards the seat and blocks the coolant flow;
- When cooling, the valve is moved away from the seat by a return spring, and the heater begins to heat up.
Mechanical liquid thermal head.
In addition, on sale you can find electronic thermal heads with a temperature sensor and a servo drive powered by a galvanic element. They are easily recognized by the screen, which shows the set or current temperature in the room.
Electronic thermostat.
Prices
- How much do chokes and thermal heads cost?
Here are the approximate prices at the end of 2016 for Valtec products:
| Shut-off valve element (thread size 1/2 inch) | Price |
| Manual adjustment valve | 300 rubles |
| Thermostatic valve without thermal head | 600 rubles |
| Thermal head without valve, mechanical | 700 - 1200 rubles |
| Electronic thermal head without valve | 2000 - 5000 rubles |
| Set of thermostatic valve and mechanical thermal head | From 1200 rubles |
Polypropylene corner choke costs 284 rubles (1/2 inch size).
Liquid thermal head costing 900 rubles.
Alternatives
- How else can you regulate the permeability of the supply line to the heating device or heating circuit?
To adjust the permeability of individual sections of the circuit in the heating system, the following can be used abnormally:
- Screw valves;
- Ball and plug valves;
Brass plug taps.
Valves.
Let me emphasize once again: the use as chokes for all of the listed elements of shut-off valves is an abnormal mode.
What does it threaten?
With a screw valve, the half-open valve will continuously move in the turbulent coolant flow, since it is movably attached to the stem. As a rule, throttling with a screw valve ends with the valve breaking off, after which the valve stops closing or opening;
Disassembled screw valve. The valve is movably attached to the stem and, when beating in a turbulent flow, will sooner or later come off.
According to the manufacturers, the half-open position of the valve on a ball valve usually leads to wear of the fluoroplastic or Teflon rings that ensure tightness in the closed position - with quite predictable consequences. Less often, scale that gets between the valve and the body simply prevents the valve from closing;
Ball valve device. In the half-open position, the flow of water with abrasive particles wears out the O-rings.
The tap that limits the maximum water flow through the faucet has been in the half-closed position for the last four years and is still working.
Semi-closed valves are characterized by falling cheeks, completely blocking the coolant passage.
Adjustment devices
These are mechanical valves or automatic devices with which you can change the heat transfer of the radiator. Mounted on both single batteries and groups of them.
Ball valves
They are used to open or stop the flow of coolant. They are installed together with bypasses in front of radiators or entire sections of the heating system.
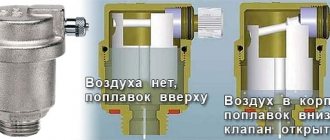
A ball valve consists of a body with an internal metal sphere. There is a hole inside it, which in the “open” position does not create obstacles to the movement of liquid. When the tap is closed, the sphere turns with its blind side and blocks the gap.
A ball valve can also operate in an intermediate position, but it is not advisable to leave it in a half-open state for a long time. At a high temperature of the coolant, the ball can stick to the walls, which subsequently causes breakdowns.
Needle taps
Valves of this design can smoothly regulate liquid flow, which directly affects the temperature in the heating radiator. The cast body houses a cone-shaped rod driven by a handle. When the handle is rotated, the needle moves into the canal, closing or opening the passage. The tip can be non-rotating, spherical, with a soft nozzle, which allows for smoother adjustment.
Needle valves can be operated manually or automatically. Additionally equipped with temperature sensors and an electric drive.
Mechanical thermostat
Designed to regulate and constantly maintain the set temperature in the radiator. It is a mechanical valve that cuts into the coolant supply pipe. At the top of the device there is a thermal head for setting the desired mode.
The thermostatic head is an element sensitive to temperature changes. Inside it is an elastic cylindrical bellows filled with gas or liquid with a high coefficient of thermal expansion. When heated, it increases in volume and moves the rod, thereby reducing the clearance of the pipe. The flow intensity drops, the radiator cools.
Mechanical thermostats allow you to control the microclimate in a room without constant human control. The specified mode will be maintained automatically. The main conditions for long-term operation of the valve are that high-quality non-freezing liquid or specially prepared water must circulate in the system, since the device is sensitive to contamination.
Automatic thermostat with remote sensor
Such devices consist of two parts - a mechanical thermal head and a temperature sensor, which are connected by a thin capillary tube 1-10 m long. The capillary mechanical thermal sensor is used to maintain a given temperature in the operating range from 30 to 90 ° C. Can be used both to start valves and to turn on/off the circulation pump.
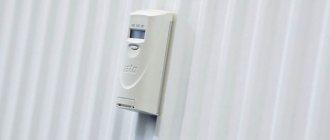
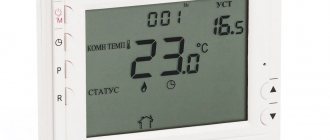
Electronic thermostat
These are the latest generation devices that allow you to create a favorable temperature in the room using a microprocessor built into the thermal head. Operates on batteries in two control modes:
- as standard, a constant temperature is maintained, which can be set using touch buttons or via radio.
- in programmable mode - the sensor regulates the temperature by hour and day of the week, the temperature schedule is set from a radio remote control or using various applications from a smartphone, tablet or computer.
Automatic thermostats with sensors help remove excess load from the heating system, save on heating the premises in the absence of residents, and make the conditions in each room as comfortable as possible.
Date: September 25, 2022
DIY thermostat
For those who know how to tinker: work with a soldering iron, have a sufficient minimum of knowledge in the field of electrical engineering, there are options for making a thermal relay yourself. From the available variety, it is better to choose not the archaic schemes of past decades, but an option that is close to modern times. It is easier to find modern components that are reliable in operation and more accurate than the old ones. Electrical circuits have also become simpler, thanks to the high degree of integration of the new chips. Here is an option with a semiconductor analog sensor:
Homemade thermal relay circuit
The U1 sensor is available in TO-92 or TO-220 housing. In the first case, it is only suitable for measuring air temperature. The second housing is suitable for attaching to metal plates, for example for measuring the temperature of batteries or pipes. The variable resistor R5 should have a linear characteristic, since the LM35 sensor itself has good linearity. Comparator U2 compares the reference voltage from the slider of resistor R5 and from the sensor.
The output signal of the comparator is amplified by current by transistor T1 and then goes to the base of transistor T2, a switch that turns on relay K1. Diode D1 must be used to protect transistor T2 from electrical breakdown during self-induction of the relay coil. The load contacts must be designed for a current of 2-5 A. If the load power is more than 400-1000 W, which corresponds to the selected relay, then an intermediate magnetic starter or triac should be used.
Table 1. Replacing transistors and diodes
| BC549C | KT315V, KT315G |
| BD139 | KT815B, KT805B |
| 1N4002 | KD105B, KD212A |
The sensor can be moved beyond the device board at a distance of 5-10 meters. But in this case, the wire from pin 2 must be metal braided (shielded). The braid is connected to pin 3 (ground), and power is supplied by a separate wire. Resistor R1 and capacitor C2 also need to be removed along with the sensor and placed in its own housing. The device is powered by a 12V DC voltage source.
The scale must be calibrated according to the readings of a standard thermometer, which is placed close to the sensor. When changing the temperature, you need to wait 2-3 minutes for the readings of the sensor and thermometer to equalize.