Sawdust is waste remaining during the woodworking process and is a mixture of wood shavings and dust. It should be noted their versatility. They are actively used in agriculture, gardening and other areas. In construction, the material is used as insulation.
Its thermal insulation properties have been known for quite some time. Our ancestors also used a mixture of sawdust and clay when building wooden houses.
The world does not stand still. Many materials have been developed as thermal insulation: expanded polystyrene, mineral wool, polystyrene foam, ecowool, foam insulation, etc.
It would seem that the method of insulation with sawdust, as a relic of the past, should have exhausted itself long ago. But even now this is a common method of thermal insulation of premises.
Is it worth it to insulate walls with sawdust?
It is human nature to strive for perfection.
And this desire helps us develop further. It manifests itself in all areas, including construction. It’s impossible to count how many special materials for insulation have already been created; there is even foam for insulating walls. Mineral wool, expanded polystyrene, penoizol, foamed polyethylene - this is just a small list of the huge variety that is presented on the market.
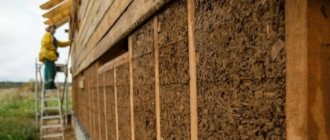
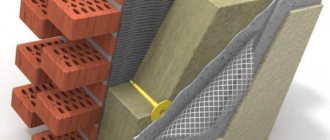
House insulated with sawdust and cement mortar
However, we should not forget about time-tested methods. For example, about insulating frame buildings with sawdust. This process will now be discussed.
Using sawdust as insulation
Sawdust is waste remaining during the woodworking process and is a mixture of wood shavings and dust. It should be noted their versatility. They are actively used in agriculture, gardening and other areas. In construction, the material is used as insulation.
Its thermal insulation properties have been known for quite some time. Our ancestors also used a mixture of sawdust and clay when building wooden houses.
The world does not stand still. Many materials have been developed as thermal insulation: expanded polystyrene, mineral wool, polystyrene foam, ecowool, foam insulation, etc.
It would seem that the method of insulation with sawdust, as a relic of the past, should have exhausted itself long ago. But even now this is a common method of thermal insulation of premises.
Useful forums
On the websites of stores selling building materials, it is very difficult to find real reviews and reports about insulating the walls of a house with sawdust, so we have prepared links to forums where users discuss various issues on this topic.
Some forums discuss the insulation of other parts of the house, but even there you can find a lot of useful information regarding the thermal insulation properties of sawdust and the features of their use.
Here is a list of these forums:
- Forumhouse.
- NGS house.
- We are building a house.
- House4U.
- Vikag64.
- Farmer's world.
Properties
Wood shavings as an insulating material have a number of positive and negative characteristics.
Among the advantages are the following:
The main disadvantages of sawdust:
Due to significant disadvantages, sawdust is practically not used in its pure form as insulation. To eliminate possible unpleasant consequences, wood shavings are mixed with lime, clay, cement or gypsum. The resulting mixture is sprayed with vitriol or other antiseptic solution.
As a result, the resulting material burns poorly and also repels rodents and insects.
Features of use
When planning to insulate a wall with sawdust or sawdust-based compounds, follow these rules :
- If there are rodents in the house, then before insulation it is necessary not only to kill them yourself or by calling workers from the relevant services, but also to carefully seal all the passages they have gnawed.
- Even when insulating a house in which there have never been rodents, it is necessary to add lime to the sawdust, because this reagent will not only destroy pathogens and the larvae of various wood-boring beetles, but also prevent the appearance of rodents. When it gets on an animal's fur, sawdust and lime cause pain to the rodent, causing it to leave to look for a safer habitat.
- Do not use sawdust obtained from diseased wood to insulate houses. There is a high probability that even after treating with lime, the disease will appear again and can affect the walls of the house.
- If you use cement, gypsum or PVA as a binder, be sure to check the expiration date and storage conditions . After all, expired or improperly stored materials lose their properties.
Insulation mixture
A mixture of wood chips is most often used for insulating low-rise frame or wooden houses. Otherwise it is called “sawdust concrete”. How to prepare sawdust insulation with your own hands?
For this you will need:
Wood shavings should only be taken from woodworking. You cannot use waste from sawing chipboard, MDF, OSB. Such material releases harmful substances into the atmosphere that adversely affect human health.
Fresh raw materials are not suitable for preparing insulation; usually they are allowed to “rest” for at least two months in order to remove the substances that prevent the binding of all components of sawdust concrete.
There are many options for preparing the mixture. They differ in the proportions of the components and the type of binder. Typically the composition includes wood filler, cement, sand or clay.
The cement slowly absorbs moisture from the sawdust, gradually binding the mixture. This insulation is distinguished by its thermal insulation properties and will last for decades.
To obtain a monolithic structure, it is recommended to use gypsum. Since it hardens quickly, small volumes should be mixed.
Composition using lime
To prepare, you need to mix 10 buckets of wood waste with lime and cement (1 bucket each).
After all the components are well soaked, it is necessary to treat the mixture with an antiseptic. Copper sulfate or boric acid is suitable for this.
The antiseptic is mixed with water. For irrigation, you can use a regular watering can. Well-prepared insulation does not release water when squeezed by hand.
Insulation with sawdust and clay
Clay-based sawdust concrete is often used to insulate baths. This mixture has not only excellent thermal insulation properties, but also good waterproofing.
Clay is not afraid of heat and humidity. This method of sawdust insulation is well suited in areas where the climate is prone to sudden changes from low to high temperatures. This material allows you to retain heat in winter and keep cool in hot summer. But the main disadvantage is the fragility of the binder under load, so this composition is mainly used for ceiling insulation.
Materials and tools for preparing the mixture:
When mixing, it is necessary to strictly observe the proportions of all components. Violation of technology can lead to cracking of the finished material.
For 2-3 buckets of filler you will need one bucket of clay. Before mixing, it is diluted with water to a thick porridge. The amount of liquid depends on the dryness of the clay.
It absorbs moisture very slowly, so it can be stirred periodically to speed up the process. But it is best to soak the clay for several days.
All components are mixed to a homogeneous consistency using a regular hoe or concrete mixer. The mixture is ready to be poured into the ceiling frame from the attic side.
As an option, insulation boards can be made. To do this, it is better to take all components in equal proportions. You must first make a frame of wooden beams with a height of at least 150 mm.
The structure is placed on a sheet of plywood and filled with the prepared solution. The surface should be leveled with a spatula and left until completely dry. To avoid cracks on the slabs, it is not recommended to dry the solution in direct sunlight.
How different types of walls are insulated
Regardless of the material from which the walls are made, they can be divided into solid and hollow.
Solid walls are insulated with sawdust from the outside or inside, and hollow walls are insulated from the inside.
If the efficiency of internal insulation of hollow walls is not enough, then an external/internal insulating layer is also installed.
Insulation with sawdust from the inside is in many ways similar to insulation from the outside, so we will only talk about the differences.
In addition, blocks of wood concrete and sawdust concrete, which we discussed in the relevant articles, can be used as insulation.
Outside
This reduction in heat loss is the most popular, because it does not require disassembling the wall to fill internal voids, and there are no disadvantages inherent in insulation from the inside.
There are three ways of such insulation using sawdust:
- pouring using the sliding formwork method;
- plastering;
- finishing with pre-prepared slabs.
Attention! Any method of external insulation with sawdust implies an increase in the size of the house, so after installing the insulating material it is necessary to lengthen the roof overhangs.
Otherwise, the upper part of the insulation will fill with moisture during rain, which will negatively affect its characteristics .
Pouring using the sliding formwork method
This method of insulation with sawdust is most often used either simultaneously with the installation of a decorative facade , or when the hardened insulation itself plays the role of a facade.
In the first case, any binders can be used to prepare a solution from sawdust; in the second, only cement mixed with PVA and a small amount of liquid glass.
Clay and gypsum, unlike cement, PVA and liquid glass, allow water vapor to pass through , so walls with such insulation will “breathe”, that is, excess moisture will be blown through the wall material, then the insulation and escape into the atmosphere.
This is especially important for houses made of wood, which are valued for their lack of dampness , because excess moisture easily passes through the walls and goes into the atmosphere.
If ventilation is properly organized , then you can use the second option for such insulation, because excess moisture will be removed by the flow of fresh air passing through the rooms.
The advantage of the second method is lower cost, because you do not have to buy external finishing materials, for example, siding.
In addition, for the insulation made according to the first option , a small free space (1–3 cm) is required between the finish and the surface of the insulating material. This is done so that the passing air removes the settling condensate.
The basic steps for both methods are the same , so we will describe the general process and clarify the differing steps.
When insulating a house from the outside using the sliding formwork method, we recommend following the tips given below.
At the very beginning, thoroughly clean the outer surface of the wall from previous finishing and any dirt, if necessary, repair its surface.
Treat the guides with antiseptics, fire retardants and hydrophobic materials , which in the first case will play the role of a frame for siding or other finishing materials, and in the second case they will act as beacons allowing you to create a flat surface.
Then install them using a plumb line and a long straightedge , which will help create a level surface across the entire wall. Place the extreme guides at a distance of 10–15 cm from the edge of the wall.
Reducing this distance too much can damage the wall material, and increasing it too much will create difficulties when attaching the finish.
Along the edges of the wall, parallel to the guides, install boards that will perform the same function. After the solution hardens, they must be removed. Thanks to these boards, the wall will be insulated up to the corners with a layer of the same thickness.
After this, prepare the sliding formwork, that is, a shield that will move along guides attached to the wall.
If you are insulating
using the first method , then attach 2-3 cm thick plates to the shield, which should fit between the guides with little effort.
This will create the gap necessary for ventilation.
When insulating using the second method, it is enough to use a flat panel of suitable height and width.
It is advisable to smear the surface of the shield facing the wall of the house with a thin layer of any fat or spray it with silicone spray, this will prevent the hardening solution from sticking to it.
Then install the shield in place and securely fix it so that it does not squeeze out while compacting the insulating composition.
Using a concrete mixer, prepare the required amount of sawdust, lime and binder, the approximate proportions of which you will find in the article (with which sawdust can be used together).
The only difference is that for the second method of insulation, the amount of sawdust in relation to cement must be reduced to three to one.
If you use cement as a binder, then be sure to add plasticizers to the mixture , thanks to this you will increase the strength of the hardened insulation by reducing the amount of water and make it more mobile, which will facilitate compaction.
When making a composition from clay, keep in mind that with the right amount of water, you can form a ball with a diameter of 7–10 cm from the finished mixture and lightly toss it on your hand. If the ball falls apart , then there is not enough water; if it spreads, then there is too much.
When working with gypsum, make as much of the composition as is sufficient to fill a 10 cm layer of all cavities enclosed by the formwork.
Pour the mixture of sawdust and binder into the cavities formed by the wall, guides and sliding formwork in small portions (10–15 cm).
Then compact with a long stick, the diameter of which is half the thickness of the cavity.
the stick repeatedly to the entire depth of the filling, moving from one edge of the cavity to the other.
Perform the same operations in other cavities.
Having filled the cavity to the top, remove the excess so that the edge of the top of the insulation is parallel to the edge of the formwork.
If you made an insulating composition on clay, then you need to wait a week for the material to shrink, then fill the void with the same solution and let it sit for three days, then move the formwork to fill the next section.
When using gypsum mortar, the formwork can be moved after half an hour , when pouring a PVA-based mixture after ten hours, and when working with a cement mixture after two days.
After moving the formwork, inspect the surface of the insulating layer; if there are holes or cracks on it, then carefully seal them with the same solution.
Application of plaster with sawdust for walls
This method of insulation with sawdust is suitable in cases where the required layer thickness does not exceed 5 cm , and there are no high requirements for the appearance of the house.
That is, this method of insulation is best suited for various outbuildings .
If a greater thickness is required, then after the first layer of the mixture of sawdust and binder has dried, you can apply the second, then the third, in the same way.
For such work, compositions based on cement and PVA are best suited, because the hardened surface of the insulation does not need protection from moisture.
Compositions based on gypsum and clay can only be used where any material will be installed on top of them to protect them from rain and snow.
If siding or any other type of facade is installed as protection against water, then it is necessary to organize ventilation between it and the insulation.
If the surface of the insulating layer is covered with cement-based plaster or painted with waterproof paint, then ventilation is not required.
When starting to plaster the wall, follow the algorithm of actions that we describe below.
First, remove any old plaster or trim from the wall and repair it if necessary.
If you want to plaster the wall with a layer of equal thickness and a smooth surface, then install beacons as described above.
Attach
a metal mesh , and the thickness of the mesh should not be less than two-thirds of the thickness of the insulating layer.
The mesh can be nailed to a wooden wall; to a brick or concrete wall it will have to be secured using dowels or anchors.
If there are beacons, the grid must be placed between them .
If you plan to apply several layers of sawdust insulating plaster, then attach a wire or thin nylon rope , with which you can fix the second mesh after the first layer has hardened.
Knead the solution; its thickness should be such that a ball with a diameter of 10 cm does not fall apart when it is lightly tossed on your hand.
Remember, gypsum mortar cannot be used on walls with beacons, because due to the short life of the composition, you will not be able to work with it normally.
Wet the wall and plaster it with the prepared solution. This can be done either with your hands or with various tools (trowels, trowels, etc.).
If beacons are installed on the wall, then apply a strip or board to them and level the surface of the plaster. Do not forget to remove the wire or nylon threads from the solution to attach the second mesh.
In the case where one layer of plaster is not enough, after the solution has completely hardened, you need to attach a new wire mesh to it and apply a second layer of plaster. If necessary, a third layer can be applied.
The time after which the insulating layer can be plastered with ordinary cement-sand mortar depends on the type of binder . For PVA and gypsum two days, for clay, cement and manure ten days.
Finishing with pre-prepared slabs
This method is most often used for exterior decoration , but it can also be used for other methods of insulation.
In addition, it is suitable not only for walls, but also for insulating floors, ceilings and even roofs.
The advantage of the method is that the time of direct work on the wall is minimized and immediately after installing and fixing the slabs, they can be covered with a facade, painted or plastered.
And other work related to the production of slabs can be carried out at any time of the year . From spring to autumn this can be done under a canopy, and in winter in any heated room.
The optimal dimensions of the slabs (length, width, thickness in cm) depend on the material from which they will be made:
- cement 70x70x20;
- plaster 65x65x20;
- clay 50x50x20;
- based on PVA 100x100x20;
- based on manure 50x50x20.
This difference in size is associated with different strength and weight of the frozen solution.
Therefore, gypsum and cement boards can be increased in size if you can cope with their weight during installation, but it is better not to increase those made from clay and manure due to the insufficient strength of the material.
You can increase their strength with the help of chopped hay or reeds , which will play the role of reinforcement.
To make slabs, you will need molds (matrices), which can be made from boards.
We recommend making slabs with locking joints ; they will provide a much higher level of thermal insulation due to the absence of gaps at the joints.
However, to make such slabs you will need a collapsible mold.
In addition, we recommend making several dozen forms of the same size , thanks to this you will not interrupt your work while the solution hardens.
If you have the opportunity and desire to make insulating boards every day, then you need a week’s supply of molds, but if you only fill them on weekends, then you can get by with the amount that you can fill in one day.
When making molds, consider the following: the two end sides adjacent to each other, for example, the top and right, must be equipped with a ridge, the other two with a groove.
The size of the ridge should be 3 mm smaller than the size of the groove - such a groove is necessary so that the joints can be sealed with fresh mortar, which will completely eliminate cold bridges.
To give the slab such shapes, the side walls must be movable , this will allow you to assemble the entire structure before pouring the solution, and after the mass has hardened, move the side walls and pull out the finished slab.
As a base, you can take waterproof sheet plywood with a thickness of 20 mm or more or a planed board of the same thickness.
The method of attaching the side walls can be any, the main thing is that when assembling the matrix, it acquires a strictly rectangular shape . All matrices must be the same size, with a maximum difference in length, width or thickness of 1 mm.
If you doubt that you can make several matrices that meet these requirements, then first make a mock-up of the slab , then make matrices based on it.
What is the sequence of actions for external installation of finished slabs?
Repair the outside of the wall and remove any dirt and level its surface.
When installed on an uneven surface, the boards may crack.
Therefore, it is advisable to first plaster an uneven wall along the beacons (you can use the method described above), then install the slabs.
After this, check the verticality of the walls. If the deviation is more than 2-3 mm per 1 m, then you will have to choose - either trim the edges of the slabs, or place them plumb and along the wall.
The first method is preferable, because there is a high probability that the inclination of the walls and corners will be different , as a result of which too many cracks will have to be sealed.
Then mark the wall and mark the locations for installing the first slab.
It is convenient to use a laser level for this , because it independently creates marking lines on the wall in selected places. Moreover, it can be adjusted both to vertical lines and to match the slope of a corner or wall.
When the markings are applied, moisten the wall.
Mix the same solution from which the slabs were made (if you used gypsum and clay as a binder, then they need to be replaced with cement or PVA), only a little more liquid, and apply it to the wall using a comb spatula.
The solution will ensure a more reliable fastening of the slab to the wall, and a comb spatula will create a layer of uniform thickness.
Install the first slab according to the markings and attach it to the wall using special anchor nails for foam insulation.
When installing into a brick, block or concrete wall, first drill a hole the entire length of the special nail, then insert the plastic clip with the mushroom head, and then drive the nail.
When installing slabs on a wooden wall, first drill the slab , then cut the plastic clip so that it does not reach the wall a little, then insert it into the hole and hammer in a nail.
If the wall is made of hard wood, then drill a hole in it whose diameter is equal to half the diameter of the nail, otherwise the nail will bend during driving and damage the insulation board.
Using a comb spatula, apply the solution to the wall, then spread it on the end of the slab on the side where you will install the next slab.
Lean the second slab against the wall, align it vertically and insert it into the already installed slab until it stops, then secure it in the same way as the previous one. Install the remaining slabs in the same way.
For trimming, use a circular diamond or pobedit saw with a blade diameter of 50–60 cm.
After installation, the slabs can be plastered or painted. them under a ventilated facade , because support slats attached to the wall will complicate installation, and the slats cannot be attached to slabs due to the low load-bearing capacity of the latter.
Finishing the interior surface of buildings
The main difference between internal insulation with sawdust and external insulation is that you have to choose between the thickness of the insulating material and reducing the area of the room .
At the same time, insulation with sawdust with any type of binder does not lead to the formation of condensation , which is inevitable when working with any other insulation materials.
In addition, in wooden houses it is advisable to use only clay as a binder, because other materials have too little vapor permeability , which will negatively affect the microclimate in the house.
In brick and stone houses, you can use any other type of binder, because the vapor permeability of the walls is so low that the effective release of excess moisture into the atmosphere is impossible even without insulation.
In addition, even in brick and stone houses you should not use a mixture of sawdust and PVA.
This is explained by the fact that the vapor permeability of the hardened glue is much lower than that of the walls, so the overall air humidity in the rooms will increase.
In addition, in the summer, moisture reserves obtained from autumn to spring are released not only into the atmosphere, but also inside the rooms, due to which the air cools down at least a little, and PVA-based insulation blocks this effect.
Filling walls with voids in a brick, block and frame house
Walls with voids (cavities) are made both from boards (walled houses and double-timber buildings) and from brick, block or monolithic cement.
After all, the cavities contain air , which has excellent insulating properties.
The only drawback of such walls is that any gap, even the smallest and barely noticeable, sharply reduces the effectiveness of such insulation.
This is due to the fact that the cavity does not interfere with the movement of cold air, which cools the inner wall of the house.
Therefore, voids in the walls are filled with various insulating materials, including those made from sawdust.
The main problem that arises when insulating such houses is related to the need to partially or completely dismantle one of the walls.
Otherwise, it is difficult to get to the cavity and fill it with material that reduces heat loss.
Therefore, the easiest way is to fill them with sawdust insulation at the construction stage .
If there is a need to insulate an already built house, then part of the wall will have to be dismantled to open access to the cavity. Because of this, in already built houses it is better to insulate the walls from the outside, because this operation will not require their disassembly.
To fill voids, 3 different methods :
- backfilling with a dry mixture of sawdust and lime;
- insulation with ready-made blocks of various sizes;
- filling with solution.
Filling with a dry mixture of sawdust and lime is a simple but effective method that provides a significant reduction in the thermal conductivity of the wall without losing the ability to transport excess moisture.
The only disadvantage of this method is the long shrinkage time, so it is necessary to either compact each layer very carefully , or fill in the bulk of the material before winter, and a year later, before the next winter, compensate for the shrinkage of sawdust.
This is easiest to do in frame and shelving houses, because removing a piece of exterior trim and the top board around the entire perimeter of the house is much easier than knocking out bricks/blocks or punching holes in a concrete wall.
When filling a void in the wall with dry sawdust, do not forget to use fire retardants , that is, substances that impede the combustion of wood.
To do this, you can either pre-soak the sawdust in an aqueous solution of this product and use wood waste after drying, or water the sawdust during laying and compaction.
The first method is preferable, because there will be no excess moisture in the wall, but the second will provide a better seal.
If you choose the second method, then you need to lay sawdust in layers 20–30 cm thick, then water it with the solution in accordance with the instructions, and then compact it in any convenient way.
The voids can also be filled with ready-made sawdust slabs made using the technology described above.
However, in brick, block or concrete houses, as well as structures made of double timber, such insulation can only be carried out during construction.
In frame houses, it is possible to insulate walls in this way only during major renovations, because all the exterior finishing will have to be removed.
The dimensions of the finished slabs should be 3–5 cm the voids
The voids can also be filled with the same solution of sawdust and binder material that is used for external insulation or the manufacture of insulating boards.
In brick, block and stone houses, such insulation can only be performed during construction .
This is due to the complexity of both laying and compacting the insulating solution.
In shelved houses and structures made of double timber, such insulation can be carried out only during major repairs , filling the voids using the sliding formwork method, and then restoring the exterior finish.
Laying wood concrete and sawdust concrete blocks
This method is used in houses with weak walls, as well as where a complete gradual reconstruction of the house is planned. The strength of blocks made from these materials is quite sufficient for the construction of two-story buildings, and in terms of thermal conductivity, wood concrete and sawdust concrete are only slightly inferior to modern materials.
The only condition is that all blocks must be manufactured by a reliable supplier in full compliance with the technological cycle.
In addition, you can prepare them yourself , because the manufacturing technology is almost no different from that used to create insulating boards.
To lay these materials as insulation, a simple sand fill is sufficient .
If you plan to use them in the future as load-bearing elements of a new house, then it is advisable to pour a strip foundation on a sand screed.
During installation, it is necessary to provide a gap of 5 cm, which will increase the thermal insulation properties of the insulation and protect it from damage caused by changes in the size of the wall, subsidence of the foundation and other factors.
This is especially true when insulating houses made of logs or timber, because they change greatly in size throughout the year due to filling with moisture and subsequent shrinkage .
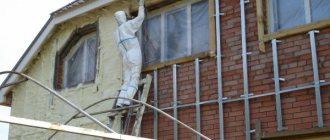
Thermal insulation of walls
Insulating walls is one of the most effective ways to maintain a comfortable indoor microclimate. Before starting work, you need to take care of fire safety.
For this purpose, the places where the wiring is laid are protected with special non-flammable materials. The wiring should be placed in a metal pipe with a wall thickness of at least 3 mm.
To fill the insulation mixture, a frame is installed, then wooden slats are attached to it, on top of which the sheathing is mounted. Sawdust is poured into the prepared structure and carefully compacted in order to avoid subsidence of the material in the future.
Ceiling protection
Most often, ceiling insulation with sawdust is performed in private homes and outbuildings.
The surface on which the thermal insulation layer will be laid must be prepared. To do this, all cracks are carefully covered with clay. They can also be treated with polyurethane foam. If the building has a chimney, then it must be prepared as well. The area around the chimney is lined with non-combustible materials (slag).
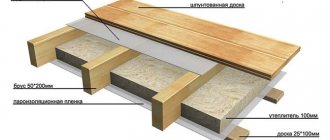
The ceiling is insulated from the attic side. The mixture of sawdust is poured over the entire area, carefully compacted and covered with boards.
Floor insulation with sawdust has its own specifics and differs significantly from similar work with the ceiling. You should not use the dry mixture method.
Over time, such insulation will shrink, and adding material again will be problematic. Therefore, you should opt for hardening solutions. Mixtures with gypsum and cement work well.
All floor coverings should be treated with moisture-resistant agents and an antiseptic before laying the material. The bottom is covered with a vapor barrier film. Then wood insulation is laid and left to harden. This usually takes from 2 weeks to a month.
Features of insulation for wooden and frame houses
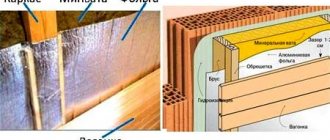
In a wooden house, thermal insulation is carried out on the outside of the load-bearing walls. To do this, supports are installed that will hold the rough facade.
Professional builders recommend using sheet material to avoid spillage of the insulation. Next, you should fill the resulting frame with treated sawdust. In a wooden structure, the layer of thermal insulation should be from 0.5 to 1 meter.
Proper insulation of a frame house with sawdust has its own specifics. Thermal insulation material is poured between the skins of the external and internal walls. When using industrial insulation, a wall width of 15 to 20 cm is sufficient.
But sawdust will not give the desired effect under these conditions. Therefore, it is advisable to do mixed insulation.
The frame is filled with a width of 20 cm, then an additional external one up to 30 cm wide is built and also filled with wood shavings.
Sawdust for insulating walls in a private house, bathhouse and other outbuildings has proven itself to be an excellent thermal insulation, environmentally friendly and inexpensive material that can compete with modern industrial insulation materials.
Source
What is sawdust concrete and where is it used?
The material is based on durable grades of cement. When mixed with sand, mineralizers, and sawdust, this building material is obtained, which is highly versatile. Today, a variety of designs are made from it, and also used for insulation purposes. But the main range of application, of course, is low-rise private construction. At the same time, sawdust concrete is used both for the construction of residential buildings and for the construction of adjacent buildings and structures.
Grades M5 and M10 are not strong enough for construction and are used for insulation purposes. As for the M15 and M20 grades, they are strong enough for the construction of houses.
Important! The more organic component there is in such concrete, that is, sawdust, the lower its strength, but at the same time the higher its insulating qualities. That is why this material is used for insulating basements and other already constructed premises. With an increase in the proportion of sand and concrete, not only strength increases, but also water resistance and frost resistance. These types of materials are good at preventing corrosion of reinforcing elements.
Composition and proportions of the batch in buckets
To mix sawdust concrete with our own hands we will need:
Sawdust concrete (wood concrete) proportions of volume in buckets for one batch for the construction of walls
The density of the mixture depends on the ratio of sand and sawdust. The less sand used to make sawdust concrete, the lower the density. In this case, the thermal properties are improved but the strength of the material is reduced. With an increase in the amount of sand and binders, the strength increases.
bags at Belaya Dacha outlet
Sequence of actions when mixing sawdust concrete
Pour a bucket of water into the concrete mixer. Add a bucket of cement. Wait 1-2 minutes until a cement emulsion forms. Next, add half a bucket of sand and two buckets of sawdust. Dilute the building mixture with 5 liters of water. It is very important to mix well. We load the last 2 buckets of sawdust and half a bucket of sand into the concrete mixer. Dilute 5 liters of water.
Sawdust concrete (wood concrete) volume proportions in buckets, batch for 1m3
The total weight of sawdust concrete 1m3 is 800 kg.
As we have already said, sometimes, to save money, part of the cement is replaced with lime; in this case, see the proportions of wood concrete in the table:
Price
Here I didn’t consider everything as meticulously as with the roof of my house, where in the estimate you can see everything from start to finish, down to every screw and nail. I have already mentioned the cost of basic materials in the text of the article. And based on the final amount, I will say that I had a budget of 25,000 rubles. on the floors, but even there are still 2 tr left. (i.e. this is all together with delivery). Floor area - 31.4 sq. m. (minus the foundation tape, it protrudes by 30 cm.)
Wooden stone, or stone wood, as sawdust concrete is called, is also a fairly cheap material. Sawdust concrete, the price of which is low, is considered the most affordable when compared with other materials. For example, one wall block, which has dimensions of 390x190x188 mm, made from sand and screenings, costs approximately 23 rubles on the market. A stone that has the same dimensions, but is already made of sawdust concrete, will cost 3-4 rubles less, and at the same time it is lighter and warmer.
By the way, it can replace 7 bricks (the cost of one is 5-7 rubles). It is easy to calculate that a wall made of a mixture of sawdust and concrete will cost 2.5 times less than a brick one. In other words, to build a house box 8 by 8 meters, you will need 20,000 bricks, the owner will have to pay 140 thousand rubles only for stones, pay the same amount to craftsmen for masonry, and 40,000 rubles for sand and cement. If you use sawdust concrete, the price of such a building will vary from 100 to 150 thousand rubles. Agree, tangible benefits.
Let’s compare sawdust concrete with other materials: the price per cube of brick will be 3 times higher than the cost of a cube of cinder block, 2 times higher than the cost of a cube of natural stone, and 1.5 times higher than the cost of a cinder block.
Sawdust concrete - application in construction
Sawdust concrete
is a building concrete consisting of sawdust, sand, water and binders - cement and lime. It is used mainly in private housing construction for the construction of load-bearing, self-supporting and non-load-bearing walls. It is used both in the form of wall sawdust blocks and for pouring monolithic structures. The presence of a large amount of sawdust in its composition gives it a number of properties close to wood, such as reduced thermal conductivity, good sound insulation, relatively low weight, and a favorable atmosphere inside the premises built from it. At the same time, unlike wood, it is not a fire hazard and does not rot.
Main stages of work
Table of characteristics of materials for wall insulation.
To ensure good thermal insulation of walls in country houses and outbuildings (bathhouses), sawdust diluted with lime is actively used. This substance acts as an excellent antiseptic and is unattractive to rodents. The prepared composition is poured onto the waterproofing layer little by little, after which it is well rolled. The result is an excellent community with high-quality thermal insulation.
The insulation of walls with sawdust is associated with their finishing with plywood or lining. Glassine is placed under them. The outside is covered with edged boards or moisture-resistant plywood. After this, a ventilation system is installed. It is done as follows: take a beam with a cross-section of 40×40 mm, which helps to create the appropriate gap. Insulation of the walls from the outside is completed by cladding with siding or block house.
The process of finishing the partitions of a house and a bathhouse with the selected raw materials should be regulated by a certain thickness of the walls, which must correspond to 15-17 cm. The thickness of the ceiling is 25 cm. As a result of such insulation, a pleasant and healthy microclimate will be maintained in the room in any season.
The area dimensions of such buildings are 35-40 sq.m. Heating the stove twice a day will help maintain a stable temperature in the room. If you live permanently in a building, the insulation of the walls should be increased slightly by changing their thickness. To do this, it is necessary to install a complementary base of boards; it is also important to fill this layer with a “warm” composition. Such a building is not afraid of the most severe frosts.
Insulation of walls with sawdust must be inextricably linked with strict adherence to fire and electrical safety standards. The chimney location points are equipped with special separation spaces, which are covered with non-combustible materials. The electrical wiring must be located on the outside, then, as a result of a short circuit, the insulation layer will not be able to catch fire. It is placed in metal cases in the form of tubes, their thickness should be more than 3 mm. The room in which the main work takes place should be thoroughly ventilated.
Pros and cons of sawdust insulation
Considering the issue of the relevance of sawdust as insulation, we note that the material is slightly inferior in popularity to other, modern types of insulation. To understand the pros and cons, at the stage of choosing a suitable insulation, we will compare the main characteristics of sawdust with the widespread mineral wool. So, choose sawdust insulation if you are looking for an organic, porous and natural product with high environmental friendliness, excellent thermal and sound insulation . According to test results and reviews from real people, insulating a frame house with sawdust can withstand 30 to 40 years of use. The material is moderately flammable.
Mineral wool, as opposed to sawdust, is inorganic in nature (however it contains organic components), fibrous, melts at 100°C, emits dust and cannot be disposed of. used as insulation for about 30 years . In their reviews, fans of mineral wool insulation cite arguments about rotting sawdust and the invasion of rodents into the space of the insulating layer. However, experienced builders say that insulating frame houses with sawdust, dried and processed using the correct technology, negates all biological impact factors. Sawdust as insulation is one of the most reasonable and useful ways to dispose of waste after working with wood.
Useful: Adding a veranda to the house
Application of sawdust concrete
Truly a popular building material, as it is the most affordable of the materials in terms of complexity of production. Perhaps people notice a wave-like interest in such materials. If previously sawdust concrete was a good option for the whole country, then with the wave of Western marketing, people, in pursuit of fashion, moved away from a reasonable framework of choice.
Only now many have begun to pay attention to the environmental friendliness and practicality of building materials, and not to what was designed for completely different climatic conditions. The following are successfully built from sawdust concrete:
Like any moderately hygroscopic material, sawdust concrete needs exterior finishing, just like aerated concrete and foam concrete.
If we consider sawdust concrete in comparison with autoclaved aerated concrete, then the water absorption of the latter is generally 200% of the mass of the block. Therefore, there is no need to be embarrassed by the presence of sawdust in the blocks. A popular insulation material that was produced in Germany at the beginning of the last century - ecowool - is generally made from what is collected from landfills.
Therefore, it is still worth figuring out what is more environmentally friendly - sawdust concrete with natural components , or ecowool with a hypercontent of bromine salts.
Enterprises in the wood waste processing business willingly make money from the sale of sawdust, so there should be no shortage of high-quality raw materials.
Sawdust concrete blocks
The finished mixture is laid out in molds and, depending on the type of mold, tamping begins. Tamping can be:
It is very important that when tamping the mixture is compacted as much as possible so that the sand in it is in contact with each other. Using a vibrating table for these purposes will not be sufficient.
equipment for the production of cinder blocks in production . Two sealing pins are quite capable of creating enough force to remove voids from the block.
The cost of one block is on average 15 rubles, which is very low for the volume of warm building material received. With a selling price of 30 rubles per block , all costs are covered.
Pros of blocks:
Minuses:
Pouring a monolith, its pros and cons
It is reasonable to pour (lay) monolithic sawdust concrete when it is possible to produce volumes of it almost without interruption in order to immediately lay the perimeter of the building under construction, taking into account the height of the formwork.
In this case, the tampers are made of timber, with a slight point at the bottom to penetrate slightly into the laid mass.
To pour sawdust concrete you will need:
The lightness of the final product allows you to easily produce and lay about two cubic meters of the mixture in one day. The costs in this case will only be for cement.
It is best to prepare slaked lime yourself from quicklime. A ton of quicklime, when purchased in bulk, costs around 5,000-7,000 rubles, and carrying out the slaking reaction is not difficult. You just need to be careful.
pros
There is no block production stage, therefore masonry work is excluded . Ease of work.
Minuses
It is impossible to quickly remove the formwork, as the strength gain is slow . Or immediately erect formwork to the entire height of the box.
Don’t pass by and be sure to check out our article on the production of charcoal, don’t forget to read the material on recycling car tires and understand the whole essence of recycling refrigerators https://rcycle.net/tehnika/bytovaya/kak-luchshe-utilizirovat-staryj-xolodilnik
Making sawdust concrete with your own hands
First of all, we need to decide what type of wood will be used. The thing is that when an alkaline medium, such as cement, reacts with sawdust, sugars are formed, which prevent rapid hardening. In this case, pine and spruce set the fastest, and larch takes the longest.
To reduce the setting time, it is necessary to reduce the amount of water-soluble substances in the sawdust by keeping them in the sun for several months or in water. You can speed up the process by treating sawdust with a solution of liquid glass or calcium chloride. The latter is mainly used for pine sawdust, but the former is much more universal and can be used with all types of wood.
This method is called mineralization, and allows the sawdust concrete to dry within a day, which will allow the blocks to be stored. Well, after a week they can be used in construction work.
The proportions depend on the strength of sawdust concrete. The higher the last material, the less water is added. You need to understand that the sawdust itself absorbs a lot of water, so when adding the latter to grades M5 and M10, about 350 liters per cubic meter is required. In the case of the durable versions M15 and M25, consumption is reduced to 250 liters for the same volume. As for other components, their consumption is usually as follows (sawdust, sand, cement, lime or clay):
The easiest way to prepare a solution is to mix all the ingredients, after which water is gradually added using a watering can with parallel mixing using the same shovel. According to one of the alternative technologies, the concrete composition is first mixed with sawdust, and then the remaining components and, if necessary, water are added. If you don’t want to do everything manually, you can purchase a mixer, but its cost exceeds 40 thousand rubles.
Important! You can check the readiness of the mixture by squeezing a fragment of it in your fist. When squeezed, water should not ooze out of the solution, but the lump itself should not crumble when you unclench your hand.
The finished mixture is usually poured into pre-prepared blocks consisting of formwork. It is better to soak the inside of it with water to make it easier to remove later. The eating itself takes place after four days. Well, drying the blocks should be done in a draft, maintaining a small distance between the building elements. The sizes of the blocks, taking into account the fact that their production is often practiced handicraft and for one’s own needs, can be very different. However, usually the thickness is not less than 140 millimeters.
You can check the strength of frozen blocks by dropping them from a height of up to a meter. The structure of the material is such that there should be no traces left on it.
Important! Previously, the use of lime was justified from an economic point of view. However, now this material has begun to cost the same as concrete, so the practice of adding it to cement mortar is gradually becoming a thing of the past. Moreover, lime increases the hardening time.
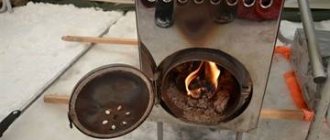
How to choose sawdust
*
It would seem that experts divide even such simple material into several varieties according to fraction size:
- small;
- average;
- large.
The middle fraction is best suited to create an insulated layer. The fine fraction creates difficulties when preparing the solution, and the large fraction has insufficient thermal insulation properties.
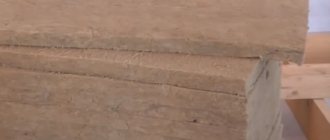
Sawdust of medium fraction
Wood sawdust is best suited for thermal insulation of the ceiling. They are obtained from already dried wood and do not require further drying. In addition, they suffer less from rot.
If sawdust is obtained from sawing wood with natural moisture, it will have to be dried. To do this, they are laid out on a flat, dry surface in a place with good ventilation. An outdoor canopy is perfect. In dry weather, sawdust is dried in several months; if it rains and air humidity is high, you will have to add another week.
If you have a choice of wood species, conifers are best. They contain a lot of resinous substances that repel insects.
An excellent choice for a bathhouse is larch. This unique tree practically does not rot. To completely avoid rotting of the insulation, 5-10% ash is added to it and left for up to six months.
If sawdust contains debris or other foreign inclusions, they should be carefully sifted through a construction sieve.
Before you start mixing the solution, you need to make sure that the following requirements are met:
- middle fraction;
- humidity below 10%;
- no mold.
The selection of high-quality source material guarantees a warm ceiling and a long service life of the insulation.