20-30% of heat is lost through the ceiling space in private homes. There are two ways to cover losses:
- put thermal insulation materials on the roof;
- insulate the ceiling, which is several times simpler and cheaper.
Therefore, homeowners most often choose the latter: insulate the ceiling. It should be remembered that the insulation requires protection from water in a vapor state: with increasing humidity it loses its thermal insulation properties, and under certain conditions it can become wet due to condensation. And this is a favorable environment for the development of mold and mildew.
Practice shows that home craftsmen either ignore vapor barriers or violate installation rules: they use the wrong type of film. To help owners carrying out repair and construction work on their own, we will tell you in detail how to properly install a vapor barrier on a reinforced concrete and wooden ceiling.
Why do you need a ceiling vapor barrier?
In modern homes there is much more moisture in a vapor state than, for example, half a century ago. Its sources are the bathroom, kitchen, indoor plants, etc.
Part of the moist air escapes through the ventilation ducts (if the natural one cannot cope, you need to install forced ventilation). But even with optimal air exchange conditions in an apartment or house there will be higher humidity than outside (with the exception of a few days when the humidity outside is about 90%). But even in this situation, due to the higher partial pressure indoors (it’s simply warmer inside an apartment or house), steam molecules will break through the structural elements of the building (floor, walls, ceiling) to the outside.
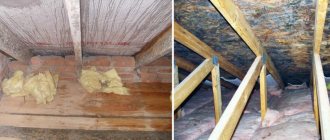
As a result, the uninsulated ceiling under a cold roof will freeze. After thermal insulation, a second problem arises: the dew point shifts into the insulation, creating a new headache (what the “dew point” is and the processes occurring inside the insulation layer are described in the article “Rules for the selection and technology of installing vapor barriers for the roof”).
Attention: for those who do not want to look at the link, let us clarify a little: vapor barrier is not needed when insulating the ceiling between the floors of a residential building and between the living and attic premises - there is no critical temperature difference that causes the formation of condensation.
Scheme of vapor barrier from inside the room.
A vapor barrier film helps prevent the accumulation of moisture in the insulation - it puts a barrier in the path of steam molecules. It allows:
- extend the life of the ceiling, especially wood;
- eliminate the problem of accumulation of vaporous moisture in the insulation, preventing the formation of condensation in the winter;
- keep the insulation dry - any material in a dry state holds heat better.
Beautiful examples in the interior
The ceiling does not necessarily have to have a perfectly smooth surface. The relief and figured ceiling looks very original and stylish. In this case, aluminum slats of similar shades were used. This ceiling is resistant to high temperatures, is not afraid of moisture and provides excellent air circulation. In addition, the design is easy to maintain and will last for several decades.
The universal and most popular ceiling color is white. Beige or cream is less commonly used. But a colored or dark ceiling also looks great in some styles
But it is important to be able to combine it with the overall style of the interior.
When choosing suspended ceilings, you need to decide which option you like best - matte or glossy. A shiny, almost mirror-like gloss finish perfectly expands the space. And matte hides the seams between the canvases as much as possible. But in some cases it is not necessary to mask the seams. This can become a kind of highlight of the interior. So, for example, a satin white ceiling with black stripes looks laconic and stylish in a modern living room interior.
The ceiling can serve as a continuation of the overall concept of the room or become a unique work of art. You can apply an unusual pattern, ornament or even photographs to the surface.
If the area of the apartment does not allow you to use and burden a small space with voluminous multi-level structures, and the interior style needs to be supplemented with figured and carved elements, pay attention to stretched fabrics with patterns. This is a great way to put a modern twist on the classics.
Suspended structures can look advantageous in many interior styles. And the loft is no exception. Hidden LED lighting above the suspended structure highlights the natural roughness and unevenness of the concrete floor and creates the effect of being in an industrial production room.
Fans of non-standard design solutions will appreciate ceilings that are unusual in shape and style. An option is considered stylish when the design of the hanging system is combined with shelves, niches, furniture or other decorative elements. For example, a non-standard solution is a ceiling that complements the design of a staircase in a country house.
You can watch a master class on installing a cassette ceiling in this video.
Types of vapor barrier films
Vapor barrier materials differ in the material from which they are made, the principle of operation and the level of vapor permeability, which must be kept in mind when choosing a vapor barrier for the ceiling.
Type of material
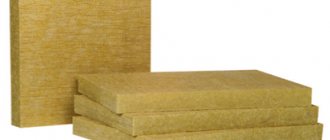
For the ceiling, you can use roll and coating (painting) vapor barrier.
Rolled vapor barrier materials. Various types of vapor barrier films are classified as roll insulators. They can be in the form:
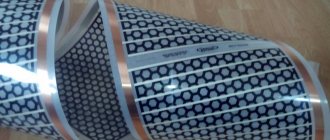
- films - do not allow steam to pass in both directions. This is a silent, although sometimes relative, vapor barrier. The vapor barrier film for the ceiling can be one-, two-, or three-layer, with or without reinforcing mesh;
- diffusion membranes that allow vapor to pass through from the side of higher partial pressure. Construction specialists and manufacturers sometimes say that these are membranes with one-way flow, which is fundamentally wrong. If you look at the material in cross-section (the diagram is shown below), you can see that vapor molecules can move in any direction. They cannot get to the insulation due to the higher vapor pressure in it. Therefore, the membrane can be laid on the ceiling on either side;
- foil films - used as reflective vapor barriers. Produced for baths, steam rooms and saunas. They are not used for residential premises - acquisition costs are disproportionate to the functions performed. Simply put, simple, cheap plastic wrap will work just as well.
Coating vapor barrier. Coating vapor barrier materials are represented by various types of mastics on a bitumen-polymer base. They can only be used outside and on concrete floors.
For a ceiling that is also a flat roof, in addition to mastic, liquid rubber is sometimes used.
Principle of operation
Vapor barrier film for ceilings can be of several types: A, B, C, D, F.
- A (some manufacturers mark it with the letters AM) - creates an insurmountable barrier to water molecules and allows steam to pass in both directions. Used to remove steam from the insulating layer;
- B is a typical representative of vapor barrier materials: does not allow steam to pass in both directions;
- C is a type of film B, only reinforced;
- D - laminated polypropylene;
- F - foil film.
Vapor tightness
Based on the level of vapor permeability, films are divided into classes:
- Class I - foil and foil films;
- Class II - vapor barriers made of propylene;
- Class III - soft material with a high coefficient of vapor permeability.
Sometimes, instead of a class, marking with the letters “SD” with a digital value of vapor permeability is used. For example, SD 50 means that in an hour, steam equal to 1 molecule of water will break through 50 m2 of film. For the ceiling, this indicator should be at the SD level of 30-40.
Benefits of use
Insulating materials, where water-repellent material is combined with foil, have many advantages, which is why they are in high demand among craftsmen. These include:
- Minimum thickness. Laying does not affect the thickness of the roof pie. If materials with anti-condensation properties are used, then it is not necessary to install a distance gap.
- Lightness. This installation will not affect the weight of the structure. Therefore, there will be no need to carry out additional actions to strengthen the foundation.
- Flexibility. Installation is easy, even if you have to lay the material on complex forms. You can easily go around concave and convex corners, various rounded surfaces.
- Environmental Safety. Vapor barrier films are made from materials that are not harmful to human health or the environment.
- Manufacturability. The sheets are easy to cut with regular scissors, or you can use a construction knife.
- Zero porosity. Vapor barrier does not absorb moisture. Long-term use, even in a damp room, will not cause the foil to rot.
- Multifunctionality. The same film can be used to protect several adjacent structures, creating a continuous sealed barrier.
Criteria for choosing a vapor barrier for a ceiling
Before going to a construction market or hypermarket to buy building materials, the buyer always mentally determines the criteria by which he is going to choose the product he needs. With regard to vapor barrier films, the following requirements are reduced to:
- to the principle of film operation. Sometimes everything comes down to the coefficient of vapor permeability, which in principle one can agree with, although this formulation of the question is not entirely correct;
- type of material;
- strength;
- durability;
- resistance against low temperatures;
- installation features;
- cost 1 m2.
In addition, an important criterion is the film manufacturer.
Operating principle. For the ceiling you need 2 types of films:
- a one-way diffusion membrane that freely allows vapor molecules to pass through and retains water molecules. It is laid on insulation only if a vapor barrier is installed on the ceiling when the attic is cold from the outside. This means that when insulating the ceiling below and in the attic, it should not be there at all (if desired, you can install it in the attic, but this is money thrown away). Indicated on the packaging by the letter “A” or “AM”;
- classic vapor barrier film (type B or C), creating a barrier to the movement of steam in both directions.
Attention: when choosing a vapor barrier for a bath, you should buy foil film (type F) or clean foil.
Type of material. Vapor barrier for the ceiling in a wooden house should only be of the roll type. For concrete floors when insulated from below - film, from above - film or mastic. Their effectiveness is approximately the same. Here you need to look at other factors, for example, price.
Strength. For a ceiling, the strength indicator is not as important as for vapor barrier of walls or roof. It is only needed during transportation and installation. After all, cheap film materials can easily be damaged during the installation process by accidentally touching them with a tool, as a result of which the integrity of the vapor barrier sheet is lost. In addition, you need to take into account this point: durable film tolerates sudden temperature fluctuations.
For suspended ceilings you can buy films marked type B, for plasterboard sheathing and vapor barrier of external insulation - type C is better suited.
Durability. The service life of the vapor barrier should match the service life of the insulation or be longer. Information of this kind is difficult to find - only on the official websites of manufacturers, and even then not always. In this case, you need to focus on the warranty period - the higher it is, the longer the film will last. In addition, you can look at consumer reviews on various forums.
Resistance to critical temperatures. Temperature parameters are important only for the diffusion membrane (type A or AM) - they must be in the range from -70oC to +90oC. When purchasing other types of film, you can ignore this criterion.
Installation features. Recently, manufacturers have begun to indicate in the instructions the types of fastening the film to the ceiling: nails with a large head, staples, glue, lath, double-sided tape. Therefore, when buying a film, you must immediately take the appropriate fasteners.
Price. For the average Russian, price is of no small importance. We need to strive for the best ratio of cost and quality. But there are pitfalls here: the price is indicated per package, and different manufacturers have different film areas. Therefore, the cost of 1 m2 will be more objective. It is not difficult to perform such calculations on your own. The area is indicated on the packaging, the cost is in the price tag.
Insulation technology
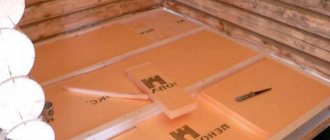
It's time to tell how reflective thermal insulation is installed on the ceiling in a private house. To install insulation on a self-adhesive base, you do not need to construct a sheathing on the base. The base needs to be well prepared - cleaned of old finishes, putty on defects and uneven surfaces. The insulation is glued to the primed surface. To do this, remove the protective film from the adhesive layer.
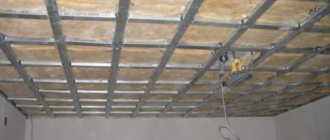
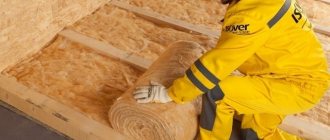
The heat insulator without an adhesive base is mounted between two battens. Moreover, the insulation is laid in two layers - the first is fixed directly to the main ceiling, after which the sheathing is mounted with other heat-insulating material embedded in its cells, and then another layer of penofol or isolon is attached to the sheathing from below. Next comes another lathing to create an air gap between the insulation and the finish. This ventilation gap will prevent condensation from accumulating.
Tools and materials
To insulate the ceiling with isolon from the inside, you will need the following tools and materials:
- perforator;
- drill;
- wooden slats for sheathing;
- wood hacksaw;
- self-tapping screws and dowels for fastening the sheathing;
- laser level;
- roulette;
- ruler;
- pencil;
- ladder;
- foil insulator (taking into account two-layer laying);
- primer;
- reinforced tape;
- putty;
- rollers and spatulas;
- solution container;
- cutter or scissors;
- stapler and staples for it.
Installation of foil insulator on the ceiling
Installation of penofol on the ceiling is carried out in the following order:
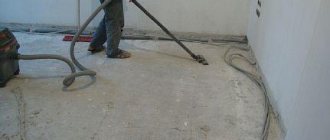
- We remove the old finish from the base ceiling, eliminate all defects with putty, and level the surface with mortar. After the putty mixture has dried, the surface is primed twice.
- We install the first layer of reflective insulator on the ceiling. For initial fixation, we use double-sided tape (if there is no self-adhesive base), then we press the covering with the lathing slats. We install the slats in increments of 500 mm. We tape all the joints of the reflective insulation with tape.
- If necessary, we place another heat-insulating material (mineral wool, foam plastic) between the slats, but you can do without it. Next, we attach strips of foil insulation to the slats. We lay the material end to end and shoot it with staplers. All joints are sealed with reinforced tape.
- We install another sheathing of wooden slats 2 cm high.
- After this, we attach the selected finishing material (plasterboard, plywood, MDF, PVC panels, lining, etc.) to the installed sheathing.
Manufacturers
There is a huge selection of films from different manufacturers on sale. At the same time, high-quality vapor barriers can be found not only in time-tested brands. This means that when choosing a little-known supplier, there is a risk of receiving material that is not of the same quality as planned.
No, not a marriage, but a combination of characteristics. The conclusion is simple: either you need to have a recommendation from acquaintances, friends or professional builders regarding an unpromoted brand, or you still need to buy a product from a well-known company.
Promoted brands include:
"Izospan" - produces polypropylene films of all types (A, B, C, D, F). Products:
- elastic;
- UV resistant;
- with a wide range of operating temperatures;
- environmentally friendly.
You can buy "Izospan" DM for 44 rubles/m2, "Izospan" C - 25 rubles/m2, "Izospan" FB - 35 rubles/m2.
"URSA SECO" (). Under the URSA SECO brand, membranes of type A and AM, films B and D are produced. These are high quality products designed to protect various structural elements of a building from steam. Effectively performs its assigned functions throughout the entire service life of the insulation.
Membranes can be purchased from 110 rubles/m2, films in the range of 11-19 rubles/m2 (depending on the density of the material).
"TechnoNIKOL". For the ceiling, a universal film is used, consisting of 3 layers, the top and bottom of which are polypropylene. Price 1 m2 - about 20 rubles.
"Axton" is a trademark of the French company Leroy Merlin. Membranes (type A) and films of types B, C and D are produced. For the ceiling you need to buy membranes (price starts from 21 rubles/m2) and film type B for 15-17 rubles/m2.
In addition, the following companies should be noted:
- "Ecolife";
- Tyvek;
- "Utah";
- "Ondytis".
Sometimes they talk about such criteria as resistance to ultraviolet radiation and the possibility of leaks under the weight of rainwater. Such characteristics have nothing to do with the ceiling.
Modern solutions
When trying to understand which vapor barrier to choose for the ceiling, one cannot ignore the innovative materials that have appeared on the market relatively recently.
To choose the right material, you need to familiarize yourself with the varieties and their characteristics.
Among them:
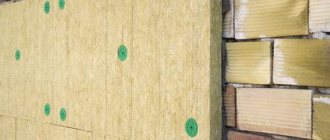
- Penotherm (isospan). This raw material contains high-quality, pre-foamed propylene foam, as well as aluminum foil. Isospan-based structures perfectly protect the room from moisture and are characterized by a long service life and reliability. At the same time, they have excellent fire resistance and do not deform even at a temperature of +150°C.
- Aluminium foil. It has a lot of operational advantages, including resistance to corrosion processes and increased reliability. However, when installing a ceiling vapor barrier based on this material, it is necessary to take into account some nuances and follow the installation rules.
Budget solutions for arranging vapor barriers are represented by ecowool, cardboard or wax-impregnated paper. When doing work, it is necessary to correctly place the layers of material: the smooth part is placed in the direction of contact with moisture, and the porous part in the direction of thermal insulation.
Video about ceiling vapor barrier:
When trying to understand which vapor barrier is best for the ceiling, it is important to take into account the installation conditions, construction features and a number of other factors. Only with this approach will the choice of raw materials be successful.
Required materials and tools
To vapor-waterproof the ceiling you need to buy:
- vapor barrier membrane type A (AM) - needed to protect the heat-insulating layer laid on top of the ceiling in a ventilated roof;
- vapor barrier film type (B);
- vapor barrier mastic for treating concrete floors outside the room (instead of film);
- double-sided tape or adhesive tape;
- polyurethane (acrylic) glue;
- fasteners: staples, nails, strips;
- construction stapler, if the film is secured with staples;
- hammer;
- roulette;
- construction knife (scissors);
- scaffolding, trestles or a strong table.
Preparatory work
The process includes three stages: waterproofing, insulation and vapor barrier. We take into account that moisture-proof structures also allow suspended moisture particles to pass through, so everything depends on the correct choice of vapor barrier components and thermal insulation.
We calculate the perimeter of the insulated area in advance - in fact we purchase the required amount of materials and fasteners. Vapor barrier in a warm room is the final stage. It is laid on the already fixed waterproofing and thermal layer.
Which side to attach the vapor barrier
Laying a vapor barrier on the ceiling causes trouble for more than one craftsman. Many of them do not know which side to attach the membrane and film. We answer: there is no difference. Absolutely, unlike the walls and roof. For pedantic owners who carry out construction and repairs with their own hands, following instructions from “A” to “Z”, we clarify:
- the membrane should always be laid with the smooth side facing the insulation, the rough side facing outwards towards the attic space;
- The film is laid with the light side facing the insulating layer, and the matte side facing the outside, into the room.
To avoid making mistakes when laying a diffusion membrane, there are several tips from experienced craftsmen:
- You need to look at the pictograms - they indicate the outside.
- The outer side of the windproof film is always with a pile, the back is smooth. Determined by the touch of the palm, tactilely.
- The manufacturer's logo is always located at the top.
- The lighter side is placed next to the insulating layer.
- The roll is rolled out on the inside.
For vapor barrier films, it makes no difference how they are laid. If there is still a small pile on it, it is better to lay it with the smooth side facing the insulation, but this is only when insulating the ceiling from below. The fleecy side on top is useless - it does not work as the technologists intended.
Step by step guide
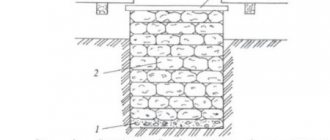
Before you start laying a vapor barrier on the rough ceiling, you need to understand what this part of the room is like. According to its purpose, a rough ceiling is a special ceiling that is installed during the construction of a building. Depending on the material of manufacture, the structure takes on a number of loads. For example, wood products differ significantly from concrete products, having their own characteristics and properties. At their base is a wooden beam.
When choosing vapor barrier materials for the ceiling, it is necessary to clearly understand what tasks and loads it will encounter.
We advise you not to neglect the installation of vapor barrier materials
And at the stage of finishing the rough ceiling, it is recommended to adhere to the following instructions:
- The vapor barrier layer is fixed directly to the beams.
- An unedged board is stuffed in compliance with a certain step.
- After this, they begin laying thermal insulation.
- Next, they arrange the floor on the second floor using boards.
- The finished structure is leveled and decorated with a decorative layer.
When arranging wooden houses, various methods of insulating the ceiling from moisture are used. The simplest one looks like this: a boardwalk is placed at the bottom of the beams, and a layer of vapor barrier is laid on top of the structure. In the second option, cranial bars are fixed to the ceiling, and a rough coating is placed on top of them. In this case, the vapor barrier can be placed in both the lower and upper parts.