When building a house, the number one task is to make a strong and reliable foundation. And so that it doesn’t feel cold, you need to make high-quality thermal insulation and finish the base. Here it is important to choose a good, but inexpensive insulation that will allow you to implement different cladding ideas.
In this article we will tell you how the foundation is insulated with penoplex - a durable insulating material in the form of slabs, we will analyze the installation technology step by step, and compare prices for this service.
Choosing a method for insulating the base
Typically one of three types is used:
- Horizontal insulation. Used for monolithic slabs, shallow-depth tape. The material is laid under the foundation. It protects well from freezing on heaving soil.
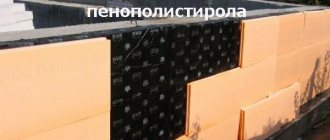
- Vertical. The insulation of the foundation is carried out from the outside - the base of the building is insulated with penoplex. The most reliable way. The slabs are attached to the base walls using special glue. When working with a base, in addition to the mixture, it is recommended to use plastic dowels.
- Insulation of the blind area. Penoplex is placed on top of the prepared pillow. After this, the concrete blind area is poured. This method will prevent deformation of the base under the influence of temperature changes.
Photo: thermal insulation of the blind area
Craftsmen recommend taking into account that when insulating with penoplex, external insulation guarantees maximum protection from the negative influence of the external environment. And it is better to do this at the stage of creating the design.
Advantages of external insulation:
- a barrier appears for groundwater and rain;
- the basement maintains a constant temperature all year round;
- the service life of the base is extended due to the fact that the concrete is protected from moisture and frost;
- resistance to temperature changes increases.
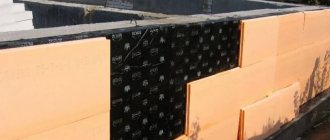
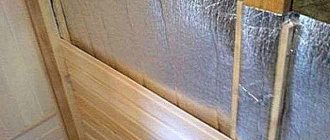
Photo: thermal insulation of the base during the construction phase
Another advantage of thermal insulation is the shift in dew point when water vapor condenses into water. In winter, when there is a difference in temperature inside and outside the room, drops of water may appear on the walls, which leads to the destruction of the finish and the appearance of mold.
By insulating the foundation from the outside, you shift the dew point towards the insulator, which maintains a constant temperature in the room and prevents condensation from forming.
Causes
It would seem that all you have to do is protect the foundation from moisture in the soil, and you can be sure that the rooms above the basement will always be warm if the heating is carried out correctly. This opinion is not always correct, because in some regions the temperature in winter can be very low. So even the thickest foundation will not save you from the penetration of cold from its side.
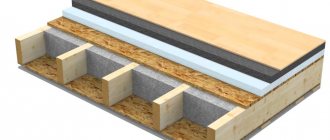
And, as the practice of construction and operation of buildings shows, it is through the floor that heat loss reaches 60%. And even if they are thermally insulated, the contact of the foundation with the walls still reduces the temperature inside the premises by up to 30% precisely through the wall surfaces. And this is one of the main reasons why it is necessary to insulate the foundation.
The second reason lies in the foundation design itself. Its lower part is located below the soil freezing level, and the upper part freezes through. At the junction of the two parts, stress increases due to different linear expansion of the concrete structure. That is, the concrete does not expand at the bottom because it is in a zone of positive temperatures, but at the top it, on the contrary, narrows. It is the border that is the most vulnerable zone, which leads to the aging of a concrete structure.
The third reason is the dew point, which, when the foundation is not insulated, is located on its inner surface, that is, on the basement side. This is where condensation forms and turns into ice. It simply gradually destroys structures.
Reason number four . Any concrete structure has its own frost resistance indicator, that is, it can withstand a certain amount of freezing and defrosting. And this figure is quite large. But you should not avoid expenses that can be used to increase this indicator or even do without it.
When talking about insulation methods using Penoplex, you need to pay attention to the fact that the surfaces adjacent to the foundation will also have to be thermally insulated. This mainly applies to walls and blind areas. Everything is simpler with walls; their thickness, included in the house design, already determines that they will not cause high heat loss.
With blind areas it is more difficult, because it is just a layer of concrete screed around the perimeter of the building. Therefore, a layer of thermal insulation will have to be laid under this structure. Typically, perlite or expanded clay 10-20 cm thick is used for this. You can also use Penoplex insulation, placing it on a waterproofing base.
External foundation insulation technology
When starting this stage of work, you need to determine the thickness of the material in accordance with the climatic conditions of the region, and clearly calculate how much of it will be needed. Let's look at each feature in more detail.
Choosing the thickness of penoplex
When arranging the foundation of a private house, it is recommended to take Penoplex 45 or Foundation. The size of the slab is 60*120 cm. The average weight of one element is from 2 to 2.5 kg. The thickness varies - from 2 to 10 cm.
When building in regions where winter temperatures reach –30 C, it is better to use slabs 10 cm thick.
Calculation of parameters
The manufacturer applies the minimum recommended thickness of slabs to the packaging for areas with different temperatures. But to be on the safe side, it’s better to do this calculation yourself. We take the following formula as a basis:
R = h1/λ1 + h2/λ2
Where
- R – regional resistance to heat transfer;
- h1 – foundation thickness indicator;
- h2 – slab thickness;
- λ1 – thermal conductivity coefficient of the material from which the base of the building is constructed;
- λ2 – thermal conductivity coefficient of penoplex.
The value of R, λ1 can be found in scientific publications. For example, for the Moscow region R is 3.2 m2 x°K/W. λ2=0.032 W/m*°K.
Our desired value is h2. The remaining data is simply substituted into the formula, and through mathematical calculations we obtain the desired result. It should always be rounded up - let there be better material with a margin.
The number of slabs is calculated based on the area being processed. The area of one penoplex element is standard - 0.72 m2.
To ensure reliable insulation, it is recommended to fasten the material in two layers, slightly shifting the slabs in a checkerboard pattern.
If you need a thickness of 10 cm, then two 5 cm slabs are placed on top of each other.
Why Penoplex?
Penoplex or, to be more correct, “Penoplex” is a Russian brand for the production of insulation from expanded polystyrene (high-density foam). For the sake of fairness, it is worth mentioning other brands, for example:
- Technoplex;
- URSA;
- Primaplex.
However, in the domestic space, the word “Penoplex” has become an eponym - a case when a proper name becomes a common noun. And, in fact, the name of this brand is now applied to many types of polystyrene. However, for the sake of fairness, in this article we will focus specifically on Penoplex insulation in the classical sense of the word. What's so good about this material?
By the way, in one of the articles we compared two brands of polystyrene: Which is better, Technoplex or Penoplex?
Do-it-yourself insulation: step-by-step instructions
Before starting work, it is worth drawing up a diagram of the base of the structure, preparing all materials and tools.
We will need:
- foam boards of the required thickness;
- adhesive solution for insulation in the form of a mixture, foam in cylinders;
- deep penetration primer;
- plastic dowels for fastening sheets to the base;
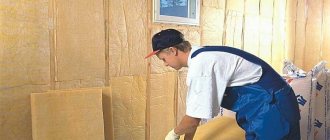
Photo: dowels for fastening penoplex - mesh for reinforcement (made of metal or polymers);
- polyurethane foam;
- perforator;
- construction mixer or drill with an attachment;
- container for mixing glue;
- knife;
- Master OK;
- rule;
- level;
- putty knife;
- brush for applying primer.
Now you can begin the construction process.
Digging a trench
- We dig out the base. To do this, dig a trench along the perimeter of the structure at a height equal to the depth of the foundation. Width – from 1 m to 1.5 m.
Photo: preparatory work - For areas with high groundwater it is necessary to make drainage. We form it under the base at the level of the sand cushion.
- At a distance of half a meter from the foundation walls, we dig a shallow trench.
- We first fill the bottom with a 5 cm layer of sand, then crushed stone.
- We lay the geotextile so that its edges protrude beyond the trench.
- We lay drainage pipes on top at a slope of 2 cm by 1 m.
- We pour a 10 cm layer of crushed stone on them.
- We wrap the edges of the fabric around the pipes.
Surface preparation
- Using a stiff brush, clean the base walls and base from dirt and concrete residues.
- Now you need to level the surface. We do this with plaster.
- To begin with, we install beacons from the very bottom of the foundation to a base height of 50 cm.
- Mix the solution thickly in a ratio of 4:1, where 4 parts sand account for 1 part cement.
- We throw the finished mixture onto the surface. As soon as the entire area is filled, we take the rule, apply it closely to the beacons and work from top to bottom, removing excess cement.
- We wait for the first layer to dry, after which we apply a second layer with a thin screed - leveling.
If there are differences of 2 cm or more on the base or foundation walls, then before plastering it is recommended to reinforce the surface with a chain-link mesh.
Waterproofing
When externally insulating the foundation of a house, it is also important to provide reliable protection from moisture. Therefore, the waterproofing material is laid in two layers: first bitumen mastic, then Technonikol sheets.
In the first case, we apply it with a roller in a small layer of up to 5 mm on all walls of the foundation and plinth, allowing time to dry.
After this, you can proceed to the second stage - attaching the sheets. We do this from the bottom up and with an overlap of 10 cm. Lightly melt the front part with a gas burner. Each element must be smoothed to release excess air from it.
It is the combination of these two materials that will prevent excess moisture from getting onto the surface of the foundation.
Installation
If you choose from methods of thermal insulation, then preference should be given to vertical.
The procedure is as follows:
- We install penoplex from bottom to top. Apply glue in 5-6 places on the inside of the slab.
- We press it against the foundation wall. Let it set for a few minutes.
- We fasten the remaining elements according to the same scheme. We connect them together according to the tongue-and-groove principle.
- We fill the gaps with foam or glue.
- We move the second layer to the side to cover the joints of the first.
When insulating the base externally, it is recommended to fasten penoplex with plastic dowels 12 cm long and 1 cm in diameter. Five pieces are enough for one slab. Fill the gaps with glue
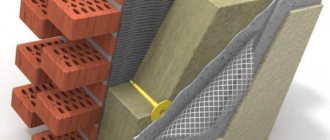
Exterior decoration
Upon completion of installation, it is recommended to plaster the surface. We fasten an overlapping fiberglass mesh to the slabs, smoothing them out so that there are no knots or irregularities. As a finishing material, you can use acrylic glue or standard cement-sand mortar.
The photo below shows an example of fastening the mesh and applying a layer of plaster.
Backfilling, creating a blind area
When insulating a bathhouse or house from a foam block, it is better to fill the trench under the building with expanded clay instead of soil. This will enhance the insulation against temperature and humidity changes. But the final step is to create a reliable blind area.
- At a depth of 20–25 cm from the top of the trench, fill in 10 cm of sand and tamp it.
- We carry out roofing felt flooring. We coat the joints with bitumen mastic and wait until it dries.
- We lay penoplex. We fill the gaps between the plates with foam.
- Under the slope we make a blind area from concrete mortar.
As for decorating the base, in addition to plaster, cladding with stone, porcelain stoneware, and siding is allowed.
What is extruded polystyrene foam
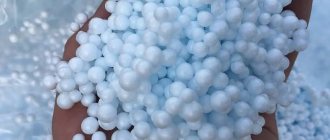
Not everyone clearly understands what polystyrene foam actually is. In general, this is nothing more than ordinary and well-known foam plastic, used in everyday practice, mainly for packaging fragile items. This is a durable, lightweight, heat-saving, biodegradable and almost insoluble material obtained by filling styrene granules with gas and then heating them.
When exposed to temperature, the granules “swell” until they occupy the entire volume available to them and sinter together.
Extruded or extruded polystyrene foam is distinguished by a special manufacturing technology. For ordinary polystyrene foam, polystyrene granules are simply heated with water vapor, while to obtain EPS, several processes are used at once: the granules are mixed and heated, a foaming agent is introduced, and then extruded under high pressure, i.e. pushed through the molding hole.
This technology provides greater uniformity and, therefore, greater strength of EPS compared to foam plastic.
Cost of services in companies in Moscow and St. Petersburg
Owners who want to insulate themselves should take into account that the price of penoplex varies significantly depending on its thickness. On average, a 20 mm slab costs 65 rubles, 50 mm – 170 rubles, 100 mm – 300 rubles.
If you trust the insulation to professionals, then the average prices in Moscow and St. Petersburg for their work are as follows:
- base primer – 30 rub/m2;
- installation of penoplex – 350 rub/m2;
- surface reinforcement – 350 rub/m2;
- finishing the base with decorative stone – 1150 rub/m2;
- plastering – 450 RUR/m2.
Although thermal insulation with polystyrene foam by craftsmen is expensive, high-quality insulation of the foundation and base will extend the service life of the foundation and will allow you to avoid spending money on its constant repairs.
Material characteristics
Several types of polystyrene are produced under this brand; we are interested in Penoplex Foundation insulation. These are slabs measuring 1200 by 600 mm. They have different thicknesses from 20 to 100 mm. We especially highlight 3 features of this material:
- Thermal conductivity - 0.030 W/(m×°K);
- Compressive strength (density) - 0.27 (2.7; 27) MPa (kgf/cm2; t/m2);
- Water absorption for 28 days is 0.5% by volume.
The table below shows more complete characteristics of Penoplex.
Types of expanded polystyrene
There are two main types of this insulation on the modern building materials market: foamed and extruded polystyrene foam. Let's take a closer look at them.
Extruded polystyrene foam
This material is also designated by the letters XPS. It should be noted that this type of coating has slightly better qualities, and therefore many people prefer to use extruded polystyrene foam to insulate the foundation. Its main advantages include:
- good ability to retain heat;
- high level of compressive strength, this indicator for this material varies within 0.25-0.5 MPa with surface deformation of 10%;
- extruded polystyrene foam has a uniform porous structure, and its pores are closed, which ensures good water-repellent function of the material;
- due to the fact that such a coating does not absorb moisture, it is not susceptible to freezing;
- Another advantage of this insulation is its durability; according to some manufacturers, the service life of the material is about 50 years.
Expanded polystyrene foam
It is also called polystyrene foam and is designated by the letters EPS. This material is also often used as insulation for foundations. Like the previous type of coating, foam plastic has a low level of thermal conductivity. Among its main advantages is its low cost, however, in terms of its qualities, EPS polystyrene foam is significantly inferior to XPS polystyrene foam. The difference between these types is as follows:
- Polystyrene foam can absorb a significant amount of water, which reduces its thermal insulation properties. Because of this, after covering the foundation it is necessary to create an additional waterproofing layer.
- The compressive strength of expanded polystyrene foam is 3 times lower than that of its extruded counterpart. In this regard, there is a need to protect the coating from soil pressure.
Taking into account the above characteristics, the technology for insulating the foundation with expanded polystyrene foam should include the following types of work:
- creating a waterproofing layer of bitumen, rolled roofing felt or any other suitable material on top of the insulation;
- erecting a brick wall around the foundation or covering the structure with profiled polyethylene membranes.
Preparatory work
Before properly insulating the base of a house with penoplex from the outside, it is also necessary to carry out preparatory work. They must be performed in the following sequence:
- Initially, it is necessary to dig a trench from the outside of the foundation along its perimeter to the full depth of the base. The width of the ditch should be comfortable for the work to be done, reaching about 1 m.
- Afterwards, you need to clean the base from soil, dirt and old waterproofing.
- Next, you need to level the surface and seal the cracks with plaster.
- At the next stage, it is necessary to open it with a primer, and after it has completely dried, apply bitumen mastic.
- Next, you need to glue roofing felt or other rolled material used as waterproofing, ensuring an overlap of at least 10 cm.
- Then a second layer of mastic should be applied.
At this stage, the preparatory activities are completed, after which the installation of insulating material can begin.
Note! Insulation should be carried out in the summer or autumn, when it is warm, there is no precipitation or sudden temperature changes, since in this case it is possible to obtain the highest quality adhesion of the thermal insulation material.
Expanded polystyrene as EPS or XPS insulation
Today, mainly two types of expanded polystyrene are used as thermal insulation: foamed (EPS) and extruded (extruded, XPS). They differ not only in production technology, but also in properties. For foundation insulation, it is preferable to use XPS. Compared to it, EPS has a higher heat transfer coefficient (less effective as a thermal insulation material), is hygroscopic, and less durable. But at the same time, foamed polystyrene foam stands out for its comparatively low price. Its shortcomings can be mitigated by installing an additional layer of waterproofing that protects the material from wet soil, as well as foundation drainage, which helps lower the groundwater level.