Thermal elements of a heated floor do not come into contact with the air they heat, so the temperature in the room is controlled by an external device - a thermostat. The amount of electricity consumption depends on its functionality. Agree, for an informed purchase it is worth understanding the characteristics and capabilities of the device.
We will tell you how to buy the most suitable thermostat for your underfloor heating. The article we have presented describes its varieties, which differ in the type of control, the type of temperature-fixing device and the method of installation. Tips are provided to make it easier to choose the optimal model.
What is a thermostat
A heated floor system involves installing heating elements under the floor covering and then connecting it to the electrical network. This is done not directly, but through a control device - a thermostat.
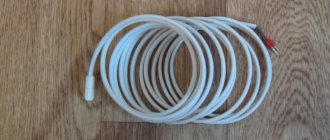
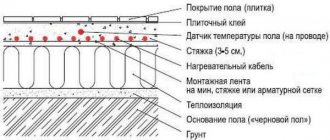
Naturally, this heating system is equipped with a temperature sensor. Installation of this device is carried out using a flexible plastic tube installed directly into the floor screed.
The latest thermostat models are equipped with a programming system, which is good news. This is quite convenient because it allows the owner to determine when to set the heating system to save mode and when to use it at full power to achieve maximum comfort, for example, after a long day when the whole family has returned home.
The price of programmable controllers is slightly higher than that of conventional models. However, thanks to the possibility of savings, the difference in price is leveled out after 1-3 seasons.
Tips for choosing devices
When purchasing a thermostat, you need to know certain nuances in order to pay only for the necessary functions and ensure the longevity of the floor heating system and the device itself.
When choosing a thermostat, you should pay attention to the quality of the plastic case. If the manufacturer saves on this, then it is worth thinking about the reliability of internal components
These selection features include the following rules:
- For heating small rooms, an inexpensive mechanical or electronic thermostat with an internal air temperature sensor is suitable.
- It makes sense to buy a programmable thermostat if you need multi-zone temperature control, as well as to save energy when there are no residents at home during the daytime.
- The thermostat must correspond to the maximum power of the heating elements with a margin of 25-30% in case of operation at reduced voltage.
- For houses with wooden interior decoration, only overhead thermostat boxes are suitable.
Also, when choosing a device, it is necessary to take into account its design.
The existing model range allows you to buy not only reliable equipment, but also a thermostat that will fit perfectly into the interior of the room.
Preparing for installation
Before installing the thermostat, you should carefully study the included instructions from the manufacturer. Particular attention should be paid to the installation section, since the installation principles of different models of regulators may differ slightly.
Remove the front cover of the regulator by slowly and carefully removing the control wheel. To do this, use a screwdriver to carefully hook the element, then unscrew the screw. If your model has latches, you can simply press them with the same screwdriver, and the panel can be removed.
Note - if you cannot remove the cover and you are going to do it by force, think twice. Most likely, you will break the fasteners, and you will have to throw away the device. Don’t rush, it’s better to study the instructions more carefully, as practice shows, this helps.
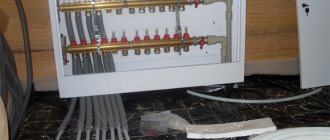
Installation of a heated floor thermostat requires the following devices:
- Corrugated tube. Often this item comes included. If for some reason your package does not provide this, you will have to purchase it additionally. It is best if the tube is 16 mm thick. To find out the required length, measure the distance from the point where the regulator is mounted to the location where the temperature sensor is installed.
- Screwdriver.
- Mounting screws.
- Mounting box.
- Building level.
- Screwdriver indicator. Necessary for phase control in the network. If desired, you can use any other similar device.
Video
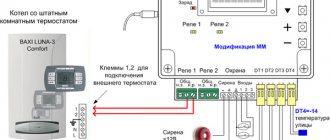
One heat controller can be installed for separate heating circuits in different rooms. It will regulate the temperature in two rooms; for this, dual-zone thermostats are used. Programmable models with remote control are capable of monitoring and managing parameters in four circuits at once.
When it is not necessary to maintain high temperatures, to save energy, lay one heating cable with a thermostat for two rooms. When choosing a heat regulator, you need to consider all its technical capabilities.
Features of installing different thermostats
When reading the manual for the purchased thermostat, do not miss the information explaining how much area the equipment can serve. If you plan to install the device in a large room, it would be best to distribute the area into several zones and install a separate thermostat in each of them. Otherwise, the regulator simply will not cope with the load, and the whole idea will be pointless.
Regulators are produced in various configurations, which to some extent determines the sequence of their installation.
Thermostats can be divided according to the following parameters:
- Construction
. On the market you can find surface-mounted and built-in devices. For the first type, it is not necessary to make a technological hole. - Control type
. The manufacturer presents temperature sensors of remote, built-in and combined types. - Functional features
. There are simple models, as well as those that support programming. Experts note that it is better when there is an advanced setting of the floor heating thermostat, because in this case the use of the floor heating system will be much more economical and efficient.
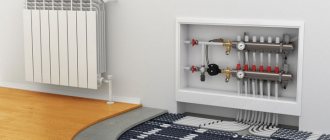
Description of the heating system
The most widespread today are warm electric floors, which can be installed with equal success in apartments in high-rise buildings or in private buildings. The use of modern technologies has made it possible not only to increase the efficiency of home heating, but also to significantly reduce utility bills.
The operating principle of such equipment is based on the property of semiconductors to emit heat when electricity passes through them. Accordingly, by decreasing or increasing the current intensity, you can effectively heat the room.
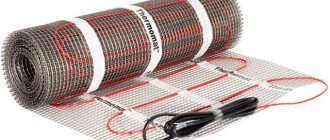
In the past, the most popular heating cables were those that ran under the floor and emitted heat as they passed through an electrical wire. Today, special infrared mats are considered advanced technology, which significantly reduce energy consumption, have high efficiency and are easy to install.
When connecting a heated floor yourself, you need to be careful, any mistake can lead to failures
Some useful information about electrical wires
Inside the box you need to insert several wires with different insulation colors. According to the standards, zero is blue, and phase is black. The ground wire is painted in two colors - yellow and green.
To determine the phase, you should use an indicator screwdriver. In addition, at the time of preparation, before installing the floor heating regulator, you should check the voltage in the network. Ideally, it is as close to 220 volts as possible.
Next you will need to cut the main heating cable and the power cable. To do this, it is best to use a sharp knife or special nippers. You need to cut it so that the cables protrude from the mounting box by about 50 mm. Next, the wires are stripped.
If the model provides screwless cable fastening, then the stripping length is determined based on the recommendations indicated on the device body. Be careful not to let the stripped cables touch each other. It is best to connect the ground wire to the heating cable braid by soldering or a terminal.
After this, the power cable is connected to the mounted thermostat. Instructions on how to install a thermostat for a heated floor are indicated by the manufacturer either on the body or in the manual. The instructions may vary slightly between similar models, so the diagram must be studied in each individual case individually.
Connect the wire with the phase and secure it to the desired contact in the device; it is usually marked with the letter L. The terminal for the neutral wire is marked N. However, you should be careful, as there are types of systems in which the N terminal is intended for connecting the main heating cable. This nuance needs to be studied separately with special care.
Next, you need to connect the temperature sensor to the terminals marked sensor. As mentioned earlier, it is located inside a corrugated tube. If the sensor is not initially located in the tube, then you will need to place it there yourself.
Types of heating cables:
- A two-core heating cable hides two current-carrying conductors under its protective insulation. This type of cable is considered more convenient than its single-core version, because it is connected to the thermostat only at one end. In such a cable there are 3 wires nearby, two of which are conductive and one is grounding.
- A single-core cable has only one conductive wire, usually white.
Connection - how to install it yourself
When connecting, consider the following nuances:
- The sensor should be located at a height of 30 cm according to the manufacturers' recommendations.
- If the flooring will be laid in a room with high humidity, then it is worth moving the regulator outside the room.
- The heated floor control element is connected in the order shown in the diagram.
Installation and configuration of the temperature sensor
Connection is carried out in two ways:
- Directly, when the heating cable is combined with a thermostat.
- Using a junction box, when a separate cable from the regulator is laid to it, and then a cable to the heating element.
Installation steps:
- The wire with the temperature sensor is inserted into the corrugated tube. The end is closed with a plug to protect the device from external factors. For example, the construction mixture that will be used upon completion of the work.
- The sensor is fixed between two heating circuits. A special tape is used for fastening. The device is installed at an average distance of 50 cm from the wall.
Do not install the sensor near a heating device or fireplace to avoid possible errors in the device’s performance.
- A regulator is placed in a specially created groove, and the tube is led to the floor.
- After laying the accompanying wires, the groove is sealed with cement.
- They are trying to tin the electrical wires.
- Then they are connected to the regulator, which is then installed in a special place above the groove with the wires.
- To check the functionality of the heated floor, the system is connected for literally one minute.
- If everything is installed correctly, the signal light on the thermostat panel will light up and the heating process will begin.
A temperature sensor is a necessary element for regulating the temperature in a heated floor system. It made it possible to save energy. A favorable microclimate is created in each individual room. The financial investment quickly pays off, so it is worth purchasing a temperature sensor, even if it is not included in the kit.
Safety precautions
Any work on the installation of electrical equipment must be carried out in compliance with basic safety regulations. Failure to comply with these can lead to disastrous consequences.
The basic rules include the following:
- Before carrying out work, make sure that the entire room, or a separate room in which the sensor is installed, is de-energized;
- Do not start a device that is in a disassembled state;
- operation of the regulator implies a temperature range from -5 to 40 °C;
- carry out timely cleaning of the thermostat from dust;
- The device must be cleaned with products that do not contain solvent or benzene;
- carry out repairs only if you are 100% confident in your abilities, and you will need to figure out how to remove the heated floor thermostat;
- Make sure that the system power does not exceed the permissible limits provided by the thermostat manufacturer.
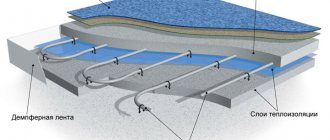
Adjusting the heated floor temperature
Scheme for adjusting the temperature in the system using a servo drive.
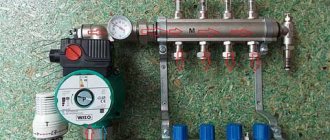
The simplest adjustment option is with manual taps. A slightly more comfortable option is automatic thermostats with sensors and servos, but only with the additional installation of a restart valve and switching unit. In addition, there are other ways to regulate the heating of floor water systems:
- change in coolant flow;
- change in coolant temperature.
The second method is used especially often and involves the installation of a three-way valve, which is entrusted with the function of controlling the mixing unit. The relay output of the temperature sensor is connected to the solenoid of the electric shut-off device: at the slightest excess of the temperature of the value set in advance, the valve opens, causing the cooled water to mix with the incoming liquid, reducing the heat capacity.
Regulator installation sequence
The process can be divided into a number of successive steps. If you follow them, all work will be completed without any nuances.
There are 5 such stages:
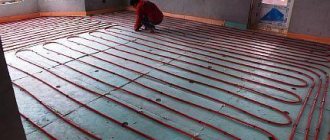
- Make a hole at the place where the device is mounted - a hammer drill or impact drill is best for this. The dimensions of this device should make it possible to install the box. In addition, create channels for laying cables and installing the sensor. Install the installation box into the finished hole.
- Now you can lay the wires. The heating system power cables should be connected to the box, and also connect the temperature sensor wires.
- Install the thermostat. It's quite simple, you just need to secure the device in the box.
- Now you need to connect the main parts of the system. This stage requires a special approach and compliance with the instructions supplied by the manufacturer, because in each specific model the sequence may differ slightly.
- Replace the front panel, securing it with the mounting screws included in the kit. Using a building level, you need to check that the regulator has been installed strictly level. Then you can close the lid and turn on the power. If you did everything correctly, the thermostat screen will turn on and the underfloor heating indicator will light up. After this, you can begin setting up the controller.
According to expert advice, it is possible to put the heated floor system into permanent operation only after 3-4 weeks have passed after pouring the screed and laying the floor covering, namely tiles. If you turn on the heating system ahead of schedule, the screed may spread and the floor covering will become unusable.
The owner must only measure the resistance between the heating elements with a special tool and compare them with the recommended values provided by the manufacturer. If everything is satisfactory, then you just need to wait for the screed to completely harden. Only after this the finished heating system, equipped with a thermostat and temperature sensor, can be put into constant operation.
Types and principles of operation
Thermostats of different heating mechanisms have different automatic control mechanisms.
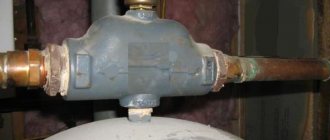
For water floors:
- Two way valve.
- Three-way valve.
Types of thermostats:
Digital. The operating feature is similar to an electronic-mechanical thermostat. A distinctive feature is the ability to set the temperature regime in the electric sensor. The electric mechanism is equipped with a touch panel where information is displayed.
Electronic-mechanical. It is a device whose operating principle is similar to the operation of an iron. Temperature regulation occurs by rotating the wheel. Turning it in one direction increases the temperature, turning it in the other direction decreases it. It is possible to determine the temperature regime only by your own intuition. The only advantage of such a thermostat is its low price and ease of installation.
Programmable. This type of device demonstrates a smart electrical mechanism. Able to turn off and on the heating system at a given temperature. It is also possible to turn on the device at a set time. All temperature modes are shown on the control panel.
Depending on the number of control channels, the thermostat is:
- Two-zone, which operates simultaneously in two areas of the heating system.
- Single-channel – processing of a special signal from one sensor.
By mounting method:
- Internal (built-in).
- External (remote, overhead).
At the moment, many varieties of heated floors with heating elements are produced, the most common among them are:
Resistive cable. There are two-core and single-core.
Cable with self-adjusting function.
Thermomat (represents a two-layer canvas, inside of which heating mechanisms are sealed).
Film (infrared). The basic basis for such heating is carbon and carbon rods.