Infrared heated floors are an excellent alternative to water and cable systems. They run on electricity, and spending on it is the main disadvantage of these designs. Although it is worth saying that in comparison with cable-type electric floors, the costs are significantly lower.
The level of costs associated with the operation of film floors is affected by the area of the heated room and the power of the device - find out how to select the power of different types of floor heating (water, electric). Therefore, it is important to correctly calculate the performance of an infrared floor for a specific area.
In addition, there are methods that can reduce energy costs - high-quality thermal insulation of the room and installation of the correct thermostat with a special program.
Consumption using thermostats
Installing a thermostat allows you to reduce the energy consumption of infrared floors by approximately 30 - 40%. In its absence, the surface will heat up excessively, which will reduce the comfort of the floors.
The main function of the thermostat is to monitor the heating level of the surface of the finished floors, and, if necessary, turn off and on the power supply.
Thermostats can be mechanical - designed to operate on floors no more than 12 hours a day, or automatic. On automatic devices, it is possible to install a program to control heating modes, and also use them to control the device.
The principle of operation of the thermostat is simple - when the device detects changes in temperature indicators, it turns off the power supply or resumes it when the heating degree drops below the set level.
Ways to reduce electricity consumption
To reduce the energy consumption of infrared heated floors, a number of points should be taken into account when constructing the system.
How much does a heated floor consume? Electricity consumption of a heated floor. Caleo
Power selection
To ensure a comfortable temperature level in the apartment, a film with parameters of 150 W/m2 is required. It is possible to lay a product whose power is 220 W - if the floor is the main source of heat.
It is recommended to lay infrared floors only in places where heating is required. In this case, it is necessary to strictly adhere to the installation rules. The film should cover about 70% of the total area.
For information! In country houses, on the first floors and balconies, a continuous carbon film with a special layer that protects against moisture is needed.
Insulation of the room
Thermal insulation of the room plays a big role in saving resources, that is, reducing heat loss. If the room is poorly insulated, then heat will escape through the cracks. And in order to maintain the required temperature level, the floor heating cycles will be longer, thereby increasing electricity costs.
Good thermal insulation of not only the floor, but also the walls and ceiling will help to avoid heat loss, since about 20% of the heat escapes through them. It is better to insulate the ceiling with basalt wool in two layers, and the walls with the laying of heat-insulating material and the construction of additional brickwork.
To prevent heat loss through the floors, in addition to laying thermal insulation material, an additional layer of concrete screed would be a good option. Foamed polyethylene with a reflective layer is suitable as floor insulation.
For your information! The presence of a metallized reflective layer allows you to save up to 40% of electricity, since it directs heat upward and does not allow it to escape through the ceilings in the floor.
And taking into account the fact that electricity tariffs are quite high today, this will significantly save the family budget from unnecessary expenses.
Doors and windows
Doors and windows must be installed and closed tightly to prevent warm air from escaping through them.
If these conditions are not met, then half the heat will be blown out, and the device will have to work longer, which will lead to additional costs.
Using programmable thermostats
By installing a programmable thermostat in each room, you can significantly reduce the energy consumption of film heated floors. Since its presence allows you to adjust the temperature taking into account the purpose and characteristics of the room, as well as the time of year.
Unlike a conventional device, where the thermostat turns off when the required temperature is reached and turns on when the floor is cooled, a programmable one can make adjustments according to a set time, or completely turn off the heating. Using a programmable thermostat saves up to 30% electricity.
Space zoning
Zoning the space will allow you to reduce electricity consumption, especially if you have programmable thermostats and install the alternating heating function on them. In addition, there is no need to place the film under heavy furniture - this is money down the drain.
Flooring
Since infrared film is thin, it can be installed under any floor covering.
When choosing a flooring product for a warm film floor, you need to take into account that different coatings have different degrees of thermal insulation. The level of thermal conductivity affects the power of the device that is required for a given “pie”.
Disabling the system and preventing it from working unnecessarily
An additional way to reduce energy costs is to turn off the system when the house is unoccupied. But this option is only suitable if the film floor acts as an additional heat source.
If the device is the main heating system, then turning it off is not advisable, since the room will cool down, and heating it again will take approximately the same amount of energy that you will save by turning it off.
For your information! Reducing the room heating level by just 1 degree will reduce costs by 5%.
If you follow these rules, you can significantly reduce your power costs, without affecting the comfort in your home.
Correct temperature
To achieve maximum comfort levels, we recommend maintaining the following floor surface temperatures:
- Linoleum 26-28 °C
- Ceramic tiles/concrete floor 26-28 °C
- Laminate 23-27 °C
The maximum floor temperature can be limited by a thermostat.
If you do not know the maximum permissible surface temperature for your flooring material, please contact the manufacturer.
Important! Wood is a good thermal insulation material.
Power consumption per 1 m2 depending on coverage
As mentioned above, the power of the device is influenced by the thermal conductivity of the floor covering, that is, different products require their own level of heating. If linoleum or PVC boards are laid, then it is enough to use a floor with a low power not exceeding 100 - 130 W/m2.
If the room has wooden floors, then the power of a heated film floor per 1 m2 increases in proportion to the thickness of the boards, since wood has a low degree of thermal conductivity.
It is not recommended to lay infrared floors under tiles, because the glue or screed does not come into sufficient contact with the base, which will lead to cracks on the surface.
Installation and useful tips
The surface of the base is leveled with specialized compounds. Unevenness or sudden changes can damage certain areas.
Leveling the surface of the base screed
If the base is made of boards, it is recommended to level the horizon using fiberboard or plywood. In case of strong differences, the surface is planed entirely with electric jointers, or the places of the highest differences are planed with hand tools.
- Thermal film;
- Connecting wire;
- Connection terminals;
- Insulating material.
Complete set of required materials
One of the options for the external design of the thermostat
Depending on the floor covering, other components are selected.
Let's calculate the electricity consumption for one room
To calculate how much electricity an infrared heated floor consumes, you need to start from its modification and purpose - the device will be the main or additional source of heating.
The average consumption ranges from 150 to 220 W, if the film is the main heat source, then 150 - 200 W/m2, if additional - from 100 to 160. In this case, the calculated consumption is 2.5 W per hour, but the actual value is much less . This indicator can be reduced by installing a special control device. With its help, individual zones of the room are heated one by one, thereby reducing the power of the film floor by 3 times.
The energy cost indicator varies from:
- type of system - main or additional;
- floor power;
- outside air temperature;
- degree of insulation of the room;
- presence of a thermostat;
- correct installation;
- number of windows.
Therefore, it is not possible to 100% accurately calculate how much electricity a film heated floor consumes.
Example of calculating energy consumption
Power calculation for heated floors
Before you begin the calculation, you need to calculate the area of the room, determine the desired temperature, and calculate the heat loss coefficient, which is multiplied by the power of a square meter.
Let's calculate the electricity consumption using the example of a room with a total area of 60 m2. Excluding furniture, the size of the room will be 40 m2.
Heat loss from 60 m2 will be equal to 30 watts per m2, or 0.03 kW.
0.03 x 60 = 1.8 kW per hour - this is how much energy is lost per hour.
To compensate for these losses and create a comfortable atmosphere in the room, more energy will be required by 0.2 kW, that is, 2 kW. A film floor without a thermostat should have this power.
If you are planning a floor with a thermostat, then the power of 1 square meter should be 2000/40 = 50 W/m2.
When installing a programmable thermostat, a more powerful film is required - 80 W/m2. With this device, the floor will work 2 times less. Despite this, the apartment will have a comfortable temperature and low electricity consumption. Instead of 1.8, only 0.8 kW/hour.
That is, 0.8 x 24 = 19 kW, and per month the energy consumption of a film heated floor will be about 600 kW. This is the case if the infrared floor is the main source of heating.
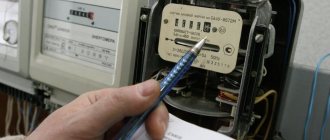
To determine costs in monetary terms, you need to use a simple formula - multiply 600 kW by the cost of 1 kW.
For your information! Experts recommend calculating the power consumption of an infrared floor with a margin. The size of this reserve is influenced by the type of room and climatic conditions.
IR film floors: design, advantages and disadvantages
The mechanism of action of IR thermal film can be considered using the example of the construction of carbon strips grouped into sections.
Carbon paste is sealed in polyester or polypropylene film. Electricity is supplied to the carbon fiber via conductive copper and silver buses located at the edges of the film. When current passes through the carbon strip, heat is released.
Sections can be cut along dividing strips. Typically the width of the rolls is from 0.5 to 1 meter. The film is available in different thicknesses. Minimum - 0.2 mm, maximum - 2 mm.
The characteristics of film heated floors make it possible to combine it with almost all floor coverings. It is enough to roll out a plastic film for insulation, and you can lay parquet, laminate, or lay tiles on top using adhesive for heated floors.
IR floors are ideal for wood floors. The wood heats up evenly, which means it does not deform or crack.
Experts have different opinions when it comes to the possibility of laying IR film under cement screed or tile adhesive. Most masters claim that it will collapse. Rather, the question here is about the different quality of the film.
If you need to roll out carpet on top, then the construction “sandwich” will look like this: IR film, plastic film, plywood, or any other rigid sheet material, carpet.
As for linoleum, the design will look the same, but you need to take into account the manufacturer's recommendations. Not all linoleum is suitable for heated floors, as there is a high risk of deformation.
Which heated floors are the most economical in energy consumption?
There are the following types of underfloor heating: water and electric, the latter in turn are divided into cable and infrared.
Water ones are connected to central heating (if permission is available) or to a specially equipped boiler. The water in the boiler is heated by electricity - in this case it is quite expensive, or the power source is gas - this is the cheapest way.
If we compare electrical systems in terms of energy consumption, it looks like this.
| Warm floor type | Energy efficiency level | Energy saving |
| Cable, in which the heating element is a cable | 68% | 58% |
| Infrared - film with carbon plates | 82% | 87% |
Based on this table, we can conclude that infrared electric floors are the most economical in terms of electricity consumption. The film heats up quickly and retains heat for a long time. In this case, heat is not wasted on heating the air, but is transferred directly to objects and people.
For your information! Any heating system intensively consumes energy only at the first stage of heating; subsequently, it spends the resource only on maintaining a given temperature level, so the consumption will be small.
It is worth saying that in addition to saving electrical energy, the infrared design ionizes the air and eliminates unpleasant odors. In addition, the film floor does not dry out the air and does not affect its humidity.
If you correctly calculate the power of the infrared floor and heat loss, and also install a thermostat, then you can easily achieve the necessary comfortable conditions in the apartment. At the same time, the system will be economical, and operating costs will not be significant.
Features of different types of infrared floors
The production of infrared floors is constantly being improved. Manufacturers are trying to take into account consumer preferences. According to the type of construction, IR floors are:
- film;
- rod-shaped.
Film, in turn, are divided into solid and striped, according to the type of carbon fiber applied, which is the source of infrared radiation. The film with continuous carbon fiber coating is easy to install and easy to cut. It transfers heat from the entire area, the heating dynamics are higher than when applying carbon in strips.
The carbon strips are arranged in groups, between which cuts can be made. Since the connection to the power source is parallel, if any unit fails, the remaining area of the “stripe IR film” will remain operational.
In this case, a film with a continuous coating is more advanced, since only the places where there is a tear or a cut fail. The service life and price of solid carbon film are higher than that of striped film.
The IR rod floor looks like a rope ladder. Many rods, which are filled with carbon, copper and silver, are connected to each other by wires. The rod mat has the ability to self-regulate. Its installation differs from the film type in that installation requires a “wet” cement screed. However, the service life is even higher than that of solid film, and it is not afraid of heavy mechanical loads.
Important points you need to know about IR film floors
With many undeniable advantages of IR film floors, there are also some negative aspects that need to be taken into account. For example, they are afraid of overheating. Therefore, they cannot be laid where you plan to install furniture that does not have legs. The space above the floor should be left at least 3 cm. You should not be afraid of this, because the free area that remains for installation will be quite enough. In addition, the design capabilities of the equipment allow, if necessary, to disconnect from the power supply the area of the floor that does not need to be heated.
The second drawback is the still fairly high price of the heating material. This is partly compensated by the fact that for IR film floors there is no need to make an expensive and labor-intensive cement screed.
Manufacturers pay attention to observing the correct procedure for connecting the carbon film to the power source, as well as proper insulation with special adhesive plates. Consumables for assembly - electrical wiring and contact clamps - are included in the kit.
The following warning applies to any heating structures that require electricity to operate. The base for the heating element must be clean and completely dry.
Connection of power wires
The connection of the cut supply wires into a single system is carried out using a VVGng installation wire, connecting sleeves in a heat-shrinkable tube and insulating material (heat-shrinkable tubes or bitumen strips), which come complete with the core floor.
The wires are fastened together using sleeves in a heat-shrinkable tube and heat-shrinkable tubes as follows:
- remove the insulation from the cut wire by about 1 cm;
- put a sleeve in a heat-shrinkable tube onto the wire;
- crimp the sleeve with pliers;
- put a heat-shrinkable casing on the installation wire;
- insert the bare end of the mounting wire into the sleeve on the other side and crimp it with pliers;
- use a construction hairdryer to heat the sleeve until it shrinks completely;
- check the strength of the connection by tugging lightly;
- slide the heat-shrinkable casing onto the sleeve;
- shrink the cambric using a hair dryer.
Sometimes, instead of heat-shrinkable casing, bitumen strips are used, and instead of sleeves in a heat-shrinkable tube, metal clips/contacts are used.
After assembling all the contacts, the IR rod floor is connected to the thermostat. A temperature sensor is also connected to it, which manufacturers recommend installing inside the corrugated hose, hidden in the grooved recess of the screed. This is done to access the sensor if it needs to be replaced.
After a positive test, construction of the flooring begins.
The procedure for performing installation work
The first step is to lay insulating tape made of any suitable material (for example, polystyrene foam) around the perimeter of the room. This measure will prevent heat loss.
Thermal insulation material is laid out on the subfloor, which has been previously cleared of debris, with the foil facing up. This is a very important point: the foil will help the heat move upward and thereby improve the quality of heating.
Thermal insulation - in rolls or plates, attached to the floor with staples of a mounting gun, double-sided tape or glue.
Then roll out the IR thermal film, always with the copper strip down. The matte side of the film should be at the top. In this case, it is necessary to exclude the accumulation of air.
In the necessary places, the roll is cut according to the applied markings. The width of the infrared heated floor can be different; it is enough to cover about 80 percent of the heated area.
It is advisable to turn the heating elements of the film with their contacts in the direction where the thermostat will be. The strips are laid out tightly, at a distance of 10 mm, but in no case overlap.
The next stage is the parallel connection of the strips using a cable. A contact is made on the copper strip, which plays the role of a current-carrying strip, with one part under the core and the other at the top. Then you need to crimp the contact with pliers. Do this for all sections. They should be laid towards the thermostat. The remaining open areas of the copper conductor are covered with special bitumen insulating tape.
When all the contacts are connected, the insulators are installed, the IR film must be attached with tape to the heat insulator. Scotch tape is also used to connect strips together. The contact clamps are hidden in recesses cut to size in the insulating material.
Last stage: finishing coat
Plastic film is spread under tiles, laminate or parquet on top of infrared floors. This will protect the heating elements from possible moisture and mechanical damage when installing the finished floor. When using laminate, you can get by with an underlay.
For tiles, glue and grout intended for heated floors are used.
The solid base under the carpet must be carefully attached to the floor with self-tapping screws. Sometimes dowels are used. It is important to be careful not to snag the electrically conductive strips.
Before laying the finishing floor, you need to make sure that it is compatible with the IR heating film and once again check the functionality of the temperature sensor.
If necessary, IR heat sources can be mounted not only on the floor. They produce models for walls and also ceilings.
What consequences can result from errors during the installation of ETP?
The most common mistakes in self-installation of ETP include:
Purchasing extra materials. This happens when a person takes into account the total area of the room. It is necessary to take into account only the one that serves as the basis for the heated floor. The floor, which is occupied by furniture and heavy household appliances, is not taken into account. Do not cut the cable in the heating mat
It is important to plan the installation so that the entire mat is used. It is better to leave a small part of the floor uncovered. It is forbidden to turn on the floor with a screed until it is completely dry.
This will cause uneven drying, the formation of voids and cracks. The cable must not be laid without first leveling and cleaning the subfloor. It is recommended to treat the base with a primer to prevent dust from settling and the formation of air pockets around the perimeter of the chamber. This contributes to its severe overheating. The temperature sensor is installed in the corrugation in order to have access to it for repair and replacement. An important step before starting operation is measuring the resistance. If any abnormalities are found, it is recommended to contact a professional to correct the problem. To carry out rearrangement of furniture or repairs in the future, you should save the ETP masonry diagram. To do this, just take a photo of the floor before pouring cement.
Possible installation errors
Heating element power
Above we examined only the standard electric “warm floor”, but today, as we know, there are several main types of this system, including:
- film floor (aka infrared);
- heating cable;
- thermomats.
Let's start with the film coating. It is used mainly where the heating system is installed under linoleum or laminate. But it is more advisable to install a cable with mats only under ceramic tiles. Each of the mentioned types has its own characteristics, parameters, and power. Now we will briefly take a look at all this.
The electricity consumption of the heating elements mentioned above is as follows:
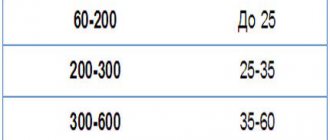
- thermomats - if you are wondering how much electricity a warm floor of this type consumes, it is on average 120-200 watts per square meter (parameters taken from the technical characteristics of the product and Davy);
- for a film floor this figure is 150-400 watts per square meter;
- finally, for a heating cable it is only 10-600 watts (often about 30) per square meter; correctly, about five turns of heating cable are laid on each meter of area, so that the total power reaches 150 watts.
As you can see, the average power of the system ranges from 110-200 watts per square meter, thanks to which the “warm floor” can be used as a source of both main and auxiliary heating of the room. Video footage of the consumption is shown below.
Calculation formulas
Let's move on to the main question - how to calculate a warm floor with an electric heating element. But here everything is very simple. To determine the power of your system, simply multiply the power of one m2 by the area it will occupy.
The cable length is usually already measured in the kit for the specified power parameters and coverage area. The recommended distance between cable turns is from 5 to 20 cm. If you want to be more precise, use the following formula: h=S*100/L. As you probably guessed, h is the pitch width, S is the area, and L is the total length of the cable.
To make the calculation process even easier for yourself, you can use a special calculator for electric heated floors. Just fill in all the required fields, and the program itself will perform the necessary calculations and give you the final result.
Warm electric floor calculator
Whatever method you use, remember that it is better to spend more time at the design and calculation stage than to later spend time and money correcting mistakes. And your reward for this will be comfort and favorable weather in your home.