Buying expensive equipment for organizing heating in a rarely visited country house, bathhouse or small house is not always advisable. It is especially unreasonable if the country property is not constantly supervised and a security alarm is not installed. What to do if heating is still required from time to time?
A homemade gas boiler, assembled from scrap materials or used household units, can handle heating quite successfully. A device made with your own hands can become the pride of the owner. Building a gas-powered structure will show off your craftsmanship.
The article we have proposed describes in detail the steps for assembling and modernizing gas units that can adequately heat private buildings. We have given as examples the most popular, practice-tested homemade options. Our advice will ensure home craftsmen success in a difficult task.
Advantages and disadvantages of gas heating
Gas is one of the cheapest types of fuel. This is why gas boilers are still the most popular. The advantages of this method of heating a room include the following facts:
- high efficiency;
- easy to use;
- environmental Safety;
- relative cheapness of fuel;
- long-term operation (20–40 years).
Gas heating also has its disadvantages. In particular:
- the equipment must have a license issued by the gas service. Without such a document, the unit cannot be operated;
- the boiler must be installed in a separate room, which is not always possible;
- there is a need for a chimney;
- connection to the electrical network is required;
- If the gas boiler is handled incorrectly, a fire may occur.
But all these additional difficulties are fully justified by the savings that gas provides compared to other types of fuel. It is less profitable to heat a room in any other way: firewood and coal are needed in large quantities, liquid fuel (gasoline, kerosene) is too expensive, and electric heating elements have a lower efficiency, and the cost of thermal energy is much higher.
.
A gas boiler is considered the most economical heating device
Other options
A homemade boiler can come in two more variants, when the unit is obtained by remaking a gas water heater or stove. This can significantly save on installation costs.
Based on a gas water heater
The alteration involves replacing the nozzle or block responsible for gas combustion if a liquefied mixture is used. You will need to purchase an atmospheric burner that fits the combustion chamber. The ignition is mounted inside it.
To connect a fan burner, you will need to purchase an additional heating circuit. It consists of a security system unit, an expansion tank and pump, an air vent and a Mayevsky valve. This type of burner is more expensive, since it will also require a pressure gauge, an automatic air bleeder and a coaxial chimney.
Conversion from a gas stove
It is almost impossible to make such a boiler. There is only one available way: install a metal container with coolant on the burner, which will heat up and then move through the pipes to the batteries. The volume of the tank depends entirely on the power of the stove. It does not exceed 100-150 liters.
The return pipe is welded from below, and the direct supply is connected from above. Hot water rises and moves to the radiators. The cold liquid returns through the lower pipe.
Such a homemade device does not require a safety valve and an air vent, since excess water in the form of steam bubbles will escape through a loosely closed tank lid.
You can install a gas boiler yourself. You just need to follow the exact instructions and remember safety precautions. Before connecting, you must remember to obtain permission from Gorgaz.
About the types of gas boilers
Depending on the number of heating circuits, boilers are:
- single-circuit (they perform only one function - they heat water or pipes in the room);
- double-circuit (perform two functions - they heat hot water and pipes in the house).
According to the method of removing combustion products, equipment is divided into the following types:
- with natural draft (air flow comes from the street). You can install such a boiler in a small house or barn;
- with supply draft (a complex system that requires a chimney and a closed combustion chamber).
According to the type of ignition, gas heaters are divided:
- electric (the boiler starts working immediately when plugged into the network);
- with a piezoelectric element (you need to ignite the equipment yourself).
According to the mounting method, boilers are divided into:
- wall;
- floor
The floor-standing gas boiler is placed on the floor; it does not require additional fastening
According to the method of adjustment, the equipment can be:
- single-stage (has only one - full power level);
- two-stage (has two power levels - weak and strong).
The gas boiler can be designed to connect to:
- main gas (enters the house through a pipeline);
- bottled gas (supplied in liquefied form in cylinders of various sizes).
Boilers are made from:
- steel (the most common and effective material);
- cast iron (such boilers can be very heavy, but retain heat for a long time);
- copper (inexpensive units that cool very quickly).
Budget wood-burning autoclave
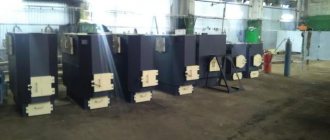
Nowadays, one of the popular and cheapest types of boilers for making at home is solid fuel. They are made for cottages or private homes.
But how to make a wood-burning boiler yourself?
You should start by preparing the necessary elements. First of all, take a thick-walled tube with the height of the heating chamber and weld the bolt.
Next, from a sheet of metal, make a circle slightly larger than the cross-section of the pipe. Then drill a slot in it for the required bolt. Connect the tube and screw and tighten the nut tightly.
At the same time, not forgetting that the air duct can be easily covered with metal, so that it is possible to change the size of the connector and adjust the combustion power of the fuel.
The second stage is the manufacture of the body. The top of the gas cylinder is removed and a cylinder of metal sheets is attached. A 15 cm pipe is attached to the side - this is a chimney.
At another stage, a disk is made that dissipates heat. Cut out a smaller circle from sheet metal and attach a handle to the body. Then you need to combine the boiler and casing. At the last stage, steel legs are welded for better air circulation.
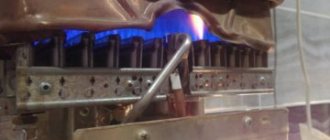
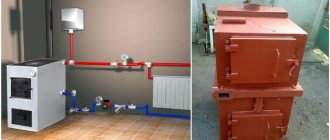
The principle of operation of a gas boiler
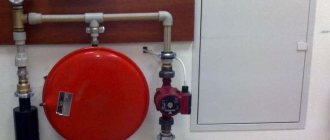
Structurally, a gas boiler consists of the following elements:
- gas burner;
- heat exchanger;
- pump;
- expansion tank;
- automation;
- fan;
- security systems;
- thermometer;
- pressure gauge;
- gas valve;
- air vent.
A gas boiler consists of many elements. Each of them is very important for the smooth operation of the unit.
When the device is plugged in, the gas burner lights up. It heats the heat exchanger, which contains water, oil or antifreeze (depending on how the house is heated). The pump creates operating pressure, under the influence of which the coolant constantly circulates through the pipes and transfers heat into the room through the surface of the radiator. Next, the cooled coolant is drained back into the boiler. This is how a gas heating system works in general terms.
Skirting radiators
This is a newfangled option when small radiators are installed around the perimeter of the apartment, at the level of the baseboard and disguised as worthless.
The main disadvantage will be this very plinth, it is wider and higher than ordinary plinths, and therefore there will be a small side around the perimeter of the room, which will not allow the bedside table or bed to be pushed completely against the wall. Agree, it’s very inconvenient when all the objects in the room stand 3-5 centimeters from the walls.
The advantage will be a more uniform heat distribution compared to radiator batteries. There will be no warm or cold corners in the rooms and it will be more pleasant to be in such a house.
Getting ready to create a boiler: useful little things
Creating a gas boiler is a slow and very responsible process. If you do not have at least basic skills in working with welding equipment, then it is not advisable to start the process. The parts of the unit are connected to each other by welding. If you don’t have a welding machine or don’t know how to interact with it, then it’s better to buy a gas boiler in a specialized store. But if you have set yourself the goal of creating your own gas heater, then you need to know:
- without the permission of the gas service, connecting a homemade boiler to the main line supplying natural gas to your home is prohibited;
- to obtain permission, you will have to call specialist analysts to your home or take the boiler to the service in person;
- if you install a boiler without permission, this may lead to a gas leak, fire or explosion;
- When performing welding work, do not forget about your own safety: put on protective gloves on your hands, a special mask on your eyes, and work clothes on your body;
- Buy elements for the boiler in a specialized store, and not from hand. All units must have certificates and passports;
- do everything strictly according to the drawings;
- Before starting work, prepare the necessary equipment, materials, and tools.
How to increase efficiency
Under no circumstances should safety precautions be neglected. If you decide to save on something, you can lose much more. For example, you should not connect a gas pipe to the basement or ground floor.
You shouldn’t skimp on automation either. Otherwise, the system may overheat, causing a rupture in the pipeline. Lack of water circulation can lead to an accident. Therefore, automation must provide control over the operation of the pump, filter, and thermostat.
You can save on the coolant supplied to the batteries without losing temperature. To do this, you need to insulate the walls and windows by sealing the cracks. Savings are calculated at the assembly stage, and not when the device is ready for use, because after the last soldering nothing can be changed.
Drawings and calculations
To weld the boiler, use ready-made drawings. In this case, there is no need to reinvent the wheel. Use already proven methods and techniques. There are not as many of them as it seems.
To build, use a drawing of a gas boiler with dimensions and design features
In order for the boiler to create warmth and comfort in the house, it is necessary to accurately calculate its volume. The simplest method of calculation is based on the assumption that for every 10 square meters of area, 1 kW of energy is required. Another 10 percent is added to the result obtained to create a small margin to ensure more comfortable operation of the boiler. For example: for a house with an area of 80 square meters, 8 kW of energy is needed per hour. Another 800 W in reserve, for a total of 8.8 kW in 60 minutes. A little more than 211 kW will be consumed per day.
But kilowatts are not volume.
To calculate it, you need to take into account that the calorific value of gas is 6.55 kW - this number is constant, it was calculated scientifically and experimentally, so it is taken as a basis.
To calculate how much boiler volume is needed to heat a particular house, you need to divide the amount of energy consumed by the boiler per day by its calorific value. Returning to our example, we get: 211/6.55=32.2. This means that a house with an area of 80 m2 requires a boiler with a volume of 33 liters (rounded up).
What do you need?
There are a lot of instructions on how to make a boiler for heating using different types of fuel: solid, liquid, electricity and others.
But not many people decide to build such a structure using gas. The main problem is that the installation will need to be connected only after approval from the relevant authorities. But first things first. So, first you need to understand that you can use such a heating unit only at your own peril and risk; responsibility for the consequences, which can be disastrous, falls entirely on the shoulders of the home owner.
After realizing this, you need to find suitable drawings. It is advisable that they contain detailed information about heating boilers, connections, cooling, chimney, deflector and other important points. The master must understand such documentation in full, because even one change will adversely affect operation in the future. It is advisable to see several photos of finished systems. This will help “assemble the unit in your head.”
After this, you need to calculate the amount of all materials for the heating boiler. It is necessary to understand that in no case should you replace the specified metal with another to reduce the cost of the structure, because it may turn out to be soft, which will quickly render the installation unusable. Then purchase blanks, as well as already assembled individual components (buttons, deflector, taps, etc.).
It is also important to have your own tool, which is needed for joining metal sheets, cutting them and grinding them. You also need to have a soldering iron, a set of screwdrivers and wrenches, hammers and all sorts of other tools that allow you to work with metal and electrical circuits.
We make a UPS and connect the voltage stabilizer of the gas boiler
UPS is an uninterruptible power supply. It is needed to ensure that the equipment continues to work when the power is turned off. And the stabilizer will protect the boiler from overloads during frequent power surges in the network.
An uninterruptible power supply can be purchased at the store. But if you do it yourself, it will be cheaper
Stores sell a variety of uninterruptible power supplies and stabilizers. They are not cheap. You can try to make an uninterrupted unit yourself. It is impossible to make a stabilizer yourself. The rules for choosing it are:
- For a 220-volt network, choose a single-phase stabilizer; for a 380-volt network, choose a two-phase one.
- Power - from 20 to 40 kW depending on the volume of the boiler.
- The stabilizer can be installed on the floor or mounted on a wall - this does not affect its operation.
Focus on the following technical characteristics of the stabilizer:
- type - electronic or relay;
- response time - a few milliseconds;
- input voltage range - from 140 to 260 volts;
- operating temperature range - from +5 to +40 0C.
The stabilizer is mounted next to the boiler in a dry place where access to water is excluded. It should not be overheated or frozen.
A stabilizer for a gas boiler will help maintain the voltage in the network at the level required for the heater to operate
Video: why do you need a voltage stabilizer for a gas boiler
How to assemble an uninterruptible power supply with your own hands
To produce a UPS you need:
- current converter (220 volts). It is needed so that a voltage of 220 volts is supplied to the boiler from the battery;
- battery (helium batteries have proven themselves well);
- charger (minimum 15 amps).
The instructions for assembling the UPS look like this:
- The converter is connected to the battery using wires with a cross-section of 4 millimeters, observing polarity.
Usually there are “+” and “-” indicators at the connection points (sometimes the polarity is indicated by different colors of the wires). The positive from the converter must go to the positive from the battery. The same goes for the negative wire. The converter is connected to the battery using two wires. Their cross-section must be at least 4 millimeters - The boiler is connected to the converter via a socket. It is already included in the kit; there is no need to install anything additional. Thus, three parts of one system - the boiler, the converter and the battery - are connected to each other.
- When the battery is discharged, a charger is connected to it.
The converter is connected to the battery using wires, connecting plus to plus, and minus to minus.
Such a unit will not operate automatically. You will have to turn it on yourself when the electricity suddenly goes out.
Video: making a UPS with your own hands
Assembling a heater with a heating element
To make a homemade electric heating boiler with a tubular electric heater, you will need the following set of materials:
- steel sheet more than 2 mm thick;
- a piece of steel pipe (length and diameter depend on the performance of the unit);
- three-phase heating elements (it is not recommended to use heaters with a built-in relay, as they wear out quickly).
First, you need to cut out the future bottom of the boiler from a steel sheet. The dimensions of the bottom must correspond to the diameter of the pipe. Then, from the same metal, you need to make a flange - a ring, whose internal diameter is equal to the outer or inner diameter of the pipe, depending on how the part is planned to be fixed to the body. The ring width is usually 30 mm.
Next, a cover with a diameter corresponding to the outer diameter of the flange is made from a steel sheet. The cover and flange are connected using 6 bolts; holes are made in advance in the places where the fasteners are installed. Several more holes are drilled in the lid - their size must correspond to the size of the heating elements planned for installation.
Welding elements
The bottom needs to be welded to the boiler body first, the flange next. The cover is mounted only after the tubular heaters are firmly fixed to it. A sealing gasket made of water-resistant material is inserted between the heating elements and the lid.
Between the cover and the flange there is another gasket made from a car inner tube. This gasket must be an exact copy of the flange, including holes for the bolts.
Installation of pipes
Before closing the boiler with a lid, pipes for connecting the heating system pipes are installed in its body, having previously cut out suitable holes
It is important that there are threads at the ends of the pipes: this is required for installing inlet valves, which will allow you to shut off the coolant circulation in the circuit if repairs are required. The pipe for discharging hot liquid is located at the top of the unit; it is advisable to build it directly into the lid
The cooled coolant is supplied through a pipe from below.
When the pipes are installed, the boiler is completely assembled and connected to the network. Sometimes its design may change: for example, not only the lid, but also the bottom is mounted on the flange. The device is universal and can be easily adapted to the technical parameters of the home heating system.
Electric installation work
During electrical installation work, the contacts of all boiler heating elements are connected to the block, and the neutral wire is connected to it. Sometimes heating elements immediately short to this wire without using a block.
A phase wire passed through a circuit breaker is connected to the contact of each heater. The cable cross-section is selected based on the load created by all the heating elements turned on simultaneously.
All wires must be insulated, special attention must be paid to ensure that their exposed parts do not come into contact with the metal lid of the boiler
The nuances of placing the finished structure
You can place a gas boiler:
- inside the house;
- outside the house;
- in the garage.
Each accommodation option has its own characteristics and nuances.
Accommodation inside the house
To place the unit inside the house, you need to allocate a separate room for it. The boiler room has the following requirements:
- area - at least 5 square meters;
- dry warm place;
- low humidity levels;
- free human access to the boiler;
- natural or forced ventilation system;
- Electricity must be supplied to the room, and an outlet must be located next to the boiler. Modern sockets provide grounding. There is no need to create additional grounding.
Inside the house, the gas boiler is installed in a separate room
Placing the boiler outside the house
Of course, it is impossible to install a gas boiler directly on the street. A special room is being built for it:
- area - at least 5 m2;
- the temperature inside is not lower than +5 0C all year round;
- Availability of electricity, grounded socket.
The pipes from the boiler to the house must be insulated so that during its “journey” the coolant from the boiler to the house does not lose its temperature.
If it is not possible to place the boiler in the house, a separate closed room is built for it
Placing the boiler in the garage
If it is not possible to arrange a separate room inside the garage to house the boiler, then consider another place to install the equipment. The fact is that the garage is a place of increased concentration of automobile gases. If a gas unit is also running inside, the concentration of carbon dioxide in the room will exceed all permissible standards. It will be dangerous for a person to be inside.
If there is a gas leak in the garage, spontaneous combustion is possible, since there is gasoline and oil in the immediate vicinity. It's better not to take risks.
If you cannot equip a special room inside the garage, follow the rules for placing the unit inside the house.
What's next?
It must be said right away that there are a number of requirements for a gas boiler. For example, it is necessary to have a special exhaust gas outlet with a deflector on top. In addition, everything must be perfectly connected. In other words, it is prohibited at the legislative level to use heating systems operating on this type of fuel without the necessary checks and obtaining the appropriate documentation. Therefore, before installing a self-made gas boiler, you must definitely call a specialist who deals with the above.
The fact is that such equipment belongs to devices that have an increased danger. And for a self-made boiler, you must obtain permission for installation from a gas service. And she, in turn, needs to provide a certificate for the product, moreover, the original, not a copy or photo.
You need to understand that getting such paper is not easy, and most often it costs a large sum of money. In addition, a minimal deviation from all prescribed standards leads to a complete ban on the use of homemade installations. This is a strong argument in favor of the fact that making a gas boiler with your own hands can only be done by a person who has extensive experience in installing and servicing such units. This refers to the complete set and assembly of the system from individual components, each of which is manufactured in compliance with GOST, and the use of hand-made parts is reduced to a minimum and is permissible only in non-critical areas.
We recommend: Multifunctional double-glazed window: what is it, the difference with energy-saving, reviews
When all issues with the relevant services have been settled, the boiler can be installed. Unfortunately, there are rare cases when homeowners manage to do this without the approval of technical supervision authorities, which is a gross violation of the law and is fraught with unpredictable consequences.
Boiler grounding
The boiler must be grounded. To do this, you will need a ready-made grounding loop from the store. It is located near the garage underground at a depth of about a meter. A steel strip is led from the grounding loop to the boiler. It is covered with a plastic box. For reliability, it is better to solder the joints of the steel strip with the boiler and the circuit.
Grounding a gas boiler is the key to its reliable and safe operation. It is necessary to do it
Insulation of the house
The degree of insulation of a house or apartment is of significant importance in saving gas. If the building is not insulated, and the doors and windows are ventilated, a significant part of the heat will go outside. The material of the walls of the house also matters. For example, wood and block transmit heat faster than double brickwork.
Good insulation of the ceiling, floor and walls will save a lot of fuel. It is advisable to replace old frames with energy-efficient double-glazed windows, and wooden doors with a more airtight modern analogue. A well-insulated building will save up to 30% on gas.
Particular attention should be paid to insulating the attic and basement, since a lot of heat also escapes through them.
Note! To increase the energy efficiency of your home, you can install reflective screens made of aluminum foil between the radiator and the wall; they will allow you to return some of the heat to the room.
Safety regulations
Always follow safety precautions when using wood burning stoves
Never leave stoves burning for a long time without control, do not forget to clean the ash chamber in a timely manner and add firewood to the firebox. Pay attention to the chimney channel valves. keep them in the open position until you start to light the stove. Use only in the cold season; it is not advisable to use it in summer. Significant overheating can lead to breakdown, and then the stove will have to be repaired
and seriously. High temperatures can cause destruction of the furnace walls. That is why you should avoid excessively high temperatures and using the unit in the warm season
Significant overheating can lead to breakdown, and then the stove will have to be repaired. and seriously. High temperatures can cause destruction of the furnace walls. That is why you should avoid excessively high temperatures and using the unit in the warm season.
We build it with our own hands
If your oven is brick. then you can also build a water boiler for it with your own hands, and the oven itself can also be made of bricks. As a water heater for it, you can take a simple cast iron radiator. A similar model can be found when dismantling old five-story “Khrushchev” buildings, if they are being demolished in your city.
Each radiator has a capacity of about one and a half liters. When twelve of these radiators are connected to each other, you will end up with a powerful 18-liter heater with an area of three square meters. However, such a scale is not suitable for all premises, but for heating a large Russian bath this will be one of the most acceptable options.
Before you install the structure itself, disassemble the radiators. they should then be thoroughly cleaned. To remove all contaminants on them, make a hot solution based on six percent hydrochloric acid and rinse the radiators with it, then rinse them with cold water. Now we change the intersection gaskets, since the temperature can be more than six hundred degrees. At this temperature, the cardboard will not be able to withstand the impact, which will cause the radiator to leak. Therefore, as a gasket, take an asbestos cord, having previously soaked it with drying oil.
Now we install the boiler in a brick oven. and it's not as difficult as it might seem at first glance. But there are some points that are worth special mention. Firstly, the water boiler pipe for the brick kiln should be equipped with a large diameter seamless pipe, this will distribute the water as efficiently as possible. Secondly, under no circumstances should pipes be soldered end-to-end to prevent the appearance of defects that could cause the boiler to subsequently leak.
You should also chamfer the edges of the pipes; before cooking, make sure that the rings are located about 5 cm apart from each other. Often, a boiler in a brick stove can leak heavily; if this suddenly happens, clean the leaking areas with a grinder and wash them.
Generally
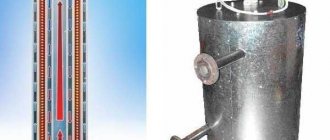
All homemade heating boilers are based on the same principle. The burning fuel will give off heat to the heat exchanger, and it will heat the coolant. How a heating boiler will operate is influenced by two main important factors - the design of the heat exchanger and the completeness of fuel combustion. In the first case, the larger the area of thermal contact between the firebox and the container with the coolant, the more heat will be transferred per unit time. In the case of complete combustion of fuel, if the influx of oxygen is insignificant, then pyrolysis gas will leave along with the combustion products. And it can give off heat during combustion.
Homemade heating boiler
Manufacturing instructions
When starting the production process, you need to start by preparing all the essentials:
- Pipes with the following diameters - 30 cm, 5-6 cm, 10 cm (the wall thickness of each is at least 3 mm)
- Steel sheet with a thickness of more than 4 mm
- Bulgarian
- Welding machine
- Hand tools
It is recommended to place the boiler on a level, hard surface. If such an installation will be installed at home in a boiler room, you should think about arranging the foundation, a few words about which will be said later.
Let's start making the boiler:
- Take a pipe suitable for its characteristics and cut off a piece from 70 to 100 cm. A short length will not allow you to load a sufficient amount of firewood, a large length will make loading extremely inconvenient
- Now you need to build a distributor. In order for it to move freely, its diameter is made 15-25 mm smaller than the main pipe
In the center of the circle you need to drill a hole with a diameter of 15 mm - air will flow through it into the combustion chamber. To ensure that the disk does not fit tightly to the panels and there is space for air circulation, it is necessary to weld an impeller to its inner side - several plates up to 5 cm high
A pipe with a diameter of 5-6 cm is welded in the center of the regulator, while its height is made 10-15 cm larger than the boiler. As mentioned earlier, it is recommended to make a damper at the top, which will allow you to adjust the draft at any time, thereby controlling the smoldering process. A door is cut out at the bottom with a grinder, through which ash will be removed
Also, the bottom is securely welded at the bottom of the boiler. At the top it is necessary to run a horizontal chimney pipe with a diameter of 8-10 cm and a length of no more than 40 cm (this is what is passed inside the heat exchanger)
The finishing touch of the design is the boiler lid, in which a hole is cut for the air intake pipe. It should lock the camera as tightly as possible
A good alternative to firewood is heating briquettes - see our review
Chimney and reflector
The walls of the boiler will constantly heat up and radiate thermal energy. If the installation is installed to heat a small room, reflectors should be placed around it - they will distribute the flow, increasing the heat flow inside.
If the oven will be located in a room where people are constantly present, you should think about their safety. One solution to the problem is to cover the structure with brickwork.
The chimney can be made from a 20 mm pipe. The horizontal straight section should be 5-10 cm larger than the diameter of the combustion chamber. It is necessary to take it outside with a minimum number of bends - 2 x 45 degrees.
A few other features:
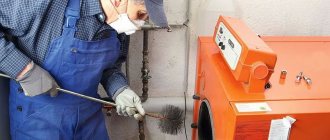
- It is recommended to make the chimney collapsible so that it can be easily cleaned of soot 2-3 times a season
- The chimney sections must be connected in the direction opposite to the gas movement
- All structures and objects that are easily flammable must be kept at a safe distance
We are building the foundation
It can be assumed that a long-burning wood-burning stove will constantly heat up to high temperatures. A simple leveled floor is not the best solution for it - a foundation should be built.
The base can be made of burnt brick or rubble. They do not heat up when exposed to elevated temperatures. All those who want to make a more solid foundation can pour a solid monolithic slab.
The boiler can also be installed on legs, which can be easily welded from channel wood. They hide from view behind brickwork.
Using the boiler
Unlike a classic stove, air must enter a long-burning wood-burning boiler in a certain quantity. To achieve this, the filling must be done in full, trying not to leave any free cavities. It is recommended to add sawdust, pellets, peat or combustible waste to the logs.
Fuel must be added according to the following instructions:
- Remove the cap and remove the regulator from the tank
- Pack the fuel tightly
- Spray flammable liquid on top
- Install the regulator, cover with the lid and open the damper
- Throw a splinter into the air pipe and when it starts to smolder, close the damper
Let's sum it up
A simple long-burning wood-burning boiler is ready. You can install such a structure in any unheated room: from a small garage to a workshop. If everything was done correctly, there will be no doubt about the efficiency and high efficiency.