A small brick stove for a wood-burning cottage is an excellent solution for small buildings that are visited periodically. Compact heaters take up little space, but at the same time perform a lot of useful functions. A small brick stove for a summer cottage can heat a room, dry clothes and shoes, and be used for cooking and heating food. Improved models heat water in quantities sufficient for washing dishes and performing hygiene procedures. The products are absolutely safe, strong and durable. It’s not difficult to make a small stove at the dacha with your own hands from brick, but there are a number of nuances, knowledge and consideration of which is a condition for achieving a high-quality result.
Materials for building a brick stove
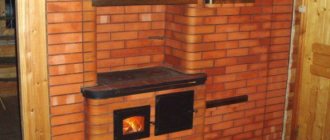
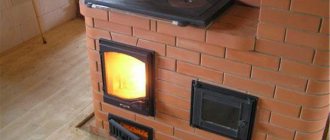
A brick stove is an important accent in the interior of a room.
The use of brick is considered a classic, since this material has all the necessary qualities - strength, heat capacity, resistance to dampness and temperature changes. Not every type of block can be used for laying a hearth.
To make a firebox, it is allowed to use only fireclay bricks designed for heating up to 2000 degrees. Used stones do not have the most presentable appearance, but the quality is not inferior to new products. Red clay bricks are quite suitable for laying the body and chimney. It is inexpensive and there will be no problems finding it.
A mixture of clay and sand is used as a binding solution for the firebox and with the addition of cement for parts of the fireplace that are not heated above 50 degrees.
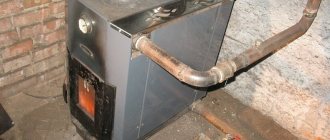
A brick stove for a summer residence is equipped with quite a large number of metal parts.
For assembly you will need:
- fireproof wire;
- firebox cast iron doors;
- doors for cleaning smoke ducts;
- grate;
- cooking floor with rings;
- steel sheet for a water heating tank;
- handles and latches.
If you plan to make a niche for the fireplace, you will need tempered glass, preferably tinted.
Possible options for brick fireplaces
Fireplaces are quite varied. Several directions can be distinguished according to fuel, firebox and installation.
Depending on the type of fuel, the fireplace can be wood-burning, gas-powered, powered from the mains, or consume biofuel.
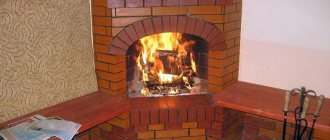
Wood-burning structures can be traditional (made of brick or stone, mainly with an open firebox) or cast iron (steel). Such fireplaces require careful design considerations, especially regarding the chimney.
On the Internet you can find many DIY brick fireplace designs for your home.
- Gas fireplaces use natural gas (from a public main or liquefied).
- Electric fireplaces are considered the cheapest and simplest, but in general they are only an imitation of a live fire.
- Biofireplaces run on special vegetable fuel, they are smokeless, do not smoke and do not need a chimney.
Also, structures can be with an open firebox (but at the same time with low efficiency, because the main heat goes into the pipe) and a closed type (the flame can be observed through glass).
In addition, indoor fireplaces can be:
- Built-in - designed and constructed together with the walls of the house during construction or major repairs;
- Wall-mounted – suitable for installation in any room;
- Island - they can be installed anywhere in the room, away from all walls;
- Corner.
The built-in corner fireplace is very practical and convenient in small spaces and has a compact size.
A big plus is that it is located in the corner of the room, so warm air moves evenly throughout the room. As a rule, such designs are well decorated, and they fit organically into the interior - this is clearly seen in the example of projects for large brick fireplaces.
A well-designed structure can decorate a room. The downside is the expensive finishing material.
Types of furnace designs
Stove with Firebox
Stone fireplaces for the home vary in several design features that characterize their functionality and performance.
Regarding the design of furnaces, the following classification has been adopted:
- For heating. Initially designed to heat a room, in most cases they also serve as a decorative element. Smooth walls are decorated with tiles, clinker or tiles.
- With hob. In addition to heating, such devices make it possible to cook in warmth and comfort, and not in a drafty summer kitchen. The downside is that the fireplace quickly cools down through the stove, without realizing its potential heat capacity.
- Combined models. The structures have a complex design and several tiers of options, which include an oven, fireplace, stove, and heating screens on the floors above. A water heating tank is provided.
- Multifunctional ovens. In addition to a variety of cooking and heating devices, they are complemented by sun loungers, niches and shelves. Two or more fireboxes are made with separate blowers, ash pits and chimneys.
When designing a heating structure, permanent and temporary systems, direct-flow, channel and bell-type, indoor and outdoor systems are selected.
Which stove is suitable for a garden house?
First we need to decide what function the hearth will perform for the garden house:
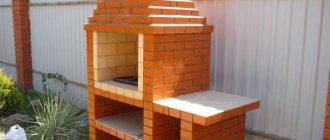
- If you are at the dacha only in the summer, and you only need it for cooking, a hob type stove is suitable for you. Its design does not provide heating. The combustion chamber, equipped with a chimney and an ash pan, is lined or made of brick, and a metal plate lies on top.
- Heating stoves are used by summer residents when they simply need heating, and have an electric stove for cooking. The design of such a stove is simple; it consists of a combustion chamber, an ash pan where ash is collected and a chimney. These also include fireplace stoves, with the help of which dacha owners try not only to heat their living spaces, but also to create country comfort. The efficiency of heat transfer of such structures depends on the thickness and origin of the material and the method of laying. Laying one brick allows you to heat the furnace walls up to 600 degrees; those laid out in this pattern are called Dutch ovens. Stoves can have different shapes, it all depends on the area of the room, the interior and the desires of the owners.
- In our country, the most popular is the heating and cooking stove; its design is more complex and consists of a combustion chamber, chimney, ash pan, hob and oven. To build such a stove you need a lot of space, but thanks to it, the house will be warmer, and a delicious dinner, simmered on the stove by a skillful housewife, is guaranteed. Such a stove has many accessories; it can be equipped with a drying chamber, a stove bench, and a tank for heating water can be placed in the structure. This stove option is the most multifunctional.
Construction of a stove for a summer residence and its features
The most popular foundation for a stove is monolithic.
The design of a compact wood-burning stove is not fundamentally different from its larger analogues.
The products consist of the following parts:
- Foundation. Serves to impart stability to the structure during operation.
- Body (body). Designed to accommodate objects that determine the performance, safety and functionality of the product.
- Smoke channels. They are made for more efficient use and distribution of thermal energy released during fuel combustion.
- Firebox. A compartment designed to hold fuel. Equipped with a grate and a hole for smoke exhaust.
- Chimney. Serves to remove combustion products from the furnace and create the necessary draft.
- Blower. A hole for the intake of air necessary for the combustion of logs. Combined with a container for collecting ash.
All other options are derivative and complement the basic design.
Smoke circulation options for brick stoves
The efficiency of a wood-burning stove largely depends on the type of its chimney. Properly organized movement of smoke gases allows you to retain heat and effectively remove fuel combustion products without endangering the health of the occupants of the house.
This design could be:
- with horizontal channels;
- with vertical channels;
- combined.
Based on the direction of movement of flue gases, stoves with smoke circulation are divided into direct-flow and counter-flow. In the second option, the smoke, before flying out into the chimney, makes several revolutions inside one of the smoke chambers. At this time he is moving in two different directions.
The horizontal channel system is not used often. It heats the oven more evenly, but for each horizontal level you will have to make a cleaning door. A modification of such a chimney can be an option with pockets. These cavities will trap smoke for some time and increase the efficiency of the stove.
A horizontal chimney is simple to implement and less susceptible to blowing out than its vertical counterpart. The addition of pockets will make the oven more efficient
Vertical channel . The operating principle of such a chimney was described above as a characteristic feature of a “Dutch” stove. In such a system, less soot accumulates and is easier to clean.
But here the resistance to the movement of the smoke flow increases, so it is necessary to make such a chimney long enough to ensure normal draft. In the vertical version, the first channel warms up more than the others.
In order for the vertical smoke circulation structure to heat up more evenly, it is advisable to expand its central channel, a counterflow is formed here, as a result the room receives more heat
This temperature difference can cause damage to the masonry. To improve the situation, you can arrange a cross-flow option, in which the middle channel is made much wider than the outer ones. The cross section here will be larger, this will slow down the flow rate and make heating more uniform.
A bell-type stove is an alternative to a design with vertical and horizontal smoke circulations. Instead of channels, there is a spacious cavity in which smoke accumulates and, after cooling, moves down and leaves through the chimney. Even after complete combustion of the fuel, the gases in the bell continue to give off heat.
The chimney bell system allows you to retain more heat for a long time. A similar effect can be achieved by creating combined structures using various elements.
Unlike a vertical smoke circulation system, there is no danger of the gases quickly blowing out and the stove cooling down. The dimensions and configuration of the cap may vary.
When designing a stove, you can combine hoods with vertical chimney elements to obtain an effective design and increase efficiency.
Varieties of orders
Arranging a stove with a hob
Beginning craftsmen can use one of the well-proven projects for small hearths:
- With single burner hob. Done literally within one business day. The body rises to a height of 80 cm, a slab is placed on top, a grate is inserted inside, and a steel pipe is led out into the street through the wall.
- For heating adjacent rooms. The fireplace is equipped with a register with pipes, a radiator and an expansion tank. The circulation of the liquid is carried out due to the difference in the mass of the heated and cold media.
- With a shield and a low trestle bed. A heating device in which the generated thermal energy is almost completely used. From the firebox, smoke enters the channels under the sunbed, and only then heats the chimney shield located on the second floor.
The choice of order should be made immediately, since dismantling and remodeling a brick kiln is a very complex undertaking.
Video description
The video will help you understand how to install one of the options for a small brick stove for a country house:
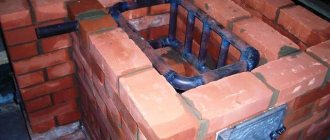
- On the 16th row, a continuous masonry is made above the cooking chamber and the smoke exhaust channel continues to be laid out.
- When installing the 17th row, a door is installed through which the chimney will be cleaned.
- During the laying out of the 18th row, the final fastening of the door is performed to clean the chimney.
- The laying of rows 19-22 is carried out according to the scheme depending on the selected furnace design.
- When installing rows 23-27, a wind niche is created. At the same stage, the oven itself is installed. It is first wrapped with asbestos rope. It allows you to improve the accumulation of thermal energy.
- When laying the 28th row, a second cleaning door is installed.
- During the laying of the 29th row, a chimney valve is installed.
- On the 30th row, the previously selected pattern is laid out.
- When installing 31 rows, a second chimney valve is placed.
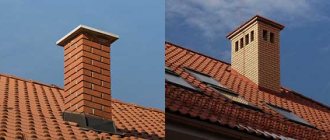
Finally, the 32nd row is laid out, which serves as the basis for the chimney. Usually it is also mounted from brick. However, some homeowners choose to install a metal chimney.
Calculation of basic parameters
The calculations are based on the boiler drawing and the order diagram. There is an easier way to determine the need for bricks. First, the volume of the body and one block is calculated, then the number of units is obtained. After this, a reduction factor of 0.8 is applied to heating structures or 0.65 to cooking structures.
If the chimney is also laid out, it takes 56 pieces per linear meter of height. Clay needs 30 kg, and cement 70 kg per 100 pieces.
Metal parts are purchased in accordance with the project in size and quantity.
Tips to help you at work
If you decide to do the assembly yourself, we recommend taking the following useful tips as a basis to help you organize and carry out the work:
- Brick fireplace stoves for summer cottages must have the same thickness of seams in all areas (4-6 millimeters);
- The evenness of the first row is checked both using a standard level and in a diagonal direction;
- Before you start laying the next row, additionally check the evenness of the previous one. To do this, use a protractor. The horizontal is checked using a building level, and the vertical is checked using a plumb line;
- If you plan to install a hob, to better fix it and protect the brick from constant overheating, apply a large layer of fresh clay mixture (about 5-7 millimeters) to it;
- In order for the heating unit to have good draft, the device is equipped with a summer operation. Thus, the removal of gases and all decomposition products will be carried out in a short way;
- A stove with a fireplace for a brick cottage should be laid out starting from the corner in each row;
- The joints of the previous row must be covered with bricks of the next one;
- The cross-section of the chimney and smoke collector always have the same diameter and shape.
Small shelves are suitable for drying berries, fruits, plants, and also have a decorative function
Brick stoves can be equipped with a purchased metal or cast iron hearth
In order to increase efficiency and heating speed, the design can be equipped with several hearths
For a detailed visual acquaintance with the preparatory stage of work and useful recommendations for the construction and selection of a brick fireplace for your summer cottage, you can also watch the video in this article.
Required materials and tools
Tools for bricklaying
For work you will need:
- Bulgarian;
- hand drill;
- roulette;
- shovel;
- tamping;
- mallet;
- Master OK;
- stepladder, if the structure is higher than 150 cm;
- protective equipment - glasses, helmet, respirator, gloves.
Materials must be purchased in accordance with design calculations, paying attention to their quality. You should take 10-15% more bricks than needed, adjusted for battle and mistakes.
Beginning of furnace installation
Before starting work, in addition to all measurements, you must have drawings of the stove, which will be installed by yourself.
The basis for the stove should be the wall of the room in which the stove will be located. Each row of bricks must be leveled with a building level.Two doors are installed: one small one is for removing ash, and the other large one is for putting firewood.
The wall of the stove that will be in contact with the wall of the room should be thicker or made of fire-resistant bricks to avoid fire.
Do-it-yourself stove laying
Covering the stove with tiles
It is better to make a fireplace during the construction of a house, but there is nothing wrong with doing this after its completion.
The following step-by-step instructions are recommended:
- Construction of the foundation. The laying depth should be below the freezing level of the soil without being tied to the foundation of the house. To reduce costs, you can use pile or bored technology.
- Furnace laying. First, dry fitting, trimming and fitting of blocks is carried out. Then the waterproofing is laid, the mortar is prepared and the laying is done. There will be no difficulties if you follow the procedure exactly. The seams between the stones should be made 5-7 mm thick, controlling the accuracy of the dimensions.
- Chimney outlet through the roof. A hole is made in the ceiling between the beams, and a sleeve filled with basalt wool is inserted into it. A similar design is installed on the roofing.
- Facing the structure. Here the choice is made in accordance with the priorities of the owners. You can limit yourself to painting or whitewashing, or you can fork out for expensive clinker or tiles.
The first lighting of the stove is carried out after two weeks of drying. First, newspapers, grass and branches are burned, then after two hours the fire is brought to maximum and maintained for at least four hours.
Choosing the optimal location
The location of the stove for a garden house must be approached with the utmost seriousness, since not only effective heat transfer, but also your safety from fire depends on it. Of course, ideally in the old days, and even now, the place where the stove will stand was planned before the construction of the house began.
Here are the basic requirements for determining a place for the stove:
- The room where you plan to install a wood-burning stove must be at least 16 sq.m.
- The stove must be installed on a reliable foundation, which means there should be no floor beams under it. The chimney should exit in a place where there are no ceilings.
- Construction near the outer wall is not advisable, because precious heat will be given to the street. Therefore, it is better to locate it in the center of the house; the chimney will exit in the area of the ridge, and the height of the pipe will be smaller. For wooden houses, central placement is recommended for fire safety reasons.
Now let's talk about the features of choosing a place for the stove. The best option to ensure good heat transfer is to place the stove so that all walls can come into contact with the air inside the home. The rooms should not be large, then you cannot do without additional heat sources.
Therefore, ideally, it should be placed in the opening of the partition between the rooms, and the firebox would go out in the kitchen or hallway area. On the one hand, the kitchen also becomes warm with the ability to cook, and on the other hand, the living spaces are freed from garbage.
When installing a multifunctional stove in large rooms, it should again be placed in the center of the room. The stove turns into a place of concentration of comfort that gives a home. It turns out something similar to a studio apartment, with an open layout, where the stove becomes a space divider.
Self-construction of a mini-fireplace for a summer residence
The construction of this heating device for a country house is distinguished by its simplicity. The only difficult process is covering the firebox. When laying a fireplace tooth, some irregularities are allowed, since it is lined with a sheet of metal, accordingly, all inaccuracies will be hidden.
A wood-burning mini-fireplace is suitable for use in the autumn-winter season, but coping with a frosty winter will be problematic for it. But in warmer periods, this device will heat a room with an area of 16 to 20 m². One of the obvious advantages of a mini-fireplace is its low cost: purchasing all the necessary elements will cost about 5-8 thousand rubles.
One of the most suitable materials for constructing a fireplace is high-quality red brick. Work begins with laying ten rows of the back wall. In the next two levels it is necessary to make an overlap the size of 1/4 brick. When laying the side walls, you need to provide a turn at an angle of 25 degrees, while leaving vertical channels. In the third row you need to make holes to provide passage for cold air. This contributes to additional heating of the room.
On the back wall of the firebox in rows 11-12, protrusions are provided to form a smoke tooth. Four metal pins are also mounted here, which will hold the inclined stainless steel screen. The back wall can be made of treated brick.
The dimensions of the fireplace at the base, excluding the chimney, are 1020x510 mm, height – 1120 mm. The cleaning door is installed on the back wall, which allows you to clean the fireplace tooth from ash and soot.
The design of this mini-fireplace for a summer house is slightly different from the original, which was proposed in the original source. In our case, the arch that covers the fuel chamber is made of 9 bricks, and not 7, as was originally specified. In the presented project, the gaps between the bricks of the arch have been reduced. The central brick has non-standard dimensions and is quite narrow.