The main malfunctions of the water heating system are a decrease in the temperature in the heated rooms compared to the calculated ones and a violation of the tightness of the heating system elements. A decrease in room temperature can be caused by the following reasons: disruption of coolant circulation, malfunction of the control unit, unauthorized connection of additional heating devices (radiators, convectors, water heated floors, etc.).
When the temperature in the premises decreases, first of all, you need to make sure that no preventive maintenance or repairs are being carried out on the heating system. Once you are convinced of this, you can begin to search for and eliminate the causes of the decrease in temperature. Use a thermometer to check the temperature of the coolant supplied to the heating system. If the temperature in the heating system is lower than required, the fault must be looked for in the control unit. If the temperature of the heating system coolant corresponds to the norm, then the malfunction of the heating system consists of a violation of the coolant circulation or the heating system is incorrectly adjusted.
Disturbance in the circulation of the coolant in the heating system can occur: due to errors in the installation of pipelines, pipeline fittings are faulty or absent, a decrease in pressure due to water leaks, complete or partial blockage of the riser, due to improper piping of heating devices, airing of the system heating - air entering the heating system.
Signs of poor heating
The first sign of heating problems is cold radiators.
When rooms are not heated enough in winter, you can feel it right away. Problems with heating in an apartment make themselves felt by discomfort for the inhabitants, the appearance of dampness on the walls and strange noises spreading through metal pipelines throughout the entire house.
Problems that arise with the heating system can be characterized by a number of symptoms:
- the system as a whole is functioning poorly;
- the heat supply on different floors is not the same;
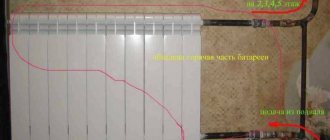
- radiators in one room are hot, in another barely warm;
- the “warm floor” system warms up unevenly;
- noise and seething in the pipes is heard;
- Coolant is leaking from pipes or radiators.
Possible breakdowns and ways to eliminate them
troubleshoot the problem as necessary. By the way, it is recommended to protect the pump from surges in the network by installing a reliable stabilizer. This move will also protect the pump from the burning of a fuse, which fails as a result of constant pressure drops in the network
So, if something goes wrong with your circulation pump and it refuses to work, then we’ll try to repair the unit ourselves.
Important: but if you are not confident in your abilities or do not have the appropriate tool at hand, then it is better to contact a specialized center
If the pump makes a hum, but the impeller does not rotate
The reasons may be the following:
- Presence of a foreign object in the impeller area;
- The rotor shaft has oxidized due to long-term downtime of the unit;
- Loss of power supply to the mechanism terminals.
In the first case, you need to carefully remove the pump from the heating system and unscrew the housing in the area of the impeller. If a foreign object is found, remove it and rotate the shaft by hand. When assembling the pump in the reverse order, it is necessary to install a reliable filter on the pipe.
If there is oxidation, then clean it well, lubricate all movable elements of the working unit and reassemble the pump in the reverse order.
If there is a problem with the quality of the power supply, then you will have to check the voltage using a tester. First, completely replace the cable in all sections of the cable and if a break or fault is detected. Then, if the cable is OK, check the voltage at the terminals. If the tester shows infinity, a short circuit has occurred. If it shows less voltage, it means that the winding has broken. In both cases, the terminals are replaced.
If the unit shows no signs of life at all
This can happen if there is no voltage in the network. Using a tester, check the voltage and, if necessary, correct the problem.
By the way, it is recommended to protect the pump from surges in the network by installing a reliable stabilizer. This move will also protect the pump from the combustion of a fuse, which fails as a result of constant pressure drops in the network.
If the pump starts but then stops
The reasons may be:
- Presence of scale between the moving elements of the unit;
- Incorrect pump connection at the terminals.
In the first case, you will have to disassemble the pump and check it for scale. If detected, limescale deposits are removed and all joints between the rotor and stator are lubricated.
If there is no scale, then check the tightness of the fuse on the unit. You should remove it and thoroughly clean all the clamps. Here it is also worth checking that all wires in the terminal box are connected correctly in phases.
If the pump makes a loud noise when turned on
The reason for this is the presence of air in a closed circuit. It is necessary to release all air masses from the pipes, and install a special unit in the upper part of the pipeline to prevent the formation of air locks.
Another reason could be wear on the impeller bearing. In this case, you need to disassemble the unit housing, check the bearing and, if necessary, replace it.
If the pump is noisy and vibrates
Most likely, the issue is insufficient pressure in the system. It is necessary to add water to the pipes or increase the pressure in the area of the pump inlet.
If the pressure is still low
Here it is worth checking the direction of rotation of the working unit in the pump body. If the wheel does not spin correctly, then an error was probably made when connecting the device to the terminals in phases when using a three-phase network.
Another reason for a decrease in pressure may be too high a viscosity of the coolant. Here the impeller experiences a lot of resistance and does not cope with the assigned tasks. You will have to check the condition of the mesh filter and clean it if necessary. It would also be useful to check the cross-section of the inlet and outlet pipes and, if necessary, set the correct operating parameters of the pump.
Causes of heating problems
Most residents of city apartments believe that they have no need to know the structure of engineering systems. Any central heating problems that arise in their high-rise building must be resolved by the employees of the management company. And it is right. It is better if only one responsible owner is involved in all matters. Indeed, in an apartment building, problems with heating often arise precisely because of unauthorized interventions in the smooth functioning of the heating system.
But individual homeowners are forced to understand problems with heating in a private home and keep the situation under control. The owner of the house must know at least in general terms about the causes of problems and be able to correct them.
The following reasons can lead to problems with the heating system:
- the system is not properly designed;
- equipment does not meet design requirements;
- the system was unbalanced due to unauthorized connections;
- installation was performed poorly;
- air pockets interfere with coolant circulation;
- radiators are installed incorrectly;
- pipelines have become unusable;
- the tightness of the connections is broken.
Let's take a closer look at each of these reasons and ways to eliminate heating problems in an apartment and in a private house.
Errors in heating system design
The design of the heating system must be developed taking into account the layout of the house.
Due attention must be paid to the development of the heating system project so that in the future the problems of heating a private house do not poison everyday life. Attempts to save money on proper design result in trouble. For example, when starting up a fully installed system, problems with heating radiators are suddenly discovered, some of which do not heat up. This means that the system was initially designed incorrectly and will have to be redone.
Design can only be entrusted to specialists who will take into account many factors. Among them: the layout of the house, the volume of heated premises, the degree of heat loss, etc. It is also important to plan the required slope of horizontal sections of pipelines. Also, the main technical parameters of the required equipment can only be determined on the basis of thermal engineering calculations.
To reliably heat a house, the heating boiler must have a power of at least 1 kW for every 10 m² of room area with a ceiling height of up to 3 m.
Boiler room is too small
This problem applies mainly to solid fuel boiler houses, since their cubic capacity must be at least 30 m3 - with a room height of about 2.6 m, which means a surface area of about 12 m2.
In addition, there is a second condition - a minimum of 4 m3 per 1 kW of the rated power of the boiler, so a boiler with a power of only 7.5 kW can be installed up to 30 m3!
If you are switching to a boiler that runs on liquefied gas, this can become a serious problem, since the minimum volume of the room with a gas boiler is 8 m3 if it has an open combustion chamber and 6.5 m3 if it has a closed chamber (it takes air directly outside).
Inappropriate home heating equipment
Its performance will depend on the correct choice of materials for the heating system.
With the current wide range of heating equipment, it is easy to make a mistake and purchase the wrong one. To avoid problems in the heating system, it is necessary to focus on the compliance of all its elements with the approved project. You need to buy radiators only of the type and with the number of sections as planned. All pipeline connecting parts, control and shut-off valves must be mutually compatible.
Heating problems in a private home often arise due to poor circulation. Circulation pumps help increase the speed of coolant movement in the pipes. But you need to select the right pump model correctly so that there is no noise in the pipes during its operation.
When arranging modern housing, old iron pipes are increasingly being replaced by more practical metal-plastic and polypropylene pipes. The absence of problems in each specific heating system will depend on their compliance with the specified project conditions. Although plastic pipes are lightweight and easy to assemble, it is better to entrust a specialist with the correct selection and subsequent installation of these products.
It is important to know that not all types of plastic pipes are suitable for heating systems. Some of them may become deformed or burst under the influence of hot water.
Actions for prevention
In operating condition, monitor the engine heating level. If it seems too high to you, then it is better to remove the pump and contact the point of sale with a request to replace the unit. The same can be done in case of pressure mismatch
Also, to protect pumping equipment from sudden failure, it is recommended to carry out preventive maintenance of the unit, which will include the following actions:
- Regular external inspection of the pump housing and careful listening during operation. This way you can check the functionality of the pump and the tightness of the housing.
- Make sure that all external pump fasteners are properly lubricated. This will make it easier to disassemble the pump if repairs are necessary.
- It is also worth following some rules when installing a pumping unit for the first time. This will help avoid repair work in the future:
- So, when you first connect the pump to the heating network, you should turn on the unit only if there is water in the system. Moreover, its actual volume must correspond to that indicated in the technical passport.
- It is also worth checking the coolant pressure in the closed circuit here. It must also correspond to what is stated in the technical specifications of the unit.
- In operating condition, monitor the engine heating level. If it seems too high to you, then it is better to remove the pump and contact the point of sale with a request to replace the unit. The same can be done in case of pressure mismatch.
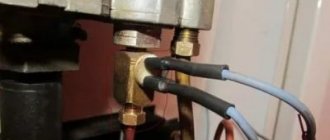
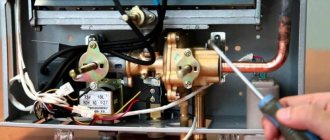
- Also, make sure that there is a ground connection between the pump and the terminals when connecting the pump. Here in the terminal box, check that there is no moisture and that all wiring is securely fixed.
- A working pump should not produce even minimal leaks. The connection points between the inlet and outlet pipes of the heating system and the pump housing deserve special attention.
Heating system imbalance
Serious problems with heating in an apartment building arise when residents begin to repair and remodel their apartments. Spontaneous, uncontrolled installation of new radiators and heated floors leads to an imbalance in the system. As a result, circulation in the system is disrupted; on some floors the radiators are hot, while on others the residents are cold. The management company’s specialists can balance the distribution of coolant through the risers, but problems with heating in individual apartments still remain.
If your neighbors changed their heating appliances and removed their thermostats, then it is not surprising that water simply will not flow through the pipes into your apartment. And it will be possible to solve such a heating problem only by removing the thermostat in your home as well.
Another opportunity to really increase the heat supply to your apartment is to follow the example of your neighbors and change the batteries. If you install aluminum or bimetallic instead of cast iron, their heat transfer will be much better.
It is prohibited to change radiators without permission; you must obtain permission!
The heating system can also become unbalanced in a private home. Then radiators located closer to the boiler heat up more than those further away. The balance will have to be restored in this way: close the control taps and limit the flow of coolant flowing to the nearby radiators, so that more heat flows to the distant ones.
Poor quality installation of the heating system
A poorly installed plastic pipe may burst during operation.
It happens that a new, recently installed radiator does not want to heat up.
Others in the system before and after it heat up normally, but this one does not. The reason is poor coolant circulation. The reason for the problem with the heating radiator could have been an oversight by the installer. Probably, when welding a polypropylene pipe, he overheated it too much, and as a result of melting, the internal diameter decreased. In such cases, the installer is obliged to redo his poor-quality work free of charge.
To avoid problems with the heating system, all pipes and fittings included in its composition must be a securely installed structure.
Leak appears
Rust on a heating pipe
Depressurization in the circuit may occur as a result of:
- rust on the heating pipe;
- mechanical loads;
- water hammer;
- hydraulic tests;
- wear of seals.
Before you can seal a hole in a heating pipe, you will have to find it. A leak can appear anywhere. Most often, the circuit begins to leak at the joints, while an accident on an entire section of the highway is also not excluded. Let's look at how to fix a leak in different situations.
Let’s say that depressurization occurs on a flat section of the highway where there are no connections. For example, a heating pipe has rusted and corrosion has eaten through the walls of the circuit from the inside (if the system is metal). Or the leak was caused by human error. One way or another, something needs to be done about it. The heating pipe is leaking, what to do:
- apply a bandage;
- replace the area completely;
- seal with a two-component compound;
- brew using electric or gas welding.
Air locks in heating
Automatic air vents free the system from air that periodically accumulates in it.
If the radiators are not heated in any of the rooms, it means that the air accumulated in the system is preventing the free movement of the coolant. An air lock can form due to many reasons, including the following:
- air enters when water is drained from the system and then refilled;
- Oxygen is released from water when heated;
- a faulty expansion tank creates a local area of low pressure;
- air is sucked into the system through connections with broken seals;
- air diffusion occurs through the surfaces of plastic pipes.
Air bubbles can accumulate either at the highest point of the piping system, or only in one of the radiators. Then the bottom of the battery will be hot and the top will remain cold. The presence of air in the pipes also provokes the appearance of unpleasant gurgling sounds. Most often, heating devices on the top floor of a building stop heating.
The more complex the configuration of the heating system in your home, the slower it should be filled to avoid air locks.
Due to air bubbles, not only does the heat supply through the piping system stop, but also corrosion of metal elements begins. The smooth operation of the circulation pump is also disrupted.
The use of simple technical devices will help get rid of the problem of clogging the heating system with air locks.
The most effective way to remove air from a closed heating system is to use automatic air vents. If they are mounted in several problem areas at once, then the air from each group of system elements will be released as it accumulates.
In addition to automatic ones, there are also manual air vents (Maevsky valve). Such a device is installed at the end of the radiator, located on the topmost floor. You can learn how to use it from the video presented here.
How to bleed air through the Mayevsky tap
Depending on how the heating system is designed, it may sometimes be necessary to bleed air through an expansion tank in the attic. The circulation pump can also help expel air pockets from the system.
Hydraulic tests
Pressure testing is carried out within 2 - 3 days at elevated pressure.
Hydraulic tests of the heating system (pressure testing) are planned and control measures designed to check the reliability of heat exchange equipment. This action is carried out in order to detect components, equipment and communication sections that are potentially dangerous in terms of leaks. Hydraulic tests should be performed before the start of the heating season, after completion of planned or major repairs of the system.
During the inspection process, water is pumped into the pipes and air is released. Then, using a pump with a pressure gauge, a pressure of 2-6 atm is created in the circuit, which is higher than the nominal one. Signs of a malfunction are leaks and drops of water at the joints. After eliminating the defects, the test is repeated. A prerequisite is the use of hot water, the temperature of which is equal to or higher than the calculated one. The thermal test shows the true readiness of the circuit for operation.
Incorrectly installed heating radiators
The absence of heating problems depends on the correct installation of radiators.
The issue of correct installation of radiators is most relevant for private homeowners, since they themselves have to regulate the heating in their home. Replacing radiators yourself should be treated with responsibility, because installing them without preliminary calculations can add unnecessary problems to the heating system.
For example, the installation was done according to the instructions, but some of the radiators are working at half capacity. It turns out that it is skewed and the coolant cannot fill it entirely. And the reason is that the heavy multi-section radiator was hung on only two brackets, although it would have been more reliable to use four. As a result, the metal structures bent and the internal tubes were deformed.
The reliability of the radiator also depends on its location. The bottom edge of the battery should be raised above the floor by 10 cm, and there should be 2-3 cm of free space between the radiator and the wall.
Each radiator must hang on reliable brackets without sagging, play or distortion.
Reducing clearance in old heating pipes
Lime deposits and rust reduce the internal diameter of the metal pipe by more than half.
In old “Khrushchev” buildings, problems in the heating system are obvious and predictable. There, the service life of the pipelines has long expired, and therefore they cause not only a decrease in heat, but also accidents. Over many decades, the pipes become so clogged with sediment that they are unable to provide normal circulation. The decision must be drastic - replace all the pipes.
In addition, a decrease in pressure in the system is caused by the formation of scale on the heat exchanger of the heating boiler. Using too hard water leads to such consequences. To prevent a similar problem with heating devices, special water softening agents are added to the system.
Washing methods
Today, it is customary to distinguish between four technological methods for cleaning a heating system.
Chemical washing. This cleaning method allows you to remove 100% of system contaminants, with a minimum of effort required. However, this cleaning method is only suitable for metal heating pipelines.
To perform chemical cleaning yourself, you need to have the following tools and materials on hand:
- washing solution, which may contain mineral or organic acids, as well as all kinds of solvents and alkalis;
- container for draining liquid;
- pump;
- hoses.
The procedure is as follows:
- water is drained from the heating system;
- acid solution is poured;
- a special pump is connected to the system, which pumps cleaning liquid throughout the entire heating circuit for several hours;
- the waste liquid is drained and clean water is pumped in.
An important point: it is strictly forbidden to pour the used acid solution into the sewer. If it is not possible to dispose of it yourself, then you can purchase special neutralization products.
Hydrodynamic flushing. This method of cleaning the heating system is carried out using special equipment, which includes thin hoses and special nozzles.
The principle of cleaning with this method is that water is supplied under pressure to a nozzle, which generates thin jets of water. With the help of these jets, all grease, rust and scale are removed from the working area.
It is worth noting that although this method of flushing pipes is quite effective, due to its high cost it is used too little.
Pneumohydropulse flushing of the heating system. In order to perform this type of cleaning yourself, you will need:
- compressor;
- outlet pipe;
- hose;
- clamp;
- ball valve;
- drain container.
The order of work consists of the following steps:
- water is drained from the system;
- the outlet pipe is connected to the “return”;
- the compressor is connected to the outlet, and we pump up a pressure of approximately 5 atmospheres. Strong pressure in the pipes causes all kinds of contaminants to break off from the walls.
- close the outlet pipe and disconnect the compressor and connect the hose;
- We open the valve, and as a result, all contaminants come out under pressure.
It is worth noting that for better cleaning, the pneumohydropulse procedure can be repeated several times.
And in conclusion, I would like to note that after studying our recommendations, you will be able to flush the heating system yourself with greater confidence.
Watch the video, which popularly explains the need to flush the heating system and the specifics of carrying out the relevant work: