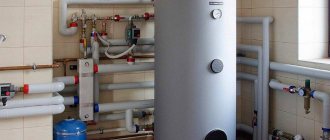
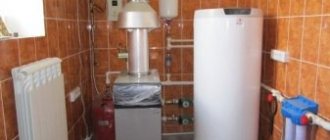
They are less often connected to free-standing boilers of similar volume. Among the latest models of water heaters, aluminum tanks have performed well. But it is still better to equip it with a temperature sensor; there is a place in the case for this. The process of connecting and piping an indirect heating boiler occurs in one of the ways described below.
Such equipment operates automatically. How to properly connect an indirect heating boiler
The circulation pump is powered through a thermal relay, so it starts to operate only when the temperature drops below the required one.
During installation, it is necessary to install a temperature sensor in a certain place (there is a hole in the housing) and connect it to a certain boiler input.
Scheme without priority When connecting an indirect heating boiler, it is better to choose a scheme with priority - it provides hot water in the required quantity. Instead of supplying gas, the heating element is connected to the electrical network. An autonomous control system is much more convenient.
The servo drive in this circuit serves precisely to control the operation of the valve.
Piping a single-circuit boiler with a hot water boiler.
What is an indirect heating boiler
A water heater is a tank filled with water. It is based on a heat exchanger cylinder. It, in turn, is connected to a hot water supply system or to a heating boiler.
This design is quite simple: hot water moves from the boiler through the heat exchanger, from which its walls heat up and transfer their heat to the water with which the container is filled.
It turns out that heating occurs not directly, but indirectly, hence the other name - indirect exchange broiler. Types of equipment.
CONNECTING THE WARM FLOOR
Warm floor - low-temperature infrared heating system. It actually works as it’s called - the heated floor heats the air. The system is fashionable, modern, and every homeowner considers it his duty to push it wherever possible or not. Regarding heated floors, you should understand the following: the floor should be warm, not hot. Comfortable temperature is 22-24 degrees. A hot floor of 26 degrees or more is appropriate in the bathroom and hallway - to keep shoes dry. In other places, a hot floor causes discomfort.
It is not a fact that the comfortable temperature of the heated floor in your conditions will be enough to heat your room. Therefore, together with underfloor heating, it is recommended to provide heating radiators in the places where they should be located, i.e. under the windows, at least a few. Otherwise, it may turn out that for half the winter you will have to walk not on a warm floor, but on a hot one.
Here's how underfloor heating works.
The "warm floor" system has a coil laid in the floor (pink). The coil has its own circulation pump, which ensures continuous circulation of water throughout the coil. The mixing valve regulates the temperature of the water in the coil.
How it works? Let's say the mixing valve is set at 26 degrees. On one side, water with a temperature of 70 degrees (red arrow) from the heating system is supplied to the valve inlet. On the other hand, water at a temperature of 20 degrees (pink arrow) from the coil is supplied to the mixing valve. The valve will mix the water so that at the entrance to the coil it is exactly 26 degrees. When mixed, excess water taken from the heating system is drained back into the system (blue arrow).
Such a scheme for assembling a heated floor is very viable and inexpensive. So before purchasing an expensive mixing unit for a heated floor, think about it, is it really necessary?
Now let's connect the warm floor to the heating system.
By the way, the proposed heating floor scheme has manual control (i.e. it is not thermostatically controlled). The temperature of the heated floor is controlled by rotating the mixing valve regulator and, as a rule, this is absolutely sufficient.
Is it possible to control heated floors automatically based on air temperature? Of course it is possible, but the significant financial costs of such management must be well justified.
Now everything really works as it should!
As you can see, from one heat source (a boiler with or without a water heater) with a temperature of 70 degrees, we powered all heating equipment at once: radiators and heated floors and a hot water boiler.
The proposed schemes are basic, i.e. they show the principle of constructing a heating system using solid fuel boilers, omitting the actual technical implementation of the solutions.
Why is it actually 70 degrees in the boiler? The temperature should be above 60, but below 80. Above 60, to avoid condensation in the boiler, and below 80, so that there is a margin for the temperature to rise to the normal limit of plastic pipes - 92 degrees. The suggested 70 degrees is usually enough for all occasions in winter and summer.
But the fashionable “weather control”, available in some boilers, is just a change in the temperature in the boiler by a few degrees when the intake temperature changes. And, as you now understand, it does not play any role.
And one more important point. The boiler has a minimum power. Minimum power of Pelletron boilers: U25, 35, 25 - 3 kW, and U60 - 5 kW. If you completely stop the heat consumption of the heating system, the boiler will not immediately, but will still boil.
To prevent this from happening, ensure a guaranteed heat consumption higher than specified. To do this: install 1-2 radiators at full flow (without heads or turning the heads to the maximum), install heated towel rails in bathrooms and toilets, do not be zealous about the insulation of pipelines, collectors and other elements of the heating system.
Typically, these measures are quite sufficient to ensure heat consumption above the minimum.
To create comfortable conditions, owners of mansions and apartments are increasingly striving to install innovative heated floors, one of the varieties of which functions by supplying water heated to a certain temperature into pipes laid in a certain way.
In this case, it is important to correctly select a boiler for water heated floors that meets all requirements and is suitable for specific conditions.
Indirect heating gas boiler
In this type of device, the tank is heated using a gas burner. Despite the fact that the installation of this equipment is not cheap, this method significantly saves the budget, because the use of natural gas is the most economical solution.
The device should be operated strictly following the attached instructions. This is necessary to maintain your own safety, because all gas appliances pose a potential danger.
How to connect a water heater to AC power?
If there is no such outlet in the apartment or you need to make a new connection to the device, then it is better to call specialists, as there are reasons for this:
- any work related to electricity requires minimal experience and knowledge, since failure to comply with generally accepted rules can lead to electric shock or damage to an electrical appliance;
- the homeowner has the opportunity to complain about poor quality work, naturally, if an agreement has been concluded with the contractor;
- and, finally, there is no need to figure out which cable to choose and what protection to use when installing a water heater.
Naturally, you can connect the boiler to the electrical network with your own hands. To do this, it is advisable to lay a separate line directly from the distribution panel using a powerful electrical cable. In this case, it is better to use a circuit breaker as a plug and socket, to which, according to the diagram, the cable from the distribution panel is connected at one end and the water heater cord at the other end. Moreover, all electrical installation work must be completed before connecting the device to the water supply.
Electric indirect heating boiler
An electric water heater is similar in function to a conventional boiler; its operating principle is as follows: when a metal heating element is heated, the water temperature rises.
The main advantage of such a water heater is its accessibility and ease of installation, because for its installation it is not at all necessary to contact a special service. The disadvantage is that it takes a long time to heat up the water.
As a rule, the choice of device depends on the type of energy carrier; for example, if liquefied gas is available, it would be more appropriate to install a gas boiler. An electric model is suitable for multi-storey buildings.
Why do you need a booster pump?
A booster pump is used when there is insufficient pressure in the water supply. Nowadays, most booster pumps operate when there is water supply, that is, the pump will work until you turn off the water at the mixer. This is done using a flow switch built into the pump. With the help of such pumps it is possible to pump low-viscosity, non-aggressive liquids without the inclusion of solid particles and engine oil impurities.
Specifications:
- Pressure 2 meters.
- Ambient temperature from 2°C to 40°C.
- The temperature of the pumped liquid is from 2°C to 60°C.
- Maximum system pressure 6 bar.
Installation of a booster pump.
The booster pump is installed using union nuts directly on the pipe through which cold water is supplied. The standard connection size is 0.5 inches. After installing the pump, it is necessary to remove air from it. How to do this is described in detail and with pictures in the instructions, which I strongly advise you to read before doing the installation. Let's look at an example of correct incorrect installation in the figure:
Example of installation of pump UPA15-90
Correct installation of the booster pump
It is also necessary to remember that the pump shaft must be located in a horizontal plane. If this is not done, the bearings will not be lubricated and will quickly fail! Let's look at another drawing and draw conclusions.
Maintenance.
At home, it is limited to cleaning the flow switch. If you don’t want to do this, you can install a mesh filter in front of the pump that will trap sludge. More complex repairs should be carried out at an authorized service center.
Differences between boilers by type of installation
- Wall. This device is compact in size and mounted on the wall. Its main advantage is that it is suitable for small spaces. Storage boilers have a small tank volume, no more than 100 liters.
- Floor. This device is quite voluminous, which is why it differs from wall-mounted storage boilers. The tank volume can hold 115 liters or more, which is quite enough for a large family living in an apartment or a country house.
Storage boilers with a large volume are usually placed on the floor. Flow-type devices are often mounted on the wall.
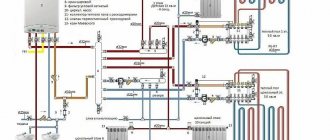
Strapping stages
First, an installation diagram is drawn taking into account the dimensions of the room and the selected locations for all devices. After this, holes for the heating boiler and boiler are marked and drilled. If the devices are floor-mounted, then it is advisable to make a small foundation for them according to the size of the buildings.
Next, propylene pipes are cut according to size and connected to each other with tees using a soldering iron. Pumps, taps, filters are installed and everything is combined into one system. If you have additional circuits, for example, on a hot floor, then a collector is installed that evenly distributes the coolant flows.
Connection diagram for a double-circuit boiler
An expansion tank and a safety complex are mandatory. When installing a safety group, you should take into account that if it works, water will flow out of it. Excess coolant goes into the expansion tank during expansion.
After all connections, water is introduced into the system and all connections are checked. If there are no leaks, then the boiler starts and the heating rate of the batteries is checked.
Differences in the principle of heating water
- Storage boiler. It has a heating element, and hot water accumulates in an installed tank - a thermos.
- Instantaneous water heater. Models of this type are called columns. They are ready to use and heat water immediately after turning on the tap. A heating element is mounted inside the device; when interacting with it, the water temperature quickly reaches the desired heating level.
Recirculation scheme
Manufacturing a circuit in which the water temperature will be constantly maintained is possible during the construction or deep modernization of a hot water supply system.
The recirculation scheme is carried out as follows:
- Pipeline laying. The scheme provides a closed loop. The pipe is laid through the required rooms to the distant point and back to the boiler.
- Connecting water intake points. Installation involves sequential inclusion of water intake points in the system. At a distant point of water consumption, the pipe does not end, but returns to the water heater.
- Connection to the pump circuit. It is necessary for forced circulation of the coolant. It is better to turn on the pump and install a shut-off device in the circuit at the interval where the water flows not to consumers, but to the storage tank. This will allow you to turn off forced circulation if necessary.
Recirculation scheme. Photo source: tolyatty.blizko.ru
Connection features
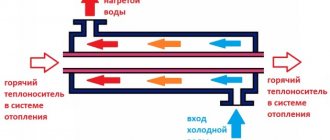
There are two ways to connect an indirect heating boiler, both with and without priority for heating hot water. When heating water with priority according to demand, all the coolant is pumped through the boiler heat exchanger.
Heating occurs quite quickly. As soon as the temperature reaches a certain point, and this is controlled by a sensor, the entire flow is redirected to the radiators.
- With a method without priority for heating water, only a certain part of the coolant flow is directed. As a rule, with this method the water takes much longer to heat up.
- When connecting an indirect heating boiler, it is preferable to choose the method with priority. This will always provide hot water in the right quantity.
- This does not greatly affect heating, because it takes 20-40 minutes to heat the entire volume of water, and 3-8 minutes to maintain the temperature.
Power calculation and equipment selection
Initially, in order to select a BKNSR scheme and select equipment, it is necessary to calculate the thermal load on the domestic hot water supply for a specific consumer. An incorrectly selected connection method will lead to ineffectiveness of the DHW recirculation system or breakdown of the main and pumping equipment.
How to choose a boiler
For example, to perform the calculation, for a family of 4 people they take hot water standards according to SNiP 2.04.01-85 “Internal water supply and sewerage of buildings.”
Simple calculations show that washing dishes will require 336 l/week, showering - 1280 l/week, and minor activities another 280 l/week, for a total of 2856 l/week or 17 l/hour.
Formula for determining power:
17x0.0375=0.637kW
Heater design parameters:
- The minimum volume of water consumption is 1.5 l/min.
- Capacity volume - more than 100 liters.
- Water heating time is up to 2 hours.
- Thermal insulation material is polyurethane foam or mineral wool.
- Safety elements: valves, temperature and pressure sensors and fuses.
- Service life is from 10 to 12 years.
General rules
According to the rules, the closer the equipment is to the boiler, the more efficient the heat exchange from the heating system.
Installation of the boiler must comply with the recommendations:
- Wall-mounted models are attached to the wall;
- Floor-mounted ones are installed on the floor.
In order for the circulation point to be in the center of the tank, the flow of cold water must be supplied through the lower pipe, and the intake of hot water through the upper. This is a prerequisite for high-quality operation of the device.
The movement of hot water should be carried out along the coil, from top to bottom.
Following these simple recommendations will ensure the correct operation of all elements that perform an important function.
Don’t forget about installing ball valves. Thanks to them, it is possible to turn off elements such as a three-way valve, circulation pump and others for maintenance.
Advantages
Modern models of gas boilers with one circuit for heating the heating fluid could be called primitive water heating devices if they were not equipped with high-precision control and monitoring equipment to ensure the reliability and safety of all operating cycles. To solve the problems of regulation and safety of boilers, an automatic boiler protection system with gas flow and pressure regulators, fittings that regulate the flow, temperature and pressure of heated water, all kinds of sensors, instruments and safety devices is aimed. This is the main advantage of gas boilers.
Other important benefits:
- simplicity of design and installation of the boiler, which includes a combustion chamber with a gas burner, a loop heat exchanger in the firebox, a system of manifolds and pipelines, and pumping equipment;
- efficiency achieved by automation and adjustment work for optimal and efficient combustion of fuel, mixing processes and regulation of coolant parameters in accordance with standards;
- the ability to connect boilers to cascade heating systems within cities and large towns, which allows not only to centrally control the system, but also to ensure reliable and high-quality heat supply to consumers in residential areas, neighborhoods, microdistricts, as well as enterprises whose boiler houses are included in the cascade;
- more environmentally friendly emissions of gas combustion products into the atmosphere compared to similar boiler houses using liquid and solid fuels.
Common mistakes
During the installation process of the device, some difficulties and, therefore, errors may arise.
To avoid their occurrence, you need to:
- Install the broiler and boiler as close to each other as possible. Be sure to check the pipes to see if they are aligned correctly.
- Correctly connect the pipeline to the coolant.
- Properly install the circulation pump.
Installation of equipment requires correct and competent work. This guarantees uninterrupted operation of the device and timely supply of water.
Connection on the water supply side
If the water collection points are located close to the heating tank, the connection is made according to the standard diagram presented below. Let us explain the functions of some elements:
- It is recommended to use a pressure reducer for pressure surges above 6 Bar;
- a check valve on the cold water supply prevents the tank from emptying into the water main;
- the expansion tank compensates for the increase in the volume of heated liquid;
- a safety valve set at 7 bar discharges water into the sewer if the pressure rises to a critical level;
- The drain valve is used to drain water using the method of communicating vessels.
It is important to leave the drain line filled - then when the drain valve is opened, the water will flow out according to the law of communicating vessels
When consumers are away from the boiler, it is worth installing a recirculation line with an additional pump and check valve. If your heater model does not have a separate fitting for connecting this line, simply cut the return line into the cold water inlet line.
Before starting a system with a water heater of the “tank inside the tank” type, you must first fill the internal tank with sanitary water, only then pump in the coolant and perform pressure testing. The master will tell you the details in the video:
How to choose an indirect heating boiler
There is not much difference in choosing an indirect heating boiler and a storage boiler.
But you need to pay attention to such points as:
- Volume. This is the main selection criterion. How to calculate? For example, on average, about 40-80 liters of water are spent per person. From this, expenses should be made for a family consisting of several people.
- Today the market offers devices with a volume from 200 to 1500 liters.
- Water flow through the heating circuit. In order to understand this feature of the device, you need to use the data sheet that comes with it. Water consumption should be no more than 40% of the total water volume.
- Tank and thermal insulation material. Of course, it would be better to choose a stainless steel container. Polyurethane foam or mineral wool are suitable as insulation. Their use guarantees high-quality thermal insulation.
Calculation
In order to find out the ratio of the length of the coil to the volume of the tank, you need to apply the following formula:
Here:
d – tube diameter (in meters);
p – coil power (thermal) in kW;
ΔT is the difference between the temperatures of the heated water and the coolant.
Calculation example
As an example of a calculation, you can take the following parameters:
- coil pipe diameter 0.01 m;
- coil power 30 kW;
- coolant temperature 80 degrees Celsius;
- tank volume 200 liters;
- the temperature of the heated water is 15 degrees Celsius.
Next you need to make a calculation:
It is advisable to do the coolant input and output on one side. In this way, the maximum level of convenience will be achieved.
Photo of connecting an indirect heating boiler
The principle of operation of a magnetic starter and a small-sized contactor + Video explanation
Sometimes the question arises: why use MP or KM at all, why not just use a three-pole machine?
- The machine is designed for up to 10 thousand shutdowns and starts, and for MP and KM this figure is measured in millions
- During power surges, the MP (KM) will turn off the line, playing the role of protection
- The machine cannot be controlled by remotely applying a small voltage
- The machine will not be able to perform additional functions of turning on and off additional circuits (for example, signal circuits) due to the lack of additional contacts
In a word, the machine perfectly copes with its main function of protection against short circuits and overvoltages, and MP and PM do theirs.
That's all, I think that the principle of operation of MP and CM is clear, for a more clear explanation, see the video.
Happy and safe installation!
In addition to the article, I attach technical documentation for KMI series contactors
Systems with two boilers
If it is necessary to organize heating of the coolant in a closed circuit from two heat generators, use the parallel connection principle. Let us explain the algorithm for the joint operation of two boilers - electric and solid fuel (the piping is shown in the figure):
- The main heat source is a TT boiler, connected in the standard way through a three-way valve. To prevent flows from looping in the other direction, a check valve is installed on each branch.
- When a stack of firewood burns out, the air in the house begins to cool. The temperature drop is detected by the room thermostat and starts the electric boiler with a pump.
- A decrease in the temperature in the supply line of the TT boiler to 50-55 °C causes the overhead thermostat to turn off the circulation pump of the solid fuel circuit.
- After the next loading of firewood, the supply pipe heats up, the temperature sensor starts the pump and heating priority returns to the solid fuel unit. The room thermostat no longer turns on the electric boiler because the air temperature does not drop.
It is also necessary to install a safety group at the output of the electric boiler; it is not shown in the figure.
An important point. The above-described piping option can be used for any pair of boilers. When installing a wall heater, a second pump is not installed.
Two heat generators, for example, gas and electric, are easily connected through a heat accumulator. The turning on and stopping of both boilers can be organized in various ways - by the temperature of the water in the tank, by time using a timer. Check valves are not needed here.
If it is necessary to connect 2-3 units of thermal power equipment with several heating circuits, it is better to assemble a diagram of primary / secondary rings. The principle is as follows: all heat sources and consumers with their pumps are connected to a common ring made of a pipe of increased diameter Ø26...40 mm (depending on the number of branches). Circulation inside the ring is provided by a separate pump.
The order of equipment installation matters: the water heater receives the hottest coolant, followed by the batteries, and finally the TP (along the water flow)
In a system with natural coolant movement, two boilers are also combined in parallel
Here it is important to withstand slopes of pipes Ø40...50 mm, and also to avoid sharp turns, using bends at an angle of 45° or bends with a large bend radius
The water diverges along two parallel branches with boilers. But the unit that is currently turned on will make it move by gravity; the pump starts at the request of the owner
Design of rafter fastenings
To do this, it is necessary to correctly calculate the wind and snow loads, i.e. optimal weight of the roofing system as a whole. Based on these calculations, the material and thickness of the load-bearing walls are designed. Errors made in assessing loads and other shortcomings can cause deformation of the entire structure, compromising the integrity of the coating and even collapse of the roof. The following factors should be considered when designing:
Calculation of the load on the rafters.
- roof type and shape;
- the presence of internal supports and their location;
- type and weight of roofing material;
- roof slope and angle of inclination;
- rafter system and its design;
- dimensions (length) of the space to be covered;
- cross-section of timber for rafters.
Origins of the problem
Since our school physics course, we have all learned the rule that when cooled, bodies contract, and when heated, they expand. This also applies to water in its usual liquid state.
The relative change in the volume of a body that occurs as a result of a change in its temperature by 1 K at constant pressure is denoted by the coefficient of volumetric thermal expansion β. It is calculated by the formula:
where V is the volume of liquid; ∂V – change in liquid volume; ∂T – temperature difference.
Water, depending on its temperature, has a different coefficient of volumetric expansion (table). Moreover, the higher the temperature, the correspondingly higher this indicator.
Table. Coefficient of volumetric thermal expansion of water depending on its temperature
This is explained, in particular, by the fact that as the temperature of water increases, its density decreases. Thus, at a water temperature of 0°C, its density ρ0 is 0.9998 kg/dm3, and at 100°C it is already 0.9583 kg/dm3. Since the specific volume of water is inversely proportional to density, the fluctuations in the volume of water will be:
Δv = 1/ρ100 - 1/ρ0 = 1.0435 - 1.0002 = 0.0433.
Thus, when heated from 0 to 100 °C, water increases its volume compared to the original by 4.33%.
In real conditions, of course, the temperature difference is not so significant, however, even an additional 1–2% in a closed system, which is a hot water supply system with a water heater, can be fatal for the elements of the hydraulic system and the water heater, first of all.
The change in pressure during thermal expansion without taking into account the deformation of the system elements can be calculated using the formula:
Δp = βt Δt/βv,
where βt is the coefficient of thermal expansion of water 1°/C; Δt – change in water temperature, °C; βv – coefficient of volumetric compression of water, 1/Pa.
Calculations show that in a rigid closed system the pressure change is about 3 bar/°C. This increase is somewhat compensated by the expansion of system elements, in particular pipes. In steel pipelines, taking into account their deformation, the pressure increase will average 2.2 bar/°C. When using polymer and metal-polymer pipes - 1.2 bar/°C.
Let us illustrate the change in pressure using the example of the readings of a pressure gauge (Fig. 1), installed after the pressure regulator, under various operating modes of a water heater, the piping of which does not have a check valve or expansion tank. In this case, the regulator maintains constant pressure only when the water is not heated. The pressure in the cold water supply system up to the regulator is 7.0 bar. The set water pressure on the regulator is 3.3 bar.
Rice. 1. Indications of the pressure gauge in the water heater piping: a) pressure when water heating is turned on; b) pressure when drawing water; c) pressure in the absence of analysis and water heating is turned off
Thus, in order to avoid a critical increase in pressure, depending on the situation, it is necessary to use a safety valve, pressure regulator, check valve or expansion tank in the water heater piping. Let us briefly consider the basics of operation and application of these devices.
Preparing the tank for water heater assembly
To make an indirect type boiler, you can use a new or old gas cylinder. This container is made of thick stainless steel 3-4 mm thick and is perfect for working with hot water.
Before assembling the heating structure, you will need to carefully prepare the cylinder. To do this, the product is cut in half using a grinder. The inner surface of the container is cleaned using an angle grinder with an appropriate attachment.
Before assembling the boiler, the cylinder must be opened and the inner surface cleaned
After this, the inside of the cylinder is washed, dried and coated with nitro primer paint. This work must be carried out without fail, otherwise after putting the boiler into operation, the heated water will smell like gas.
When using a tank from other metal containers, preparation is carried out according to a similar scheme.
Tips for DIY installation
There may be several such tips:
- You need to carefully study all accompanying documentation for the purchased equipment. Comply with all its requirements and installation recommendations.
- Before starting installation, it is necessary to draw up a project for the work to be carried out and check the correctness of the connection diagram.
- Before installation, prepare all the necessary components and tools.
- Observe safety regulations during installation and connection.
- Create reliable connections between system components.
- Provide access to the device for repair and maintenance.
- If you have the slightest doubt about your abilities and skills, turn to specialists.
5 / 5 (17 votes)