The heating battery is leaking, what to do, how to fix the leak in a short time
Contents: 1. The heating battery is leaking - what to do 2. How to fix the leak 3. Cement-plaster bandage to eliminate the leaking heating battery 4. Moisture-resistant glue, the heating battery is dripping 5. Using a clamp and rubber as a means to eliminate a radiator leak 6. Hermetic seal to eliminate leaks 7. Use of welding Sooner or later everything fails. But when the heating battery leaks, many people don’t know what to do. But almost everyone has to face this problem. In order to avoid damage to your own and your neighbors’ property, you must adhere to a certain procedure. In addition, during the heating season, hot water flows in the radiators, which can burn you. Therefore, everyone should know what to do if the heating battery is leaking.
Air conditioner thermostatic valve
Downcast
. Why are you afraid of them (utility workers)? You pay them money every month, right? So don’t ask for your money, but DEMAND! Don’t humiliate yourself and don’t beg - take the paper and write an Application addressed to the head of the housing office (or whatever it’s called in your area). Complain - that you called his employee, he came, did nothing, i.e. refused to perform his DUTIES. And that if “tomorrow” you flood your neighbors, then during the debriefing you will at all levels blame him - the boss - for the inaction that led to it. ".
Message from Novosel
as an option, they will first require you to pay a receipt, they have a price list
You are contradicting yourself.
If they are “obliged”, what is the payment?
A leak in a heating radiator is, although unpleasant, a fairly common failure that residents of houses or apartments encounter sooner or later. The main reason for leaks is, of course, aging of pipes and metal corrosion. Sometimes a leak appears due to improper installation of connections or due to excessive mechanical stress on the heating system.
Radiator
Sometimes the reason may be the choice of the wrong materials (for example, if a silicone gasket is placed in a pipe connection, it will deform over time, which is why a leak will appear).
Unfortunately, many ordinary people believe that to eliminate the problem it is enough to simply place a basin under the dripping pipe. The result is always the same - a burst pipe, water on the floor, angry neighbors downstairs.
If your radiator leaks, call a specialist immediately!
However, there are times when you have to fix the breakdown yourself. What to do in this case?
First, you will have to turn off the heating and release all the water from the pipes. If you live in a multi-story building, the valves will be located in the basement. Be sure to put a sign on them indicating that repairs are underway, otherwise anyone can go down to the basement and fill the system. In this case, streams of dirty hot water will flow into your apartment.
The heating battery is leaking - what to do?
The first thing to do if the radiator is leaking, as in the photo, is to turn off the water. But if the leak is serious, then it is urgent to call an emergency team - plumbers have all the necessary tools and materials to eliminate the problem if the battery leaks. If boiling water is pouring out of the radiator in all directions, then you need to throw something thick over it - for example, a blanket. This is not a way to get rid of a leak, but at least you will be able to approach it without fear of injury. Next, if possible, you need to turn off the water. It’s good if there is a tap or valve in the apartment itself - this will allow you to quickly turn off the water supply and save your property. But what if there is no such valve and the radiator is leaking - what to do? Then you need to turn on the coolant supply valve to the heating system, which is located on the main pipe near its entrance to the basement. If the leak is minor, then you can try to fix it yourself (for more details: “How to fix a leaking heating pipe if it is leaking”).
To come in
Already registered? Sign in here.
There are no users viewing this page.
Find out the cost of repairs
Why do clients choose us?
Heating and Repair
We have the best prices!
The heating system has a connection system: a boiler, an expansion tank, batteries, air vents, pipes, fasteners, manifolds, pressure-increasing pumps, and thermostats. On the open tab we can find and select the necessary parts of the system for the garage. Garage Heating Assembly Includes Important Components
Any node is important. Therefore, the correspondence of parts of the structure must be planned technically carefully.
Thanks to the wonderful film “Afonya,” replacing a gasket in a faucet has become an almost anecdotal situation. Despite all the achievements of civilization, if a faucet leaks in the kitchen or bathroom, it is sometimes simply unrealistic to wait for qualified help from a plumber from the management company. But if the faucet is leaking in the house: how to fix the plumbing equipment yourself? This is not the most difficult task. You need to find out the cause of the problem and fix it using a simple set of tools.
How to fix a leak
There are several options for solving the problem, using:
- self-tapping bolt;
- rubber pad with wire or clamp;
- cement-plaster bandage;
- fabric impregnated with heat- and water-resistant glue;
- special sealant;
- welding
The easiest way to fix a small leak in a cast iron radiator is to fix a self-tapping bolt in the hole. It must be remembered that all these methods of eliminating leaks are only a temporary measure - it is advisable to replace old radiators with new products as soon as possible.
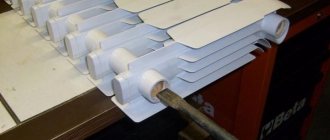
Cement-plaster dressing to eliminate leakage of the heating radiator
Before fixing a leak in the heating battery, you need to prepare the required materials and tools:
- cement;
- alabaster (plaster);
- container with water;
- salt;
- medical bandage
To eliminate the leak, a bandage is applied to the damaged area.
The procedure after turning off the water is as follows:
- dilute cement in a container with water to the consistency of thick sour cream;
- cut the bandage into strips 25-30 centimeters long;
- thoroughly soak the bandage with the cement mixture;
- wrap strips around the damaged area.
The process is repeated until a durable bandage is obtained. If it was not possible to turn off the water, then instead of cement you need to use alabaster, which dries much faster. Then a cement bandage is applied to the plaster cast. If the heating battery leaks at the threaded connection, you can use salt:
- wet strips of cloth or bandage in water;
- roll the material thoroughly in salt;
- wrap the leak area.
The gap will close as a result of the salt dissolving in the water. A cement bandage is applied on top.
Correct check of radiators before the heating season
Battery checks should be carried out in the summer. Immediately after the heating season, it is recommended to perform pressure testing. To do this, increase the hydraulic pressure in order to identify weak points. If leaks are detected, they are repaired.
Checking radiators should consist of several stages:
- Thorough external cleaning of radiators . Dirty batteries weaken the system and cause unpleasant odors. In addition, uncleaned batteries can become sources of harmful microorganisms that can bring illness into the home. When servicing equipment, detergents should be used.
- Cleaning the batteries inside . To do this, you can use dust brushes with a long handle. You can buy periscopic devices on the market to get to the most inconvenient corners. It is advisable to carry out internal cleaning at least every 5-7 years.
- Adding water . When the radiators are already clean, you can begin ventilating the heating equipment. During downtime, a large number of air pockets could appear that block water circulation. The air should be completely expelled from the system.
Poll: Do you carry out annual inspection and pressure testing of your heating system?
Battery leaks in heating systems occur quite often. You always need to be prepared for this. Scheduled maintenance of the heating system guarantees uninterrupted operation for a long time. But it’s still better to always play it safe and keep the necessary tools and supplies at home in case of breakthroughs. The equipment must be monitored at all times to avoid unpleasant consequences.
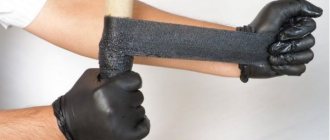
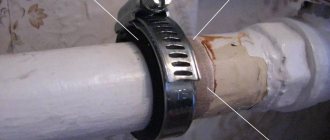
Using a clamp and rubber as a means to eliminate radiator leaks
If the damage is located at the junction of the main pipe and the radiator, then the leak can be removed for a while using wire and a rubber band (car clamp). A piece of rubber is wrapped around the damaged area and secured with wire.
If you cannot find a special remedy for eliminating radiator leaks, then you can simply cut pieces of rubber from a bicycle inner tube - the strips should be 30-35 centimeters long and 4-5 centimeters wide. Using a clamp, you can stop the leak for a while. For this reason, it doesn’t hurt to have a few clamps in stock at home - their price is low.
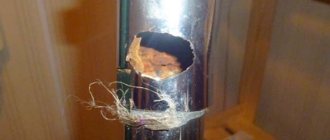
Depressurization of the radiator wall or fin
This kind of damage brings big trouble. It is extremely difficult to fix a problem when the battery is leaking, but for a short time you can find a way out of the situation. The method is quite simple.
The small hole on the battery needs to be enlarged. Before doing this, you need to turn off the water and reduce the pressure. Using a drill, make a hole larger than it was. A wooden peg is inserted into the drilled hole. When exposed to water, it swells and stops water leakage.
You can also use a self-tapping screw with a rubber washer instead of a peg.
Of course, leaving the battery in this state for a long time is dangerous; the section must be urgently replaced with a new one.
Hermetic seal to eliminate leaks
As for how to fix a heating radiator leak, if there is minor damage, you can use a powder or polymer-based sealant. They can be found in hardware stores.
Such a composition polymerizes upon contact with air, and as a result of hardening, a strong filling is formed, which gives time for significant repairs. Some sealants are two-component polymer compounds, and harden as a result of mixing their two components. Other products harden as a result of a chemical reaction with air. Using sealants designed specifically to fix leaks, you can solve the problem in a matter of minutes.
Mixer device
Ball valves, regardless of their location and manufacturer, always have the same design, which greatly simplifies repairs. It is enough to figure it out once and then solve all the issues without any problems. Mixers of this type consist of the following parts:
- The handle is a rotary type, fixed with a screw that can be unscrewed with a small hexagon.
- The faucet cover covering the work area is usually spherical in shape.
- A rod, the fastening of which is sealed with a washer and nut.
- A spout through which water is supplied.
- The body, inside of which the rod moves and the cartridge is located.
- A ball-type cartridge that is held inside by rubber seats.
- Seals that prevent water leaks.
By the way!
The system works very simply: when you lift the lever, the cutouts in the cartridge and the holes in the seats are aligned and water flows into the spout. Due to rotation, the cavities shift, changing the proportions of hot and cold water. This allows you to set the optimal temperature in just a few seconds.
Welding Application
If you have certain skills and a welding machine, you can simply weld the leak. This is the best way to solve the problem, but it is not suitable for all radiators - only for steel appliances. If the battery is leaking, what should you do? The first thing you need to do is stop the water supply to the heating device. It’s good if the leak occurred in the summer, but much more often they happen during the heating season. Since you can simply scald yourself with hot water, you must first turn off the coolant supply.
In case of serious damage, it is necessary to call an emergency team - experienced plumbers will be able to quickly solve the problem. If the leak is small, then it can be eliminated using improvised means. But you need to remember that any method of eliminating a leak will only help temporarily restore the operation of the heating device, so it is recommended to change it in the near future.
One way to fix a battery leak is shown in the video:
Required Tools
Before work, it is important to collect the necessary set of tools. They should be at hand at any time needed
So, for the job you will need an adjustable wrench, a flathead and Phillips screwdriver, and wrenches. Often, this modest set should be enough. It happens that a kitchen faucet leaks suddenly and heavily. How to fix it, what keys are needed - it’s impossible to say specifically here. The fact is that each manufacturer has its own standards. A set of keys that every motorist has will be sufficient.
It would also be a good idea to prepare various additional elements. These can be pieces of rubber, leather, from which gaskets can be made. A fluoroplastic sealant in the form of a tape, rags, and detergents may also be useful.
Sometimes during the repair process, keys or any other tool may fall - in order not to damage an expensive sink or sink in this way, place a sponge, rag, or something else under the bottom that can absorb the shock.
Kinds
Let's start with definitions. There are taps and mixers in the bathroom and not in the kitchen. Taps only supply water; mixers also allow you to regulate its temperature by mixing two streams - cold and hot water. In this article we will talk specifically about taps and how to repair them. Faucet repair is very similar, but has its own characteristics. By the way, you can read about the repair of single-lever faucets.
There are several types of taps for the bathroom or kitchen:
- valve;
- single-lever (also called cartridge or flag).
Cranes - flag and valve
Their devices are different, so the repair, even with the same damage, is significantly different. Therefore, we will consider each type separately.
Do-it-yourself valve repair
Valve taps can be called classics of water supply. And, although they are gradually being replaced by new designs, there are still plenty of them. Their internal structure has not changed over the decades. Only the design has changed - it has become more diverse and sophisticated. Today you can find both the most ordinary models and very exotic ones.
Structure of valve taps
Water taps of this type are still used today, as they are simple and reliable, serving not for years, but for decades. If all the “filling” is of proper quality, all that can fail during this time is the gaskets. Replacing them is the main way to repair a valve.
Replacing the rubber gasket
If the faucet in the kitchen or bathroom continues to drip when the valve is completely closed, most likely the reason is that the gasket on the valve has lost its elasticity (see photo in the next paragraph). It no longer presses tightly against the saddle, which is why water continues to flow and sometimes the faucet not only drips, but even flows. To repair the faucet in this case, replace the gasket. To do this, you will need a wrench, or better yet, an adjustable wrench and a set of spacers.
Before fixing a dripping faucet, turn off the water supply (you can completely, you can only in this thread, if possible). Next, it’s a good idea to make sure that the water is turned off. The water doesn't flow - we're starting repairs. You will need a wrench or wrench. They will need to unscrew the head housing (the top part of the housing).
It is better to work with an adjustable wrench. To avoid damaging the surface during the operation, wrap it with a soft cloth and then apply the key. Unscrew the head and remove the valve. Now you can replace the gasket or install a new valve. You pry off the old one with something sharp - you can use a screwdriver with a flat blade, you can use an awl, etc.
When choosing a gasket, please note that its edges should be beveled at approximately 45°, otherwise the water supply will make noise during operation. If you don’t have one like this in your arsenal, you can trim the edge with something sharp - a knife or scissors.
Replacing the gasket in a faucet in pictures
If there is no suitable gasket, it can be cut from a sheet of dense rubber (porous is not suitable). The thickness of the rubber sheet or gasket is 3.5 mm, the inner diameter is slightly less than the diameter of the rod, the outer one should not protrude. Don't forget about the 45° beveled edges.
Having installed the gasket, put the valve in place and tighten the head. New models do not require winding on the thread. Moreover, winding is contraindicated - it can cause a crack in the body. If an old tap from the times of the USSR is being repaired, tow is placed on the threads, lubricated with packaging paste, and then tightened. After this, you can turn on the water little by little.
Sometimes the opposite story happens with this gasket on the valve - water does not flow or barely oozes out. In this case, the gasket came off the stem and blocked the flow of water. First, you can try opening/closing the tap a couple of times, and if that doesn’t help, you need to repeat the operation described above, that is, repair the tap by replacing the gasket. Just remember to remove the old one stuck to the saddle.
Water seeps out from under the stem
If water drips from under the valve, the seals are most likely worn out. There are two ways to repair a faucet with a leaking stem. To begin with, you can try to tighten the head housing more strongly. They do this again with an adjustable wrench. It is not advisable to use pliers, as they leave marks. Tighten the head as much as possible (just don't overdo it).
Valve valve structure
If the threads are tightened as much as possible and water continues to ooze out, the gaskets on the oil seal must be replaced. To do this, first tighten the tap to the limit, then remove the tap head again, pry it with something sharp and remove both rubber rings, replacing them with new ones.
The water does not shut off
If the gasket is changed, but the water does not shut off, when the tap is rotated, the thread breaks, the rod needs to be changed - the thread on it has worn off. There are two options here - replace the stem itself or the entire valve head.
There may be a hole in the saddle
If the threads are not worn, the gasket is new, but the valve is leaking, inspect the seat. There may be a hole in it. It forms gradually - it is washed away by water supplied at high pressure. If the gasket is not pressed tightly in some place, a sink will form in this place. Sometimes water completely undermines the entire circumference, forming sharp edges that quickly damage the gasket. The hole and sharp edge must be removed. Take a regular screwdriver and run it along the edge to dull the sharp edge. The same operation can be done using a natfil or a piece of fine-grain sandpaper. The main thing is to achieve a smooth (as much as possible) and non-sharp edge.
Preparation and necessary tools
The first rule of any plumbing repair is to turn off the water supply. Valves can usually be found in the toilet; the levers simply need to be turned 90 degrees. If the equipment has not been used for a long time, the valves may become blocked. It doesn't take any heroic effort to turn them. This way, you can simply rip off the tap and then instead of one problem you will have to solve two
Valves should be developed carefully, gradually increasing the effort and adding lubricant drop by drop.
Only after the water supply is securely shut off can repair work begin. First you need to prepare the necessary tools so that they are at hand:
- adjustable wrench;
- flat screwdriver;
- crosshead screwdriver
- wrench, etc.
Usually this simple set is quite enough. Auxiliary elements will not interfere, for example, pieces of rubber or leather for making new gaskets, fluoroplastic sealing tape, which replaces liners, rags, sponges, detergent to remove dirt accumulated inside the mixer, etc.
Advice. To prevent an accidentally dropped tool from damaging the sink or bathtub, it doesn’t hurt to put something soft underneath: a rag, a piece of foam rubber or other material suitable as a shock absorber.
The reasons why a faucet is leaking can be very different. For a traditional two-valve faucet, the most pressing problem is the wear of the gasket or liner, which needs to be replaced. If a ball (or hinge) valve, which is designed fundamentally differently, is leaking, completely different actions will be needed.
How to fix a faucet with a cartridge
Most often, faucets with one lever are installed in the bathroom or kitchen. They are also called flag or single-lever. A special device, a cartridge, is responsible for opening/closing the water in it, which is why they are also called cartridge ones.
Cartridge tap
There are two plates with holes inside the cartridge. The lower one is fixed rigidly, and the upper one is movable. A rod is attached to it, and it, in turn, is attached to the handle. By turning the handle, we move the rod, and it moves the movable plate, which opens/closes the water and changes its pressure.
If there are problems with such a faucet, it can only be repaired by replacing the cartridge. The main problem with them is that they start to leak - water oozes or drips from under the handle. To repair a leaking or dripping cartridge faucet, you need to replace the cartridge. The only way.
Replacing the cartridge
The first step is to turn off the water, then remove the handle. To do this, first remove the colored plug - it covers the screw. After unscrewing the screw, pull the handle up, separating it from the stem. After the handle is removed, unscrew the pressure ring - it holds the cartridge. Now all that remains is to take it out.
Then, along with the cartridge, you need to go to the store or market and buy exactly the same one. The new one must match in size, the holes in its lower part must have the same shape and location. Basically, you need to find an exact copy.
How to disassemble a faucet with a cartridge
Assembly occurs in reverse order:
- place the cartridge (strictly vertically, twisting it a little around its axis so that the protrusions in the body fit into the recesses on the cartridge),
- tighten the clamping nut;
- install the handle;
- screw in the fixing screw;
- insert the plug.
An initial check can be done after the pressure ring has been installed. You can turn on the water and check if the tap is now flowing.
If the water flow becomes too weak
Most modern faucets are equipped with a mesh on the spout that traps solid particles that may be contained in the water supply. If the stream of water gradually becomes less elastic, and the pressure on other taps does not change, the reason is that this very mesh is clogged. In this case, you can fix the faucet in a couple of minutes.
Need to clean the mesh
Unscrew the nut with the mesh, which is located at the end of the spout. Rinse it, clean out clogged holes (you can use a needle or an old toothbrush). Place the cleaned mesh in place.
Criterias of choice
Choosing a Mayevsky crane is quite simple. There are not many criteria and they are all quite easy to understand. Let's go through each of the significant parameters separately:
- Centralized or decentralized heating system. For a decentralized system, you can safely install Mayevsky’s mechanical cranes as usual. For centralized systems, it is better to take care of a tap with a safety device.
- Dependent or independent heating connection diagram. To independently connect the system to the heating plant, it would be rational to use automatic valves. For an addict: it is better to use the usual one.
- Depending on the type of wiring. For horizontal wiring, it is better to provide valves for each radiator; for vertical wiring, you need to install air vents only on the top floor. But this issue is dealt with by designers or installers rather than by apartment owners. If there are problems with air locks: just install the valve.
- Another important point is the control valve. It can be sharpened for a square wrench, or for a regular screwdriver. For private households, it is better to use a bolt with a screwdriver head. This will be easier to adjust, and there is a screwdriver in almost every home. In apartments, Mayevsky taps are often installed at the design stage, providing taps for square keys. This is one of the precautions so that the average user does not try to independently adjust the heating system.
Mayevsky crane installation diagram