I recently renovated my kitchen. Everything turned out well, but I completely forgot about the heating radiators. I must say that I still have them of the Soviet type - “accordion”.
The paint has peeled off over time and rust has appeared in some places. Now I'm thinking about what paint to cover the battery with. The heating season has begun, and everything will have to be done on a hot surface.
Before working, I familiarized myself with what professionals and amateurs advised. And at the end of the article I will share with you what happened with the coloring.
The story was shared by blog subscriber Ruslan.
Is it possible to paint hot heating pipes in an apartment?
If you use a special dye correctly, you can give pipes and radiators a pleasant, updated look even during the heating season. But when choosing such paint, you need to have certain knowledge. After all, the work will be carried out in a residential area, therefore, special requirements are imposed on the dye:
- absence of harmful fumes;
- short drying period;
- long service life;
- protection of metal from rust;
- ease of use.
But even when choosing a paint with optimal characteristics for painting batteries, the average person can make a lot of mistakes when painting, since they still need to properly prepare the surface, select a tool and perform the work properly. More on this later.
Painting hot batteries
After preparing the radiator, you can proceed directly to painting. A few recommendations when painting the battery:
- Painting of the battery begins from its upper part, preferably from the inside. If you do not want to stain the floor with paint, then you should place newspapers or plastic wrap under the radiator. The wall behind the battery should be covered with tape or at least covered with cardboard. And in order to better paint the back of the radiator, you should take a special brush with a rounded handle;
- It is recommended to apply paint in several layers, but they should not be too thick, otherwise the battery will take a very long time to dry. It is best to apply one coat, wait until it dries, and then apply the next one;
After the battery is painted, you need to leave the room and wait until the paint is completely dry. If there is such an opportunity, then it is worth opening a window or at least a window.
Painting a battery in winter is not such a difficult task. The main thing is to choose a good heat-resistant paint and apply it correctly.
Color options
- over the old layer, only if it is smooth and undamaged (no cracks, chips, bulges, etc.); preliminary sanding of the surface or complete removal of the old paint: if the previous layer is damaged (cracks or swelling are visible) or you notice rust (remove it with a metal brush); if the old paint comes off, it must be completely removed and then painted.
Don't forget the primer if needed. The primer mixture is applied to a clean and dry surface, so thoroughly wipe the pipes with a damp cloth and wipe them dry with a rag.
Wait until the primer layer dries and only then start painting.
As a rule, the paint is applied very simply and does not dry for long.
Try to keep the layer minimal. If the paint is translucent, it is better to open it twice with a thin layer than once with a thick one. Although usually even manufacturers recommend applying at least two layers of coating.
After the primer has dried, apply the paint with a roller or spray gun, and you can reach hard-to-reach places with a brush (if you can’t get by with a straight brush, use a special radiator brush - it will easily fit into a thin opening and paint the part of the pipe hidden from view).
Features of surface and enamel for painting
To paint the surface of a slab, you do not need to have special knowledge; it is enough to have basic information and take into account some features when painting yourself. But it is worth considering the fact that ordinary enamel is not suitable for painting the surface of a gas stove, since when exposed to high temperatures, such paint very quickly deteriorates and peels off.
You can paint the stove at the place where it is installed, but it is still advisable to temporarily disconnect the device from the gas supply network.
First, let's look at the type of surface of gas stoves. So, most often, in the manufacture of gas appliances, alloyed stainless steel is used. The metal has a high degree of resistance to high temperatures.
This surface is painted with special enamel to protect the coating from corrosion and give the gas appliance a beautiful appearance.
Before you start painting the gas stove, you need to remove the old layer of paint. To do this, you can use a metal brush, sandpaper or a chemical agent. Only after this can you start painting the old surface.
Plain enamel or acrylic paint is not suitable for painting the surface of a gas stove. Because when exposed to high temperatures, it will melt and burn.
The paint for the surface of a gas stove must be resistant to high temperatures and other destructive factors.
As a rule, enamels with the following properties are used for painting:
- Internal stability. Such enamels withstand high temperatures well and do not deteriorate in conditions of high acidity.
- External stability. This protection is designed to protect the metal surface; the enamel protects both from thermal stress and chemical processes.
Such characteristics are necessary for long-term use of a gas appliance in aggressive conditions.
Heat-resistant paint is intended for painting surfaces exposed to high temperatures. This option is suitable for painting the slab yourself
To achieve the required level of stability, enamel for restoration of a gas stove must include the following elements:
- quartz sand;
- soda;
- feldspar;
- borax.
All these elements form a transparent mixture, to which you need to add some more components.
To obtain the most effective paint for devices exposed to high temperatures, the following elements are additionally added during production:
- alumina;
- zinc;
- alkaline elements;
- titanium;
- lead.
This entire composition forms a high-quality paint with high resistance to aggressive factors and imparts a beautiful shine to the painted surface.
It is worth noting that enamels with the addition of cobalt and nickel oxides have better adhesion to the element being painted. This paint can be applied even to a surface that has not been treated with a primer.
Technology for painting polymer pipes
You can paint hot pipes made of polymer materials only after preliminary preparation. This is due to the fact that the glossy surface of the pipe prevents high-quality adhesion of the paint, and the coating will leave much to be desired, which will entail the need to apply several layers of paint. To prevent this, the surface of the pipe is cleaned with sandpaper.
At the next stage, the pipes are wiped with a damp cloth after sanding to remove dust. Make sure the pipes are dry and clean before painting. After this, it is necessary to cover the floor and walls with protective material (film) to prevent paint from entering.
If you use high-quality paint, which was mentioned earlier, then you can paint the pipes without prior priming. Otherwise, it makes sense to cover the surface with a primer and only after it dries, apply paint. The heat level of the pipes does not matter when using high-quality paint, because its range of use allows painting at any radiator temperature.
Pipes are painted with a brush 5 cm wide. You can also use a roller in places where this is possible. Apply the paint in a thin layer so that there are no smudges. If the surface is not completely covered, painting must be done a second time.
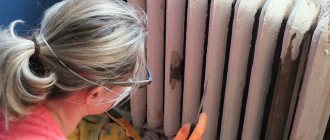
How to prepare a radiator for painting
Batteries are prepared for painting as follows:
- Use a damp cloth to thoroughly wipe all sections of the heating device. In case of severe contamination, wash the battery using detergents.
- Rust is removed with sandpaper (a piece of sandpaper). If the corrosion is deep, it is removed with a metal round brush inserted into the drill chuck.
- Hard-to-reach places are treated with a rust converter. The chemical solution converts iron oxides into a durable anti-corrosion layer. The liquid is applied with a suitable size brush. You need to work with gloves.
- Prepare the wash. The solution is applied to a hot battery and covered with film. After about two hours, the swollen old paint is removed with a spatula or a metal round brush. The wash can be prepared at home. To do this, 1 kg of soda is mixed with the same amount of slaked lime in 5 liters of water.
- Finally, all surfaces are sanded and degreased with white spirit.
- The heating device is coated with a special primer. The primer increases the adhesion of paint to the cleaned surface of the battery.
If the preparatory measures have been carried out correctly, the paint will ideally lie on the treated surfaces of the heating devices when hot.
Painting pipes: tips from professionals to self-taught ones
How to choose coating paints
The coating is selected depending on how the product will be used. If the pipes are intended for hot water supply (for example, heating or bathroom), then be sure to choose a material that can protect against rust when exposed to hot water. When you see the “hot water supply” marking on the package, you can safely take it from the store shelf. Anti-corrosion paints are: pentaphthalic, organosilicon and alkyd. You can also use water-dispersed ones, but only before thoroughly priming the surface to be painted. Oil paints should not be used because they quickly change color.
- Alkyd paints. Pros: they provide good coverage, withstand high temperatures, resist mechanical stress and are wear-resistant. The color palette of this paint is varied. Cons: smells unpleasant even after drying.
- Water-dispersed. Pros: dry quickly and do not have a pronounced odor. Cons: they lose color over time and require updating.
- Acrylic. Pros: they give a glossy shine and are made from organic components; they retain their original appearance for a long time. Cons: they take a long time to dry and have a persistent and pungent odor of acetone and other solvents.
For cold water, pipes are painted with materials that can resist condensation. They should adhere well to the metal and be applied without gaps. Be sure to clean the pipes from the old coating, otherwise the new layer will peel off. Even if everything looks normal on the outside, it is quite possible that the old layers are susceptible to corrosion and have already begun to peel off.
There are many types of paints in stores. The most popular of them are PF-115, because they are inexpensive and durable. But you can also use polyurethane and epoxy materials, which are more resistant to various influences.
You can also try special enamel for rust, but it is much more expensive than regular paints, since it contains a rust inhibitor, a primer with adhesion and the enamel itself.
How to paint pipes: step-by-step instructions. Step 1: prepare surfaces for painting
The main thing at the first stage of work is cleaning the old coating, especially areas with rust. To do this, use a tin brush with coarse bristles. It is also worth using all kinds of solvents. To be safe, wear gloves and a protective mask against fumes and dust. To ensure that the old paint is removed almost imperceptibly, the surface is heated with a hairdryer, and only then they begin to clean. After this, grease, dirt and dust are cleaned from the coating using a special composition. All of the above is done to ensure that the metal is preserved for as long as possible.
Step 2: prime the pipes for long service life
The main guarantee of protection against rust and uniform application of the topcoat is surface priming. Builders recommend using alkyd paints because they do an excellent job of preserving steel surfaces. Prime the coating with one layer and wait until it dries completely before continuing the next work.
Step 3: paint the pipes
You will need a medium sized soft brush. The paint should be applied in several layers, as this will ensure an even coating. It is best to paint in 2 layers, with the 2nd being applied only after the 1st has completely dried. You should not use thick paint, since when painted it lays down in a thick layer, and when it dries, it forms unsightly streaks. Therefore, it is diluted with a solvent so that it lies evenly.
Also, so as not to have to repeat all the work over and over again, the pipes must be completely dry.
How much paint is needed: calculation formula
Typically, paint packages indicate how much paint is used per 1 m² in one layer. But if there is no designation, you can use a simple formula.
Pipe length (area) X Pipe diameter X number π (3.14).
Don't forget to factor in the fact that the paint is applied in 2 layers, and then buy the required amount of paint.
How to paint polypropylene pipes
Often there is no need to paint plastic pipes, but to improve the aesthetic qualities of the product, they are still painted. For plastic, as for metal, there is a primer, but its use is not so useful. The best paints for polymer products are mineral, acrylic, pentaphthalic and emulsion. The only thing is that you should not use water-soluble paint, as it will wear off very quickly during cleaning. You can use any color from the palette related to the selected paint.
A visual demonstration of the above instructions is shown in the video.
Good luck with your renovation! Add more color to your home!
What to consider when choosing enamel?
1. To decide which paints are suitable for heating pipes, you need to understand their features and characteristics. The quality of the coating depends not only on the enamel; it is important to purchase the appropriate primer composition. For metal communications, alkyd-based mixtures with an anti-corrosion effect are more suitable.
2. If you need to choose odorless paint, you can choose aqueous acrylic solutions.
3. There are types that include three properties: priming ability, with a rust converter in the composition and painting function.
4. For pipes with an uneven surface, if there is an old layer, it is better to use matte products that help hide defects.
5. Glossy enamels are suitable for smooth and even parts during initial application.
6. The use of oil solutions is undesirable, since under the influence of temperature they change color, do not last long and cannot protect the metal from corrosion.
Powder and hammer types
These are not quite ordinary enamels. Decorative varieties are an alkyd base that allows for non-uniform coloring. Depending on the type of filler, the surface can be given the effect of embossing or carving. With the help of the mixture, all the roughness of the heating system communications is well masked. Easy to apply at home by spraying.
Powder paints are used only in factory conditions, due to the application technology. This is a dry product that is supplied from a special gun under the influence of steam or galvanic current. Thanks to innovation, the treatment process results in an even distribution over the entire substrate. For strength and stability, subsequent polymerization is required, through which the powder turns into a monolithic shiny layer. The result is a surface protected from mechanical influences and shockproof. This technique is suitable for pipes with coolant temperatures above 600°C.
Accuracy
Do not forget that you must be careful not to stain the objects around you.
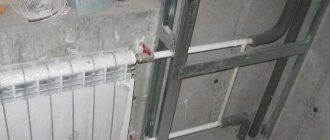
Often the pipes are located in niches and can be difficult to get to. Therefore, apply the primer first, and apply the paint with a spray gun so that the layer is thin and even. In addition, it will significantly reduce the overall operating time.
Paint elements from top to bottom. In this case, you will avoid unnecessary drips and waste of paint, and the surface will be neater.
Each element must be painted on all sides, including those hidden from view, and not just on the front side.
Now you know how to paint heating pipes, so next time you can do it yourself.
https://youtube.com/watch?v=DHq_Ot0RoNMrel%3D0%26controls%3D0%26showinfo%3D0
This article was produced by our experienced team of editors and researchers, who reviewed it for accuracy and comprehensiveness.
Number of sources used in this article: 18. You will find a list of them at the bottom of the page.
wikiHow's content management team carefully monitors the work of its editors to ensure that every article meets our high quality standards.
Most people believe that PVC pipe is difficult or even impossible to paint due to its smooth surface. But with proper preparation and having the right tools, completing this task becomes incomparably easier. And while PVC does contain certain compounds that make it water-resistant and prevent foreign substances from sticking to it, a little sanding and a coat of primer will allow you to change the color of PVC pipes to any shade you like.
I want to paint the ventilation grilles, electrical box covers and radiators in the kitchen to match the color of the wall. Well, simply because in the kitchen, apart from the above-mentioned elements, there is nothing white at all.
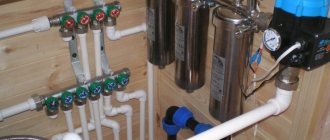
I bought water-dispersed “heat-resistant enamel for radiators” “AQUA”. Painted the vent. grilles and metal-plastic pipes leading to radiators. I had to paint it in several stages, because enamel naturally doesn’t adhere well to plastic. But everything seems to be covered. However, when the paint dried, it began to peel off easily from the surface.
I understand that answers like “What did you want? Naturally, enamel will not stick to plastic.” However, I would like to receive more objective advice.
It is better to buy radiators of a certain color - I already understood this from the forum. But how to paint the rest? 1) Plastic ventilation grille 2) Metal ventilation grille (i.e. already covered with factory white paint) 3) Metal-plastic heating pipes (i.e. they have white plastic on the outside).
For what?
The main reason to paint pipes is, of course, to protect against corrosion. Alas, there is no escape from steel pipes: in the second half of the last century, for reasons of saving on heating, cold and hot water, steel pipes without anti-corrosion coating began to be installed en masse .
In the eighties and nineties, the situation was aggravated by the fact that construction organizations carrying out the installation of utility networks practically ceased to be controlled and at the same time found themselves under strict financial limits.
The consequence was the massive use in heating and water supply systems of the cheapest thin-walled steel pipes, originally intended for gas mains.
As a result, the pipes, already not a model of reliability, literally crumbled into dust over a dozen years without painting. Paint could only delay the inevitable; but this is better than nothing.
Unfortunately, steel water pipes in apartments are still the most common today.
Tip: a galvanized pipe itself does not need painting to protect it from rust. However, the protective layer of zinc on the threads may be damaged; and it’s better to paint the threads.
On galvanized surfaces it’s worth at least painting the threads
Drying cold water pipes
Painting pipes in the case of cold water begins with drying. The fact is that cold water supply pipes are noticeably colder than the air in the apartment most of the year. The consequence is the formation of condensation on them .
Drying the liner with cold water is quite simple:
- Collect a supply of water that will last you for a day;
- Do not use cold tap water during this time. During this time, the pipe, along with the water in it, will reach the room temperature, and all the moisture will evaporate from it.
If you need to paint the cold water riser, you will have to use a fan. Under sufficiently strong air flow, water evaporates faster than it condenses. In any case, when the temperature difference between the pipe and the air is 10-15 degrees, as is usually the case.
Condensation inevitably falls on a cold pipe
Painting
Finally, let's get to the main point.
How to paint pipes?
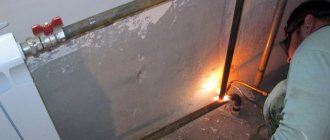
- Prepare the surface . Old paint and rust must be removed from it. Layers of paint can be easily removed with a regular sharp knife; You can carefully heat the paint with a hair dryer or a gas torch (a can with a nozzle).
Attention: do not overheat the threaded connections. If the winding burns out, the thread will leak.
- Clean the surface of the pipe with a wire brush . This final stage of surface preparation of the water pipe will remove any remaining rust and paint from the pipe and prepare the surface for primer.
When preparing the pipe surface for priming, a wire brush is necessary.
- Prime the pipe . An anti-corrosion primer will help protect the pipe from rust; the paint will stick much better.
- After the primer has completely dried, the pipe is painted, usually twice . It is better to use thin layers of liquid paint. If necessary, thin the thickened paint. If it is thick, it will take much longer to dry, and untidy drips from the water supply pipe will not beautify it.
A special case
People often ask whether it is possible to paint hot pipes. The answer is yes.
But, as usual, there are subtleties.
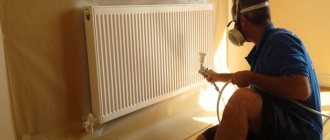
- Whatever paint you apply with a brush, it will dry on a hot surface much faster than you rub it . The result is an uneven layer of paint and visible brush marks. The solution is simple: buy spray paint. Or use a spray gun.
Please note: attempts to protect the wall with newspaper will most likely lead to streaks remaining on the wall, and at the same time on the floor. Don’t be lazy, secure with tape a large enough piece of plastic film so that one piece covers both the wall and the floor underneath it.
- Paint will smell when drying on a hot pipe or radiator . No not like this. SMELL. Take care of ventilation, or in half an hour you will be animatedly communicating with aliens or gnomes in green hats.
Excuse me... but... could you ventilate the room?
- The first paint you come across, especially white, will quickly change its color on a hot pipe . The correct paint for hot pipes is heat-resistant enamel, on which the manufacturer has explicitly indicated the upper operating temperature range of at least 100 C.
For hot pipes and batteries - heat-resistant enamel
Reasons for painting pipes
We all know that paint, applied even in a small layer, serves as protection for water and heating pipes.
It prevents their corrosion. In addition, using paint of a certain color, you can complement the interior or simply successfully fit pipes and a radiator into it. And even if the radiator you bought already has a suitable color and a protective layer against corrosion, the same cannot be said about the pipes.
It doesn't matter what material they are made of. It is better to treat plastic and metal pipes with paint
There are a number of reasons why this measure must be carried out without fail:
- The layer of old paint has begun to peel, cracked, or has been damaged in some other way. You have just installed pipes that do not yet have protection against corrosion. The need to create completeness in the interior, decorating the heating elements. A planned measure to prevent damage to the heating system.
Reasons for painting a gas pipeline
Painting of pipes transporting gas to consumers is carried out not only with the aim of giving an aesthetic appearance to communications.
Reasons for painting gas pipelines include:
- highlighting the gas pipeline with color and distinguishing it from other communications;
- protection of metal from corrosion, which significantly increases the service life of gas pipes.
The Gas Supply and Gasification Department has every right to turn off the gas if the communications are not in order.
Paint is the only anti-corrosion protection, so you should not skimp on it; you need to paint it in at least two layers with the consumption specified by the manufacturer
According to the standards adopted at the state level, all highways of multi-storey buildings (up to the valve) are on the balance sheet of the housing and communal services department. In apartments and private houses, the owners must monitor the condition of gas pipes.
Is it possible to paint polypropylene pipes?
Many owners have a question about whether it is permissible to paint plastic pipes.
Experts say that they can be painted. The main thing is to choose a good suitable paint and follow the correct painting technology. In this case, it will be painted with high quality and for a long period.
The only problem with painting plastic pipes is how to do it correctly, so that the painted materials remain beautiful for many years, and do not peel off and crack every month.
So, having decided to paint the pipes in your home, you should adhere to the following stages of work:
- If they are already installed, then you need to come up with a design for the room in which they are located. If this is a bedroom, then it is best to paint the pipes to match the color of the wallpaper or curtains - this way it will be less noticeable. And if it’s a children’s room, then you can add originality and paint it in a bright color. For example, with pink wallpaper, you can make an element of raspberry color or, conversely, a more pastel shade. You can also come up with an ornament. For example, make it with polka dots or stripes. You should not proceed to the next stage without resolving the issue with the interior of the room. Nobody wants to paint an element a hundred times: there is no need for unnecessary hassle and waste of money. Therefore, it is better to think through everything down to the details from the very beginning. You can use the Internet and look at alternative options, and then add something of your own.
- Having decided on what you want, you can go to the store. Here you have to choose the paint that will stick well to the pipes without losing its appearance. Painting pipes with regular paint is just a waste of money. This type of paint will not last long and will begin to peel off even before the heating season. Therefore, you need to familiarize yourself with the range of paints specifically for plastic. It is worth considering that not only cold but also hot water is supplied through the pipes in the house. That is, the paint must be designed to withstand heat.
Polypropylene pipes, threaded transitions and fittings for connections.When choosing paint, it is better to contact a specialist in the appropriate store. He is more aware of their characteristics and features. You need to explain to him what exactly needs to be painted, how and where. But since there are different consultants, it’s still worth having at least some idea about paints. So, for polypropylene pipes it is suitable:
- ordinary paint for metal;
Wall paint;
- acrylic paint;
- special paint for plastic.
- You can paint a pipe using different methods.
The choice of paint should be influenced by the type of polypropylene pipes.
What color should I paint the battery?
The white radiator is a classic. In our country, batteries are usually placed under the windows, and they are almost always white. A radiator in the color of the window sill and frames is the most common and absolutely organic solution. However, it is far from the only one.
Black batteries are very popular today. There is an opinion that a radiator painted black heats a little better than a white one. However, experts say that the difference, if any, does not exceed 1-2%. The black color of the battery is more of a design tribute than a concern for heat. Such radiators can often be found in modern interiors, especially those decorated in a loft style.
A battery in the color of the wall is a less common solution, but certainly a successful one. Of course, this does not disguise the battery or make it invisible. However, thanks to this technique, the radiator does not stand out from the general space and does not look like something alien.
Photo from the project of designer Galina Yurieva
Not many people would dare to paint the radiator in a bright color that contrasts with the walls. Making the battery a focal point is a bold move. And very effective. This design option is suitable for a modern minimalist interior.
An interesting idea is to paint the battery using the ombre (or gradient) technique. The outer section is painted, for example, white. The second has a subtle color, and each subsequent section becomes more saturated.
Photo source: the-village.ru
Colored batteries are especially appropriate in children's rooms. Here you can safely get creative. For example, decorate the radiator with patterns, drawings, and thematic painting. Or paint the battery in the form of colored pencils, rainbows, etc.
Dye selection
Various types of coloring compounds can be used as a coating for polypropylene pipes, among which the following items stand out:
- standard paints used to protect metal surfaces;
- classic dyes intended for wall decoration;
- acrylic compositions, as well as mixtures designed specifically for plastic;
- polyurethane based dyes.
All of these types of coloring mixtures are commercially available and can be purchased at a hardware store.
When determining the coating application method for polypropylene, we proceed from the characteristics of the selected composition. Let's consider each of the options proposed above in more detail.
Choosing the Ideal Battery Paint
It is important to determine which paint is best to transform radiators. There are a number of requirements that the paint applied to batteries must meet
Heat resistance of the paint is required at least one hundred degrees; abrasion resistance and non-toxicity are also required, since the batteries are regularly cleaned and the radiator itself heats up. The greatest heat resistance is achieved by paint containing metal powder instead of coloring pigments.
There are special paints for radiators on sale; many people use water-based enamels and heat-resistant varnishes. The paint you choose must be suitable for coating metal and match the primer. Good compounds are durable, do not change color, and can protect themselves from corrosion.
Glossy shine and long-term color fastness are ensured with acrylic enamels based on organic solvents. But they smell quite strong when applied.
Water-dispersed paints dry quickly, but it is important to select them carefully, choosing special types. After painting with alkyd enamels, the uniformity of the coating is guaranteed, it will be durable and resistant to influences
However, the smell can be observed not only during the painting process, but also some time after drying, released from heating.
Color selection
The decision on what color is best to paint the radiators is up to the owners. A wide range of products and various formulations are now available. White enamels and silver are considered classic. Some choose colors in accordance with the interior, lighting, general style of the apartment and design features. Gold and bronze shades, subtle patterns and designs look unusual.
If the look of your old radiators no longer pleases you, then you can try to breathe new life into them through experiments
Advantages of half proplenovo pipe
Polypropylene has a number of advantages, including:
- heat resistance (due to which they are vikorist for drinking both cold and hot water);
- wear resistance;
- thickness and value;
- resistance to corrosion.
Plastic elements can be produced in different colors. For this reason, add barnberry to the plastic. What else is there to do if you bought plastic materials in a white color and couldn’t get hold of them?
The solution is to cover the plastic pipes with tarpaulin so that they fit into the interior of the room. For example, many people want to mix such elements under the color of the walls in order to make them less noticeable. And others, for example, should de-emphasize the prefabricated pipes. For example, you can prepare them in a green color and wrap them with pieced grape leaves. Prepared in such a manner, the stench will be as strong as that of a grape tree. This option is especially suitable for the kitchen.
Temperature ranges
At what temperature is the use of special, heat-resistant primers required? Let's analyze the coating requirements at different operating temperatures.
Up to 60C
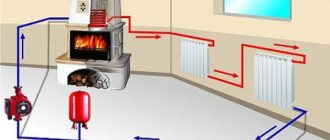
In particular, elements of autonomous heating systems fit into this temperature range. Their typical temperature difference between supply and return is 70/50C, which gives no more than +60C on the surface of the heating devices.
At temperatures from 0 to +60 you can safely use general purpose paints and primers. If the painting technology is followed (that is, if the surface is cleaned well and the primer matches the type of paint and varnish material), there is no need to worry about paint delamination or fading.
General purpose paints can be used in an autonomous heating circuit.
Up to 100C
The only significant difference from the previous scenario is the need to use paints with persistent pigments. The binder and primer remain the same as before: all popular types of paint can withstand prolonged heating without destruction.
Up to 300C
And here comes the high point of heat-resistant soils. If the instructions for using a temperature-resistant coating indicate the need for priming, you will have to select special compounds that can withstand prolonged heating and retain their properties over the entire range of operating temperatures.
Over 300C
All paints intended for temperatures above +300 degrees are applied without prior priming, directly onto a cleaned and degreased surface. A layer of soil at such temperatures will only increase the likelihood of the coating peeling off.
Particularly heat-resistant paints are applied directly to the metal base.
Is it possible to paint plastic pipes?
Plastic pipes, by and large, have quite a beautiful color. However, many people wonder whether they can be painted. If desired, plastic pipes can be painted, but not all. In addition, this will require special paint. The fact is that the surface of the pipes is too smooth and ordinary paint begins to peel off very quickly. There are two types of paints for plastic surfaces on the market, alkyd and polyurethane acrylic paints.
Alkyd paints belong to the class of environmentally friendly paints. They practically do not absorb dust and dirt. Before painting, pipes must be degreased with solvent 646 and coated with a special primer for plastic. You can paint pipes either with a brush or with a spray gun.
Polyurethane acrylic paints for plastic pipes are produced on the basis of an aqueous solvent. These paints can be given any color by adding a small amount of a special pigment. This type of paint is considered one of the best. After drying, the layer acquires increased strength. The paint adheres perfectly to smooth surfaces and does not peel off for many years. The best manufacturers of polyurethane acrylic paints are companies such as Astika, PaliPlast RP Base and NOVALIS.
As we said above, not all plastic pipes can be painted. In particular, polyethylene and polypropylene pipes cannot be painted. The structure of these materials is such that not a single paint, even the stickiest one, will stick to the surface of the pipes. PVC or ABS plastic is very difficult to paint. Firstly, this cannot be done at all without a special primer. Secondly, not every paint is suitable for this. It must contain organic compounds, and the complete drying time should not exceed twelve hours.
If you decide to paint plastic pipes, then you will have to carefully complete all the preparatory work. Pipes must be cleaned to perfect condition and degreased. Then you will have to coat them with acrylic primer. Only after this can you proceed directly to painting. As you can see, it is much easier to paint PVC or ABS pipes with water-based acrylic paint. This process does not require pre-treatment of the surface.
Plastic pipes need to be painted under certain conditions. The ideal ambient temperature is plus eighteen degrees Celsius and air humidity is not higher than eighty percent
It is very important that the temperatures of the plastic, air and paint are the same
It is best to paint plastic pipes in one layer about 0.6 millimeters thick. If there is a need to apply a second layer, this can only be done after the paint has completely dried. Do not confuse the drying of the top layer of paint with the complete drying of the entire layer. Typically, the surface of a paint layer dries in eight hours at room temperature, but complete drying of the entire layer occurs only after four days.
Step by step painting instructions
Painting cast iron heating radiators.
After the radiator has been prepared for painting, they begin to carry out a set of works on painting the batteries in accordance with the following points of the instructions.
- Covering material (PVC film, sheets of paper or cardboard) is used to cover the walls and floors around the batteries. Fix the protective coating with tape.
- Radiators are painted from top to bottom. All stains are removed with a brush.
- The front surfaces of the sections are painted with round brushes and rollers.
- The surfaces between the sections and inside are painted with radiator brushes with curved heads.
- Panel devices are painted with rollers or dye is applied with aerosol cans. Heating panels are also painted with a spray gun.
- Depending on the type of paint, a certain amount of time is maintained between layers of paint.
- The final drying of the paint is determined tactilely.
- Remove covering material.
What should the paint be like?
Do you know which open communications have the greatest length in our apartments? Of course, heating systems, and since heating pipes are a special type of surface, the painting composition must therefore meet certain requirements.
Captain Obvious informs: it is not recommended to use ordinary paint on batteries and supply pipes, since, most likely, it will not live up to expectations and will quickly become unusable.
So, what paint should you use to paint heating pipes? Among the requirements, the most important are the following:
No water permeability
It is important that the paint functions as an anti-corrosion coating. Even if the heating pipes are located in a dry room, there is a risk of rust on black steel
Properly selected paint will avoid this; The aesthetic point is no less important, since the color of the paint should not only not disturb the external aesthetics of the room, but also complement it. In principle, if the pipes are located in niches that will be closed in the future, then only protective properties will be required from the paint.
However, you should not hide any communication pipes with any insulating materials, as this will make it difficult to access them in the event of a breakdown;
Pipeline paint can be any color.
- Since the surface of the battery is often subject to heat, one of the most important points among the paint requirements is its resistance to high temperatures. Otherwise, the coating may become yellow in the future, and cracks and delaminations may appear on the painted surface.
- It is preferable to choose paints with good adhesion to metal, otherwise you will have to treat the surface to be painted with a primer.
How to calculate paint consumption for pipes?
There is only one way to calculate the volume of paint spent on painting a pipe - by comparing paint consumption rates per 1 square meter and the area of the surface to be painted.
The paint consumption per “square” of surface to be painted will be indicated on each can. These data are calculated by the paint manufacturer itself.
The area of the surface to be painted, in this case a pipe, is calculated as the area of the cylinder. The calculation formula determines this value as the product of the length of the pipe and the circumference of the cross-section of the product. Those who are too lazy to calculate the circumference using a special formula can measure this value with a flexible meter right on the spot.
As a result, knowing the area of the surface to be painted and the paint consumption per “square”, we simply multiply these values, obtaining the exact volume of paint consumption in liters. Moreover, this volume will be spent on only one layer. And if you need several layers of paint, multiply the consumption per layer by the estimated number of layers.
Causes of condensation
Drops of water form and accumulate on the cold water supply pipeline due to high humidity and significant temperature changes. Before deciding how to remove condensation from a cold water pipe, you need to find out the reason for its formation.
The most common factors:
- improper organization of the ventilation system or poor exhaust, for example, due to blockage (especially in rooms with excessively high humidity);
- leaks of plumbing equipment due to improper installation or wear (leaking faucet, toilet tank);
- the difference in temperature in the area with cold water and in the room where it passes is a problem that arises in the summer, when the discrepancy is greatest;
- constant movement of cold water due to leaks higher up the riser (for example, neighbors’ cistern on the top floor is leaking);
- poor quality of thermal insulation of the cold pipeline, incorrect installation when distributing hot and cold water - the pipes are located very close to each other;
- high humidity in the room, which can be caused by: household reasons: laundry hung out to dry; steam from a boiling kettle or cooking food;
- atmospheric or geographical nuances (proximity of large bodies of water; frequent and heavy rainfall; humid climate);
- structural defects of the building that arose as a result of deviations from the technology at the construction stage (inadequate hydro- and thermal insulation of the foundation, floors).
Each of these factors can cause condensation to form on a cold water pipe. More often than not, several conditions are to blame. Rare isolated cases of moisture are not terrible, but the constant appearance of moisture is fraught with problems.