The most common home water heater today is the electric boiler. Its malfunctions are most often caused by a breakdown or contamination of the heating element, in more rare cases - by tank corrosion, thermostat malfunctions, etc.
To save on professional repairs, you can clean and replace the heater on an Ariston water heater yourself.
Ariston water heater design
A typical boiler design consists of the following elements:
- external casing and internal storage tank with anti-corrosion coating;
- thermal insulation;
- bracket for mounting the device;
- hoses for water inlet and outlet;
- thermostat with sleeve;
- tubular electric heater (TEH);
- anode;
- flange;
- residual current device (RCD);
- mode adjustment knob;
- cable for connecting to the network.
When the device starts, the thermostat records the water temperature. If it differs from the one set by the mode, then the element supplies power to the heating element. When the temperature rises, the heating automatically turns off.
To prevent cold and hot water from mixing when the taps are opened, the point of liquid supply to the tank is as low as possible, and the point of intake is at the top of the tank. The movement of heated water is ensured by the process of convection.
Types of electrolyzers
Devices for splitting water are of the following types:
Such electrolyzers have the most primitive design (picture above). They are characterized by the characteristic that manipulating the number of cells will give you the opportunity to power the device from a source with any voltage.
Flow view
These units have in their design a completely filled electrolyte bath with electrode elements and a tank.
The device of a conventional flow-type electrolyzer, where A is a bath with electrodes, D is a tank, B, E are tubes, C is an outlet valve
The working principle of the flow electrolysis plant is as follows (from the picture above):
- when electrolysis leaks, the electrolyte and gas are squeezed out through pipe “B” into tank “D”;
- in container “D” the process of separating gas from the electrolyte takes place;
- gas exits through valve “C”;
- the electrolyte solution flows back through tube “E” to tub “A”.
Interesting to know. This working principle is configured in certain inverter devices - the combustion of the released gas allows parts to be welded.
Membrane view
The membrane type electrolysis plant has the same design as other electrolyzers, but the electrolyte is a polymer-based solid called membrane fabric.
Membrane electrolyzer design
The membrane fabric in such units has a dual purpose - transfer of ions and protons, zoning of electrodes and electrolysis products.
Aperture view
When one substance cannot penetrate and influence another, a porous diaphragm is used, which can be made of glass, polymer fibers, ceramics or asbestos material.
The device of a diaphragm electrolyzer, where 1 is an outlet for oxygen, 2 is a flask, 3 is an outlet for hydrogen, 4 is an anode, 5 is a cathode, 6 is a diaphragm
Alkaline view
Electrolysis cannot occur in distilled water. In such cases, it is necessary to use catalysts, which are alkaline solutions of high concentration. Based on this, a significant part of ionic devices can be called alkaline.
Main! It should be noted that the use of salt as a catalyst is harmful, since chlorine gas is released when the reaction occurs. An excellent catalyst is usually sodium hydroxide, which does not corrode metal electrodes and does not contribute to the release of harmful substances.
Operating principle of the heating element
The heating element of the boiler is a curved tube, through the center of which runs a conductive thread with high electrical resistance. When current passes, it releases a large amount of heat, which is transferred to the contents of the tank.
To avoid short-circuiting the thread in water, it is enclosed in a heat-conducting insulating layer - quartz sand or magnesium oxide. From the outside, the system is immersed in a copper or stainless steel tube.
When the thermostat receives a signal that the water temperature is too low, it closes the circuit, turning on the heating element. The tube operates until the liquid at the level of the thermal sensor sleeve is heated to the desired level.
If water comes into contact with the outer metal shell, then such an element is called open or “wet”. The heating element, in which the tube is enclosed in a sealed ceramic flask, is closed or “dry”. The first has an advantage in heating speed, and the second in service life.
Diagram of a heating element in a water heater.
Make an electrolyzer with your own hands
Surely, you are familiar with the process of electrolysis from the elementary school curriculum. This is when 2 polar electrodes under current are placed in water in order to obtain metals or non-metals in their pure form. An electrolyzer is needed to break down water molecules into oxygen and hydrogen. The electrolyzer, being part of scientific mechanisms, divides molecules into ions.
There are two types of this device:
- Dry electrolyzer (this is a completely closed cell);
- Wet electrolyzer (these are two metal plates placed in a container of water).
This device is simple in terms of design, which makes it possible to use it even at home. Electrolyzers divide the electrolysis charges of atoms of molecules into charged atoms.
In our case, it divides water into positive hydrogen and negative oxygen. To do this, a large amount of energy is required, and to reduce the amount of energy required, a catalyst is used.
Typical breakdowns and their causes
Signs of a heating system malfunction are:
- long wait before turning on the heating element;
- a sharp increase in energy consumption;
- frequent operation of an RCD, which turns off the device when there is a current leak;
- too cold water (weak or insufficient heating);
- cyclic switching on and off of the heating element at a stable water temperature (for example, immediately after filling the tank full).
If the hot water is cloudy and has an unpleasant odor, this may be a sign of a clogged tank. In this case, some of the impurities are deposited on the heating tube, so the system needs to be completely disassembled and cleaned.
The reasons for the failure of the heating element can be:
- Short circuit of the element due to corrosion. To reduce the aggressive effect of water on the tube, a sacrificial electrode is installed next to it - an anode with a higher electrochemical potential. Due to the formation of a galvanic couple, the more active metal corrodes. When it corrodes, corrosion begins to affect the heating element.
- Disruption of heat transfer due to a layer of scale. Carbonate salts, which are contained in hard water, settle on the surface of the heating element. The presence of a magnesium or zinc electrode softens deposits, but does not stop the process of scale formation. If you neglect cleaning, the surface of the element will become covered with a thick enough layer of salts to disrupt the transfer of heat from the heating element to the water.
- Broken conductive thread inside the heater. Failure of the main element of the heating element can occur as a result of overheating, a power surge or a manufacturing defect.
The average service life of a part is 3-5 years.
Schematic representation
A schematic description of the electrolysis reaction will take no more than two lines: positively charged hydrogen ions rush to the negatively charged electrode, and negatively charged oxygen ions flow to the positive one. Why do you have to use an electrolytic solution instead of pure water? The fact is that a fairly powerful electric field is required to break a water molecule.
A salt or alkali performs a significant part of this work chemically: the metal atom, which has a positive charge, attracts negatively charged hydroxyl groups OH, and the alkaline or acidic residue, which has a negative charge, attracts positive hydrogen ions H. Thus, the electric field can only pull the ions apart to the electrodes.
Electrolyzer circuit
Electrolysis takes place best in a solution of soda, one part of which is diluted in forty parts of water.
The best material for electrodes, as already mentioned, is stainless steel, but gold is best suited for making plates. The larger their area and the higher the current, the greater the volume of gas will be released.
Gaskets can be made from various non-conductive materials, but polyvinyl chloride (PVC) is best suited for this role.
Tools and materials
To replace the heating element, you will need the following tools:
- hub wrench 55 or adjustable wrench No. 2 (with the appropriate size of the fixing nut);
- socket and ratchet wrenches (for mounting on a bar or flange);
- crosshead screwdriver;
- multimeter, indicator probe.
To clean the surface of the heating element, you will need citric acid or a vinegar solution. When replacing a heating element or anode, you need to prepare a new part with similar dimensions and technical characteristics.
Application of plastic gaskets
The option of manufacturing an electrolyzer with polymer gaskets allows you to use an aluminum container instead of a plastic one.
Thanks to the gaskets, it will be reliably insulated. When cutting out plastic gaskets (4 pieces are needed), you need to give them the shape of rectangles. They are laid in the corners of the base, providing a gap of 2 mm.
Now you can start installing the container. To do this, you will need another sheet in which 4 holes are drilled. Their diameter must correspond to the outer diameter of the M6 thread - these are the screws that will be used to secure the container.
The walls of an aluminum container are stiffer than those of a plastic container, so for more reliable fastening, rubber washers should be placed under the heads of the screws.
The final stage remains - installing the gate and terminals.
Step-by-step instructions for replacing the heating element
The disassembly sequence may differ depending on the type of mounting of the heating element inside the tank. On Ariston boilers, 3 types of element fixation are used: on a nut, on a strip or on a flange with screws or studs in a circle.
Before you begin disassembly, you must complete the following steps:
- Disconnect the device from the power supply.
- Turn the shut-off valve, stopping the flow of water into the tank. Disconnect the hoses from the valves. Open the check valve. Remove water from the tank through a hose or its own drain system.
- Remove the protective cover from the boiler control system, which is located under the tank.
- Check the presence of current at the thermostat contacts. Take a photo or sketch the order of connecting the wires to the terminals, and then remove the contacts and set aside the control unit.
Only after preliminary preparation will the protective case with fastenings open. It must be dismantled to remove the heating element and anode.
With fastening nut 55
In older models of the Ariston boiler, the heating element, active electrode and thermostat are attached to a 55 mm nut.
After dismantling the control unit you need to:
- Place a wide basin under the tank, since the water may not have completely drained out of the container.
- Tighten the nut with a hub or adjustable wrench and carefully turn it counterclockwise.
- Remove the heating element. If it is difficult to remove due to a thick layer of scale, carefully knock off some of the deposits with a thin but not sharp tool.
- Inspect the surface of the heating element and the magnesium anode. In case of complete destruction, only a threaded rod remains in place of the “sacrificial” element.
- Unscrew the heater mount. Check the performance of the thread using an ohmmeter or multimeter. If the resistance is below nominal, buy a new part.
- Rinse the heating element and immerse it in an acidic solution for several hours. To prepare the product, you can use 50-60 g of dry citric acid or 100 ml of table vinegar per 2 liters of hot water.
After cleaning and replacing the necessary elements, you need to reassemble the device in the reverse order.
In older models of Ariston water heaters, the heating element is secured with a 55 mm nut.
With fastening strip
In modern designs, instead of a large nut, a clamping strip or flange is used. The tank with nut can be disassembled in an inverted position after removing the boiler; fastenings with a strip can be dismantled only from below.
The nut that secures the flange with the anode and heating element is fixed on the transverse bar. The fastening element is unscrewed using a ratchet wrench or a socket tool. After this, the bar is removed and the flange with the heating tube is removed. To speed up the process, you need to rock it a little and turn it.
With flange and all-round fastenings
In new boiler models, the heating element flange can be fixed at 4-6 points in a circle. Depending on the configuration of the device, the mounting nuts can be screwed onto bolts or studs.
As with the flange, a socket or ratchet wrench will work to remove the flange. After unscrewing the nuts, you need to carefully pull the flat part with the anode and heater attached to it.
Some models have 2 heating elements installed at once. To understand which one has failed, you will have to take out both elements and check them with a multimeter. The process of disassembling a tank with several heaters is no different from what is described above.
"Dry" heating element
The dry heating element has an additional protective flask, which protects the tube from corrosion. The fasteners on the bar or flange are located in the same way as with an open type of heater.
In most cases, the cause of failure of a dry heating element is scale deposited on the bulb.
Two-terminal model
Models of this type must be folded from the base. To do this, you can take an aluminum or steel plate
After this, it is important to secure the plastic container to the cylinders. You can also use screws
Next, all that remains is to install the shutter. In this case, the nozzle can be used of a needle type. Its diameter must be at least 3 mm.
The terminals in the device are attached directly to the bottom board. For this, ordinary conductors are used. The tube should be installed last
At this stage it is important not to forget about the clamping ring. It is best to select filters for the electrolyzer of the mesh type
There must be two valves in the system. They are attached to spindles.
I decided to make a gas generator to decompose water into oxygen and hydrogen, so that it could be soldered with hard solders and installed in a car for complete combustion of gasoline. There are many reports on the Internet about generators that have already been manufactured, supposedly even working.
I found stainless steel, cut 11 15x15 mm plates with a grinder, and assembled them. Then I made octagons out of them. I cut gaskets from a car inner tube. When I cut out the plates, I left three of them with one corner to make it more convenient to connect the power, 8-octagonal. Then I passed the plates with a block to better form gas bubbles. Before assembly, I glued gaskets on one side of the plates and used glue on the gaskets during assembly. This makes it easier to assemble and more airtight. Well, since the generator is ready, then you can test it. I poured water into one and a half containers, connected a 14 volt, 7 ampere rectifier, but the result was NOTHING.
I went online again and it turned out that not only me, but no one else’s generator was working on the water. And in order to stir it up, you need to pour electrolyte into it. There are also many suggestions for preparation - Mr. Muscle, Mole, caustic soda, baking soda, the main thing is that it contains NaOH. The generator does not want to work on clean water. True, someone made a generator on water, but after that no one saw it again, and the description and drawing were not preserved. I decided to make an electrolyte from baking soda. He poured boiled water, added baking soda and stirred until it dissolved completely (saturated solution). I connected a half-barrel with soda according to a temporary circuit, at the output there was a tube with a needle from a syringe, applied voltage and began to wait for the result, which was not long in coming. The generator started working.
I made the connection differently and as in the Modeler-Constructor magazine, the first and last plates (this works worse) and the minus on the 1st and last plates, and the plus in the middle (this way more gas is produced). I tried connecting another 18 volt 13 amp power supply, with it the generator works more fun. As a result, I came to the conclusion that the larger the plate area and ampere, the more gas is released.
The experiment was a success, now I will make a gas generator from 50 plates measuring 20x20 mm. To avoid using a hydraulic seal at the outlet, I want to use a washer reservoir from a VAZ, that is, the supply and return are at the bottom of the reservoir, the generator is below the reservoir, and the gas outlet is at the top. There will be a constant replenishment of the generator itself with electrolyte, and the electrolyte will additionally act as a water seal, and on top of the washer reservoir there will be a gas outlet to the burner. I will make the generator mobile so that it can be installed on a car and at any time it can be removed and used as a torch for soldering.
I didn’t draw anything, because there are a lot of works on the Internet, you can look there. I think a photo report is enough.
A device that allows you to produce hydrogen from water is a hydrogen generator. They are often used in cars. The use of such a device in a car is justified. The produced hydrogen enters the intake manifold of the engine. This allows you to save fuel and sometimes increase its power. In the USA, such generators are produced in factories. They are not cheap - from 300 to 800 dollars. In our country, it is preferable to make a generator yourself.
Checking the performance of the heating element
The functionality of the heating element can be checked in practice after assembling the boiler or using a multimeter. To do this, you need to measure its electrical resistance. The nominal resistance of the heating element is calculated using the following formula:
R=U2/N, where U is the network voltage, and N is the power of the element.
For example, with a heater power of 1.5 kW, the nominal resistance will be 32.3 Ohms. If the heating element is working properly and descaled, but the water remains cold, then the cause of the boiler malfunction could be a failure of the switch or thermostat.
You can check the performance of the heating element using a multimeter.
Determining the malfunction
The reliability and quality of water heaters produced under the Ariston brand have not raised the slightest doubt for many years.
It is enough just to follow the technical recommendations for operation prescribed by the manufacturer. But the notorious human factor makes its own adjustments here too. One day the boiler stops working normally - it stops heating the water or does it very slowly.
Most often, the reason for this is problems associated with the electrical part of the device:
- broken switches;
- fuses, various sensors;
- heating units.
But before you start diagnosing and repairing them, you just need to check:
- availability of electricity in the supply network;
- availability of water supply sources;
- make sure that there are no consequences from children's pranks: closed ball valves;
- pulled plugs from electrical sockets;
- Are there any problems with the thermostat?
When all of the above has been checked and the listed reasons are excluded from the list of possible causes, we check the functional state of the heater itself:
- a decrease in its effectiveness due to scale formed;
- short circuit as a result of leakage;
- due to burnout of the spiral itself.
This procedure is most conveniently performed using a tester, by measuring the resistance of the product being tested. The technical data sheet of the boiler indicates the power of the installed heating element. Using the formula P = U2/R, Ohm's law, we determine its resistance.
For a heating element with a power of 2 kW, the resistance is about 27 Ohms. You should also check the possibility of breakdown of the spiral on the body of the water heater.
You may be interested in an article about installing an Ariston gas water heater. Read an article about the features of repairing an Ariston water heater with your own hands here.
Prevention measures
To prevent damage to the heating element, you need to:
- disassemble the boiler and inspect the anode and heating element at least once every 6-9 months;
- At each maintenance, rinse the tank from dirt and scale;
- when replacing the heating element, also change the “sacrificial” element;
- avoid mechanical methods of cleaning the tube, especially with a knife and other sharp objects;
- tighten the nuts and bolts firmly, but without jerking, so as not to damage the threaded connections.
To slow down the formation of scale, you need to heat the water no higher than +60...+65°C. Once every 2-3 weeks, you can set the regulator to maximum mode to disinfect the tank.
For high water hardness, it is recommended to install a filtration (softening) system. Depending on the configuration and resource, it is mounted in front of the boiler or on the common apartment wiring. You can buy a water purification system in the KVANTA + online store.
Negative aspects of hydrogen heating of buildings
In discussions on the feasibility of using hydrogen fuel for heating systems, skeptics provide compelling arguments:
- High cost: even in the most efficient electrolysis plants created today, to produce hydrogen it is necessary to spend 2 times more energy than its subsequent combustion.
- Explosiveness: people became convinced of the ability of hydrogen to easily explode during the crash of the Hindenburg airship, the cylinder of which was filled with this particular gas.
- The complexity of the preparatory process: getting hydrogen from water is half the battle. To be used effectively in heat generators, it must be supplied at a stable pressure, which requires a compressor and an additional tank with a reducer. In addition, you will need to get rid of water vapor, which will require the use of a dehumidifier.
Useful tips
To protect the heating element from high voltage in the network, you can connect the boiler via a control relay. If the set maximum is exceeded (for example, 220-230 V), it turns off the device, preventing the tube from burning out. If there are frequent surges or the voltage in the network is too low, it is recommended to install a stabilizer.
In addition to the heating element and anode, when disassembling it is advisable to pay attention to the rubber gaskets of the boiler. Timely replacement of sealing elements will prevent leaks.
Before starting the boiler, you need to check it for leaks: assemble it, wipe it dry, fill it with water and let it stand for 3-4 hours. If there are no traces of water on the body and connections, the device can be connected to the network.
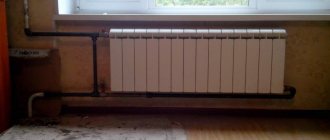
Selection of heating pipes
Having figured out which heating boiler will heat the water in your home, you can choose pipes for heating radiators and the system as a whole. Traditional materials for heating pipes:
- steel;
- copper;
- plastic.
Quite expensive and requiring the invitation of professionals for welding, steel or copper pipes are increasingly being replaced in practice by metal-plastic or polypropylene pipes.
Metal-plastic pipes
The connection and installation of metal-plastic pipes can be done using crimp and press fittings.
To make a connection using compression fittings and subsequent connection of heating pipes, you will need:
- spanners;
- flarer;
- springs for bending pipes.
The main disadvantages of connections on compression fittings are:
- their cost is quite high;
- fragility of rubber gaskets under high temperatures;
- periodic “downtime” of heating pipes in the summer, which also does not have a very favorable effect on the durability of rubber parts.
As a result, the need for preventive work to tighten joints may occur every five years or more often.
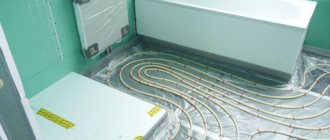
Rules for connecting metal-plastic pipes using a press fitting
A reliable, permanent connection with press fittings allows you to install heating with plastic pipes, hiding them directly in the walls. These pipes will last for many years without replacement if the temperature of the heating water flowing through them does not exceed 80°C.
The only disadvantage of using this type of connection is the need to purchase special equipment for installation
Polypropylene pipes
Recently, a leading place among suitable water and heat supply equipment has been occupied by a pipe for a heating boiler made of polypropylene. The use of polypropylene is due to the fact that it is very durable, is not afraid of system defrosting, and has a very affordable price.
Polypropylene pipes can be bent quite evenly (unlike metal-plastic). They will last quite a long time if all operating rules are observed.
Their only drawback is the need to use a special tool for welding.
There are the following features of connecting polypropylene pipes by welding:
- It is more convenient to weld polypropylene pipes together with a partner. The main condition for a high-quality connection of plastic pipes is the choice of the correct heating time, so as not to overheat them, and precise fixation, which does not allow shifts and displacements along the axis in the first few seconds after connecting the heated parts.
- Welding and installation of heating pipes is carried out at positive ambient temperatures - above +5 °C. When working in winter, it is necessary to create a “heat zone” where polypropylene pipes are welded.
To carry out high-quality work on soldering polypropylene pipes, it is necessary to comply with all the requirements of the instructions supplied with the device.
It would be a good idea to carry out several test welds on individual short sections of pipe using inexpensive couplings to gain at least some initial skill in handling the welding unit.
Non-standard diagnostic methods
If it is impossible to use any of the methods, try connecting the wire and plug to the output of the spiral and the electrical network. A working heating element begins to heat up. To check the resistance of the insulating filler, one of the ends of the cable, with the plug disconnected from the network, is disconnected from the output of the spiral. Reassemble the circuit, including a 5 A fuse. Insert the plug into the socket and observe the operation of the system. If the fuse does not blow within several hours, the heating element is operational and there is no short circuit with the housing.
Other methods are also used to check the heating element. For example, you can ring the heater using a landline phone. The cable connecting the phone to the network is connected to the contacts of the spiral. If there is a signal in the tube, the heating element does not require replacement. You can call a landline from a mobile phone. The presence of a bell indicates the integrity of the spiral.
Getting rid of leaks
If you notice that water is dripping from the boiler, it is not always possible to repair it yourself. It is good if the cause of the leak is wear of the seal on the flange. In this case, the gasket must be replaced with one of the same size, which will allow the damage to be repaired. Things are much worse if the water heater is leaking due to wear and tear on the tank itself. Some people advise gluing or soldering the holes, but, as practice shows, after a short period of time you will still have to say goodbye to the boiler, because. Such leak repair methods are extremely short-lived.
That's all I wanted to tell you about repairing the boiler yourself. We hope that now you know what to do if your electric water heater leaks, does not heat water well, or does not work at all. There are not many problems with these devices and you can get rid of them with timely system maintenance. At least once a year, inspect the check valve and clean the heating element so that malfunctions avoid you!
It will be interesting to read:
Calculation example
So, for example, when measuring you got a result of 20 ohms. Substituting into the formula, we calculate:
P, W Heating element power = 2202 V household voltage squared / 20 Ohm resistance of the heating element = 2,420 W
Accordingly, the power of the heating element that we tested is 2420 W, which fully corresponds to the declared indicator in the passport. And considering that it passed all other tests successfully, it means that the problem is not in it and you need to look further, for example, ring the electrical circuits or measure the voltage in the socket.
If the multimeter shows a result of 100 Ohms, then the power will be only about 500W. This is naturally not enough for normal operation and full heating of water. An increase in resistance can be caused by various processes: a decrease in the cross-section of the conductor, oxidation or contamination of contacts, etc. In any case, such a measurement will give you the necessary information for further search for causes.
As you can see, checking the operation of the heating element is quite simple; for this you only need a multimeter and a little free time. Many problems will be revealed by a simple test, and if this does not help, then by measuring the resistance parameters of the heating device.
And if you encounter any problem not described here, want to add something or find an error, write in the comments, it will be useful to many.
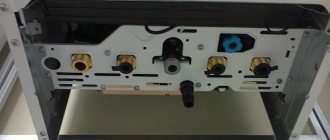
Where is the water heating element located?
If we consider different brands of machines (Indesit, Bosch, LG), then the heating element in each type of model can be located in different places, and it is most convenient to approach it either through the back panel or through the front.
But if you are not aware of this, you can still find it yourself:
- The back panel of the machine is inspected. If the lid is large, then the heating device is located behind it;
- The machine must be placed on its side and the bottom inspected. This may be how you detect the heater;
- The easiest way is to remove the back panel. If there is no heating element there, then it will be easy to install it in its place.
There is another option - use a flashlight to illuminate the inside of the drum of the machine. If you have good vision, you can determine the exact location of the heater.
Having found the heating element, you need to make sure that it is working. Note that for such a procedure there is no need to dismantle the element.